Fabrication Post your questions and projects on Fabrication of Interior or Exterior or custom audio and electronics here.

How to shave a 1st gen Rear bumper into a roll pan

Thread Tools
 
Search this Thread
 
Old 09-17-08, 06:34 PM
  #1  
Work in Progress

Thread Starter
iTrader: (5)
 
tallbozo's Avatar
 
Join Date: Aug 2006
Location: Vancouver, WA
Posts: 904
Received 4 Likes on 4 Posts
How to shave a 1st gen Rear bumper into a roll pan

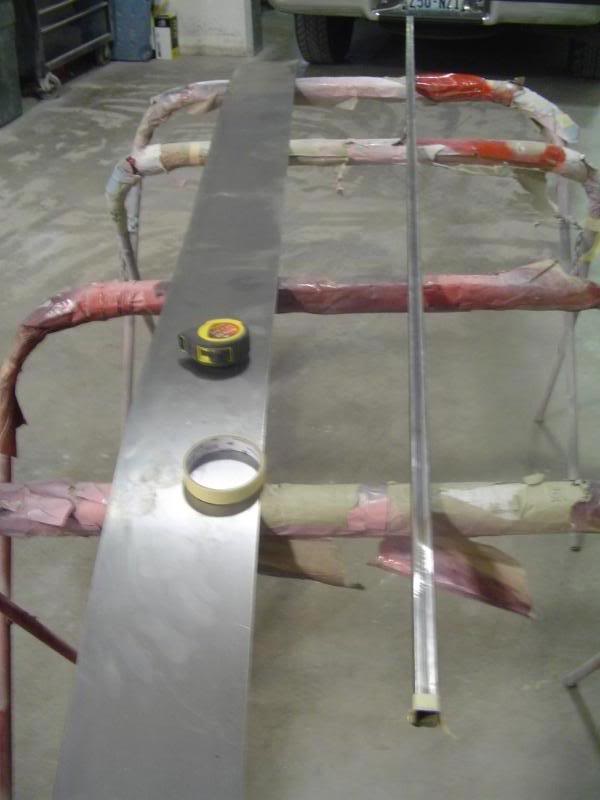
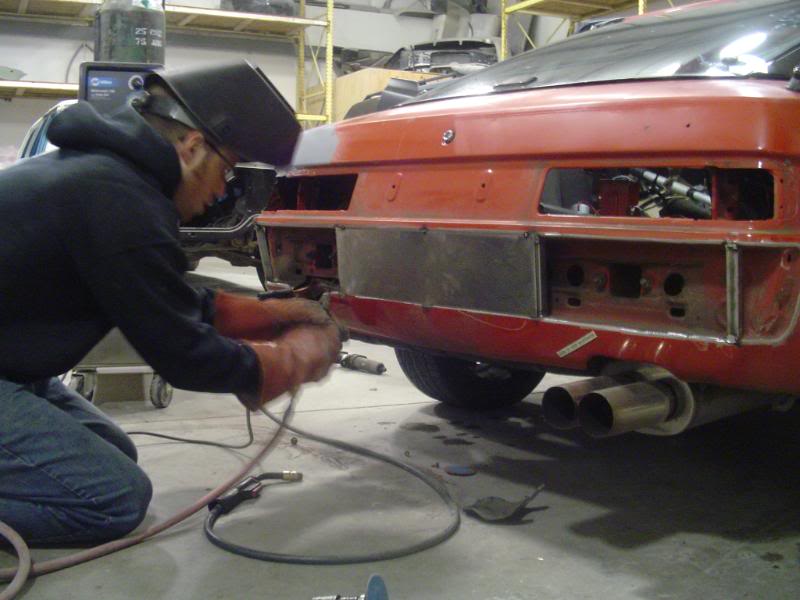
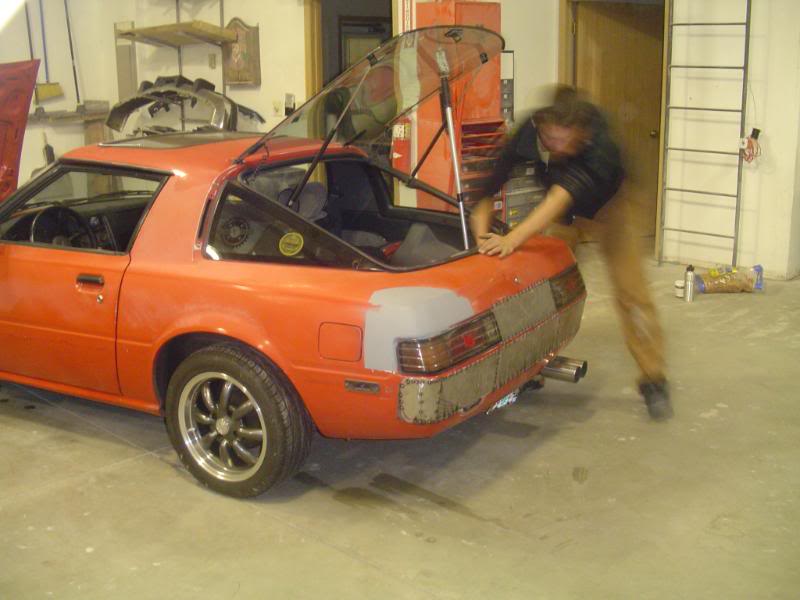
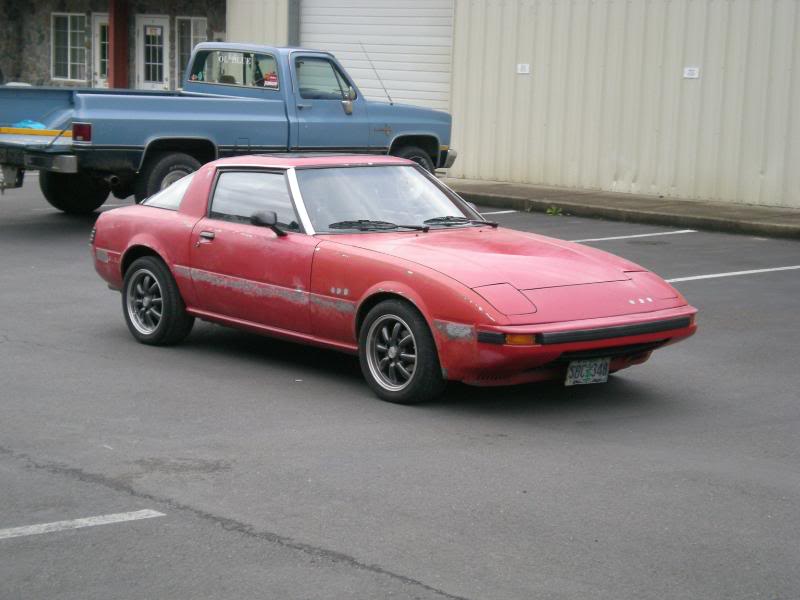
Now I personally have to skill involved in this, but my roommate brian is the one who knows what he's doing. It started as a paint project that turned into a fabrication job.

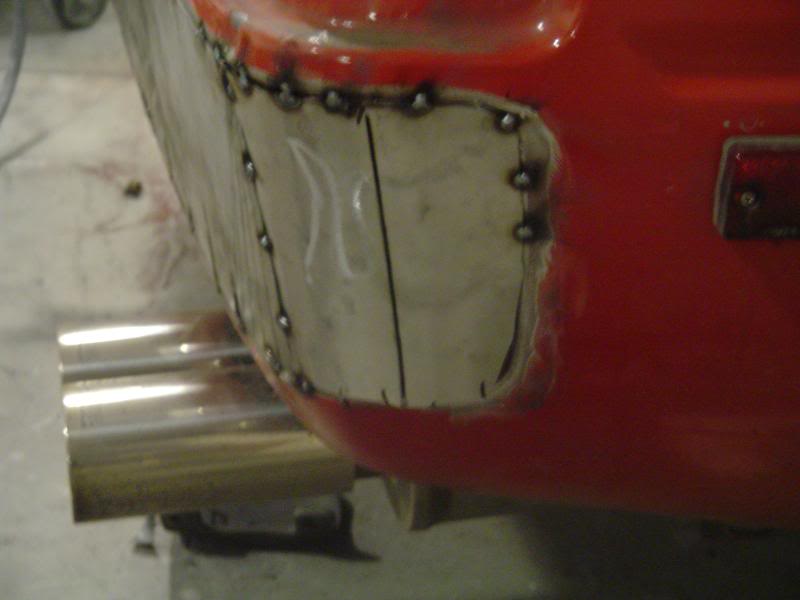
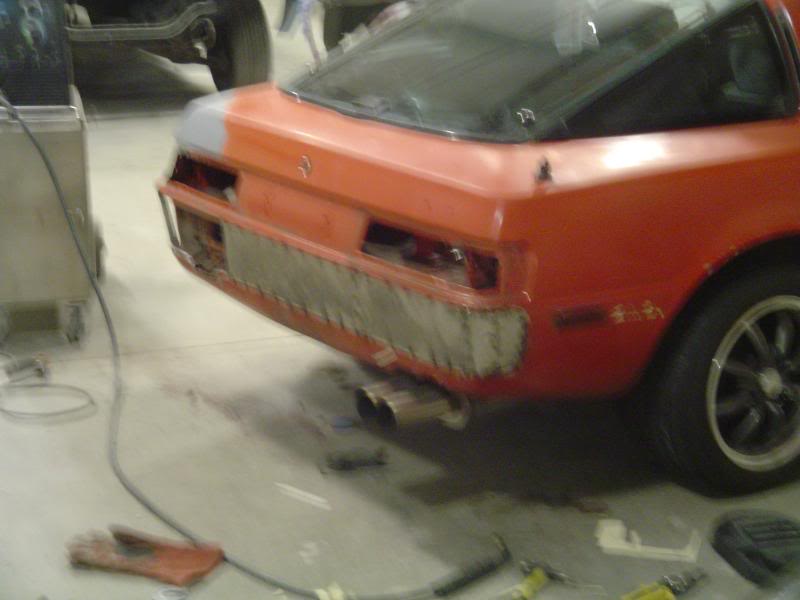
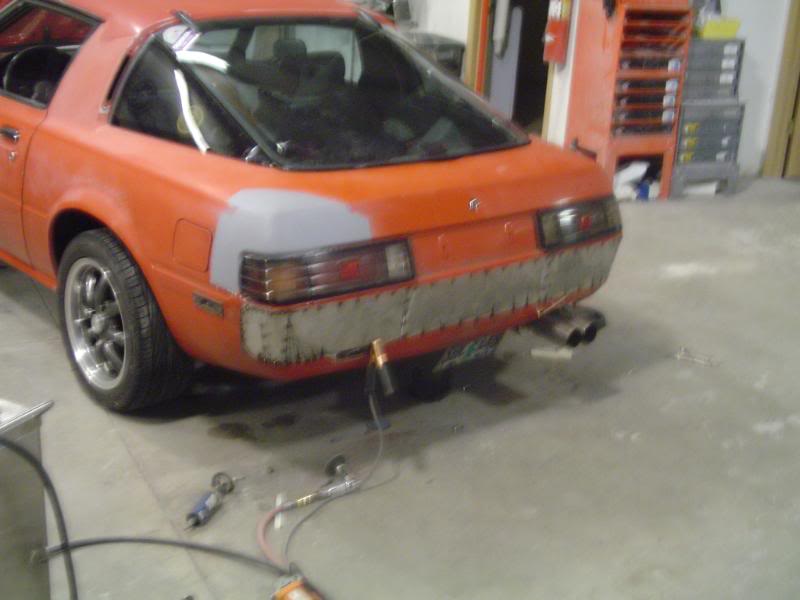
I guess pictures will make more sense than anything so if you do have any questions let me know! Its been a fun build and i cant wait for the finished product!

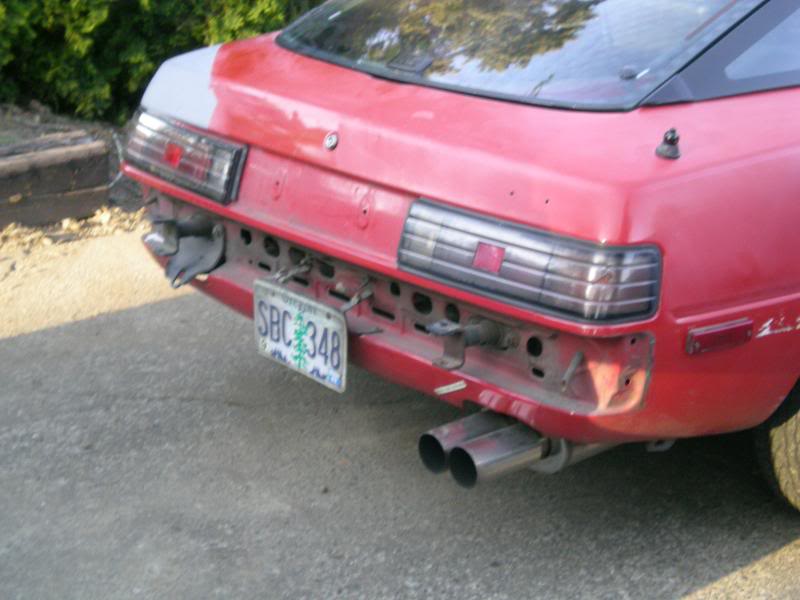
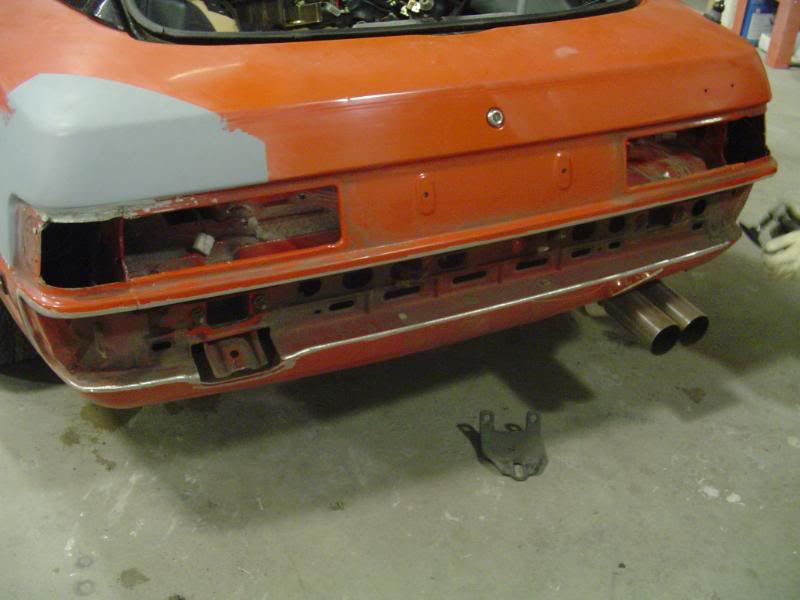
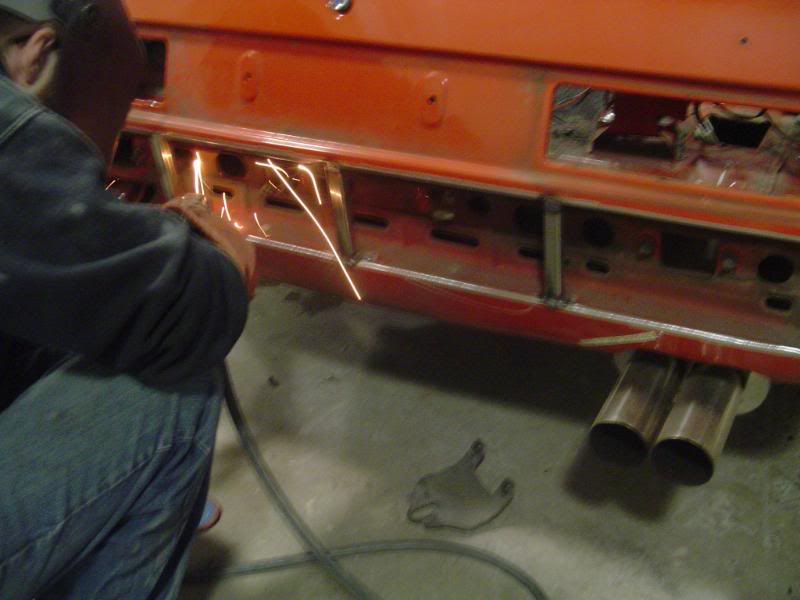
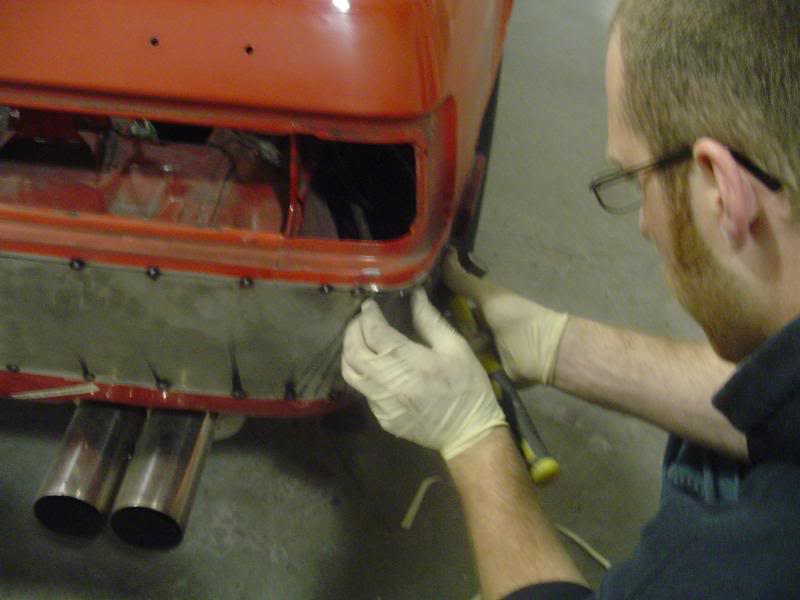
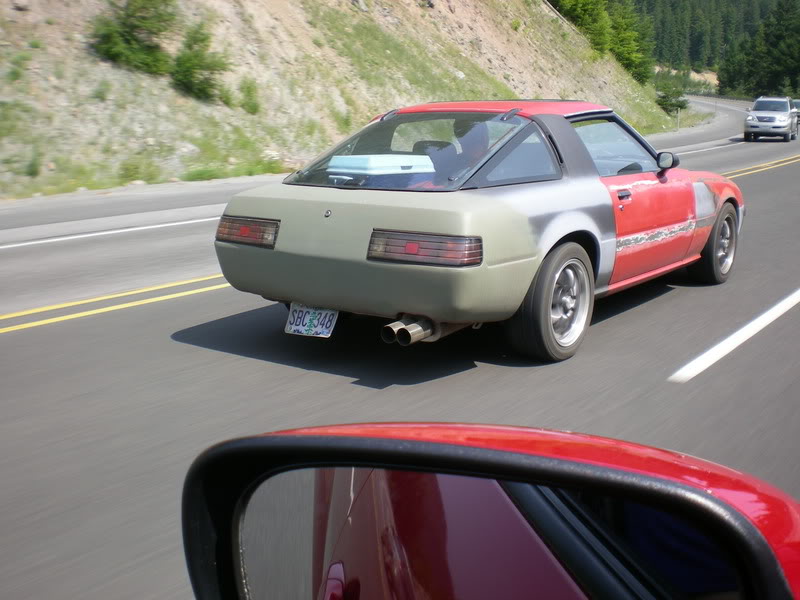
Started by removing the rear bumper and bumper struts
Name:  Picture064-1.jpg
Views: 2931
Size:  61.5 KB
Name:  DSC02704.jpg
Views: 1676
Size:  47.6 KB
Name:  DSC02705.jpg
Views: 1062
Size:  40.8 KB
Name:  DSC02709.jpg
Views: 1110
Size:  43.3 KB
Name:  DSC02710.jpg
Views: 1126
Size:  46.1 KB
Name:  DSC02712.jpg
Views: 1329
Size:  48.5 KB
Old 09-17-08, 06:38 PM
  #2  
Work in Progress

Thread Starter
iTrader: (5)
 
tallbozo's Avatar
 
Join Date: Aug 2006
Location: Vancouver, WA
Posts: 904
Received 4 Likes on 4 Posts
Once the reinforcements were welded in, the sheet metal was tacked into place.
Name:  DSC02715.jpg
Views: 1047
Size:  50.1 KB
Name:  DSC02716.jpg
Views: 953
Size:  56.6 KB
Name:  DSC02722.jpg
Views: 956
Size:  40.4 KB

The corner pieces were bent to shape and tacked into place as well

Name:  DSC02727.jpg
Views: 942
Size:  42.5 KB
Name:  DSC02730.jpg
Views: 976
Size:  32.1 KB
Name:  DSC02731.jpg
Views: 884
Size:  35.3 KB
Name:  DSC02732.jpg
Views: 1030
Size:  40.7 KB
Old 09-17-08, 07:50 PM
  #3  
*** Bless The USA

iTrader: (8)
 
Viking War Hammer's Avatar
 
Join Date: Jan 2007
Location: Saint Louis / Illinois
Posts: 7,139
Received 0 Likes on 0 Posts
interesting....... what's it look like finished?
Old 09-18-08, 12:45 PM
  #4  
Work in Progress

Thread Starter
iTrader: (5)
 
tallbozo's Avatar
 
Join Date: Aug 2006
Location: Vancouver, WA
Posts: 904
Received 4 Likes on 4 Posts
Name:  DSC02743.jpg
Views: 970
Size:  43.6 KB
Name:  DSC02753.jpg
Views: 951
Size:  53.1 KB
Name:  Picture327.jpg
Views: 945
Size:  54.8 KB
Name:  Picture372.jpg
Views: 1069
Size:  57.0 KB
Name:  Picture362.jpg
Views: 971
Size:  47.4 KB
Name:  Picture364.jpg
Views: 962
Size:  58.6 KB
Old 09-18-08, 12:50 PM
  #5  
Work in Progress

Thread Starter
iTrader: (5)
 
tallbozo's Avatar
 
Join Date: Aug 2006
Location: Vancouver, WA
Posts: 904
Received 4 Likes on 4 Posts
This is still a work in progress but this is where its at now. We also shaved the side markers and all emblems and trim. we are also doing fender flares and working on a design that will match the rear.

Name:  Picture322.jpg
Views: 1020
Size:  99.2 KB
Name:  Picture284.jpg
Views: 1339
Size:  54.6 KB
Name:  Picture143-1.jpg
Views: 905
Size:  97.4 KB
Name:  Picture147-1.jpg
Views: 1126
Size:  130.8 KB
Name:  Picture157-2.jpg
Views: 2757
Size:  82.2 KB
Old 10-09-08, 10:04 PM
  #6  
Rotary Enthusiast

iTrader: (1)
 
yeti's Avatar
 
Join Date: Mar 2006
Location: Knoxville, TN
Posts: 944
Received 53 Likes on 43 Posts
I think it's awesome but maybe you should have left the taillight centre piece. It's just a bit too plain back there now.. We'll see when it's done. good luck and good job.
Old 10-14-08, 11:50 PM
  #7  
Work in Progress

Thread Starter
iTrader: (5)
 
tallbozo's Avatar
 
Join Date: Aug 2006
Location: Vancouver, WA
Posts: 904
Received 4 Likes on 4 Posts
Originally Posted by yeti
I think it's awesome but maybe you should have left the taillight centre piece. It's just a bit too plain back there now.. We'll see when it's done. good luck and good job.
Agreed 
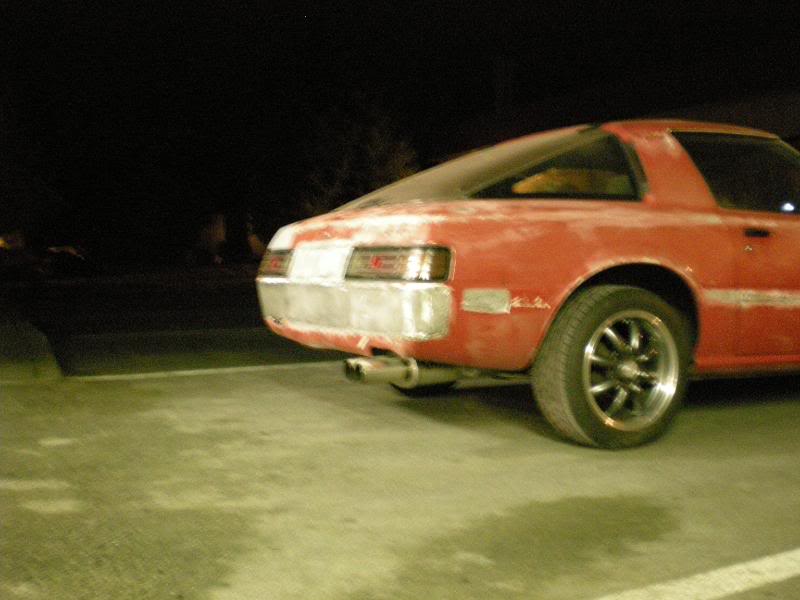
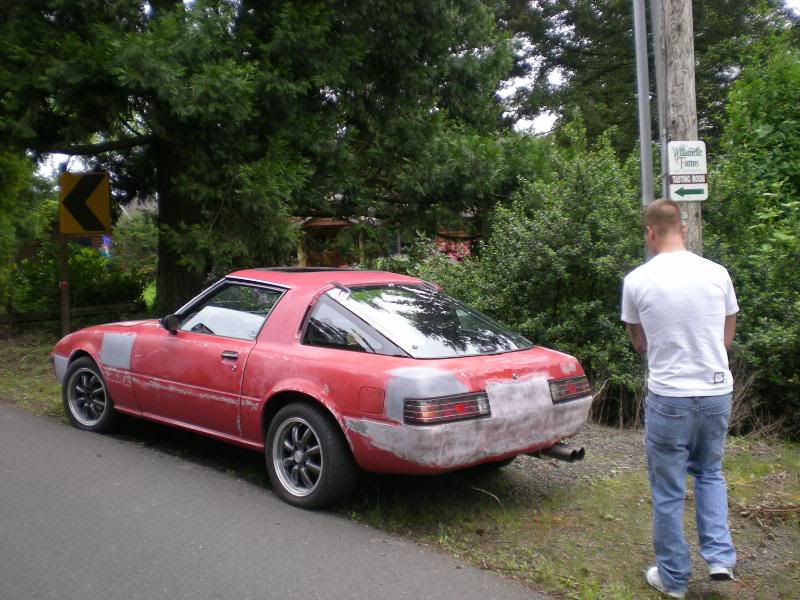
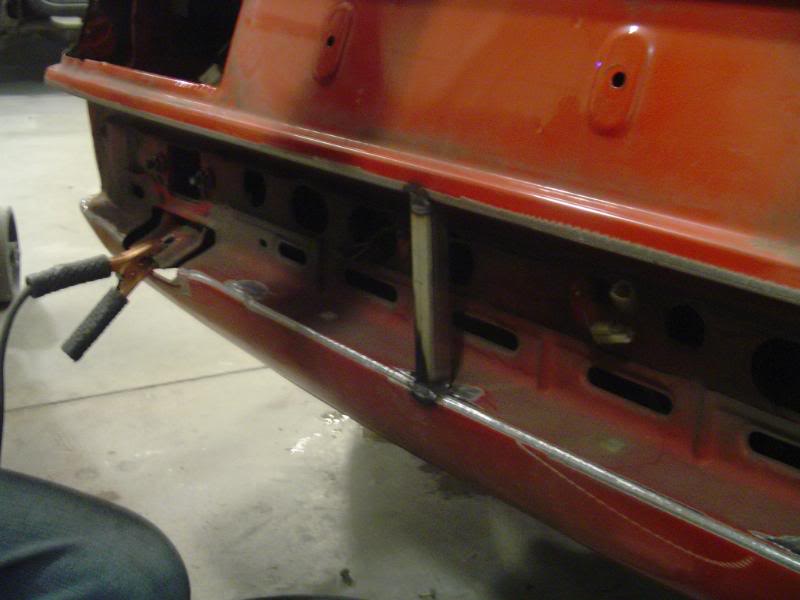
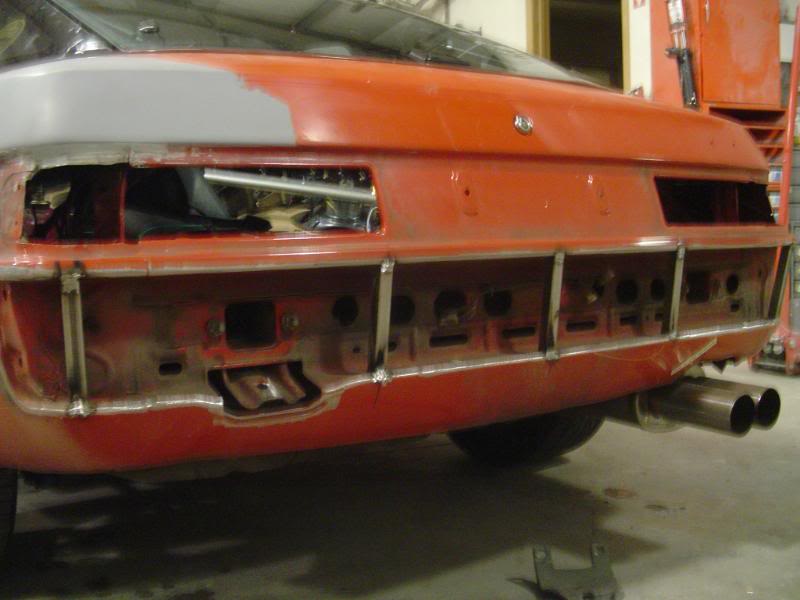
its going to be replaced with the original panel.
Old 10-15-08, 12:28 AM
  #8  
Ooooooh, custom.

 
Rotary Noob's Avatar
 
Join Date: Oct 2006
Location: Corona, CA
Posts: 618
Likes: 0
Received 0 Likes on 0 Posts
That looks bitchin!

I know what Im doing if I get a first gen...
Old 10-15-08, 12:56 AM
  #9  
I'm in rotary heaven!
 
quasar's Avatar
 
Join Date: Dec 2006
Location: jax
Posts: 399
Likes: 0
Received 0 Likes on 0 Posts
No i want a basket case to do some work to.
Old 10-15-08, 01:28 AM
  #10  
Banned. I got OWNED!!!
iTrader: (30)
 
Kerebrus's Avatar
 
Join Date: Feb 2007
Location: Cali Native
Posts: 3,608
Likes: 0
Received 0 Likes on 0 Posts
I love no side moldings & no side markers. I like your work, clean!!

Name:  Picture005.jpg
Views: 1272
Size:  37.0 KB
Old 10-16-08, 06:52 AM
  #11  
Rotary Freak

iTrader: (16)
 
PvillKnight7's Avatar
 
Join Date: May 2002
Location: Maryland
Posts: 2,597
Likes: 0
Received 2 Likes on 2 Posts
I wouldn't do it but I might change my mind when you post pics after the paint job. <hint hint nudge nudge>
Old 04-20-09, 10:30 AM
  #12  
Junior Member
 
Timbo82's Avatar
 
Join Date: Mar 2008
Location: Chicago Ridge, IL
Posts: 20
Likes: 0
Received 0 Likes on 0 Posts
That looks awesome. I want to eventually shave my bumper. Im intrested in seeing how you do your fender flairs.
Old 04-21-09, 11:31 PM
  #13  
can't find redline

 
maggot's Avatar
 
Join Date: May 2008
Location: SK, Canada
Posts: 39
Likes: 0
Received 0 Likes on 0 Posts
Wow me like. Can't wait to see this finished
Old 04-28-09, 10:00 AM
  #14  
Turbovert done.

iTrader: (11)
 
rogrx7's Avatar
 
Join Date: Aug 2005
Location: Miami
Posts: 2,046
Received 4 Likes on 4 Posts
994
Old 03-04-12, 06:38 PM
  #15  
newbie

 
steve-00's Avatar
 
Join Date: May 2007
Location: kelowna
Posts: 14
Likes: 0
Received 0 Likes on 0 Posts
What did you do about the hatch water run off hose line that runs out by the bumper
Old 03-05-12, 11:01 AM
  #16  
mr.niceguy

 
tru_az1an's Avatar
 
Join Date: Oct 2007
Location: Six Flags Magic Mountain, Ca.
Posts: 200
Likes: 0
Received 0 Likes on 0 Posts
I think I like it too!
Old 03-11-12, 08:14 PM
  #17  
D.I.L.U.S.I.

iTrader: (5)
 
full-cruise's Avatar
 
Join Date: Nov 2002
Location: L-Town pa
Posts: 2,051
Likes: 0
Received 0 Likes on 0 Posts
nice work. i mentioned this to a fb friend years ago and he shruged it off and said aaah to much work.
looking at it now i love it.
Old 07-29-12, 11:19 PM
  #18  
www.VJMU.org

 
SiRMarlon's Avatar
 
Join Date: Jan 2009
Location: Los Angeles, CA
Posts: 121
Likes: 0
Received 0 Likes on 0 Posts
Great work on that...not sure how I feel about it though! But I can appreciate the work that went into it.
Old 07-30-12, 08:33 PM
  #19  
Don't Cross The Streams..

iTrader: (3)
 
Rotor_Venom08's Avatar
 
Join Date: Apr 2009
Location: Houston, TX
Posts: 842
Likes: 0
Received 0 Likes on 0 Posts
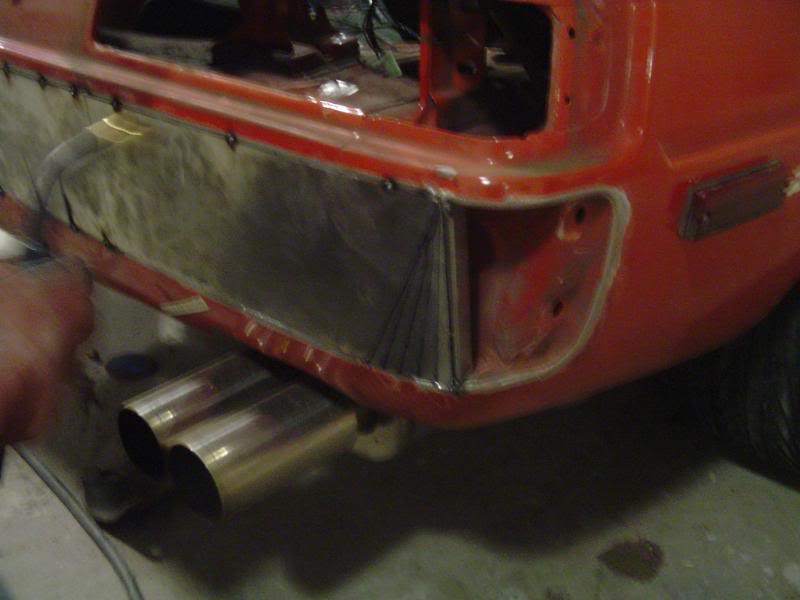
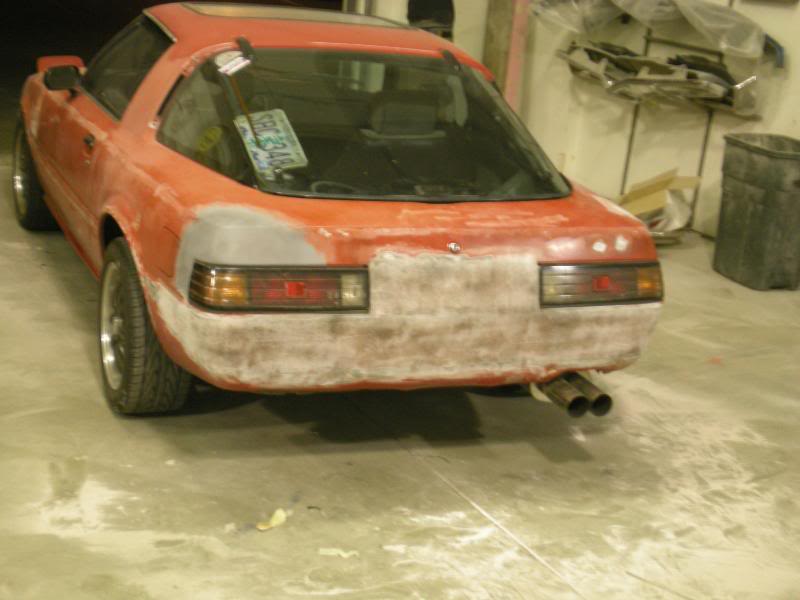
looks cool but seriously... all that shaving work and left the lock for the hatch? ... thought that was weird if your going to go for the smooth look go all the way. just my .02
Old 09-07-12, 01:53 PM
  #20  
Anti-Hero
 
thethingthatshouldnotbe's Avatar
 
Join Date: Jul 2011
Location: Brownsburg, Indiana
Posts: 318
Likes: 0
Received 1 Like on 1 Post
Looks like my fc

How to shave a 1st gen Rear bumper into a roll pan-forumrunner_20120907_145320.jpg
Old 09-11-12, 11:06 PM
  #21  
500+hp club

iTrader: (26)
 
silverfdturbo6port's Avatar
 
Join Date: Sep 2007
Location: .
Posts: 2,211
Likes: 0
Received 4 Likes on 4 Posts
could you make it one piece and tack the edge and have someone bend it wrapping it around while another tacks it in place? Might take less time and prep work for the final product?
Old 10-10-12, 12:36 AM
  #22  
ROTA-WEEEEEEEEE
 
scottj8666's Avatar
 
Join Date: Oct 2011
Location: Foley MN
Posts: 125
Likes: 0
Received 0 Likes on 0 Posts
Cool - now shave the front
Old 10-10-12, 02:03 AM
  #23  
Instrument Of G0D.


iTrader: (1)
 
WANKfactor's Avatar
 
Join Date: May 2011
Location: omnipresent
Posts: 1,540
Received 964 Likes on 728 Posts
^^ what i was going to say!
Old 10-15-12, 09:17 PM
  #24  
Senior Member

 
rx7freak13v's Avatar
 
Join Date: Jun 2008
Location: Summerfield,FL
Posts: 424
Likes: 0
Received 0 Likes on 0 Posts
this is an awesome project. i had thought about this multi billion times for my fc. i am looking forward to seeing the final product. thanks for sharing with us Tallbozo
Old 02-13-15, 06:27 PM
  #25  
Work in Progress

Thread Starter
iTrader: (5)
 
tallbozo's Avatar
 
Join Date: Aug 2006
Location: Vancouver, WA
Posts: 904
Received 4 Likes on 4 Posts
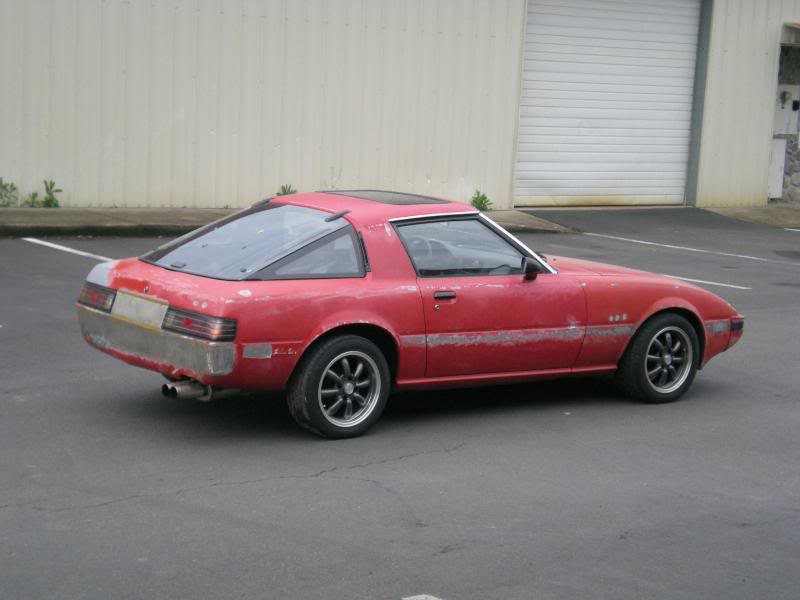
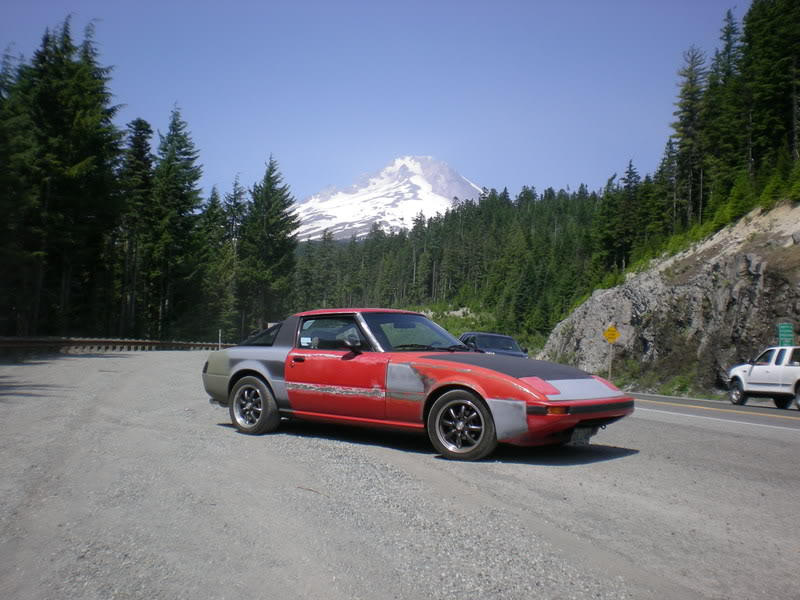
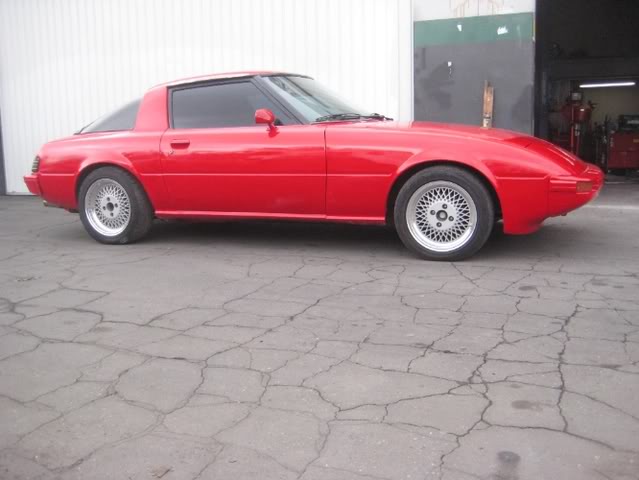
Just bringing some closure to anyone who was interested. Here is where I ended the project. I had to sell because I didn't have room to keep it. It was in a primer sealer paint so you can at least see the final result. Fun project and sad to see it go.
Attached Thumbnails How to shave a 1st gen Rear bumper into a roll pan-dscn5450.jpg   How to shave a 1st gen Rear bumper into a roll pan-dscn5468.jpg   How to shave a 1st gen Rear bumper into a roll pan-dscn5455.jpg   How to shave a 1st gen Rear bumper into a roll pan-img_1358.jpg  
Related Topics
Thread
Thread Starter
Forum
Replies
Last Post
Th0m4s
Build Threads
25
02-26-19 02:04 AM


Quick Reply: How to shave a 1st gen Rear bumper into a roll pan


All times are GMT -5. The time now is 09:57 PM.