Jap Spec Series 5 FC3S - Twin turbo rew conversion!

 01-09-17, 05:31 AM
#127
Full Member
Thread Starter

Mate absolute pleasure to have you on board my thread,
Got a little done today exhausted now thou, I hate bushings.
Started at the front with HEL braided brake lines. and actually secured lines to the shocks haha.


while i was there was going to put my camber bolts in but decided to just repaint the camber tops and max them out.

Also i painted up cooling panel, tried to get a little fancy with mat red metalic, wont make a difference with how beaten it is/will become.


This part went alright not looking forward to the reverse getting it back in thou,

letting her bits flop about, made sure to keep pressure on the drive shaft as cbf doing the gearbox oil again.

What is this cam for rear toe?

Reversed on drivers side???

These as well as the trailing arms can go suck a ****!!!

Got a little done today exhausted now thou, I hate bushings.
Started at the front with HEL braided brake lines. and actually secured lines to the shocks haha.
while i was there was going to put my camber bolts in but decided to just repaint the camber tops and max them out.
Also i painted up cooling panel, tried to get a little fancy with mat red metalic, wont make a difference with how beaten it is/will become.
This part went alright not looking forward to the reverse getting it back in thou,
letting her bits flop about, made sure to keep pressure on the drive shaft as cbf doing the gearbox oil again.
What is this cam for rear toe?
Reversed on drivers side???
These as well as the trailing arms can go suck a ****!!!
01-11-17, 05:15 AM
#128
Full Member
Thread Starter
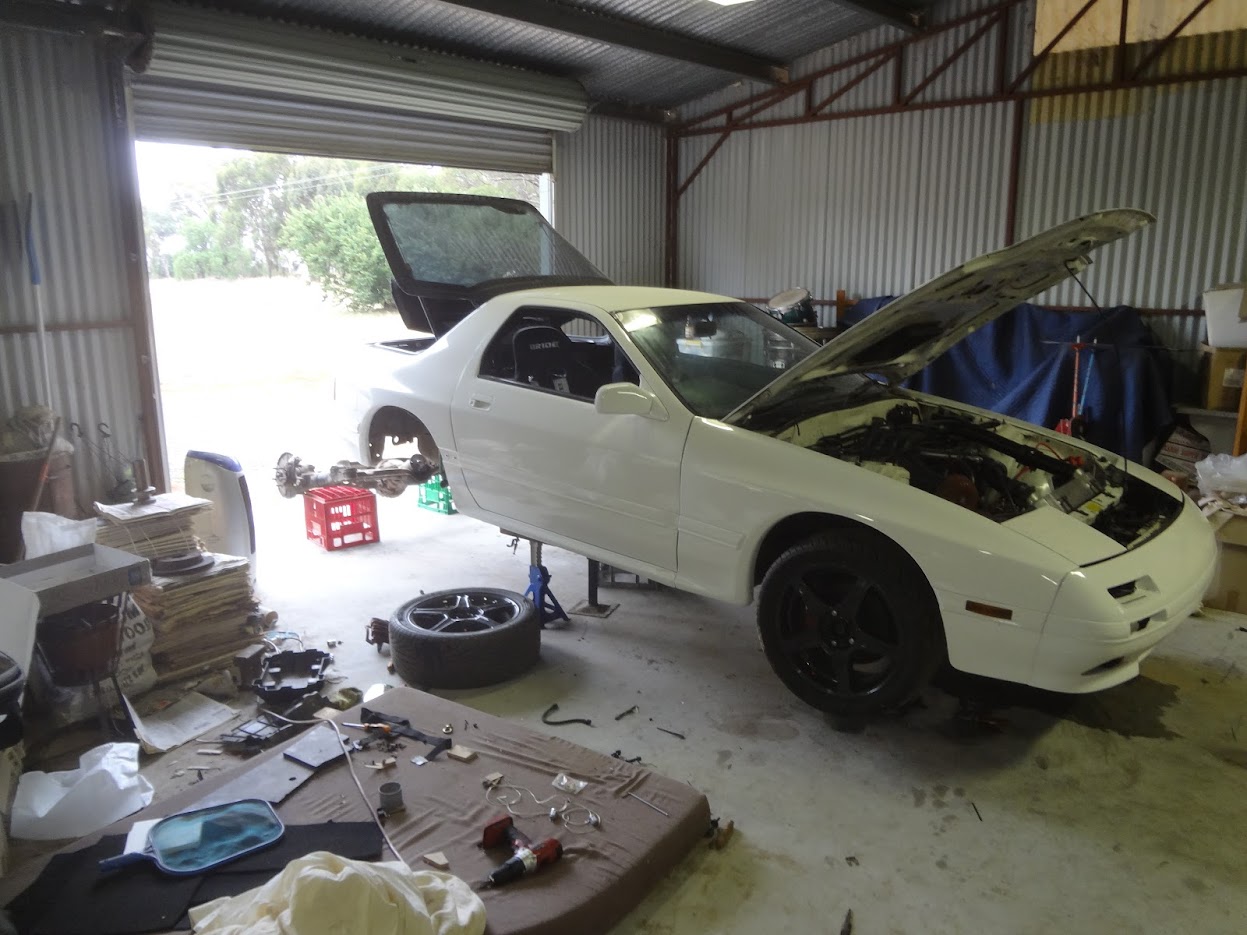
Put an end to those pesky rubber bushings.
Diff!

Frame, fair bit of rust too, i dare say this fc saw some salted japanese roads in time.

At this point i was obviously about to use the s5 viscous diff that was in the car just for streetability and cos i dont have power steering.
Scuffed it up best i could then laid down some primer.

And subframe a slightly different shade of blacker black

A well trained fc nerd will notice this is not the s5 viscous diff but the welded s4 unit, pretty much it came down to the s4 axels not fitting the s5 stub axels and then there would have been the issue with getting new cv boots and new dts eliminators.
So I'm now rocking a welded diff, swapped out the drive shaft with minimal oil loss also.

Rear brake lines and supernow camber arm in place

Putt the frame back together with the shiney bits

Ready to Go!!!

Just looks awesome

the best of pbm and super now

Was getting late and light had gone but yeah you get the idea.

Diff!
Frame, fair bit of rust too, i dare say this fc saw some salted japanese roads in time.
At this point i was obviously about to use the s5 viscous diff that was in the car just for streetability and cos i dont have power steering.
Scuffed it up best i could then laid down some primer.
And subframe a slightly different shade of blacker black
A well trained fc nerd will notice this is not the s5 viscous diff but the welded s4 unit, pretty much it came down to the s4 axels not fitting the s5 stub axels and then there would have been the issue with getting new cv boots and new dts eliminators.
So I'm now rocking a welded diff, swapped out the drive shaft with minimal oil loss also.
Rear brake lines and supernow camber arm in place
Putt the frame back together with the shiney bits
Ready to Go!!!
Just looks awesome
the best of pbm and super now
Was getting late and light had gone but yeah you get the idea.
01-13-17, 06:28 AM
#129
Full Member
Thread Starter
Soo car is back on the ground, with brakes and clutch bleed.
This is after i finalized the wiring the of the thermo fans, After some searching i found it is 90% likely the PowerFC cant control the thermos, but the wiring for the thermoswitch is still there so i wired the thermos to that as well as a parallel dummy switch in cabin.
Im digging my paint job of the cooling panel cant wait to get it out in the sun.

Rear camber looks pretty good from eyesight, i must had i had a hard time getting the supernow camber link in there it is completely shortened which i believe is as much positive camber i can get. you must remember this is with the pbm subframe risers

This was what was left of the list, however one of my oil lines became unhappy and sprung a leak and i suppose this must be a thing with an fittings as once it sprung a leak i lost nearly all the oil. shut it down before this happened soo couldnt have hurt anything.

Thoughts on number plate bracket location?

Id actually forgotten i hard started with this mod and had forgotten i had already routed the water line to the front of the car, then found the perfect spot for the misters, its plugged into the rear washer tank and probably does nothing.


Could actually see the blockage in the oil line, and i had some more hose sitting around so just re made the line, also considered blocking off the thermo state in the oil coolers just for good measure but the thermostat in them works a little different then i had thought still wouldnt be had to tap a bolt in their to block it off.
line in question

2 steps forward 3 steps back

Confident enough to put the undertray back on, i drained the rest of the oil swapped the drain plug, red greddy magnetic plug is just visible and so tomorrow just need to get some oil and fill it back up.

fixing the indicator resistors, no idea what the **** i was doing when i first wired these.

Final coats of putty and primer for the bonnet.


This is after i finalized the wiring the of the thermo fans, After some searching i found it is 90% likely the PowerFC cant control the thermos, but the wiring for the thermoswitch is still there so i wired the thermos to that as well as a parallel dummy switch in cabin.
Im digging my paint job of the cooling panel cant wait to get it out in the sun.
Rear camber looks pretty good from eyesight, i must had i had a hard time getting the supernow camber link in there it is completely shortened which i believe is as much positive camber i can get. you must remember this is with the pbm subframe risers
This was what was left of the list, however one of my oil lines became unhappy and sprung a leak and i suppose this must be a thing with an fittings as once it sprung a leak i lost nearly all the oil. shut it down before this happened soo couldnt have hurt anything.
Thoughts on number plate bracket location?
Id actually forgotten i hard started with this mod and had forgotten i had already routed the water line to the front of the car, then found the perfect spot for the misters, its plugged into the rear washer tank and probably does nothing.
Could actually see the blockage in the oil line, and i had some more hose sitting around so just re made the line, also considered blocking off the thermo state in the oil coolers just for good measure but the thermostat in them works a little different then i had thought still wouldnt be had to tap a bolt in their to block it off.
line in question
2 steps forward 3 steps back
Confident enough to put the undertray back on, i drained the rest of the oil swapped the drain plug, red greddy magnetic plug is just visible and so tomorrow just need to get some oil and fill it back up.
fixing the indicator resistors, no idea what the **** i was doing when i first wired these.
Final coats of putty and primer for the bonnet.
02-08-17, 08:17 AM
#130
Full Member
Thread Starter
So i had to redo one of the cooler lines and decided to just drop the oil while i was there, when i was filling it up i thought of the issue of not getting the oil through the coolers and back down to the motor quick enough soo i came up with this idea.
slowly filled the system in revers so to speak ie into the coolers first, in hind sight thou i would have pulled that cooler hose off and sealed the filling funnel to the hose.


Just a little close up of how much better and cleaner crimping is over twist or solder.

And a rear shot of the water spray setup.

Finally my beer can overflow tank, not sold on location but it works well.

slowly filled the system in revers so to speak ie into the coolers first, in hind sight thou i would have pulled that cooler hose off and sealed the filling funnel to the hose.
Just a little close up of how much better and cleaner crimping is over twist or solder.
And a rear shot of the water spray setup.
Finally my beer can overflow tank, not sold on location but it works well.
02-08-17, 08:40 AM
#131
Full Member
Thread Starter
The other thing ive been playing with since once again im away from the car is some new tail lights.
I got this s5 light for a $5 yeah it was pretty badly damaged but served my purpose.


I used the the oven method to soften the glue set it to 60c and just kept slowly prying at it.
note jap spec lights dont fit in my oven haha

All the pieces seperated.

I played with the s5 light for a while, but kind of decided i would need to go all out or just be boring and do halos. and while this was happening some s4 lights came up in mint conditions for extremely cheap.
I would also like to add that s4 lights are heaps easier to disassemble, less pieces and either different or weaker glue in the s4 lights.
Soo heres a few little mock up to see what it would look like with led strip simply in the housings.

kind of a cool effect but not really what i was after.

then taped the strip directly to the light lense, pleasantly surprised with how well this works.

So got at it, used a glue gun and just went nuts haha

I tried cutting and re-soldering the strips back together but that was way too difficult, wouldnt have been too bad if the strips werent water proof but the glue and silicon got any where near the iron the pads were ruined, then i burnt my self.
Soo went with this folding method.

Anyway after a few hours work finished it up and well here it is obviously off.

BAM!!


Little wiring left to do, as i need to put a relay in soo that when the reverse light comes off half the red halo does aswell. and i still need to work out if ill keep the standard bulbs in and dim the halos down or have just the halos and changing dim also.
I got this s5 light for a $5 yeah it was pretty badly damaged but served my purpose.
I used the the oven method to soften the glue set it to 60c and just kept slowly prying at it.
note jap spec lights dont fit in my oven haha
All the pieces seperated.
I played with the s5 light for a while, but kind of decided i would need to go all out or just be boring and do halos. and while this was happening some s4 lights came up in mint conditions for extremely cheap.
I would also like to add that s4 lights are heaps easier to disassemble, less pieces and either different or weaker glue in the s4 lights.
Soo heres a few little mock up to see what it would look like with led strip simply in the housings.
kind of a cool effect but not really what i was after.
then taped the strip directly to the light lense, pleasantly surprised with how well this works.
So got at it, used a glue gun and just went nuts haha
I tried cutting and re-soldering the strips back together but that was way too difficult, wouldnt have been too bad if the strips werent water proof but the glue and silicon got any where near the iron the pads were ruined, then i burnt my self.
Soo went with this folding method.
Anyway after a few hours work finished it up and well here it is obviously off.
BAM!!
Little wiring left to do, as i need to put a relay in soo that when the reverse light comes off half the red halo does aswell. and i still need to work out if ill keep the standard bulbs in and dim the halos down or have just the halos and changing dim also.
 02-16-17, 05:38 PM
#133
Full Member
Thread Starter
So i had to redo one of the cooler lines and decided to just drop the oil while i was there, when i was filling it up i thought of the issue of not getting the oil through the coolers and back down to the motor quick enough soo i came up with this idea.
slowly filled the system in revers so to speak ie into the coolers first, in hind sight thou i would have pulled that cooler hose off and sealed the filling funnel to the hose.


Just a little close up of how much better and cleaner crimping is over twist or solder.

And a rear shot of the water spray setup.

Finally my beer can overflow tank, not sold on location but it works well.

slowly filled the system in revers so to speak ie into the coolers first, in hind sight thou i would have pulled that cooler hose off and sealed the filling funnel to the hose.
Just a little close up of how much better and cleaner crimping is over twist or solder.
And a rear shot of the water spray setup.
Finally my beer can overflow tank, not sold on location but it works well.
02-16-17, 05:52 PM
#134
Full Member
Thread Starter
The other thing ive been playing with since once again im away from the car is some new tail lights.
I got this s5 light for a $5 yeah it was pretty badly damaged but served my purpose.


I used the the oven method to soften the glue set it to 60c and just kept slowly prying at it.
note jap spec lights dont fit in my oven haha

All the pieces seperated.

I played with the s5 light for a while, but kind of decided i would need to go all out or just be boring and do halos. and while this was happening some s4 lights came up in mint conditions for extremely cheap.
I would also like to add that s4 lights are heaps easier to disassemble, less pieces and either different or weaker glue in the s4 lights.
Soo heres a few little mock up to see what it would look like with led strip simply in the housings.

kind of a cool effect but not really what i was after.

then taped the strip directly to the light lense, pleasantly surprised with how well this works.


So got at it, used a glue gun and just went nuts haha

I tried cutting and re-soldering the strips back together but that was way too difficult, wouldnt have been too bad if the strips werent water proof but the glue and silicon got any where near the iron the pads were ruined, then i burnt my self.
Soo went with this folding method.

Anyway after a few hours work finished it up and well here it is obviously off.

I got this s5 light for a $5 yeah it was pretty badly damaged but served my purpose.
I used the the oven method to soften the glue set it to 60c and just kept slowly prying at it.
note jap spec lights dont fit in my oven haha
All the pieces seperated.
I played with the s5 light for a while, but kind of decided i would need to go all out or just be boring and do halos. and while this was happening some s4 lights came up in mint conditions for extremely cheap.
I would also like to add that s4 lights are heaps easier to disassemble, less pieces and either different or weaker glue in the s4 lights.
Soo heres a few little mock up to see what it would look like with led strip simply in the housings.
kind of a cool effect but not really what i was after.
then taped the strip directly to the light lense, pleasantly surprised with how well this works.
So got at it, used a glue gun and just went nuts haha
I tried cutting and re-soldering the strips back together but that was way too difficult, wouldnt have been too bad if the strips werent water proof but the glue and silicon got any where near the iron the pads were ruined, then i burnt my self.
Soo went with this folding method.
Anyway after a few hours work finished it up and well here it is obviously off.
02-16-17, 05:54 PM
#135
Full Member
Thread Starter
BAM!!


Little wiring left to do, as i need to put a relay in soo that when the reverse light comes off half the red halo does aswell. and i still need to work out if ill keep the standard bulbs in and dim the halos down or have just the halos and changing dim also.
And finally a sick vert which gave me the inspiration for this idea.
 02-24-17, 07:47 PM
#137
Full Member
Thread Starter
Gathered the last couple of things i thought i needed,
Got sick of trying to get the pfc to control the thermo fans so bought this littler aeroflow controller,
Has temp sensor for water and oil and can trigger the fans from either at what ever temp, very compact and for $120 with a good relay not badly priced.

Install wise i just got an adapter and put it where the original thermoswitch was.

and oil still had a spare spot in the sandwhich plate


Second half of the first picture was my agm battery, was looking at deka or the likes but this little champ has 450cca and is much more like the internals of braille but still at a very good price.
Have tested it with a bad tuned and cranked fine about 10times in a row.

And ditched the classic style battery terminals and went with lugs, this is how i do my lug terminals heat them up and fill with solder.

Got sick of trying to get the pfc to control the thermo fans so bought this littler aeroflow controller,
Has temp sensor for water and oil and can trigger the fans from either at what ever temp, very compact and for $120 with a good relay not badly priced.
Install wise i just got an adapter and put it where the original thermoswitch was.
and oil still had a spare spot in the sandwhich plate
Second half of the first picture was my agm battery, was looking at deka or the likes but this little champ has 450cca and is much more like the internals of braille but still at a very good price.
Have tested it with a bad tuned and cranked fine about 10times in a row.
And ditched the classic style battery terminals and went with lugs, this is how i do my lug terminals heat them up and fill with solder.
02-24-17, 08:00 PM
#138
Full Member
Thread Starter
Soo here are some shots of the s4 lights on the car.
Still havent sealed them or finished the wiring as I havent fully decided what i want to do with the lower middle brake light, and if it'll turn off when reverse is engaged or anything like that.
s5 and s4 lights leds wired to parkers in high light condition

s5 and s4 lights leds wire to parkers in low light conditions

s4 and s5 lights led wire to parkers with standard brake lights engaged low light

Then wired the led to the brakes lights, and will keep halogen parking lights, also thought to have the 3 red squares lit up (right side) or just the top two (left side)


also as i side note,
you have to remove this bracket on the s4 lights for the centre garnish

and the importance of running the gaskets
No gasket

with gasket

Unfortunately the daily decided to pack it in, destroyed atleast second gear. I also believe my PowerFc has died now also as its not seeing pressure changes. so im pretty broke no and will probably have the fc on hold till i work out what im going to do ecu wise.


Still havent sealed them or finished the wiring as I havent fully decided what i want to do with the lower middle brake light, and if it'll turn off when reverse is engaged or anything like that.
s5 and s4 lights leds wired to parkers in high light condition
s5 and s4 lights leds wire to parkers in low light conditions
s4 and s5 lights led wire to parkers with standard brake lights engaged low light
Then wired the led to the brakes lights, and will keep halogen parking lights, also thought to have the 3 red squares lit up (right side) or just the top two (left side)
also as i side note,
you have to remove this bracket on the s4 lights for the centre garnish
and the importance of running the gaskets
No gasket
with gasket
Unfortunately the daily decided to pack it in, destroyed atleast second gear. I also believe my PowerFc has died now also as its not seeing pressure changes. so im pretty broke no and will probably have the fc on hold till i work out what im going to do ecu wise.
10-11-17, 06:57 PM
#139
Full Member
Thread Starter
Been a while since an update and id actually completed this little mod quite some time ago but only just recently was able to fire it up.
RotaryAviation OMP adapter
For those not in the know this little adapter allows you to scavenge your omp oil from a dedicated reservoir. With this setup you get the best of both arguments for premix and omp and with the only downside being you must keep an eye on its level.
First step was seeing if i could get the omp out with out pulling the turbos, first win!


I bought a 2nd catch can to modify as the 2 stroke oil res. The adapter relies on gravity to feed the oil, soo you have to mount the res quite high this was my first idea on how to mount the pump, i also swapped around the top and bottom of the can so the drain was still at the bottom and the mounting was equal.

Fitting the pump and adapter back in,
This little heat sheild needed to be trimmed, its the only thing that gets in the way with the extra size of the adapater and having the twins still fully hooked up.

OMP with adapter

Im still not quite sure how i managed to fit it back in, you can see how close it is to the oil return, also trying to line up two key ways at once blind is not fun.

You can see here a good shot of where the hose needs to be ran

RotaryAviation OMP adapter
For those not in the know this little adapter allows you to scavenge your omp oil from a dedicated reservoir. With this setup you get the best of both arguments for premix and omp and with the only downside being you must keep an eye on its level.
First step was seeing if i could get the omp out with out pulling the turbos, first win!
I bought a 2nd catch can to modify as the 2 stroke oil res. The adapter relies on gravity to feed the oil, soo you have to mount the res quite high this was my first idea on how to mount the pump, i also swapped around the top and bottom of the can so the drain was still at the bottom and the mounting was equal.
Fitting the pump and adapter back in,
This little heat sheild needed to be trimmed, its the only thing that gets in the way with the extra size of the adapater and having the twins still fully hooked up.
OMP with adapter
Im still not quite sure how i managed to fit it back in, you can see how close it is to the oil return, also trying to line up two key ways at once blind is not fun.
You can see here a good shot of where the hose needs to be ran
10-11-17, 07:43 PM
#140
Full Member
Thread Starter
And here is where i actually ended up mounting the tank, you simply undo the couple of allen bolts and top it up.
The hose is nice and straight and has a gradual drop to the adapter.

Sight tube is nice and visible, and you can see that i just capped the other barb on the can.

And used some left over an hose guides to keep it away from the pulleyand everything else.


Ive noticed a slight draw on its first start up, and the exhaust definately smells of the sweet 2stroke.
Quite a simple and clean mod that anyone with a ecu that can still control the OMP should do

The hose is nice and straight and has a gradual drop to the adapter.
Sight tube is nice and visible, and you can see that i just capped the other barb on the can.
And used some left over an hose guides to keep it away from the pulleyand everything else.
Ive noticed a slight draw on its first start up, and the exhaust definately smells of the sweet 2stroke.
Quite a simple and clean mod that anyone with a ecu that can still control the OMP should do
08-21-18, 07:15 AM
#141
Full Member
Thread Starter
The fc is finally seeing some love again!
Its been a hard slog with little to no progress as of late, the big hurdle that hurt the fc was getting a local bloke to build me a speeduino ecu, he pretty much took my money found it too difficult then dropped of the face of the earth...
In amongst that I bought a new daily which instantly did a head gasket with in 24 hours of ownership, i was extremely lucky it didnt crack a cylinder wall.
But now i have acquired a Haltech ps2000 and have nearly finished up the wiring.
Stay tuned.
08-23-18, 10:16 AM
#142
Full Member
Thread Starter
Thanks mate,
Yeah i know too much project not enough car,
Im sick of looking at the thing, i deliberately took it out of its comfy shed and bought it to melbourne soo id have to finish it.
Haltech install

Stock ecu connectors cut off, think added maybe 3 wires to the loom and it now has provisions for two more pressure inputs, and set it ready for flex fuel.


Haltech CAN wideband

MAC Boost solenoid, and one of the pressure input connector in frame and the new CAS wire

Last time i want to see this out of the car!

1st draft for ls1 coil brackets, its a 3d print with a modula design soo it can be made and mounted easily

all coils stacked up and ready


And fully mounted

with labels

Yeah i know too much project not enough car,
Im sick of looking at the thing, i deliberately took it out of its comfy shed and bought it to melbourne soo id have to finish it.
Haltech install
Stock ecu connectors cut off, think added maybe 3 wires to the loom and it now has provisions for two more pressure inputs, and set it ready for flex fuel.
Haltech CAN wideband
MAC Boost solenoid, and one of the pressure input connector in frame and the new CAS wire
Last time i want to see this out of the car!
1st draft for ls1 coil brackets, its a 3d print with a modula design soo it can be made and mounted easily
all coils stacked up and ready
And fully mounted
with labels
08-23-18, 10:24 AM
#143
Full Member
Thread Starter
Haltech mount i 3d printed says FCREW in the centre

Basic design but should do the job well.

Soo yeah i cut up re-ameniya cables to make my new spark cables

Haltech wideband installed very similar to the old setup

Snaked the wiring through this will now be rather empty still need my fuse box to arrive.

Where and how the haltech will now live, had to make a bit of a show point about it.

Relay and fuse box

Thick gauge wire to cover any expand ability in the future,

Really nice compact and cheap unit ebay like $30

Basic design but should do the job well.
Soo yeah i cut up re-ameniya cables to make my new spark cables
Haltech wideband installed very similar to the old setup
Snaked the wiring through this will now be rather empty still need my fuse box to arrive.
Where and how the haltech will now live, had to make a bit of a show point about it.
Relay and fuse box
Thick gauge wire to cover any expand ability in the future,
Really nice compact and cheap unit ebay like $30
10-22-18, 03:45 AM
#144
Full Member
Thread Starter
I am finalising a few things now
Firstly i completely re did the steering wheel,
Which was good to find why my horn was shorting as the wiring in the hub was ****!
Soo thin hub, a QR and a new knock off horn button


Which of course didnt fit soo printed out a horn ring with a little rotor in it

Relay box and loom back into the car

Beef wire to the fuel pump

Pinned out the prosport gauge soo i could wire the Haltech wideband to display through it

Then wasted an entire day trying to install a pan brace,
everything is already at its maximium height soo tried to get the brace to add any height, spent soo long drilling holes out dia grinding etc.
Was all set with studs and good quaility hardware which ultimately all ended up coming off as it just wont work with my setup.


Firstly i completely re did the steering wheel,
Which was good to find why my horn was shorting as the wiring in the hub was ****!
Soo thin hub, a QR and a new knock off horn button
Which of course didnt fit soo printed out a horn ring with a little rotor in it
Relay box and loom back into the car
Beef wire to the fuel pump
Pinned out the prosport gauge soo i could wire the Haltech wideband to display through it
Then wasted an entire day trying to install a pan brace,
everything is already at its maximium height soo tried to get the brace to add any height, spent soo long drilling holes out dia grinding etc.
Was all set with studs and good quaility hardware which ultimately all ended up coming off as it just wont work with my setup.
10-22-18, 03:57 AM
#145
Exhaust Manifold Leak
I fitted a REW spec engine in a FC and I drilled the turbo side holes in the center housing and for the plug side I welded 2 M12 long type of nuts to the housing and tapped one hole. this was could re use the stock FC mounts
 10-22-18, 04:28 AM
#146
Full Member
Thread Starter
Soo i ditched the **** digital gauges and put in a defi zd its an awesome bit of kit, i need to give it speed and rpm still but can easily replace just about every gauge in your car can even do fuel level.
It needed a mount soo once again got 3d printing and came up with this.
Will grab a photo of the unit in it soon

Some of you may be aware but i had some baller spec work equip 05 i was trying to get to fit
17x9+5 and 17x10 +20 is a bad idea on a stock body fc

Once i realised this i sold them, and bought some volk gt-n not my first choice of wheel but this wheels came up super cheap and in much better sizing for the fc.


It needed a mount soo once again got 3d printing and came up with this.
Will grab a photo of the unit in it soon
Some of you may be aware but i had some baller spec work equip 05 i was trying to get to fit
17x9+5 and 17x10 +20 is a bad idea on a stock body fc
Once i realised this i sold them, and bought some volk gt-n not my first choice of wheel but this wheels came up super cheap and in much better sizing for the fc.
11-04-18, 08:53 PM
#147
Full Member
Thread Starter
Been hard at it hopefully be in the tuners shop in a week or soo for rego aswell.
as promised some better shots of the defi Zd with the 3d print mount.


Been able to run it round the block a few times now and may have even cheekly stopped in for some fuel.
Seems to be running fine except secondaries either arent kicking in or more likely the staging in the tune isnt right, might try play with it but cruises around great.


as promised some better shots of the defi Zd with the 3d print mount.
Been able to run it round the block a few times now and may have even cheekly stopped in for some fuel.
Seems to be running fine except secondaries either arent kicking in or more likely the staging in the tune isnt right, might try play with it but cruises around great.
11-07-18, 09:43 PM
#148
Full Member
Thread Starter
Been hard at it,
Oil cooler lines were leaking soo that got replaced with aeroflow lines and high flow fittings,
also completed an astra electric steering pump setup.
3 x M16x1.5 O ring to AN6 fittings Aeroflow PN AF351-06S
1 x M12x1.25 bolt to block rack (thou i accidently ordered x1.5)
2 x 90 degree -6 fittings Aeroflow PN AF103-06BLK
1x 90 degree -6 to 3/8 hose fitting Aeroflow PN AF413-06BLK
2 metres of 3/8 rubber hose and -6 braided hose Aeroflow PN AF100-06-2M (braid -6)
2 x 3/8 hose clamps


Lines are very loosely mounted as i couldnt really get them any nicer, will do for now.
Also can see the super rare infini undertray i scored.

Sooo i may have gotten the feed and return wrong the first go and blew the *** out of my steering rack.
Luckily new rack was easily sourced.


This is the correct plumbing

I also got some Supernow camber tops,
The plan is to run these maxed caster that combined with the astra pump will hopefully take away any indirect steering feel at high speeds

Oil cooler lines were leaking soo that got replaced with aeroflow lines and high flow fittings,
also completed an astra electric steering pump setup.
3 x M16x1.5 O ring to AN6 fittings Aeroflow PN AF351-06S
1 x M12x1.25 bolt to block rack (thou i accidently ordered x1.5)
2 x 90 degree -6 fittings Aeroflow PN AF103-06BLK
1x 90 degree -6 to 3/8 hose fitting Aeroflow PN AF413-06BLK
2 metres of 3/8 rubber hose and -6 braided hose Aeroflow PN AF100-06-2M (braid -6)
2 x 3/8 hose clamps
Lines are very loosely mounted as i couldnt really get them any nicer, will do for now.
Also can see the super rare infini undertray i scored.
Sooo i may have gotten the feed and return wrong the first go and blew the *** out of my steering rack.
Luckily new rack was easily sourced.
This is the correct plumbing
I also got some Supernow camber tops,
The plan is to run these maxed caster that combined with the astra pump will hopefully take away any indirect steering feel at high speeds
11-12-18, 04:20 AM
#150
Full Member
Thread Starter
Took the quote from another forum that answers your question and a few more, basically internally regulated.
Theres a video on youtube of the current draw, it does pull close to 60amp when making pressure and about 7.5amps at idle.
Sound is awesome sounds like a mini jet engine spooling up
If you can mount it closer, my lines are a little long, this makes for a delay in steering effort, it is only noticeable when i was bleeding it etc and doesnt play any part while driving.
Steering effort is quite nice thou, i contribute this mostly to running a heap of caster thou, as this wants to keep the wheels straight at speed.
Car is off to Mazworx tomorrow for a tune and rwc!!!
Been at this thing for soo long, soo nervous and excited hopefully everything goes smoothly.

I'm also driving it there!
Have an unregistered permit and have taken it for a few drives now, everything is working great
Originally Posted by KYPREO post_id=2821734 time=1541653562 user_id=154
I've got an Astra electric power steering pump to install as well for my 1st gen. I love how you've mounted it. I'll see if I can do something similar (although might need a guard underneath for street use). I love the simplicity of these things. It took me a while to figure out by tracking down the Factory Service Manual, but this particular version actually has the logic controller/ECU in the pump itself that regulates output based on pressure, which is why it only needs a constant power source to run, ie no aftermarket ECU wizardry.
I am very keen to hear how you find the noise, current draw and steering effort at differing speeds.
I am very keen to hear how you find the noise, current draw and steering effort at differing speeds.
Sound is awesome sounds like a mini jet engine spooling up
If you can mount it closer, my lines are a little long, this makes for a delay in steering effort, it is only noticeable when i was bleeding it etc and doesnt play any part while driving.
Steering effort is quite nice thou, i contribute this mostly to running a heap of caster thou, as this wants to keep the wheels straight at speed.
Car is off to Mazworx tomorrow for a tune and rwc!!!
Been at this thing for soo long, soo nervous and excited hopefully everything goes smoothly.
I'm also driving it there!
Have an unregistered permit and have taken it for a few drives now, everything is working great