4-Rotor FC Build
 02-20-13, 07:28 PM
#1251
I wish I was driving!
Sorry, you've never really seemed like you needed to be told anything about this build.
Based on your attention to detail, I would have thought you would have compared the bores of the installed stationary gears in your front and rear housing, and done a light clean up cut to your 2nd intermediate housing, and then built your stationary gear carrier to fit that bore.
This is how guru racing recommends maching their center bearing carrier.
http://www.mazdatrix.com/instruction...ingFitment.pdf
 02-22-13, 12:43 AM
#1252
Why Teflon�?
Works great when used in steady temperature conditions but it will loose shape when going through heat/cold cycles and sure it will start to leak, especially under high oil pressure.
Why not a (heat treated) copper ring? Or alu for that matter?
Grtz Dennis.
Works great when used in steady temperature conditions but it will loose shape when going through heat/cold cycles and sure it will start to leak, especially under high oil pressure.
Why not a (heat treated) copper ring? Or alu for that matter?
Grtz Dennis.
I've used the teflon because it squishes a bit, so if the alignment between the oiling tube and the stationairy gear carrier is a little bit off the teflon will squish around a bit, and still create a seal. It can't squish out because it sits in a chamber and the oiling tube goes through it. I can change to a copper seal really easily, but I'm not 100% sure if it's better. The front cover also uses a teflon ring instead of a copper one.
Sorry, you've never really seemed like you needed to be told anything about this build.
Based on your attention to detail, I would have thought you would have compared the bores of the installed stationary gears in your front and rear housing, and done a light clean up cut to your 2nd intermediate housing, and then built your stationary gear carrier to fit that bore.
This is how guru racing recommends maching their center bearing carrier.
http://www.mazdatrix.com/instruction...ingFitment.pdf
Based on your attention to detail, I would have thought you would have compared the bores of the installed stationary gears in your front and rear housing, and done a light clean up cut to your 2nd intermediate housing, and then built your stationary gear carrier to fit that bore.
This is how guru racing recommends maching their center bearing carrier.
http://www.mazdatrix.com/instruction...ingFitment.pdf
 , I knew about the inserting procedure for the guru center bearing carrier, but assumed that the machinig was necessary because all the diameters of the holes in the intermediate iron are a bit different, (I've seen about 0.15mm variation in the irons I have, also the 2 holes in the same iron are always a different size). Ah well, this will work fine, The rear and front rotors show a similar difference when measuring between the rotor flank and the rotor housing on the left and the right side, and they use the stock stationairy gears.
02-22-13, 07:11 AM
, I knew about the inserting procedure for the guru center bearing carrier, but assumed that the machinig was necessary because all the diameters of the holes in the intermediate iron are a bit different, (I've seen about 0.15mm variation in the irons I have, also the 2 holes in the same iron are always a different size). Ah well, this will work fine, The rear and front rotors show a similar difference when measuring between the rotor flank and the rotor housing on the left and the right side, and they use the stock stationairy gears.
02-22-13, 07:11 AM
#1253
Wasted spark plug
http://csidesigns.com/flowgeeks/elas...ginners-guide/
Under "Type of seals", the PTFE part.
I don't work in the automotive industry but we use Teflon o-rings for sealing vacu�m in our processes.
No, I can't tell you what I do. :-)
Grtz Dennis.
Under "Type of seals", the PTFE part.
I don't work in the automotive industry but we use Teflon o-rings for sealing vacu�m in our processes.
No, I can't tell you what I do. :-)
Grtz Dennis.
03-02-13, 03:44 PM
#1255
Senior Member
In regards to your exhaust port size, it seems you went slightly larger (wider @ least) than the OEM opening, is the timing still fairly close as well? Were there significant performance gains in your flow simulations, w/slightly larger? (Hope I didn't miss the info, LOL)
It seems you and RotaryGod are right on the money w/the exhaust port configuration, the 1980 "Mazda Rx-7 Competition Prep and Service Manual"(p.51) shows that they recommend exhaust headers as follows: SS304, 42mm dia (1.65") x 1.5mm wall (.059"), I can't imagine they'd use exhaust ports w/larger openings than the headers! This is on a NA 12A, w/270 ps @ 9k rpm...48mm DDW..(Weber IDA)!! (though it doesn't specifically say the tube has been "pinched" into an oval, it would seem that it has)
Love, LOVE, LOOOOOOOVE your build!
03-03-13, 01:18 PM
#1256
Elastomers: A Beginner’s Guide | FlowGeeks
Under "Type of seals", the PTFE part.
I don't work in the automotive industry but we use Teflon o-rings for sealing vacu�m in our processes.
No, I can't tell you what I do. :-)
Grtz Dennis.
Under "Type of seals", the PTFE part.
I don't work in the automotive industry but we use Teflon o-rings for sealing vacu�m in our processes.
No, I can't tell you what I do. :-)
Grtz Dennis.

In regards to your exhaust port size, it seems you went slightly larger (wider @ least) than the OEM opening, is the timing still fairly close as well? Were there significant performance gains in your flow simulations, w/slightly larger? (Hope I didn't miss the info, LOL)
It seems you and RotaryGod are right on the money w/the exhaust port configuration, the 1980 "Mazda Rx-7 Competition Prep and Service Manual"(p.51) shows that they recommend exhaust headers as follows: SS304, 42mm dia (1.65") x 1.5mm wall (.059"), I can't imagine they'd use exhaust ports w/larger openings than the headers! This is on a NA 12A, w/270 ps @ 9k rpm...48mm DDW..(Weber IDA)!! (though it doesn't specifically say the tube has been "pinched" into an oval, it would seem that it has)
Love, LOVE, LOOOOOOOVE your build!
It seems you and RotaryGod are right on the money w/the exhaust port configuration, the 1980 "Mazda Rx-7 Competition Prep and Service Manual"(p.51) shows that they recommend exhaust headers as follows: SS304, 42mm dia (1.65") x 1.5mm wall (.059"), I can't imagine they'd use exhaust ports w/larger openings than the headers! This is on a NA 12A, w/270 ps @ 9k rpm...48mm DDW..(Weber IDA)!! (though it doesn't specifically say the tube has been "pinched" into an oval, it would seem that it has)
Love, LOVE, LOOOOOOOVE your build!
My primairy runners use 48,3 x 1,5mm tubing, made from 304L stainless steel. The 12A using a slightly smaller primairy pipe makes sense, because it doesn't have as much displacement as a 13B.
 03-23-13, 08:21 AM
#1261
When we build turbo-headers we use 54x2mm with 304L at least.
the 50mm inside diameter is about exactly the same area as the stock turbo engine outlet in the housing.
the 50mm inside diameter is about exactly the same area as the stock turbo engine outlet in the housing.
03-25-13, 04:42 PM
#1262
I think they mean the outlet in the housing at the flange side. I don't know exactly what the stock port size is, mine are a bit larger than stock at 12,3cm^2, which equals 39,6mm, I'm using 48,3x1,5mm tubing, which has a 45,3mm ID dimension, so the piping I'm using has a bit more area than the exhaust port has, but it's a much smaller difference than what most use.
For anyone who's wondering, sadly there has been little progress on the car. Currently putting in over 80 hours a week at my day job, so not a lot of stuff is happening on the car. I think I can pick things up in a few weeks and finally get the engine together.
For anyone who's wondering, sadly there has been little progress on the car. Currently putting in over 80 hours a week at my day job, so not a lot of stuff is happening on the car. I think I can pick things up in a few weeks and finally get the engine together.
03-26-13, 11:29 AM
#1265
I think they mean the outlet in the housing at the flange side. I don't know exactly what the stock port size is, mine are a bit larger than stock at 12,3cm^2, which equals 39,6mm, I'm using 48,3x1,5mm tubing, which has a 45,3mm ID dimension, so the piping I'm using has a bit more area than the exhaust port has, but it's a much smaller difference than what most use.
For anyone who's wondering, sadly there has been little progress on the car. Currently putting in over 80 hours a week at my day job, so not a lot of stuff is happening on the car. I think I can pick things up in a few weeks and finally get the engine together.
For anyone who's wondering, sadly there has been little progress on the car. Currently putting in over 80 hours a week at my day job, so not a lot of stuff is happening on the car. I think I can pick things up in a few weeks and finally get the engine together.
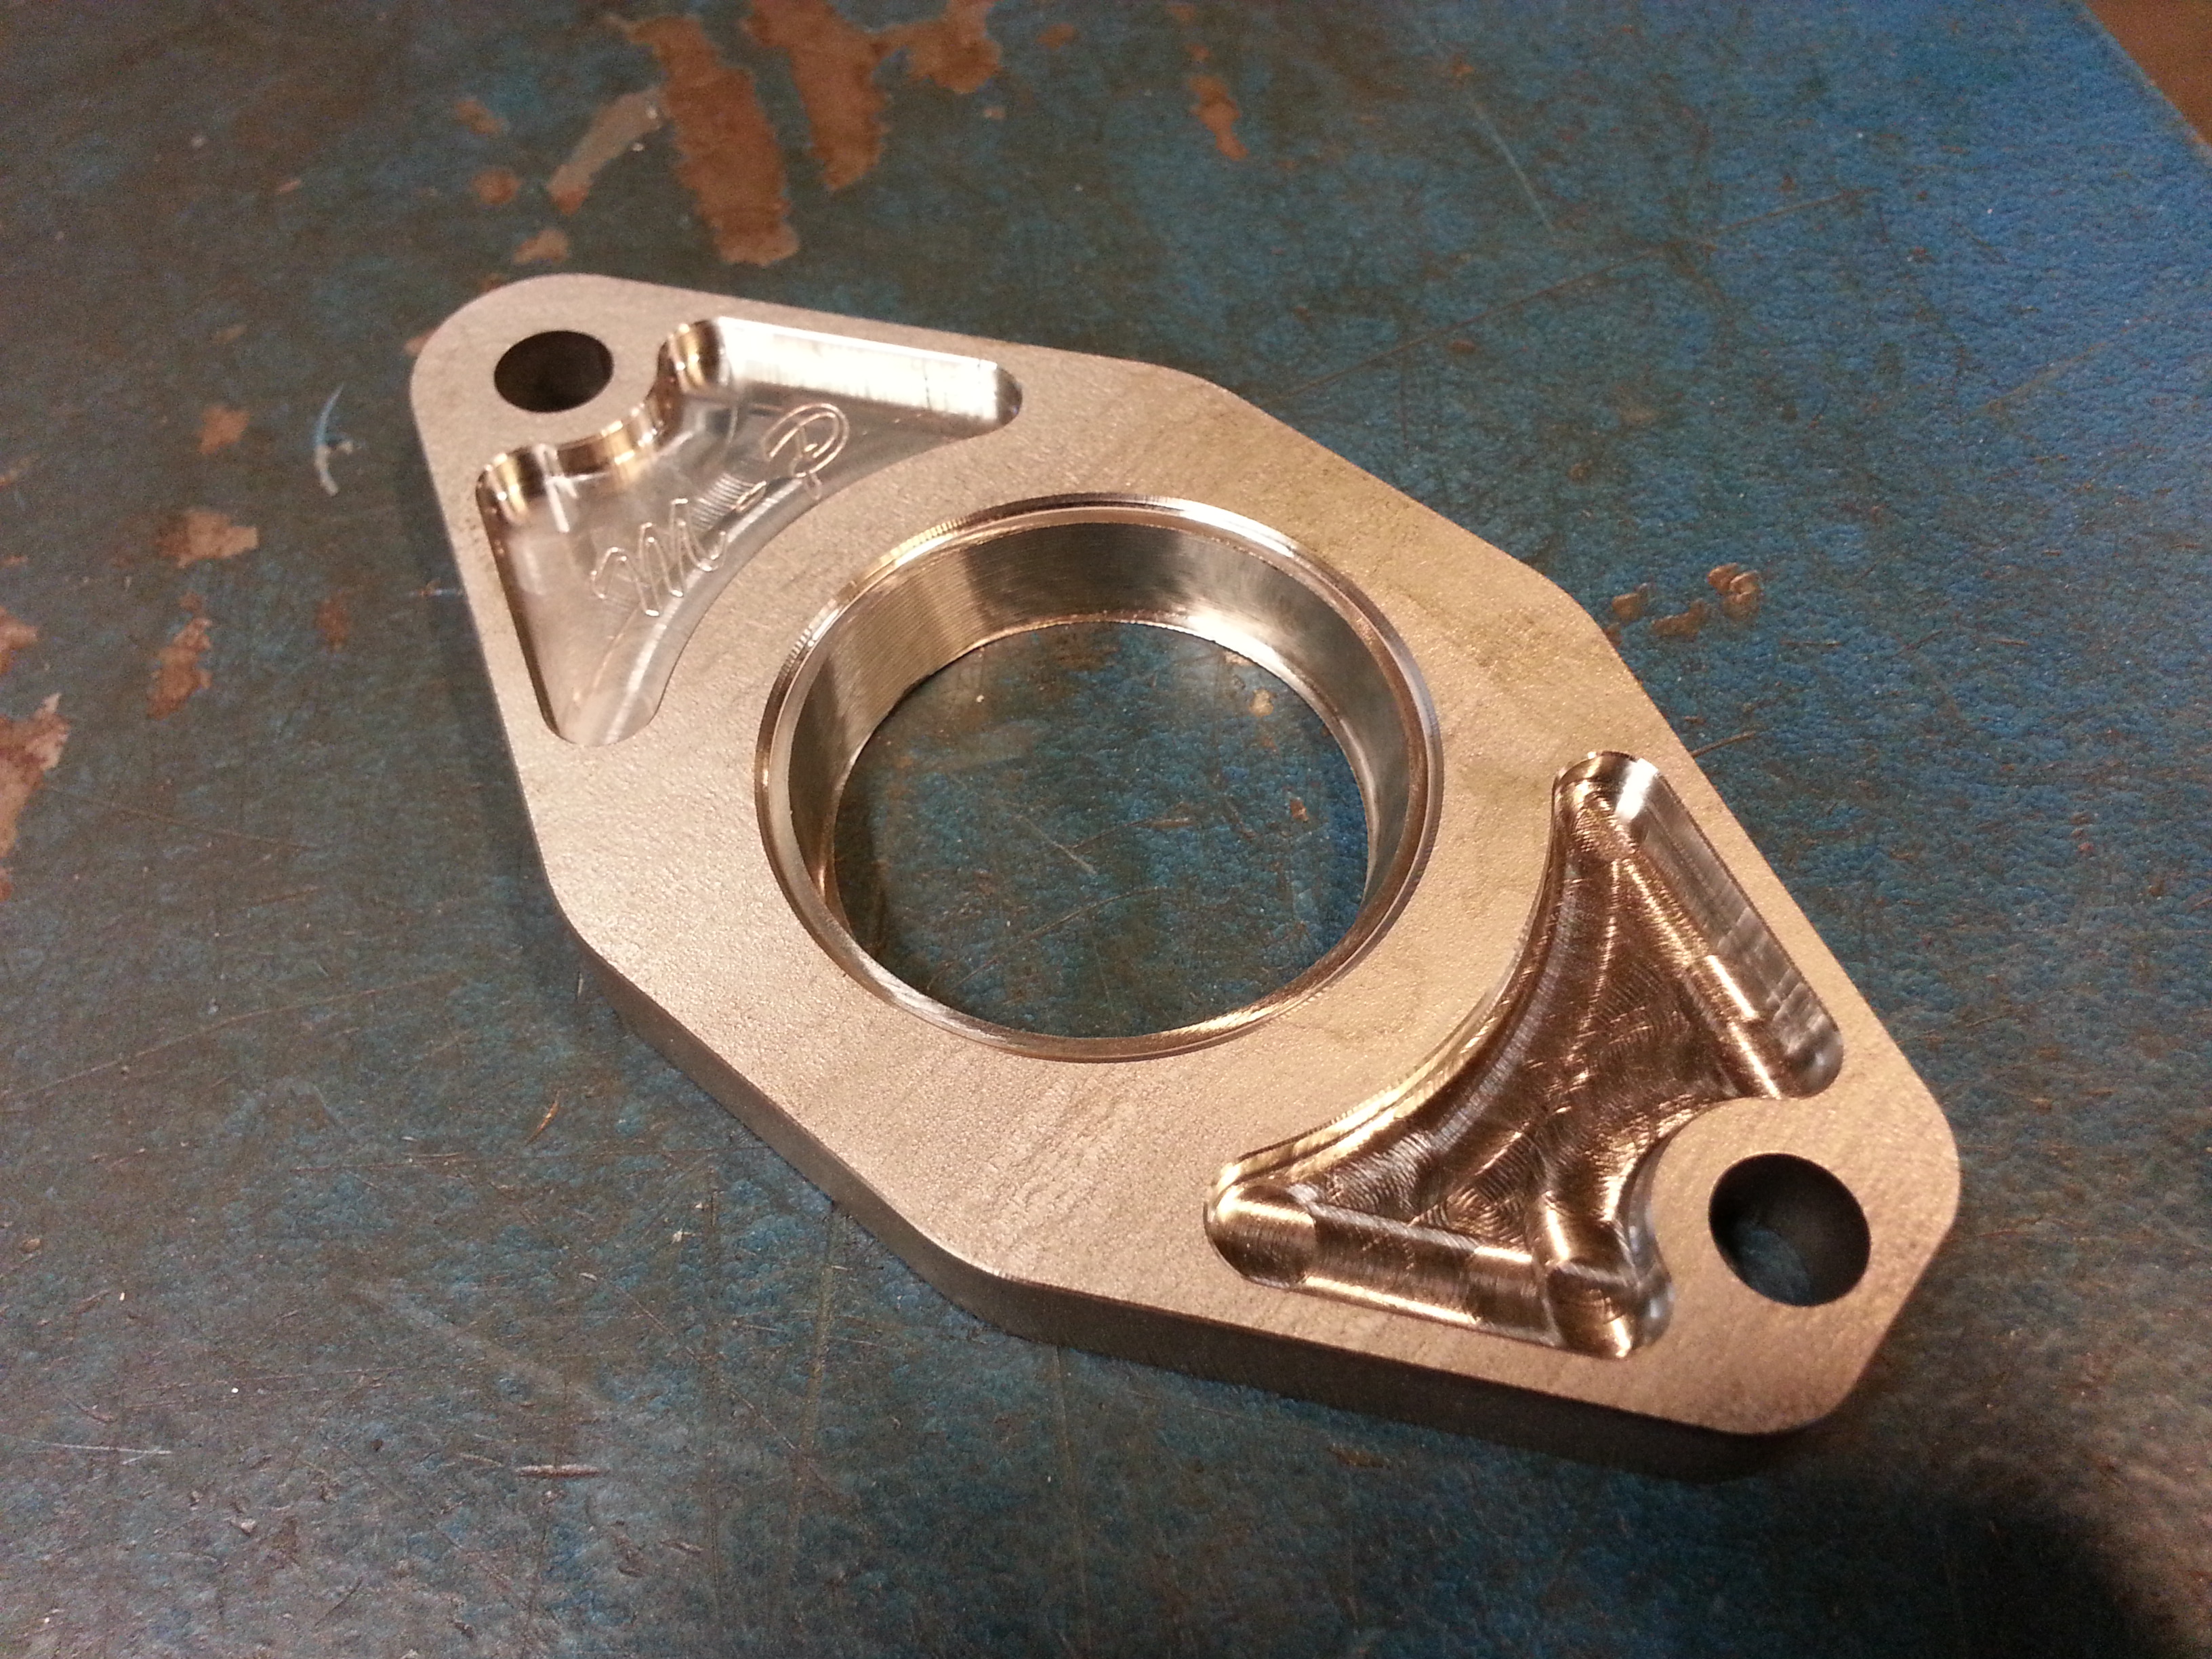
This is my flanges to suit stock outlet on housings. The Little edge is to fit 54x2mm tube inside.
And the hole though i flow optimized from stock outlet to round. Almost exactly the same area.
04-02-13, 05:49 PM
#1266
Nah, that would mean I have free days in the weekend, which I don't have a lot of lately , But after this week things should quite down at work and I should be able to get back to working on the car 
Not that I haven't done anything at all, all the engine bits are clearanced, and checked for specifications, all needed rebuild parts are here. I even painted the engine iron's

I went with plain black for the side iron's, No need for fancy colours here, this engine won't need it to look good Now I need to spend a few evenings cleaning and making sure every o-ring groove and mating surface is nice and clean!, Not looking forward to that. 
, But after this week things should quite down at work and I should be able to get back to working on the car Not that I haven't done anything at all, all the engine bits are clearanced, and checked for specifications, all needed rebuild parts are here. I even painted the engine iron's
I went with plain black for the side iron's, No need for fancy colours here, this engine won't need it to look good
Now I need to spend a few evenings cleaning and making sure every o-ring groove and mating surface is nice and clean!, Not looking forward to that.

 04-09-13, 05:11 PM
#1270
Had today off, so I worked some more on the 4-rotor project , Rotors and iron's are cleaned, the rotor side seals are now sized to obtain a proper corner-to-side seal clearance, main bearings are replaced and I've begun installing seals onto the rotor.
Busy with the side-seals, Yeah, I really need to machine a nice case to hold all the seals during assembly, I found that coffeecups are a horrible way to organise seals, especially for a 4-rotor

Oil seals mounted, I used viton o-rings in there, which are crappy to get in place. I'm going to have sore thumbs for a week!

Also got the seals for the irons ready, I'm using viton o-rings here instead of the stock mazda seals. Got a bunch of 2.4 and 2.0 viton cord through an industrial supplier, cut everything to size and joined the seals with sicomet.

Hopefully I can start stacking things together soon, should be interesting! I think I'll have to build the engine from the rear up instead of starting at the front. I also need to figure out a way to create some timing marks, since the original ones won't work anymore.
, Rotors and iron's are cleaned, the rotor side seals are now sized to obtain a proper corner-to-side seal clearance, main bearings are replaced and I've begun installing seals onto the rotor.Busy with the side-seals, Yeah, I really need to machine a nice case to hold all the seals during assembly, I found that coffeecups are a horrible way to organise seals, especially for a 4-rotor
Oil seals mounted, I used viton o-rings in there, which are crappy to get in place. I'm going to have sore thumbs for a week!
Also got the seals for the irons ready, I'm using viton o-rings here instead of the stock mazda seals. Got a bunch of 2.4 and 2.0 viton cord through an industrial supplier, cut everything to size and joined the seals with sicomet.
Hopefully I can start stacking things together soon
, should be interesting! I think I'll have to build the engine from the rear up instead of starting at the front. I also need to figure out a way to create some timing marks, since the original ones won't work anymore.
The following users liked this post:
L.S.X (02-18-20)
04-10-13, 10:27 AM
#1272
Full Member

Join Date: Sep 2011
Location: Scotland
Posts: 60
Likes: 0
Received 0 Likes
on
0 Posts
Hi John, excellent work.
I would like to ask why you've chosen Viton for the gas and water seals?
I recently rebuilt my engine using the OEM kit and visually there is a significant difference between the inside Gas seal (orange with a hard inside and outside edge) and the outer water seal which just looks like a rubber ring. In practice there must be reasons for the design of the orange gas seal being as it is....but then that's probably beyond my brain skillz
thanks
04-10-13, 10:46 AM
#1273
I'm thinking you are going to have longevity issues with that standard viton inner gas ring. Ok for the outer but not the inner. After all the phenominal work you have done so far it would be a shame to have issues due to a simple o-ring. Keep up the good work though...this build has been breathtaking to witness.
FWIW,
Crispy
FWIW,
Crispy
04-10-13, 10:56 AM
#1274
Ive always used oem oil rings ( mainly due to lack of knowledge of aftermarket rings ) but i gota say i was expecting pineapple racing water seals in your build because of thier proven worth, they are known to hold seal even when the engine reaches temps that cause the plates the start blueing
04-10-13, 12:11 PM
#1275
Yeah sure
Yes, you use a special sealant to act as the orange stuff underneath the inner o-ring during assembling. This is not new or experimental, this has been done lots of times before succesfully.
There are a few reasons I use the viton seals, they are re-usable unlike the oem-seals, are very resistant to high temperatures, and it's a huge cost difference here in the netherlands (OEM seals are about $1200 through the dealership here for a 4-rotor, and about $800 when you buy them at atkins or mazdatrix after shipping and customs which also takes a long time, industrial viton o-rings are about $80 through work, and delivered within a day).
I am pretty sure these are absolutely identical to the pineapple seals. Maybe even better, since I've heard about those seals breaking at the joint.
Hi John, excellent work.
I would like to ask why you've chosen Viton for the gas and water seals?
I recently rebuilt my engine using the OEM kit and visually there is a significant difference between the inside Gas seal (orange with a hard inside and outside edge) and the outer water seal which just looks like a rubber ring. In practice there must be reasons for the design of the orange gas seal being as it is....but then that's probably beyond my brain skillz
thanks
I would like to ask why you've chosen Viton for the gas and water seals?
I recently rebuilt my engine using the OEM kit and visually there is a significant difference between the inside Gas seal (orange with a hard inside and outside edge) and the outer water seal which just looks like a rubber ring. In practice there must be reasons for the design of the orange gas seal being as it is....but then that's probably beyond my brain skillz
thanks
Yes, you use a special sealant to act as the orange stuff underneath the inner o-ring during assembling. This is not new or experimental, this has been done lots of times before succesfully.
There are a few reasons I use the viton seals, they are re-usable unlike the oem-seals, are very resistant to high temperatures, and it's a huge cost difference here in the netherlands (OEM seals are about $1200 through the dealership here for a 4-rotor, and about $800 when you buy them at atkins or mazdatrix after shipping and customs which also takes a long time, industrial viton o-rings are about $80 through work, and delivered within a day).
Ive always used oem oil rings ( mainly due to lack of knowledge of aftermarket rings ) but i gota say i was expecting pineapple racing water seals in your build because of thier proven worth, they are known to hold seal even when the engine reaches temps that cause the plates the start blueing