Widebody Turbo Swap - My Dream FB Build is Finally Happening!

 02-21-15, 11:35 AM
#53
Here's an excerpt of the quip from the company about the difference between the red and black bushings:
"Why do people buy the red parts when they're not Graphite Impregnated like the Black parts?
In the end this is really because some people simply like the color Red more than Black."
I find that to be in pretty good tase, props to them for calling people out on the color preference.
I will be running Mobil 1 full synthetic Race oil in this build. I'm a huge Mobil 1 fan after using it in my Audi's and it's been a very good lubricating and cleaning oil for me. I would never run that in a rotary with the OMP still installed as it does not burn well at all.
My thought is this: What's better - dirty, hot 4-stroke oil that's not meant to be burned? Or clean, pre-mixed 2-stroke oil that's chemically engineered to be burned? You wouldn't run a chainsaw, snowmobile or weed whip with 4 stroke oil and an OMP injecting 4 stroke oil into it. You premix the gas with oil that's engineered to burn in whatever ratio you decide to be safe for the engine.
Not to start an OMP debate here, I just wanted to clean up the engine is all. To be entirely honest, the main reason I deleted it is because the previous owner took out the 4 banjo bolts with their crush washers that attached the lines to the OMP itself and lost them (at least, I haven't found them yet). I wasn't going to
So this way I'll have all the emissions blocked off, OMP blocked off, and I've got some really cool wiring ideas to try and hide some of the electrical components to make the engine bay extremely simple...
 02-21-15, 01:28 PM
#54
Premix with gas is much thinner. A 20w50 will provide a thicker film making for easier starts. That's just my experience. The RX 8 had a Rotary Aviation 2 stroke OMP injection kit when I bought it. It had hot start problems. Once i removed it and rerouted the stock OMP the problem went away.
That's just my experience. You may not have a problem.
That's just my experience. You may not have a problem.
02-21-15, 03:25 PM
#55
Moderator
iTrader: (3)
Join Date: Mar 2001
Location: https://www2.mazda.com/en/100th/
Posts: 30,796
Received 2,574 Likes
on
1,830 Posts
$118 - Universal Presilencer, 3in ID
$95 - Universal Cylinder Presilencer 6" OD with 3" ID
I'm really tempted to go with the $95 one since it's $30 off right now and is a nice, smaller, concise package that would be easy to stuff under the car. I'm also planning on running the stock heat shields in this car so it would help to make sure I can fit the whole system under the car going with a smaller presilencer.
02-22-15, 08:58 AM
#56
Energy Suspension StoreMade003 Package Kit - Mazda RX7 79-85 That is the exact kit that I ordered. I ordered the black ones because they're graphite impregnated which helps lubricate the bushings over time.
Here's an excerpt of the quip from the company about the difference between the red and black bushings:
"Why do people buy the red parts when they're not Graphite Impregnated like the Black parts?
In the end this is really because some people simply like the color Red more than Black."
I find that to be in pretty good tase, props to them for calling people out on the color preference.
It is a JDM S4 13bt engine so it is EFI, correct. It is a bit backwards when you're used to 12a's having the OMP lines running into the carb, but pretty cool in my opinion.

Can't wait to see your project as it develops. Love reading the updates.
02-22-15, 05:11 PM
#57
Premix with gas is much thinner. A 20w50 will provide a thicker film making for easier starts. That's just my experience. The RX 8 had a Rotary Aviation 2 stroke OMP injection kit when I bought it. It had hot start problems. Once i removed it and rerouted the stock OMP the problem went away.
That's just my experience. You may not have a problem.
That's just my experience. You may not have a problem.
Thanks for the info!
There's been so many views on this thread already and so few replies, what are all you lurkers doing!?
 02-23-15, 10:44 PM
#60
Thanks man! That's your first post, I'm surprised you're allowed to post outside of the introduction part of the forum. Anyways, thanks for checking it out!
That's my one worry right now, I was waiting for someone to call it out.
The second picture makes the corrosion and carbon buildup look much worse than it actually is. I assume that this engine has been sitting for a very long time and had a bit of water create small rust spots somewhere that ran down into the housings. Since I've been soaking the engine in MMO and cleaning it with carb cleaner I've been able to eliminate much of the rust corrosion and carbon buildup by rotating the engine by hand. I know it's not the safest or smartest idea to run an engine that isn't a fresh rebuild. But to be entirely honest I'm running out of funds to keep dumping into this build. Next winter will be when I try to pull the engine and give it a rebuild.
If it turns out it needs a rebuild when I drop it in, the first start date will probably be extended to May 1, 2016.
02-24-15, 12:46 PM
#62
There's always something wrong I know what you mean, there's probably something a little toasty in this engine. But there's nothing I can do apart from tearing the whole engine down and doing a full rebuild. There's no way I can find a spare $1,800 for a rebuild kit right now though. Even the cheaper kits with a set of apex seals would be pushing it for me. I'm a college kid right now and don't have the unlimited funds to keep throwing in this build. Even if I drop this motor in and it doesn't start, runs on one rotor, has low compression, blown oil seal, blown coolant seal, bad apex seal, wrecked side seal - no matter what it was, I want to have the chassis completely ready for the next stage. If it turns out that I can't drive it this year, then I just won't drive it this year. I'd be extremely curious what the minimalist kit would be to open the engine and replace the seals though....
I'm flying along right now and will continue to make progress at as rapid of a pace as I can. I really want to get the red chassis in the garage and tear everything off of the underbelly and undercoat it after cleaning it. Then, while it's underneath the car time I'll do the full poly bushing kit, make sure all the heat shields get put back in their place, do the e-brake cable swap from drum to disc, and anything else to make the suspension and everything under the chassis be as ready as possible for the engine to be dropped in. I've got a huge order of 5 boxes coming from RockAuto with just about every suspension part I'll need to make it drive like new (Moog steering parts, bearings, seals, etc.) that should really help with the driver feel in this car.
02-24-15, 03:53 PM
#63
Moderator
iTrader: (3)
Join Date: Mar 2001
Location: https://www2.mazda.com/en/100th/
Posts: 30,796
Received 2,574 Likes
on
1,830 Posts
the second Rx7 i bought was a 1980 with a bad engine, and i bought a used engine for it, which turned out to be bad also, and so i'm not a big fan of used engines  . i also have had a couple Rx7's with things like bad oil seals, and dowel pin oil leaks
if that was mine i would pull it apart and have a look. there is a big difference between full rebuild and a clean, replace anything bad, and put back together too
. i also have had a couple Rx7's with things like bad oil seals, and dowel pin oil leaksif that was mine i would pull it apart and have a look. there is a big difference between full rebuild and a clean, replace anything bad, and put back together too
02-24-15, 06:26 PM
#64
I replace everything but the control rings,corner seals,side seals,and bearings and come out under $600 every time including cleaner. I splurged $150 on a JEGS parts cleaner tank and dont regret it. For cleaning the best tools I've found are GUNK engine degreaser for the tough stuff,Purple Power or Super Clean after GUNK, and rinse with brake cleaner and compressed air then coat with wd40 to prevent flash rust. Razor blades and tiny dental type scrapers are a must. Keep a tooth brush and large nylon brush handy. Avoid sand paper. Before assembly i use rubbing alchohol and a microfiber towel to surface prep for the gasket goo. Have a tub of brand name Vaseline handy and motor oil as assembly lube.
02-24-15, 06:41 PM
#65
$330 - 87-88 Turbo Rx7 Engine Gasket Kit (8DF4-10-271)
$18 - 69-11 Front & Rear Main Seal (ARE81)
$30 -74-11 Rx7 & Rx8 Corner Seal Spring Set (ARE85)
$36 -86-95 Rx7 13B 2mm Corner Seal Plug Set (N326-11-C22)
$40 -http://atkinsrotary.com/store/69-11-Atkins-Rotary-Viton-Oil-Ring-Inserts-ARE15.html
$72 -http://atkinsrotary.com/store/86-11-Rx7-and-Rx8-13B-2mm-Apex-Seal-Spring-Set-ARE83.html
$199 -http://atkinsrotary.com/store/86-95-Rx7-13B-2mm-Atkins-Apex-Seal-Set-ARE13-2.html
What am I missing? I think that's everything. All of this is not needed if your budget is tight but it will make you sleep better.
02-24-15, 09:49 PM
#68
the second Rx7 i bought was a 1980 with a bad engine, and i bought a used engine for it, which turned out to be bad also, and so i'm not a big fan of used engines . i also have had a couple Rx7's with things like bad oil seals, and dowel pin oil leaks
if that was mine i would pull it apart and have a look. there is a big difference between full rebuild and a clean, replace anything bad, and put back together too
. i also have had a couple Rx7's with things like bad oil seals, and dowel pin oil leaksif that was mine i would pull it apart and have a look. there is a big difference between full rebuild and a clean, replace anything bad, and put back together too
That's hard to differentiate in my mind, full rebuild versus clean. I keep thinking that they're one and the same, with almost no difference.
I replace everything but the control rings,corner seals,side seals,and bearings and come out under $600 every time including cleaner. I splurged $150 on a JEGS parts cleaner tank and dont regret it. For cleaning the best tools I've found are GUNK engine degreaser for the tough stuff,Purple Power or Super Clean after GUNK, and rinse with brake cleaner and compressed air then coat with wd40 to prevent flash rust. Razor blades and tiny dental type scrapers are a must. Keep a tooth brush and large nylon brush handy. Avoid sand paper. Before assembly i use rubbing alchohol and a microfiber towel to surface prep for the gasket goo. Have a tub of brand name Vaseline handy and motor oil as assembly lube.
$330 - 87-88 Turbo Rx7 Engine Gasket Kit (8DF4-10-271)
$18 - 69-11 Front & Rear Main Seal (ARE81)
$30 - 74-11 Rx7 & Rx8 Corner Seal Spring Set (ARE85)
$36 - 86-95 Rx7 13B 2mm Corner Seal Plug Set (N326-11-C22)
$40 - 69-11 Atkins' Rotary Viton Oil Ring Inserts...
$72 - 86-11 Rx7 & Rx8 13B 2mm Apex Seal Spring Set...
$199 - 86-95 Rx7 13B 2mm Atkins Apex Seal Set (ARE13-2)
What am I missing? I think that's everything. All of this is not needed if your budget is tight but it will make you sleep better.
So about $750 with cleaning supplies and shipping. Turbos are 'spensive... then again... you can reuse seal springs, corner springs, main seals, and go without corner buttons to save a wad of cash...
Half of me wants to drop the engine in and hear it run first though. Rebuild can be next winter when I can actually afford it, but we shall have to wait and see which route I can go with.
Do you run that with water or kerosene? I'd like to get one but couldn't keep it out in the garage if there's any water involved - it would freeze. The garage gets below 30 almost every night that it's cold out, which royally sucks.
02-25-15, 12:13 AM
#69
Hmm, I like to do a good cleaning during a rebuild. Why not? I like to paint the irons, so they need to be clean first. Same for rotor housings and front cover, oil pan etc. But I don't clean the rotors much anymore because they just get dirty again in 5 minutes. Just shave off loose carbon with a razor blade and maybe a fine wire wheel (to keep the yellow cadmium coating on as much as possible to reduce chances of rust). Obviously make sure the slots are clean, and that's about it.
02-25-15, 06:08 AM
#71
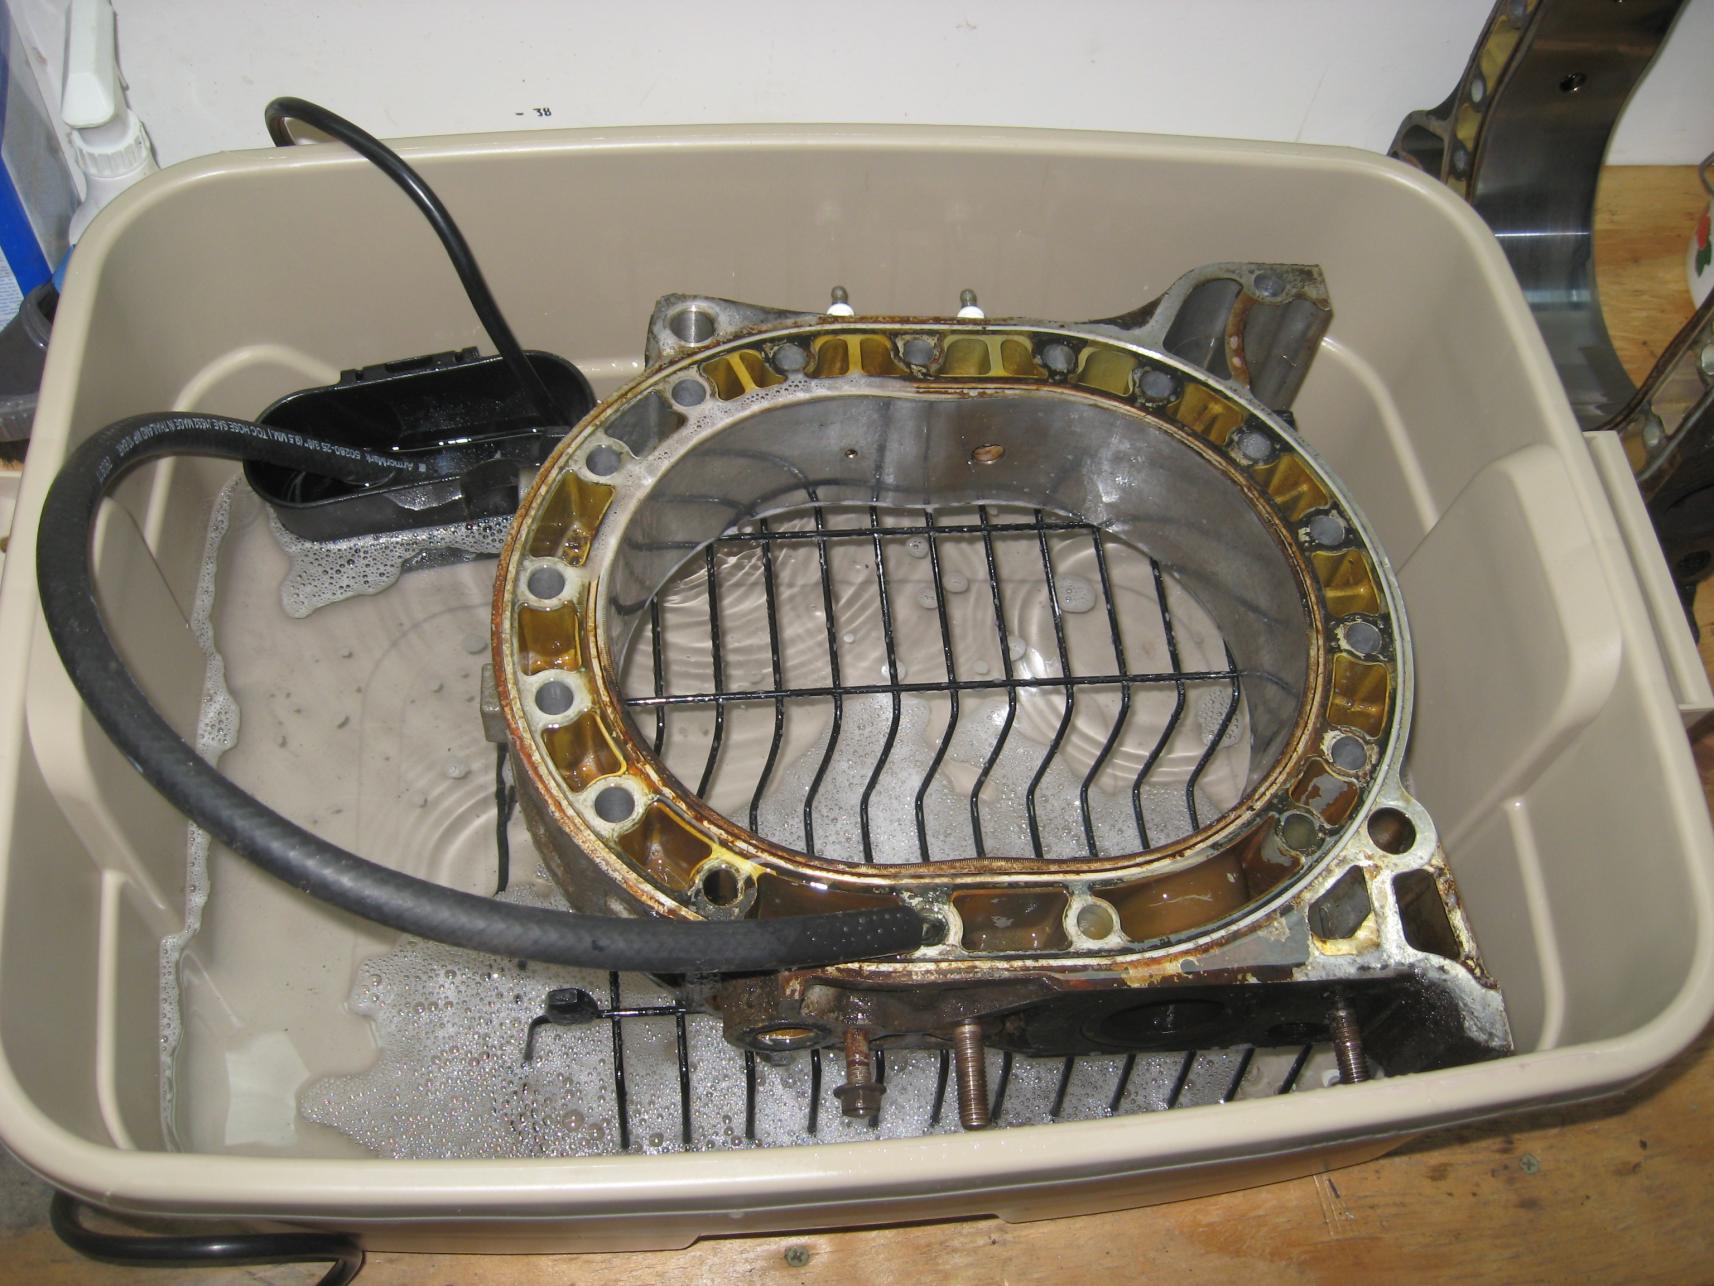
I really wanted to do a parts washer on the cheap so I went to my local home center and bought a 10 gallon tote, a dishwashing rack, and a garden fountain pump and made my own table top parts washer for $33. You can see it in my build thread on page 6... Worked great!
 02-25-15, 09:40 AM
#73
Yeah parts washers are the way to go. I just filled mine with one gallon of purple type cleaner and topped it off with water The GUNK cleaner, brake cleaner etc will be sprayed into it as you clean individual parts so it just adds to the cocktail. I never though about using kerosene. I guess it may be better to rinse with something water based with a good degreaser.
02-25-15, 01:45 PM
#74
Moderator
iTrader: (3)
Join Date: Mar 2001
Location: https://www2.mazda.com/en/100th/
Posts: 30,796
Received 2,574 Likes
on
1,830 Posts
02-28-15, 12:42 AM
#75
Hmm, I like to do a good cleaning during a rebuild. Why not? I like to paint the irons, so they need to be clean first. Same for rotor housings and front cover, oil pan etc. But I don't clean the rotors much anymore because they just get dirty again in 5 minutes. Just shave off loose carbon with a razor blade and maybe a fine wire wheel (to keep the yellow cadmium coating on as much as possible to reduce chances of rust). Obviously make sure the slots are clean, and that's about it.
I really wanted to do a parts washer on the cheap so I went to my local home center and bought a 10 gallon tote, a dishwashing rack, and a garden fountain pump and made my own table top parts washer for $33. You can see it in my build thread on page 6... Worked great!
Actually, here's a pic:
Actually, here's a pic:
Yeah parts washers are the way to go. I just filled mine with one gallon of purple type cleaner and topped it off with water The GUNK cleaner, brake cleaner etc will be sprayed into it as you clean individual parts so it just adds to the cocktail. I never though about using kerosene. I guess it may be better to rinse with something water based with a good degreaser.
Yeah, I agree that it would be extremely nice and cheap to clean parts that way.
Update on the week:
I got my huge RockAuto order in finally with a large list of other parts as well.
Rock Auto Order:
Rear wheel bearings
Rear wheel seals
Front wheel outer seals
Front brake caliper repair kits
Rear brake caliper repair kits
Moog idler arm
Moog outer tie rod end
Moog tie rod end adjusting sleeve
Coolant thermostat
Thermostat housing seals
Intake manifold gasket set
Clutch Master Cylinder
Clutch Slave Cylinder
1 rear hatch lift support
Of course I forgot to get inner tie rod ends and accidentally forgot to add the second hatch strut. So I made another order that should be here later next week with two inner tie rod ends and one more hatch strut.
Pile of 5 boxes from RockAuto with a huge stash of parts inside.

Parts haul for the red chassis, mostly suspension parts.

Stock S4 TII flywheel and stock clutch setup that should run, I just needed a cheap replacement.

Set of metal louvers that came in, really digging the look so far.

Rear view of the louvers on the car, a little crooked - but I still like it.

Rtek 2.1 with a Palm IIIc and charging dock finally made it home.

Bluetooth serial adapter dongle came in for the Rtek 2.1 that'll be in the car.

Old N326 (non-turbo) ECU with the right side engine harness connected.

Stripped the electrical tape, wiring insulation and corrugated covering off the wiring harness.

Pretty much everything on the right side engine harness de-pinned and made ready to be installed in the red car.

Injector wiring harness all de-pinened and ready to go.

Everything that won't be used in the engine build, all emissions stuff.
