Widebody Turbo Swap - My Dream FB Build is Finally Happening!
 02-15-15, 02:47 PM
#26
Yeah there is definitely nothing wrong with harbor freight tools, especially with how good their return policy is. All of my ratchets, sockets, and wrenches are harbor freight and work awesome. I haven't cracked anything or striped anything out at all. That's why I keep going back there, for the price, you really can't lose. I just for unlucky with my compressor.
I was actually going to ask you if you had any experience with auto paint because I'm planning on respraying my bay to get my feet wet. So far I've collected all the necessary tools and supplies to get it done, just waiting for time to do it. So if you need anything when you do your car, I should have it. Which brings me back to air compressors. ...from what I hear, you need at least a 25 gal. Tank to run an hvlp gun, that's why I was wondering about your compressor.
I was actually going to ask you if you had any experience with auto paint because I'm planning on respraying my bay to get my feet wet. So far I've collected all the necessary tools and supplies to get it done, just waiting for time to do it. So if you need anything when you do your car, I should have it. Which brings me back to air compressors. ...from what I hear, you need at least a 25 gal. Tank to run an hvlp gun, that's why I was wondering about your compressor.
Haha so we are in the same boat with the paint! I planned to use my dad's big 21gal compressor for when I painted. My dad isn't a professional painter by any means, but he painted our big boat and some other projects around the house and they came out pretty well. If you have any spare time I'd love to come see how you paint your bay. I'd really like to be able to do the painting myself and not drop more money on someone else doing the paint job.
A friend of mine who helped me build my car paints his own cars and they turn out awesome, using single-stage paint.
https://www.rx7club.com/build-thread.../#post11638398
That's the post where he painted his most recent project.

 .
02-16-15, 12:08 AM
.
02-16-15, 12:08 AM
#30
I will definitely let you know when im ready to paint. Come learn from my mistakes haha
02-16-15, 02:19 PM
#31
I went to welle auto supply in blaine. The guy there was super helpful and put up with me asking tons of questions for about an hour. They have a bunch of stuff for body work too, everything is pretty high quality.
I will definitely let you know when im ready to paint. Come learn from my mistakes haha
I will definitely let you know when im ready to paint. Come learn from my mistakes haha
Sounds good man, would be nice to hang out again! Especially if we both get to gain some painting experience. Maybe ^Nick will grace us with his presence
 02-17-15, 01:19 AM
#33
Finally separated the passenger side rear fender and sideskirt as one piece.


Shouldn't have done it all as one piece, but it worked out alright.

What the passenger side rear fender and side skirt looks like separated.

After the removal, look at the wheel poke!

Serious amount of extra wheel sticking out there.

Driver's side came off much easier after learning how it was attached.

Entire body kit on top of the car after finishing the night.
 02-17-15, 01:39 AM
#34
I believe that I'm going to be changing the direction of this build for this year.
The goals of the build will be the same, with the exception of the widebody kit. I do not have enough time to properly repair the fiberglass damage dealt to the kit during the removal, as well as some other measures that would need to be done in order to install the kit in the first place.
There are large parts of fiberglass missing that I'll need to repair myself in order to make the kit usable again. I'm also heavily considering making molds of the kit in order to replicate it and put it back on the market using my Company's name. In order for me to accomplish these things I won't be able to get the car done in time to enjoy it this summer when I was hoping to have it done.
I will be heading in a direction similar to this one for this year:

I've got a bid in for some ZG 240Z flares right now, and I'm actively shopping for a small IMSA 3-piece spoiler. I'm also going to be keeping the IMSA air dam and reusing it for my car since it's pretty much irreplaceable in this area.
UPDATED Chassis Goals
UPDATED Drivetrain Goals
Tentative First Drive Date - May 1st
The goals of the build will be the same, with the exception of the widebody kit. I do not have enough time to properly repair the fiberglass damage dealt to the kit during the removal, as well as some other measures that would need to be done in order to install the kit in the first place.
There are large parts of fiberglass missing that I'll need to repair myself in order to make the kit usable again. I'm also heavily considering making molds of the kit in order to replicate it and put it back on the market using my Company's name. In order for me to accomplish these things I won't be able to get the car done in time to enjoy it this summer when I was hoping to have it done.
I will be heading in a direction similar to this one for this year:
I've got a bid in for some ZG 240Z flares right now, and I'm actively shopping for a small IMSA 3-piece spoiler. I'm also going to be keeping the IMSA air dam and reusing it for my car since it's pretty much irreplaceable in this area.
UPDATED Chassis Goals
- Install 240Z (or equivalent, universal possibly) fender flares onto the red car
- Small IMSA-style 3-piece wing for the rear
- Repair all body damage on the car, back to flawless factory condition
- New door and window seals from Mazda to get that satisfying "thump" door noise of a new car
- Sand, fill and paint prep for respray after kit installation in RH "Sunrise Red" FB paint code
- Add sound deadener to the interior to keep the road noise down and provide that more exotic-feeling quiet ride
- Clean up the interior to better-than-new condition with GSL-SE seats, new sound system, aftermarket gauges and some other personal touches
UPDATED Drivetrain Goals
- Swap the GSL-SE suspension over from the black car to the red car, front and rear
- Get the Epsilon 3-piece wheels redone with a brushed-aluminum powder-coated-colored center and polished lips
- Put the S4 TII engine into the red car
- Redo the wiring harness to my liking, making it a very clean-looking and fully-functional wiring installation
- S4 TII transmission, FB shifter location modification with a custom FB driveshaft (just ask Mazdatrix to put a TII yoke on an FB shaft, easy to do)
- Front mount intercooler and cold air intake
- Try to push at least 200hp to the rear wheels, but I'm aiming for around 250rwhp or more (that can only be accomplished with some good mods though since the S4 TII stock engine is at 182hp)
- Rtek 2.1 engine management system with the Bluetooth serial adapter to allow for my own tuning
- Full 3" exhaust from the downpipe back (probably an eBay downpipe and I'll fab the rest)
Tentative First Drive Date - May 1st
02-17-15, 11:16 PM
#37
I know I will be, but that's how I like it  Already about to pull this black turd out of the garage and pull in the red car to start the suspension work. Then it'll be engine/trans/wiring harness swap after that.
Yeah, I've always been a fan but never had a reason to run them (aka - the right wheels) and I'm glad that I have a solid reason to try them out now. They should look good if I can do them right the first time, I'll learn a lot installing them for sure!
I spent my afternoon/evening accomplishing the following:
Engine out of the black car and on the ground, about to split the engine from the transmission.

That is one bare engine bay now...

Engine on the stand with the new adapter, I can say that I'm pleasantly surprised at how well the adapter fits the front iron. Very glad that I purchased it since it made mounting much easier than the janky way that I was doing it before. I know certain people *cough* Jeff *cough* who can mount them like a pro using just the arms from the stand, but since I already had this at home I figured I better start using it.
That stupid front pulley bolt is really stuck on this motor though, so it's cocked back one notch and has a pool of WD40 sitting in there. I think I'm gonna have to finally shop for a torch now to get this one off by applying heat but I really don't want to do that...it's by far the hardest one I've come across to date though. I have those AC Delco chain-link Vise-Grips from AutoZone that have worked wonders on every other one I've had to take off before. It's just that this one isn't wanting to budge at all right now. Ah well, I'll get it eventually.
I know that I have the driveshaft waiting at home for me that I'll go pick up this weekend, and maybe my new vanity plates are there too (I had to since all the cool kids are doing them nowadays *cough* Nick *cough*). Ordered the full polyurethane kit from Energy Suspension tonight so that will be installed while I'm swapping the suspension from the black car onto the red car.
So it'll have:
Already about to pull this black turd out of the garage and pull in the red car to start the suspension work. Then it'll be engine/trans/wiring harness swap after that.Yeah, I've always been a fan but never had a reason to run them (aka - the right wheels) and I'm glad that I have a solid reason to try them out now. They should look good if I can do them right the first time, I'll learn a lot installing them for sure!
I spent my afternoon/evening accomplishing the following:
Engine out of the black car and on the ground, about to split the engine from the transmission.

That is one bare engine bay now...

Engine on the stand with the new adapter, I can say that I'm pleasantly surprised at how well the adapter fits the front iron. Very glad that I purchased it since it made mounting much easier than the janky way that I was doing it before. I know certain people *cough* Jeff *cough* who can mount them like a pro using just the arms from the stand, but since I already had this at home I figured I better start using it.

That stupid front pulley bolt is really stuck on this motor though, so it's cocked back one notch and has a pool of WD40 sitting in there. I think I'm gonna have to finally shop for a torch now to get this one off by applying heat but I really don't want to do that...it's by far the hardest one I've come across to date though. I have those AC Delco chain-link Vise-Grips from AutoZone that have worked wonders on every other one I've had to take off before. It's just that this one isn't wanting to budge at all right now. Ah well, I'll get it eventually.
I know that I have the driveshaft waiting at home for me that I'll go pick up this weekend, and maybe my new vanity plates are there too (I had to since all the cool kids are doing them nowadays *cough* Nick *cough*). Ordered the full polyurethane kit from Energy Suspension tonight so that will be installed while I'm swapping the suspension from the black car onto the red car.
So it'll have:
- All new poly bushings
- Racing Beat springs
- New KYB shocks and struts
- Re-pack the front wheel bearings
- New front wheel seals
- New rear wheel bearings
- New rear wheel seals
 02-18-15, 11:12 AM
#41
Moderator
iTrader: (3)
Join Date: Mar 2001
Location: https://www2.mazda.com/en/100th/
Posts: 30,778
Received 2,563 Likes
on
1,823 Posts
if i may make a couple of suggestions, i think i would try the epsilons under the stock fenders before you go and put flares on it, you'd be surprised what can fit under the stock fenders.
the second, check out Fungus Mungus's flares look like, he didn't get the 240z flares, and the ones he got actually fit the car, they look great too. we haven't seen too many pics of the car yet, as its not quite done, but he's raised the bar for the 1st gen crowd.
third, 250hp is pretty easy in a 13BT. many ways to do it. best way is some BNR type turbo, with a stock hotside and larger compressor. 3" exhaust. at about 10-12psi. then you will probably need more fuel, lots of ways to do that....
02-20-15, 12:09 AM
#42

Next on the list is a wideband (probably Innovate MTX-L since it's the most compatible with an Adaptronic ECU and I like the digital numerical readout with the mechanical-style rising gauge action it has going on), I'm working out my FMOC issue with a forum member right now who's being awesome (package was lost by USPS, sucky for both of us), downpipe and exhaust piping, FMIC with BOV, pieces to make a custom CAI, among many other things. I'll make a working list later when I'm feeling more awake.
Got the TII front yoke/FB driveshaft and the emissions block off plates home.

New toy today, gonna clean up some dirty old bolts for the fun of it. This will also be what I use to clean the bolts for my wheels since I'm too lazy to do it by hand.

Lawd Jeezus it's a fire! Just kidding, this was one stuck front pulley bolt!

Pretty cool picture, I really liked this one. The large flame is from the WD-40 that's been sitting in there for a while now.

Got the turd out! With the help of the new air compressor and the 1/2" Snap-On impact gun it wound right out. It wouldn't do it before being heated, good trick to learn!

My 3rd 12a torn down, making progress! Now I have no more engines to tear down around the house. I had to do this to free up space for the 13bt to finally come out of the back room.

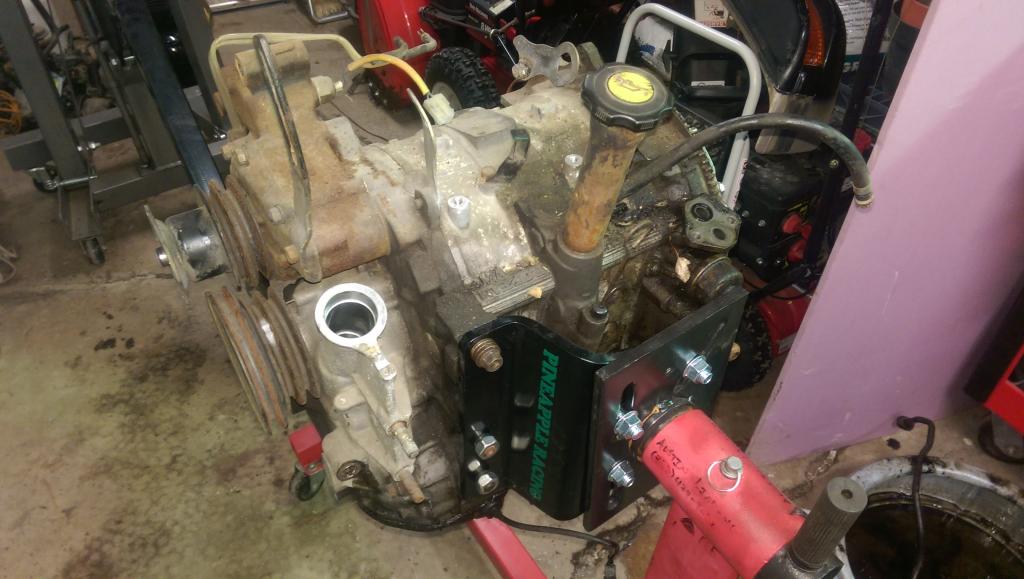
JDM S4 13bt finally made it to the stand!

Well that's a weird looking motor swap...compressed air! Got a 21gal instead of the 8gal I had for a few weeks. I can say I'm already very impressed with it and I'm glad I made the swap. I know 25gal is recommended for painting but I think I'll be alright with the 21. If not then I'll just swap my dad for his 30gal for a few weeks.

That's all she wrote for tonight folks, I've got my 3rd test in 3 days tomorrow - I'm exhausted!
02-20-15, 12:48 AM
#43
Jeff20B to the rescue.
There is a way to make your own presilencers at home! https://www.rx7club.com/1st-gen-non-...ncers-1035866/
The thread mostly talks about how to make something similar to the RB design in 2" core with 4" shell but does it with a twist using slightly different materails.
What you want to do is make one with a 3" perforated core and then whatever size shell will fit under the car. You also don't have to stick with round. I'd go oval if I were you. More muffling with decent ground clearance.
Get perforated tubing, pot scrubbers and SS wool from the sellers mentioned in the thread. As for the oval shell, I'd recommend getting a round tube and cutting it lengthwise, then adding a couple inches of flat and there's your oval.
02-20-15, 10:48 AM
#44
Moderator
iTrader: (3)
Join Date: Mar 2001
Location: https://www2.mazda.com/en/100th/
Posts: 30,778
Received 2,563 Likes
on
1,823 Posts
Believe it or not, I've got one good S4 turbo here and I'm considering getting a JDM S5 turbo tomorrow that's been used up to 13psi in a local guy's build. I'm already planning on going with a full 3" exhaust from the downpipe back, nothing smaller than 3" the whole way. And maybe only one Magnaflow muffler at the end with no presilencer of any sort, but I haven't decided on that yet. Isn't there a way to make your own presilencer at home? I believe I saw a thread about it on here...I'll do a search in a minute. I actually have an Rtek 2.1 on the way from a forum member and the Bluetooth serial adapter from Rtek in order to tune with my phone or tablet. That's how I'll get more fuel to the engine safely, and I'll be able to tune the engine myself as well.
if you have the $$ i like to put this in the middle, REV TII Presilencer for 87-91 RX-7 TURBO II - Racing Beat as it is quiet, and then the rear muffler just provides the tone
02-20-15, 05:04 PM
#46
I applaud the decision to put the body kit on hold for a bit. That's a hard thing to do. At least you're honest with yourself, I think that's what makes a successful build.
When do you plan on doing poly bushings? Do you have a press? I only ask because I need to do mine too but I don't have a press...yet
When do you plan on doing poly bushings? Do you have a press? I only ask because I need to do mine too but I don't have a press...yet
02-21-15, 12:03 AM
#47
Jeff20B to the rescue.
There is a way to make your own presilencers at home! https://www.rx7club.com/1st-gen-non-...ncers-1035866/
The thread mostly talks about how to make something similar to the RB design in 2" core with 4" shell but does it with a twist using slightly different materails.
What you want to do is make one with a 3" perforated core and then whatever size shell will fit under the car. You also don't have to stick with round. I'd go oval if I were you. More muffling with decent ground clearance.
Get perforated tubing, pot scrubbers and SS wool from the sellers mentioned in the thread. As for the oval shell, I'd recommend getting a round tube and cutting it lengthwise, then adding a couple inches of flat and there's your oval
the biggest hurdle to power is the teeny stock compressor on the stock turbo. putting a bigger compressor on, adds what feels like 50hp. and secondly the downpipe wants to be big, 3", but then if you like it can go down to 2.5", and or adding another muffler doesn't hurt anything.
if you have the $$ i like to put this in the middle, REV TII Presilencer for 87-91 RX-7 TURBO II - Racing Beat as it is quiet, and then the rear muffler just provides the tone
I applaud the decision to put the body kit on hold for a bit. That's a hard thing to do. At least you're honest with yourself, I think that's what makes a successful build.
When do you plan on doing poly bushings? Do you have a press? I only ask because I need to do mine too but I don't have a press...yet
When do you plan on doing poly bushings? Do you have a press? I only ask because I need to do mine too but I don't have a press...yet
The poly bushings I bought don't need a press of any sort to be installed, I could just push them on with my hands. They're not super hard like some of them can be, and they come with some installation lube that I use plenty of in order to get them to go in straight and easily. And to get the old ones out I just light em on fire
So my day went like a rollercoaster of ups and downs.
I pressed on the apex seals through the exhaust ports with my fingers and, of the 6, only one was free. Well, after hours upon hours of soaking the rotors and housings in MMO I was able to loosen up all 6 apex seals. So that's extremely encouraging. I'll let them keep sitting and soaking until it goes in the car (rotating the engine periodically and getting all the seals of course).
Full set of polyurethane bushings arrived the other day. I got the black set (graphite lube impregnated) in the full kit that will do the entire car from front to back.

View inside the rear rotor housing exhaust port.

View inside the front rotor housing exhaust port.

Underneath the intake manifold...notice the plugged coolant passage on the front of the engine.

Nasty rust buildup in that front coolant passage. It's the one on the intake manifold where the coolant is just at a blockage so I'm sure that's why there's always such a buildup of nastiness there.

The oil pan actually looked really good though, I'm not complaining about it at all.

Oil pan wasn't full of gunk or debris either, so that's a good sign.

Before, with the super annoying metering oil pump injectors and their respective lines...

...and after, once I blocked off the oil injectors. This engine will be running premix obviously! I wanted this one to be as simple as possible.

Just a few minutes with the wire wheel on the drill can work wonders on a dirty engine!

The left side is obviously not cleaned, the right was wire wheeled for just a few seconds. This setup should look really good once I can clean up the whole engine.
 02-21-15, 01:06 AM
#48
$118 - Universal Presilencer, 3in ID
$95 - Universal Cylinder Presilencer 6" OD with 3" ID
I'm really tempted to go with the $95 one since it's $30 off right now and is a nice, smaller, concise package that would be easy to stuff under the car. I'm also planning on running the stock heat shields in this car so it would help to make sure I can fit the whole system under the car going with a smaller presilencer.
02-21-15, 07:15 AM
#49
The poly bushings I bought don't need a press of any sort to be installed, I could just push them on with my hands. They're not super hard like some of them can be, and they come with some installation lube that I use plenty of in order to get them to go in straight and easily. And to get the old ones out I just light em on fire
Full set of polyurethane bushings arrived the other day. I got the black set (graphite lube impregnated) in the full kit that will do the entire car from front to back.

Full set of polyurethane bushings arrived the other day. I got the black set (graphite lube impregnated) in the full kit that will do the entire car from front to back.
Now that's interesting. I haven't seen the OMP (MOP?) lines into the housings directly before. I thought they went from the OMP to the carburetor... Or does this engine have fuel injection? Sorry if I'm playing catch-up. Love the build and your determination!