SCCA Super Touring U Build
 03-24-17, 03:15 PM
#376
spoon!
 03-25-17, 09:26 PM
#378
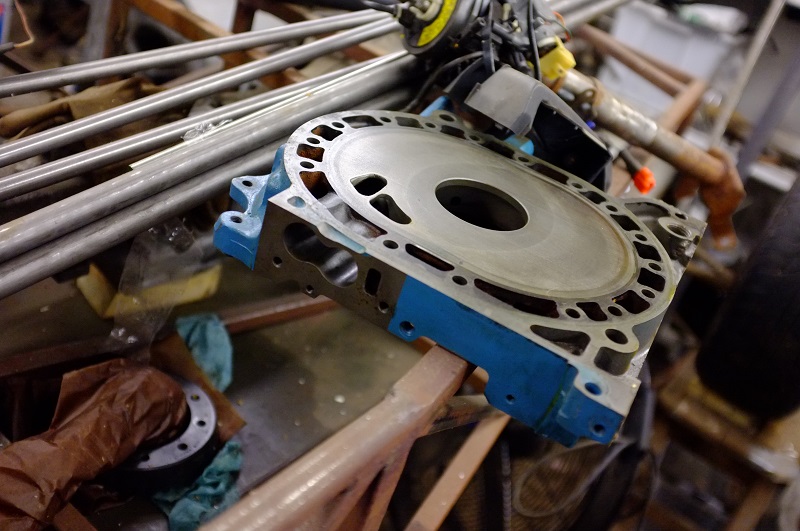
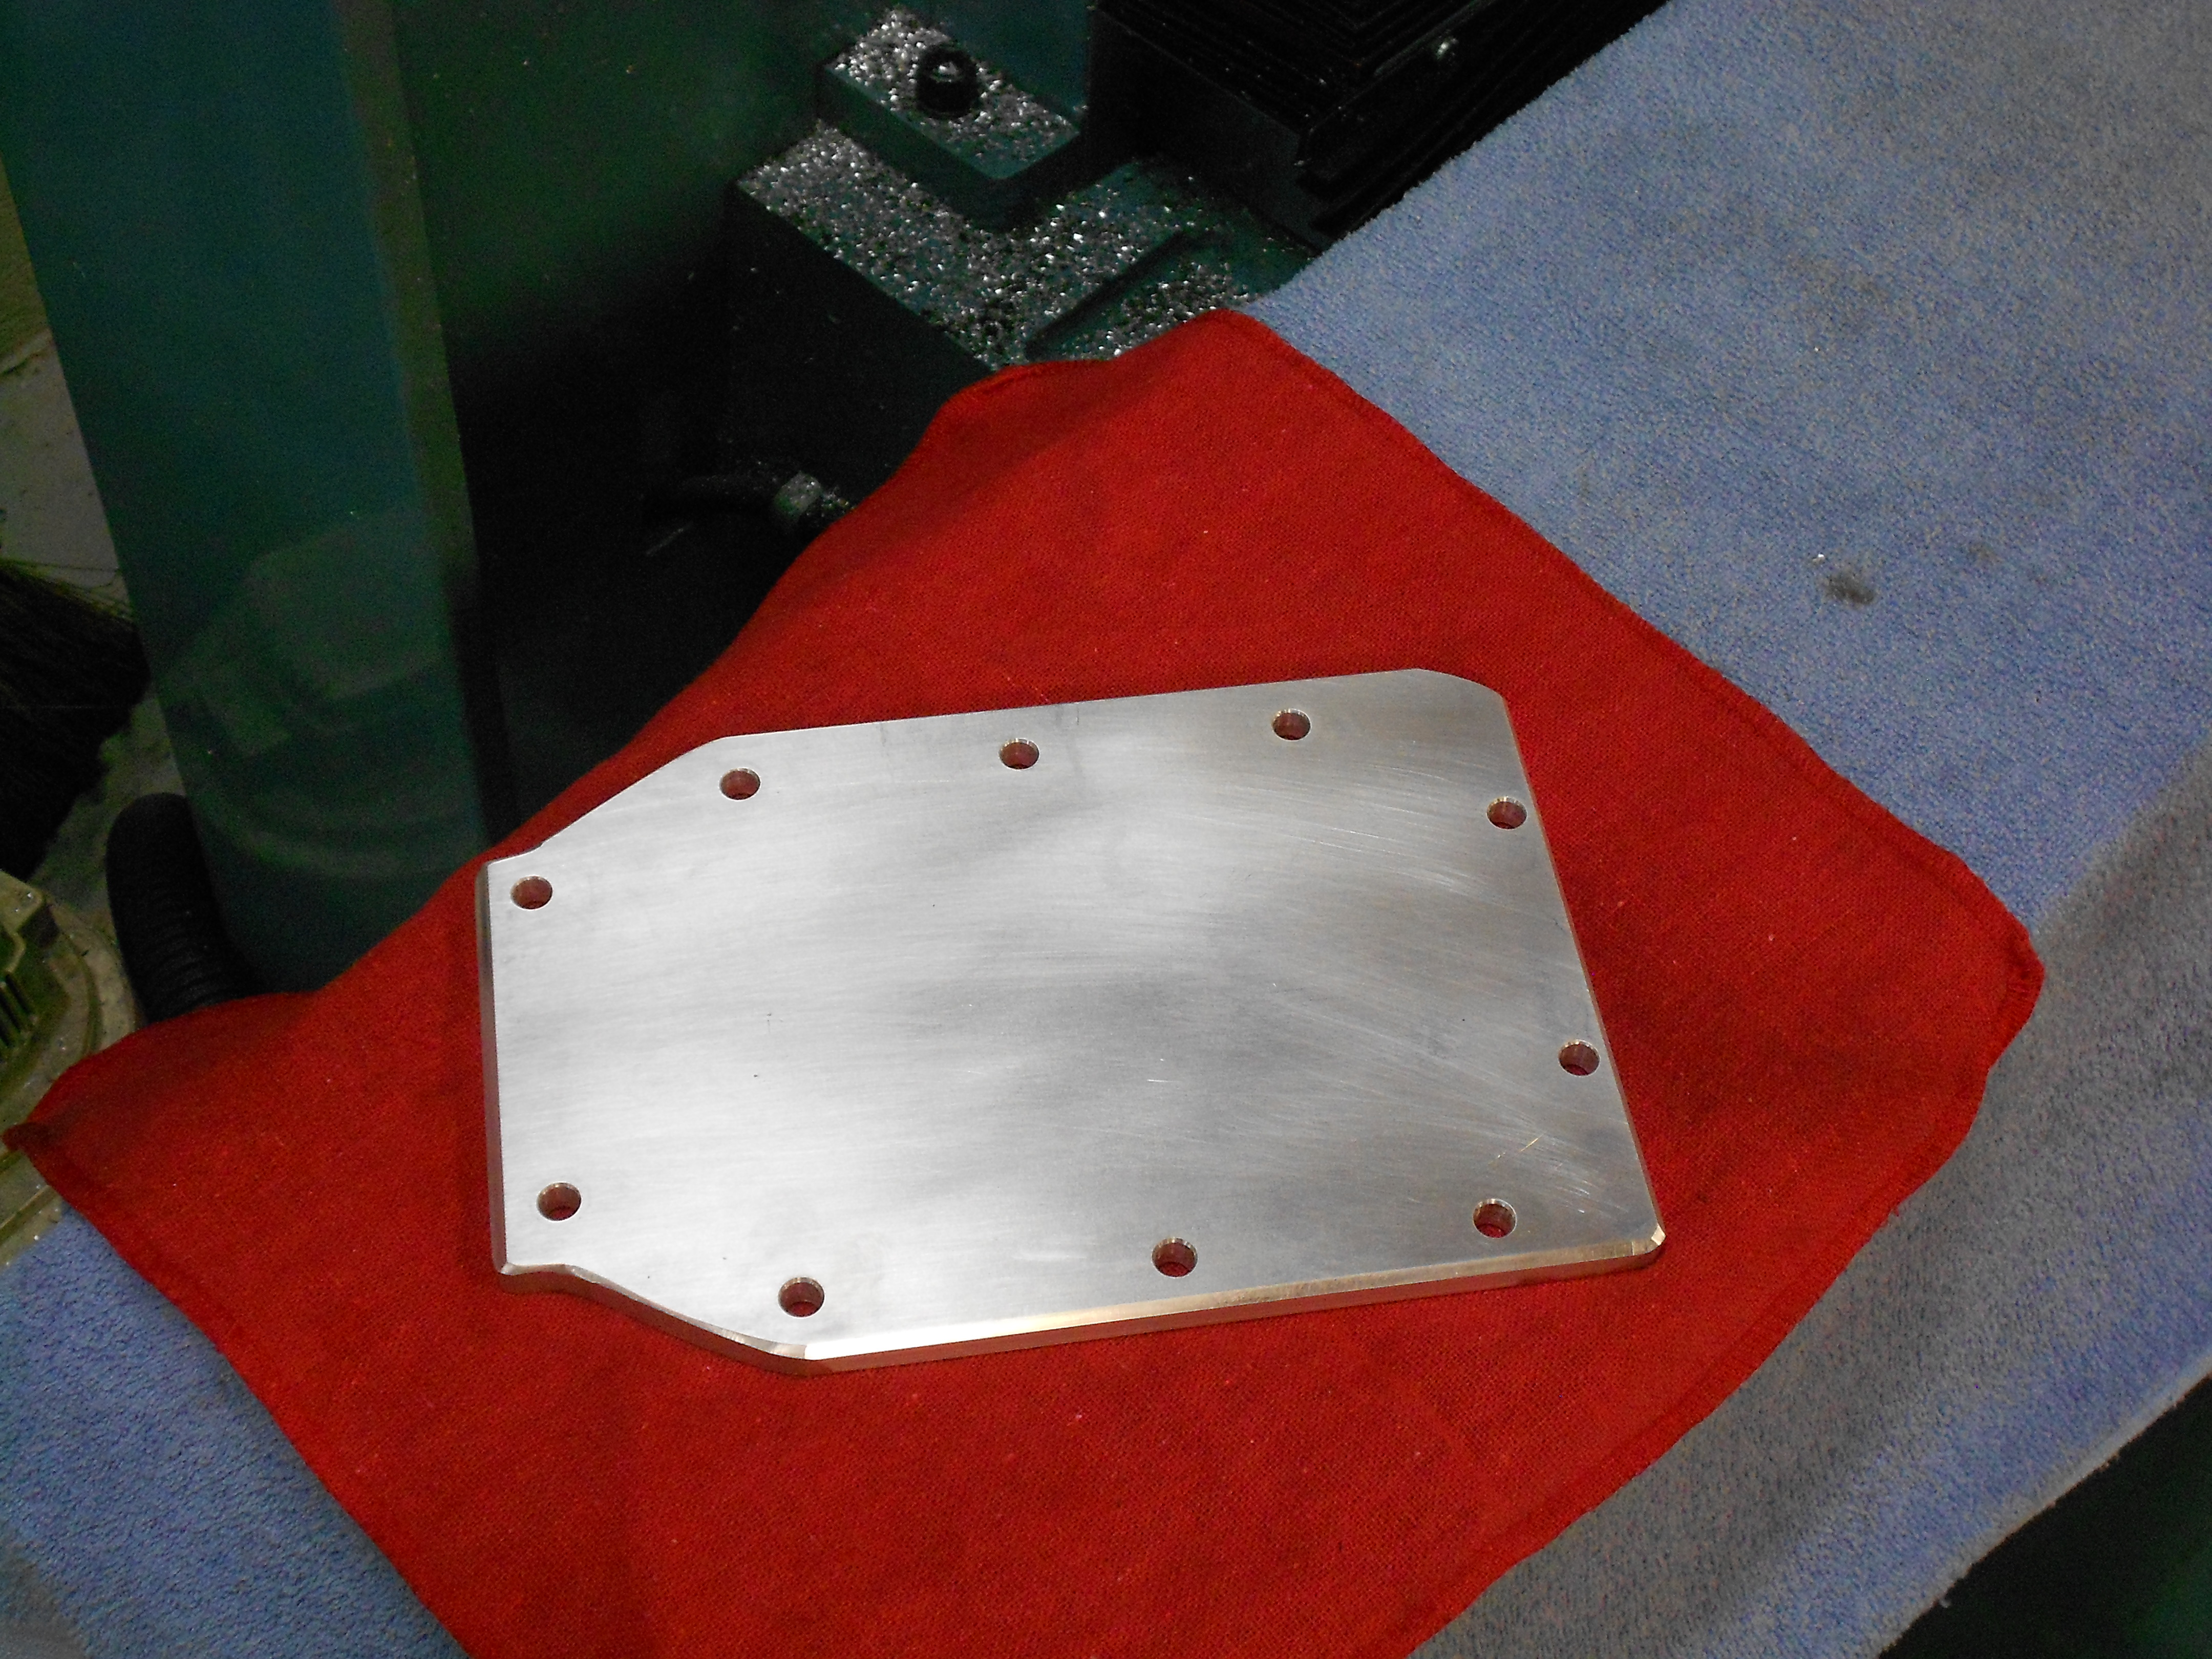
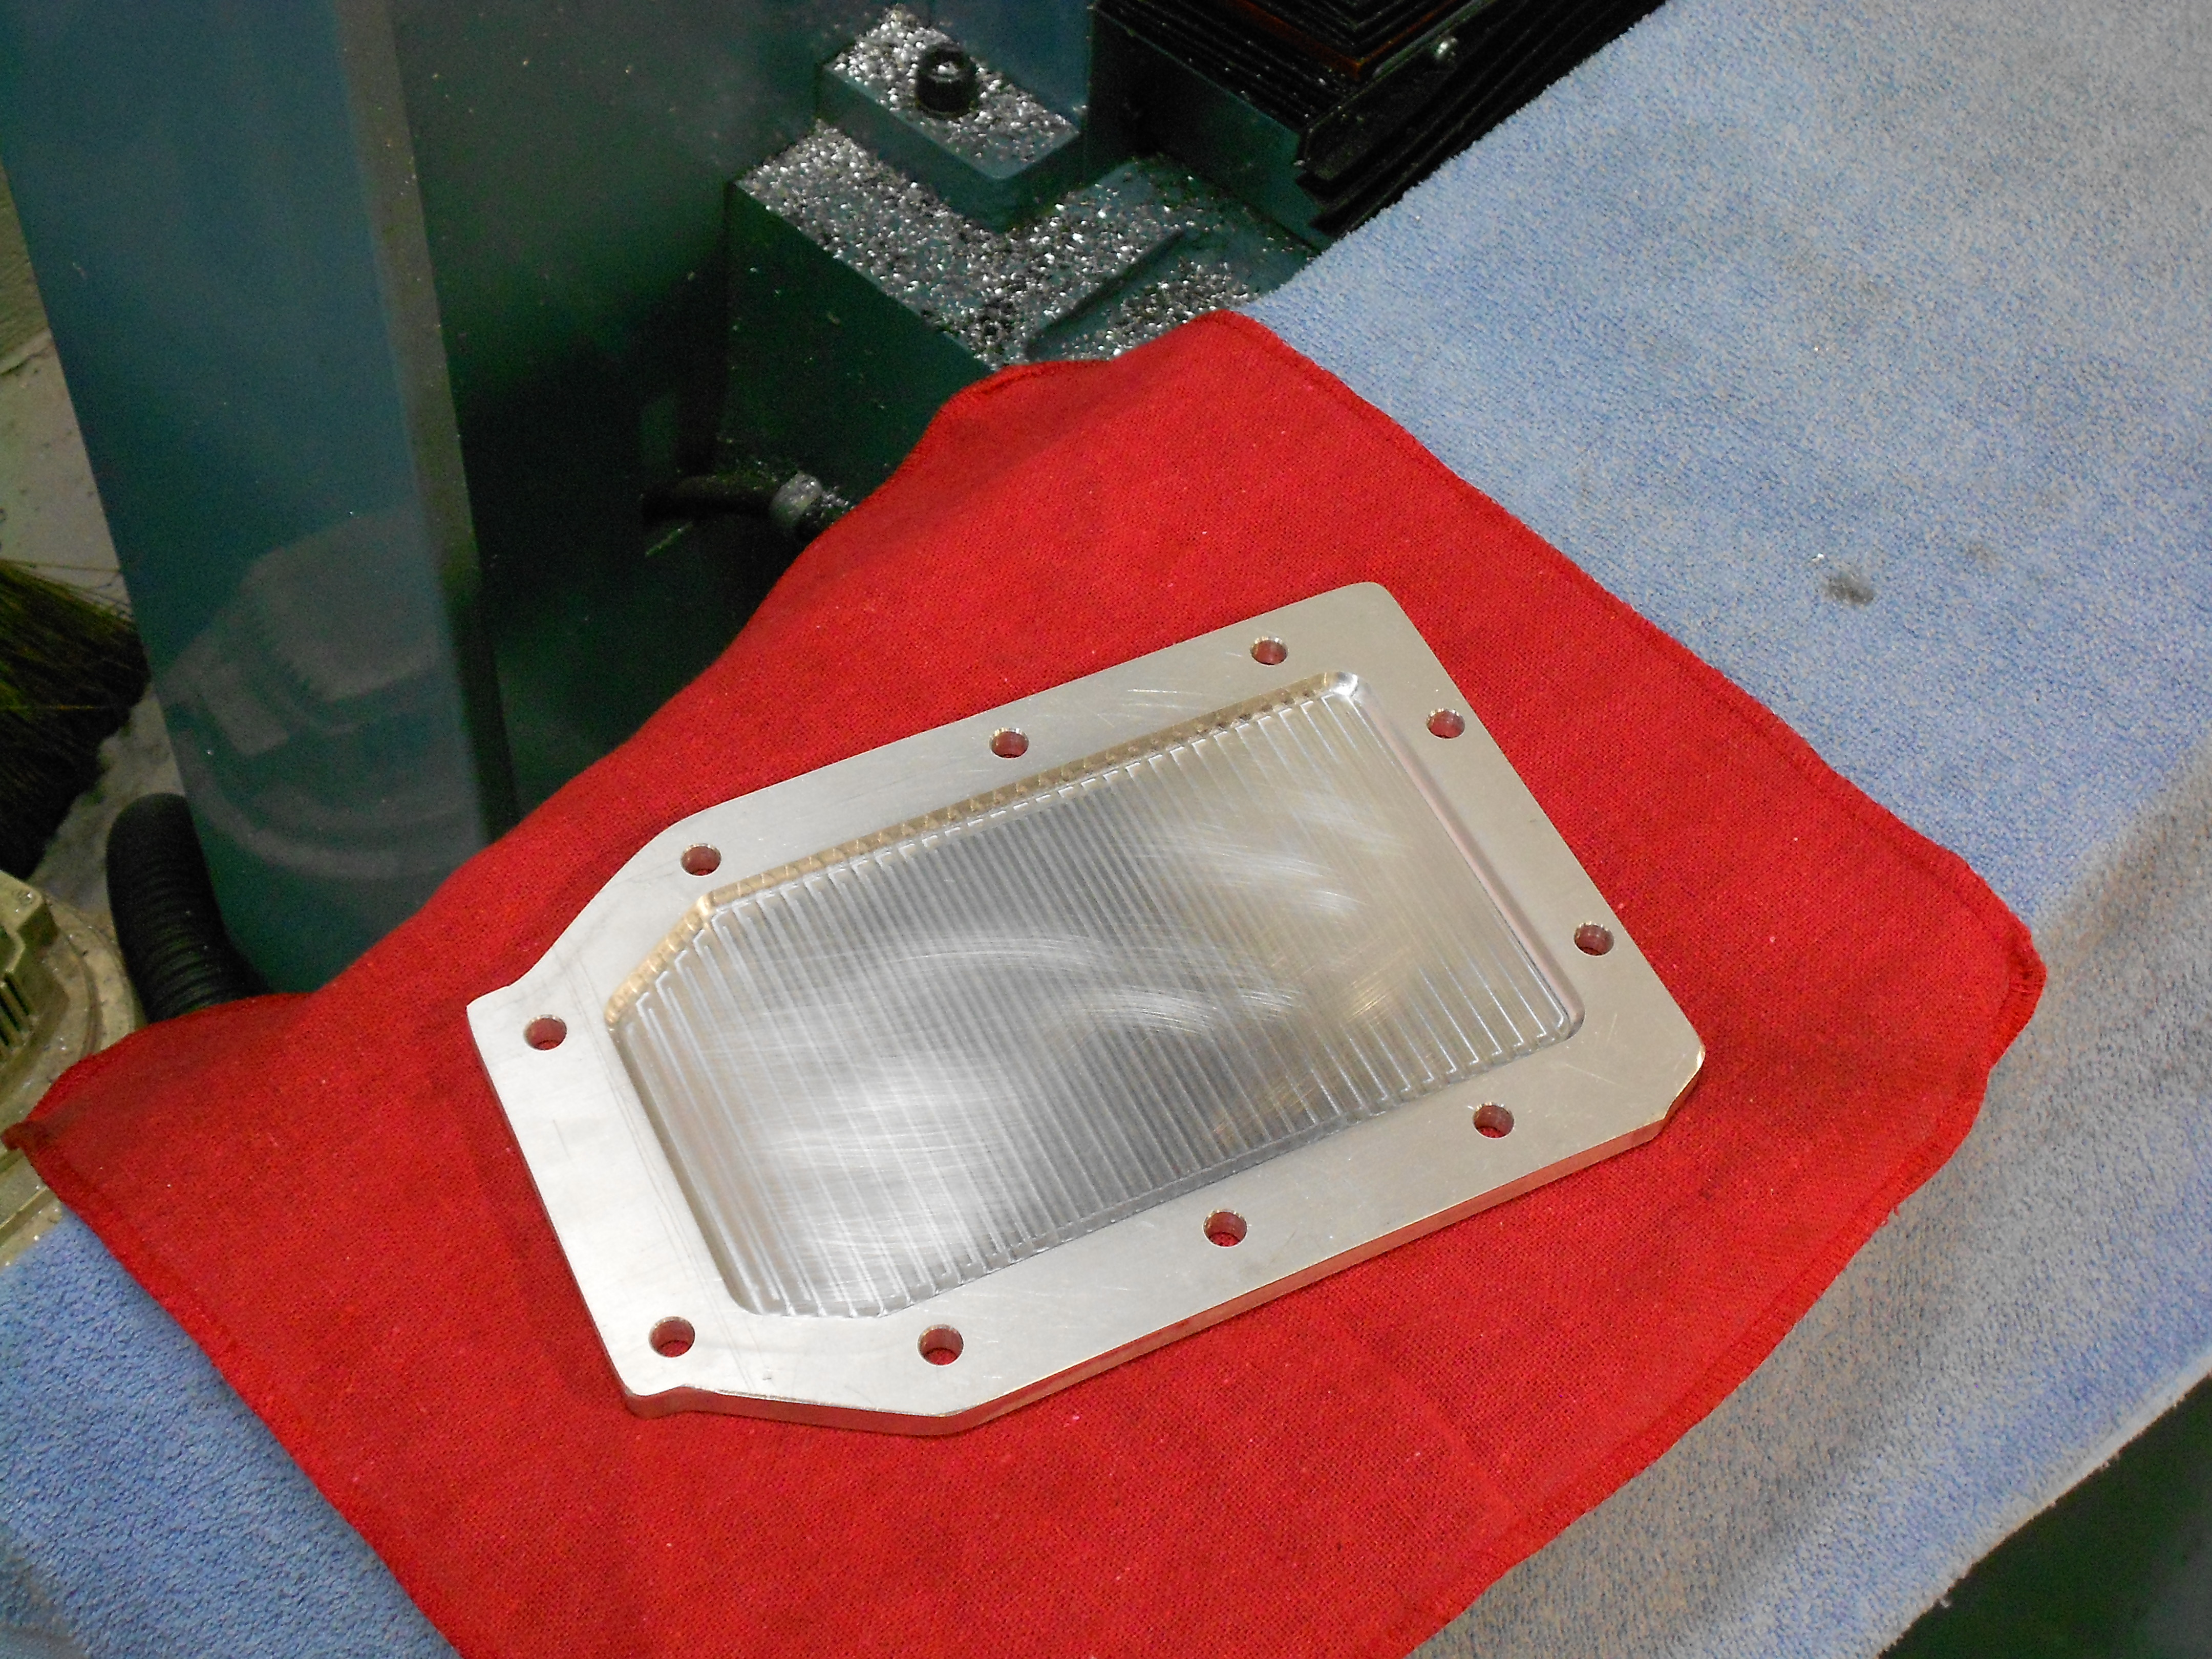
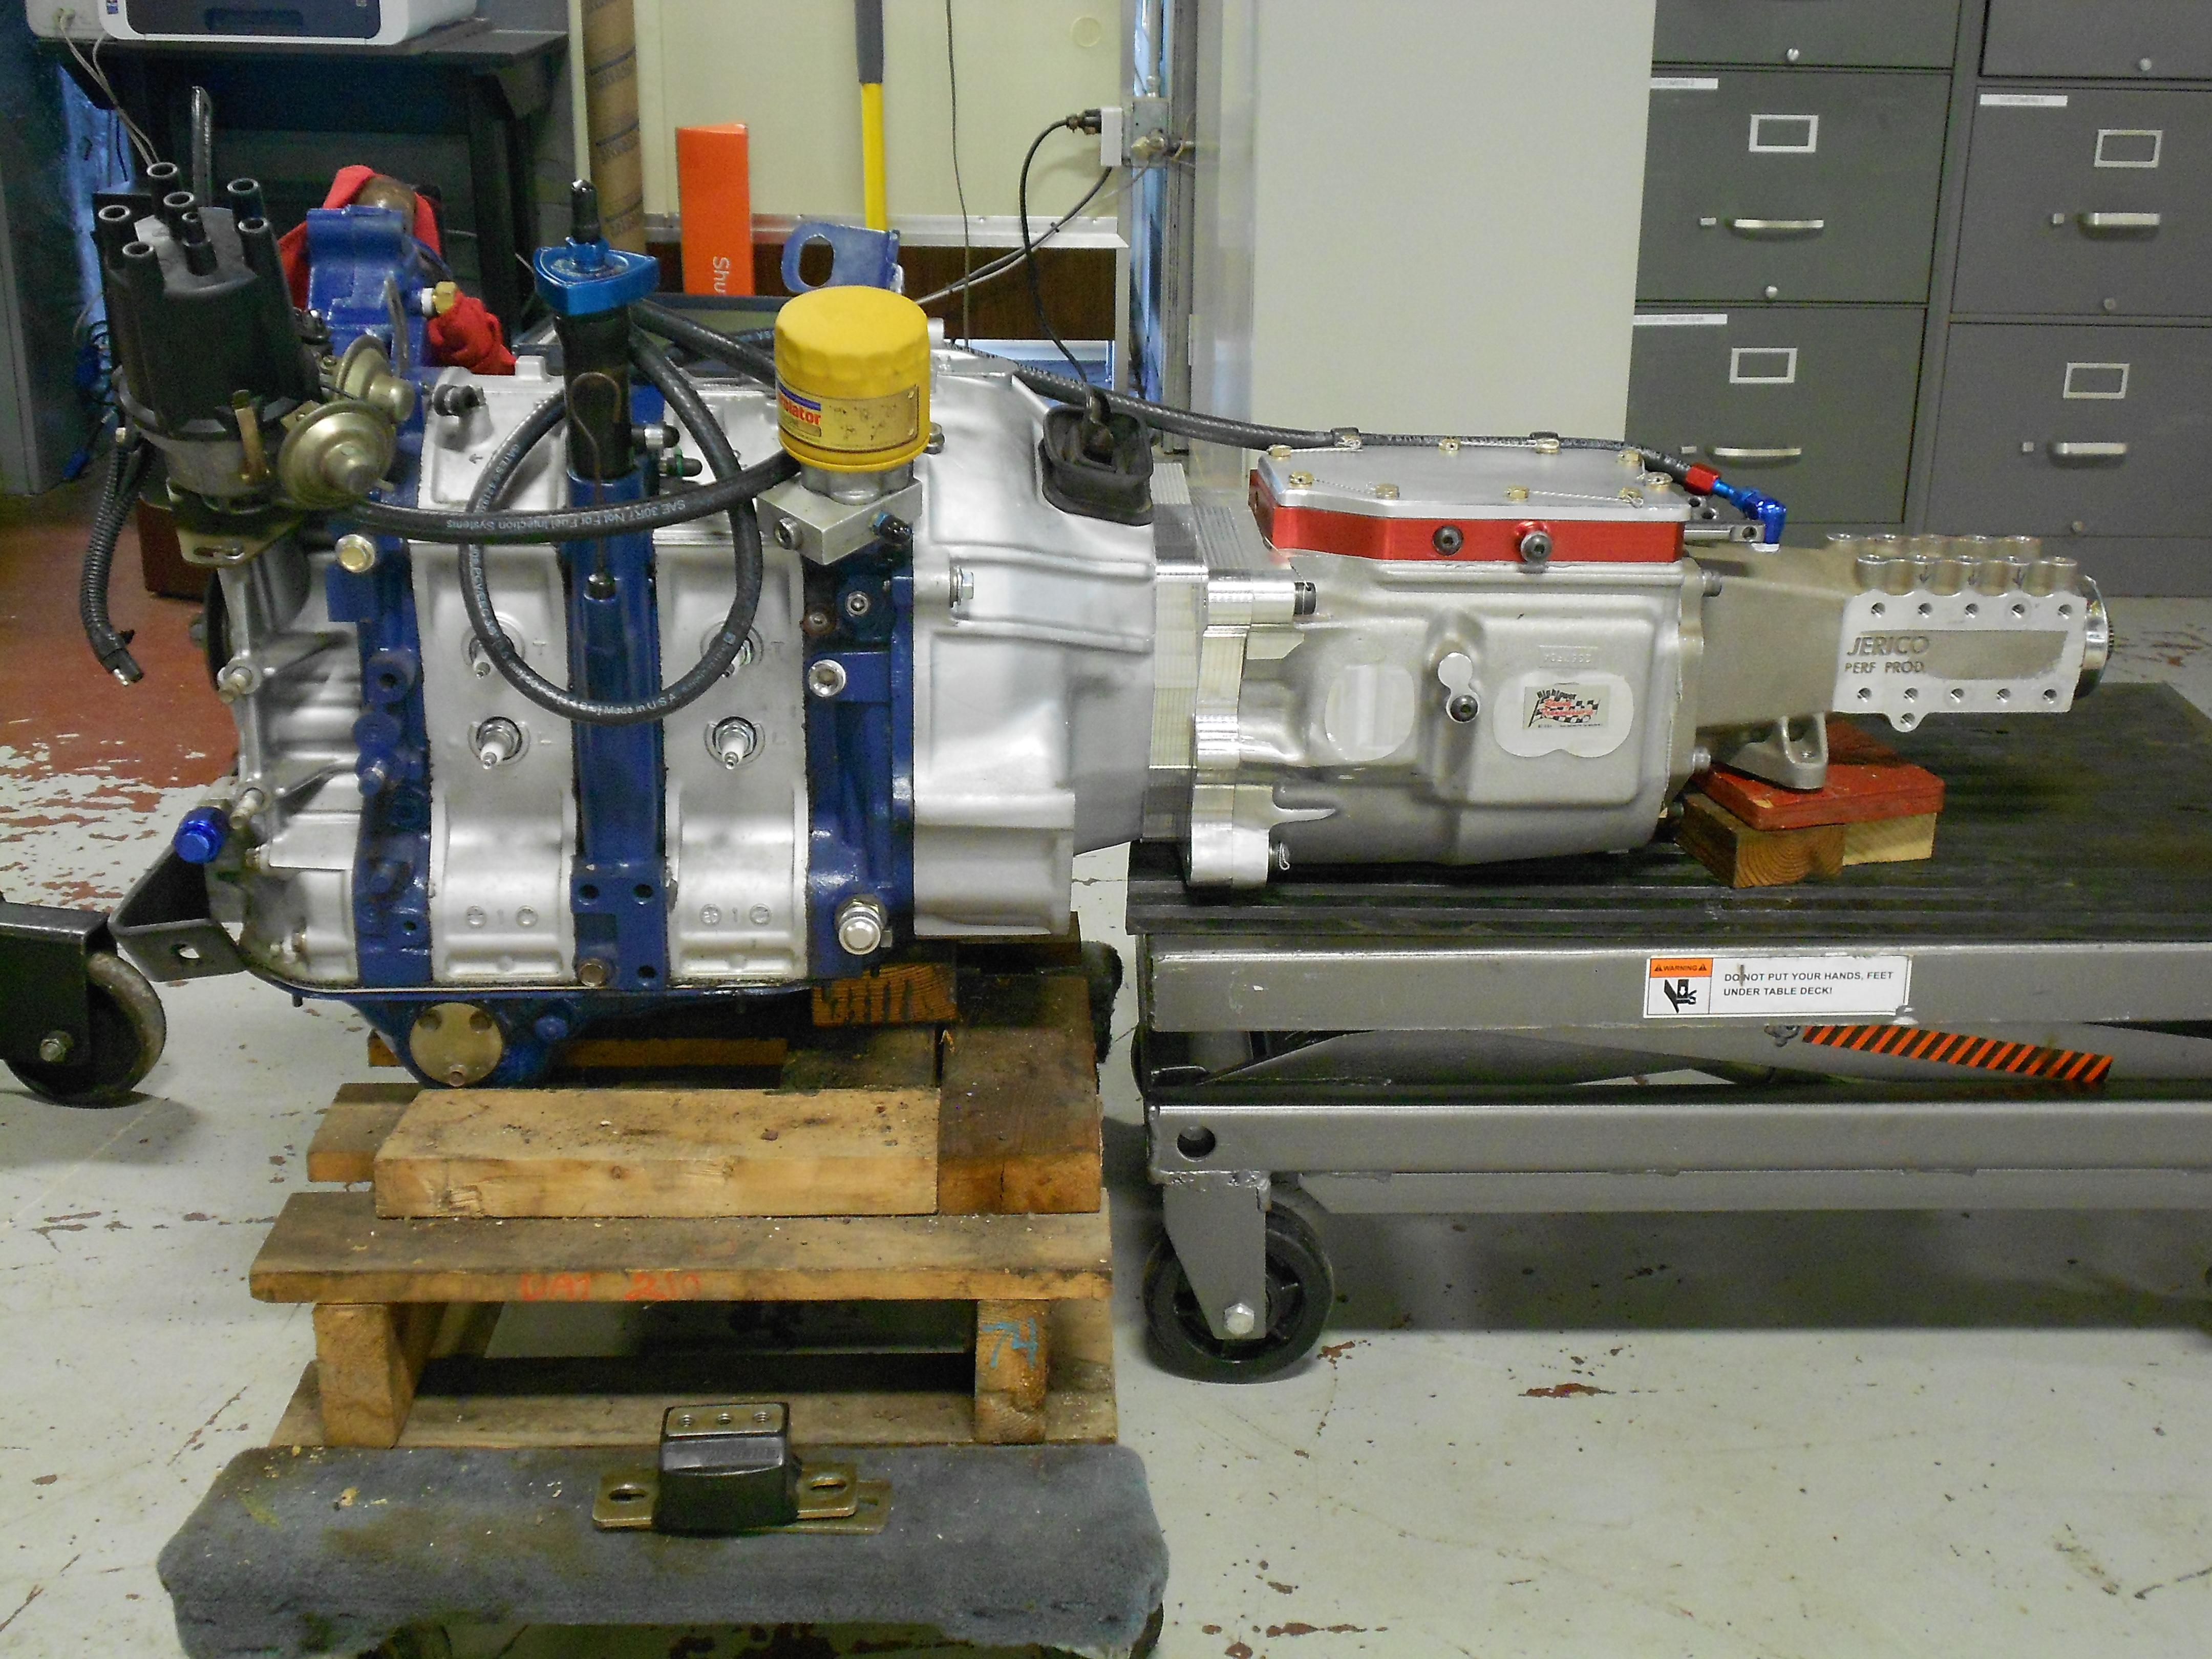
So a few more detail items and the engine/trans were put back in. The finned top cover that I have will not clear the top of the tunnel in my car so I had a new one made by David Long at www.santafegarage.com It started as a 3/8" thick piece of 6061 that David drilled and shaped fit the transmission. He recessed the inside .200" for shift fork clearance.
Finalized everything else on the transmission and mounted it to the engine. Then put the engine/transmission in the car and set output shaft height and location to match the Mazda transmission I took out. Next up is to modify the factory transmission cross member.
Outside of top cover
Inside of top cover
Installed and cover bolts safety wired
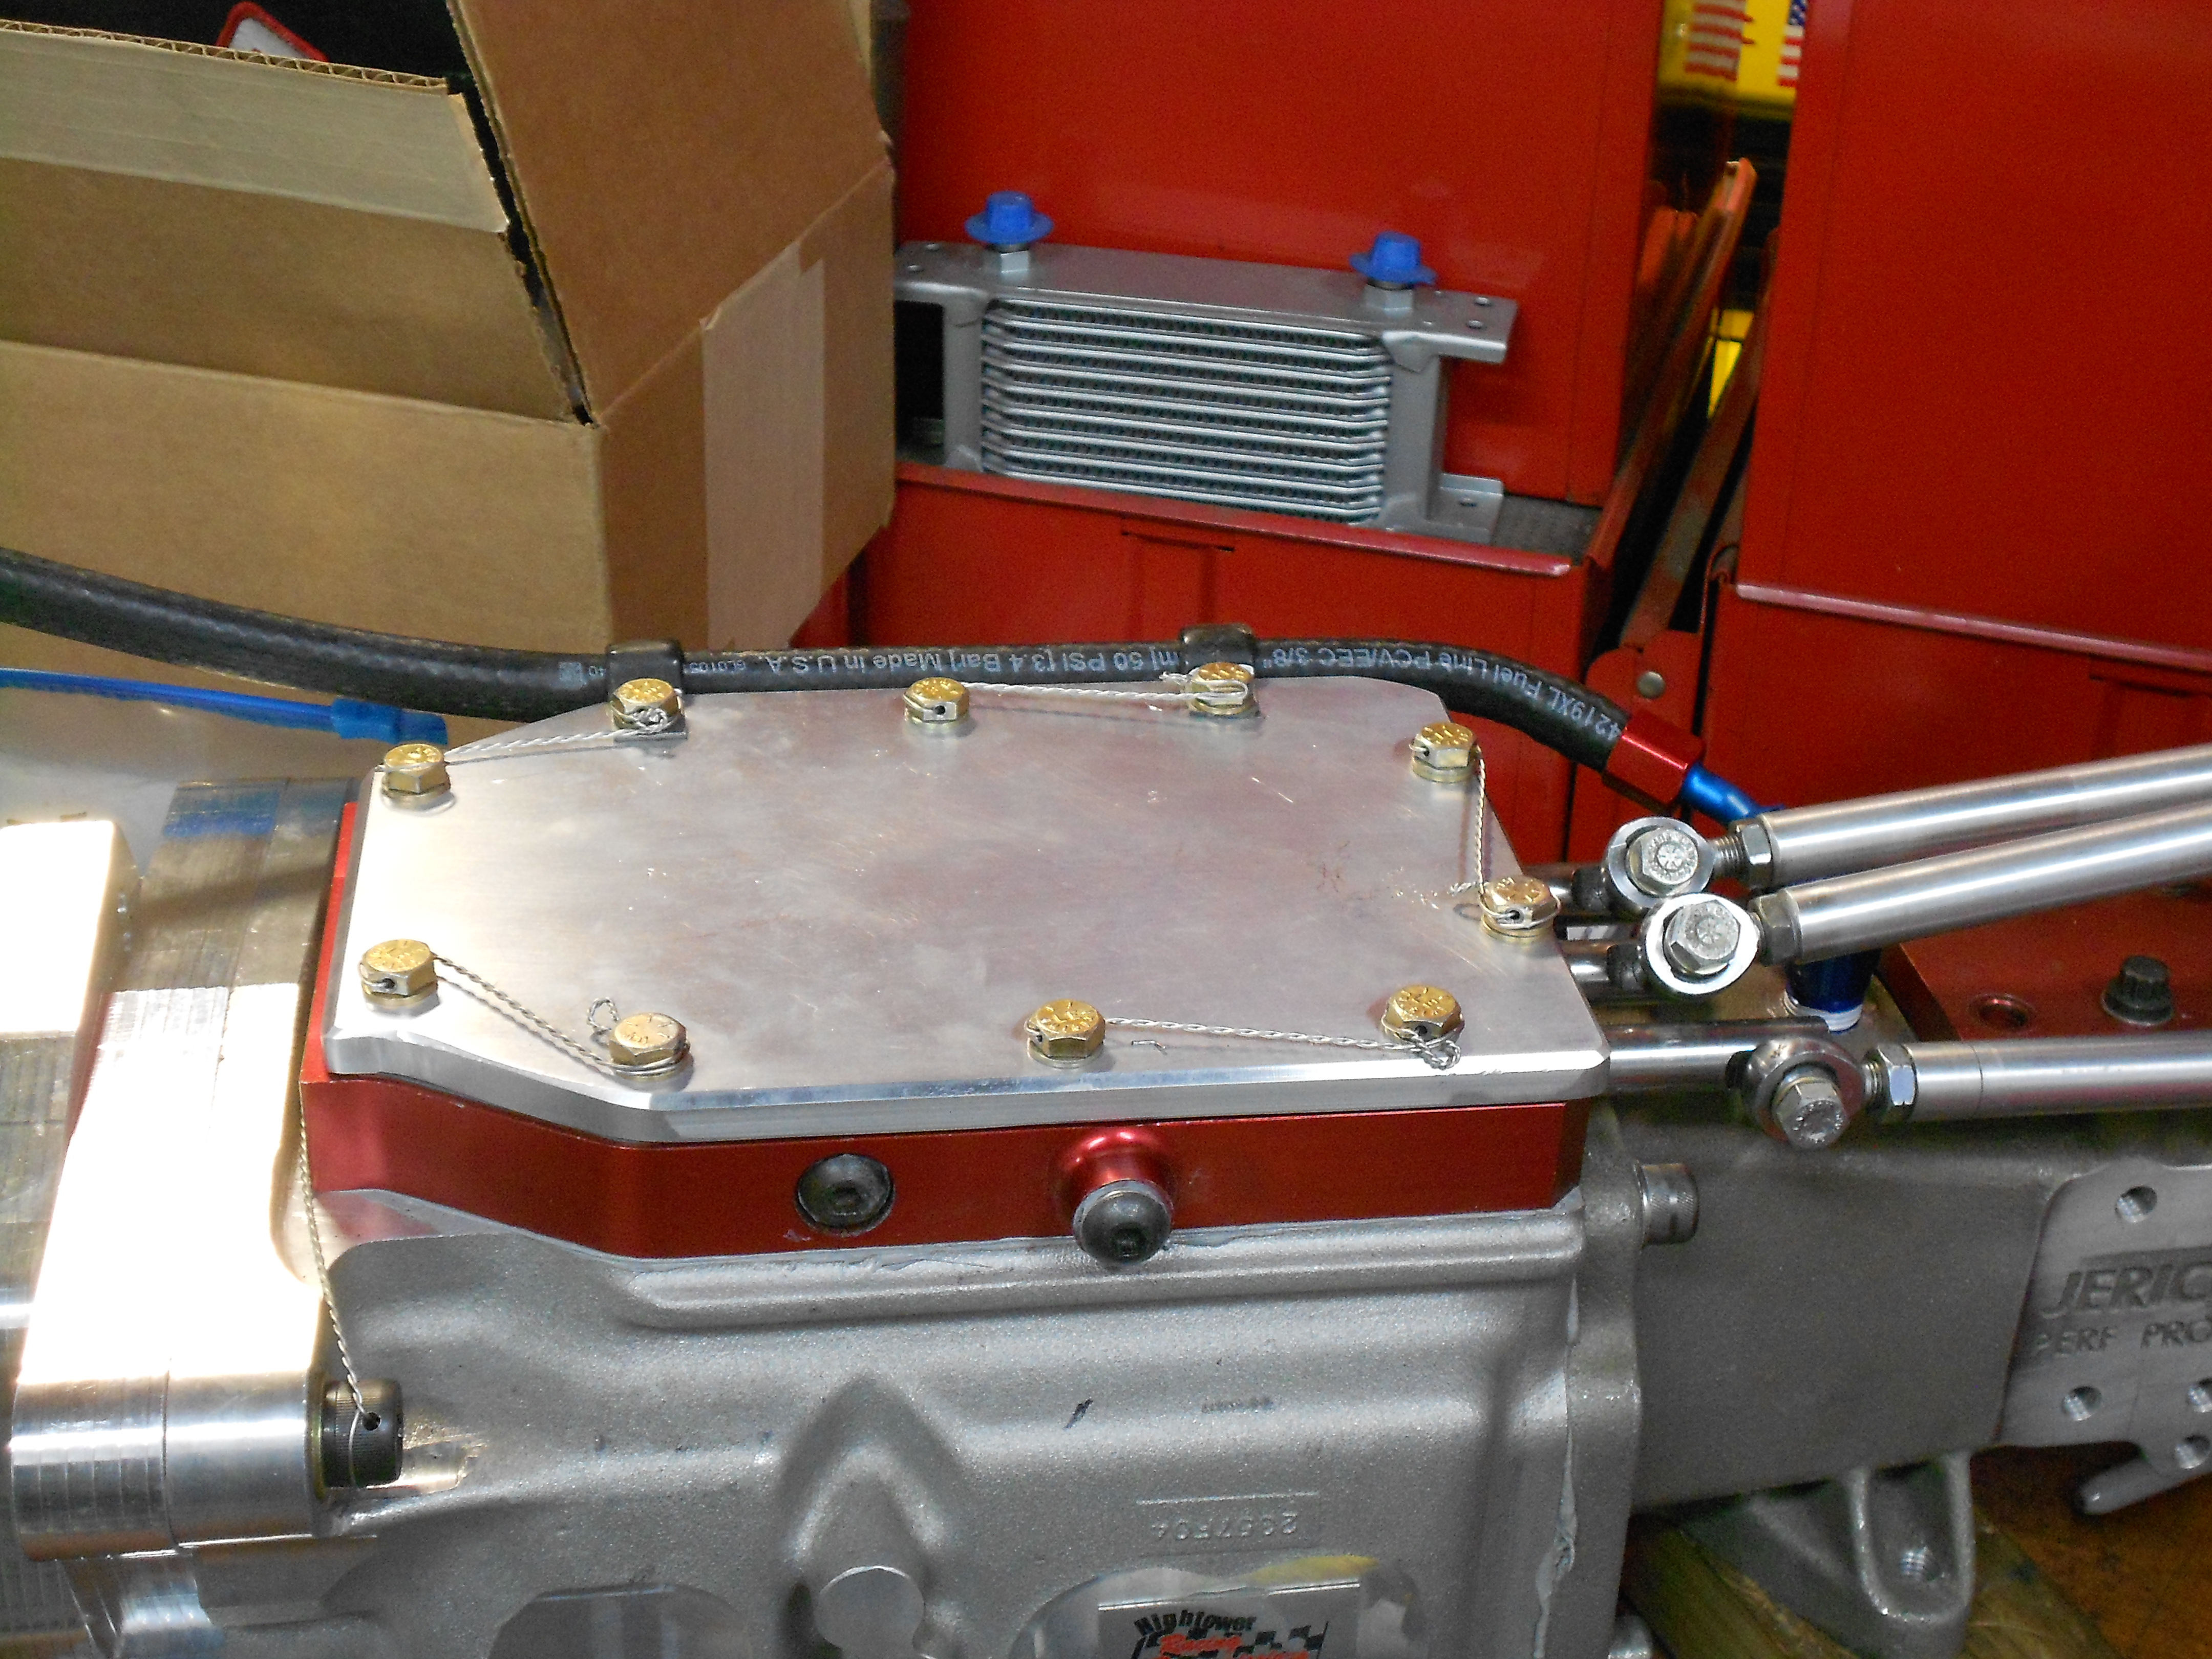
Ready to install in the car
Finalized everything else on the transmission and mounted it to the engine. Then put the engine/transmission in the car and set output shaft height and location to match the Mazda transmission I took out. Next up is to modify the factory transmission cross member.
Outside of top cover

Inside of top cover

Installed and cover bolts safety wired

Ready to install in the car
 03-26-17, 05:08 PM
#379
Banned. I got OWNED!!!

Wow, Scott. That came together SO nicely. They look like an incredible pair!
 04-03-17, 08:15 AM
#386
spoon!
Oh yeah, bit late in the game now (which is to say I don't see it changing anything you're doing) but I was checking the GCR and they added the verbiage "Alternate suspension components including spindle, knuckle, hubs, etc. sourced from the same manufacture are permitted." to the STU regs over the winter. 9.1.4.1.E.7 if you need to look. Also, a weight break for not having ABS slipped in at some point in the last couple months - 9.1.4.N.10 says a 2% weight break for no ABS.
04-03-17, 11:00 AM
#387
Oh yeah, bit late in the game now (which is to say I don't see it changing anything you're doing) but I was checking the GCR and they added the verbiage "Alternate suspension components including spindle, knuckle, hubs, etc. sourced from the same manufacture are permitted." to the STU regs over the winter. 9.1.4.1.E.7 if you need to look. Also, a weight break for not having ABS slipped in at some point in the last couple months - 9.1.4.N.10 says a 2% weight break for no ABS.
The weight break for non-ABS is welcome - puts me at 2254. Right now I am probably 100-125lbs over that with a full tank of gas, cool box full of ice/water and my fat *** in the seat.
04-03-17, 11:35 AM
#388
spoon!
Well yeah, but when has logic ever correlated well with SCCA rulesmakers?  Still, it's nice that it's explicitly spelled out now - it sounds like it would also be legal (now) to do the 626 ball joint (or whatever it was) and FC knuckle swap.
I'm still annoyed by the continued insistence on carburetors in a lot of classes that allow rotaries - I'm really tempted to try to low-production-volume commercially make a DCOE or IDA style throttle body that accepts standard Weber chokes and boosters, just so I can make the argument that it will flow identically to the legal carburetor and try to get it legalized. Or, well, make the argument that SCCA never adequately defines what a carburetor is, but nevermind that.
Still, it's nice that it's explicitly spelled out now - it sounds like it would also be legal (now) to do the 626 ball joint (or whatever it was) and FC knuckle swap.I'm still annoyed by the continued insistence on carburetors in a lot of classes that allow rotaries - I'm really tempted to try to low-production-volume commercially make a DCOE or IDA style throttle body that accepts standard Weber chokes and boosters, just so I can make the argument that it will flow identically to the legal carburetor and try to get it legalized. Or, well, make the argument that SCCA never adequately defines what a carburetor is, but nevermind that.
04-03-17, 10:17 PM
#389
Well yeah, but when has logic ever correlated well with SCCA rulesmakers? Still, it's nice that it's explicitly spelled out now - it sounds like it would also be legal (now) to do the 626 ball joint (or whatever it was) and FC knuckle swap.
I'm still annoyed by the continued insistence on carburetors in a lot of classes that allow rotaries - I'm really tempted to try to low-production-volume commercially make a DCOE or IDA style throttle body that accepts standard Weber chokes and boosters, just so I can make the argument that it will flow identically to the legal carburetor and try to get it legalized. Or, well, make the argument that SCCA never adequately defines what a carburetor is, but nevermind that.
Still, it's nice that it's explicitly spelled out now - it sounds like it would also be legal (now) to do the 626 ball joint (or whatever it was) and FC knuckle swap.I'm still annoyed by the continued insistence on carburetors in a lot of classes that allow rotaries - I'm really tempted to try to low-production-volume commercially make a DCOE or IDA style throttle body that accepts standard Weber chokes and boosters, just so I can make the argument that it will flow identically to the legal carburetor and try to get it legalized. Or, well, make the argument that SCCA never adequately defines what a carburetor is, but nevermind that.
Personally I see being able to use an affordable and proven to be viable alternative to the stock induction a bonus that the piston guys don't have. Also, if they give us some form of aftermarket EFI everyone else would get them. Be careful what you wish for, this stuff already costs too much.

As far as the FC knuckles are concerned, I don't see the benefit of those. With the FB setup I have the ability to lower the car while maintaining geometry. Hard to get what amounts to a 2" drop spindle with an FC knuckle.
Last edited by mustanghammer; 04-03-17 at 10:23 PM.
04-04-17, 09:23 AM
#390
spoon!
I am person that got the carb allowances in STU for rotaries. Before that, rotaries were limited to stock induction. Like a Niki and or whatever you could do with the OE EFI stuff. Since the rules required the induction system to match the engine I would have been stuck with 80's technology at best.
Personally I see being able to use an affordable and proven to be viable alternative to the stock induction a bonus that the piston guys don't have. Also, if they give us some form of aftermarket EFI everyone else would get them. Be careful what you wish for, this stuff already costs too much.
As far as the FC knuckles are concerned, I don't see the benefit of those. With the FB setup I have the ability to lower the car while maintaining geometry. Hard to get what amounts to a 2" drop spindle with an FC knuckle.
FC knuckle... if I were doing an FB to STU from a scratch build today, I'd be thinking of doing a long "spherical bearing adapter stud" to an FC knuckle that would do the same function as the roll center corrector and get the geometry to the same place, albeit maybe minus the Ackerman Susko's spacer puts in. Mostly it would be to have a bolt-on strut that's more easily messed with though; I just think it would be less annoying than boring the FB knuckle.
All the messing with the FB geometry and issues with getting good dampers on it is why I'm doing an NA Miata to the same "13B Streetport" spec line. Albeit doing it slowly.
04-05-17, 10:16 PM
#391
I haven't been taking notes on what changed when; I'm honestly mostly thinking in terms of a general Club thing - "where 'automotive carburetor with XXmm venturis is called out' injection with XXmm IIRs are allowed" which would affect Prod and P2 also, plus various stuff that's regulated to DCOEs. I'm going to full well admit that I might be biased by being sick of tuning carburetors, especially with having to screw with them in my day job, but I'm staring down the barrel of an engine development and carb development program, or at the very least trying to duplicate the Prather modified IDA we used to have when we were trying to do EProd.
FC knuckle... if I were doing an FB to STU from a scratch build today, I'd be thinking of doing a long "spherical bearing adapter stud" to an FC knuckle that would do the same function as the roll center corrector and get the geometry to the same place, albeit maybe minus the Ackerman Susko's spacer puts in. Mostly it would be to have a bolt-on strut that's more easily messed with though; I just think it would be less annoying than boring the FB knuckle.
All the messing with the FB geometry and issues with getting good dampers on it is why I'm doing an NA Miata to the same "13B Streetport" spec line. Albeit doing it slowly.
I am doing an FB for the oldest reason there is - it was the car in the "driveway." A better choice would be an FD or an RX8 but a rotary powered Miata will be a damn good mouse trap.
I used an approach similar to what you described on the CP Mustang I used to have and ended up with a 2.5" drop. Used a .75" spherical bearing and a 6 x.75" grade eight bolt in place of the ball joint. Worked really well.
As far as the rules are concerned....I have no idea. The SCCA changes direction with respect to technology like the Titanic in a field of ice bergs. Took me months to get cage and carb rulings for STU.
Last edited by mustanghammer; 04-05-17 at 10:21 PM.
04-12-17, 10:53 PM
#392
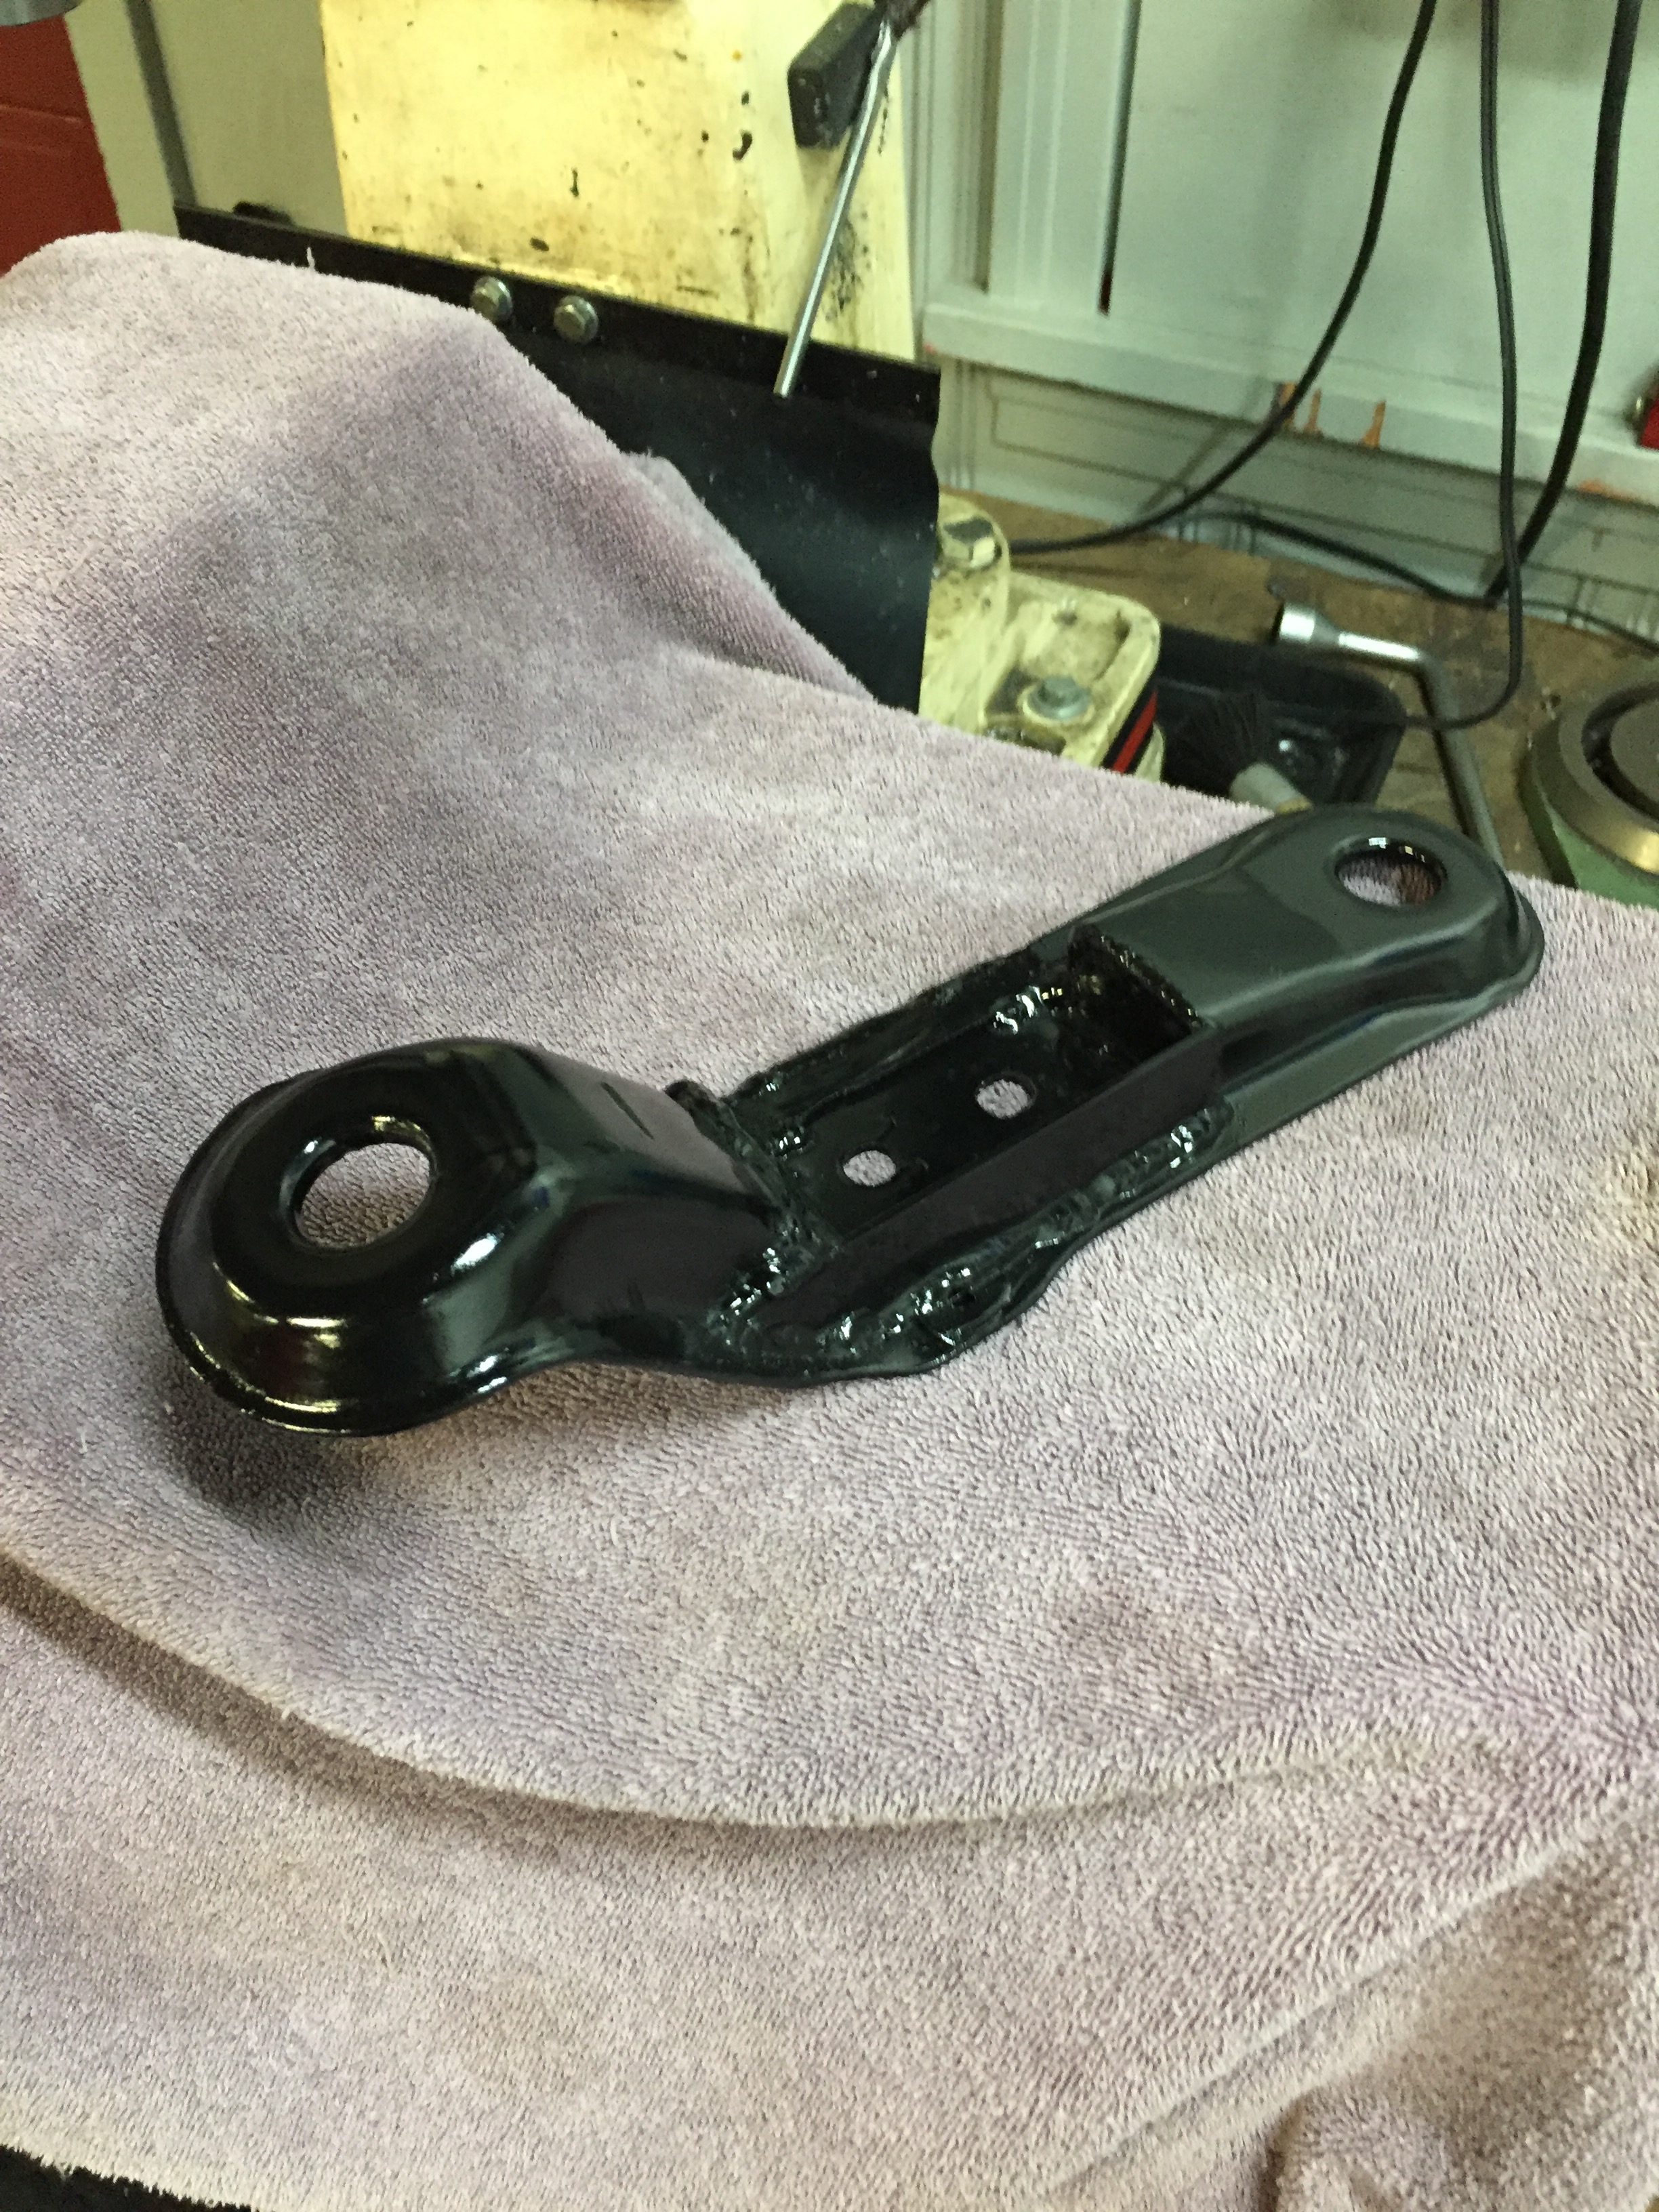
The factory transmission cross member just happened to line perfectly with the transmission mounting pad on the Jerico. But I did need to section it a little to make it work. After that I had to make a .375" shim to get the transmission located in the car in exactly the same place as the Mazda transmission. Installing the Jerico in the car in the same location as the Mazda transmission it replaces means that drive line angles that were working before are maintained. It also means that the exhaust system will go back in the car. A time saver.
I did this by first plotting the location of the Mazda transmission on the floor below the car with a plumb bob. I also measured the height of the output shaft center line from the floor. After that it was a matter of not moving the car until I could get the engine and transmission back in the car.
Transmission Cross Member

 04-12-17, 11:19 PM
#393
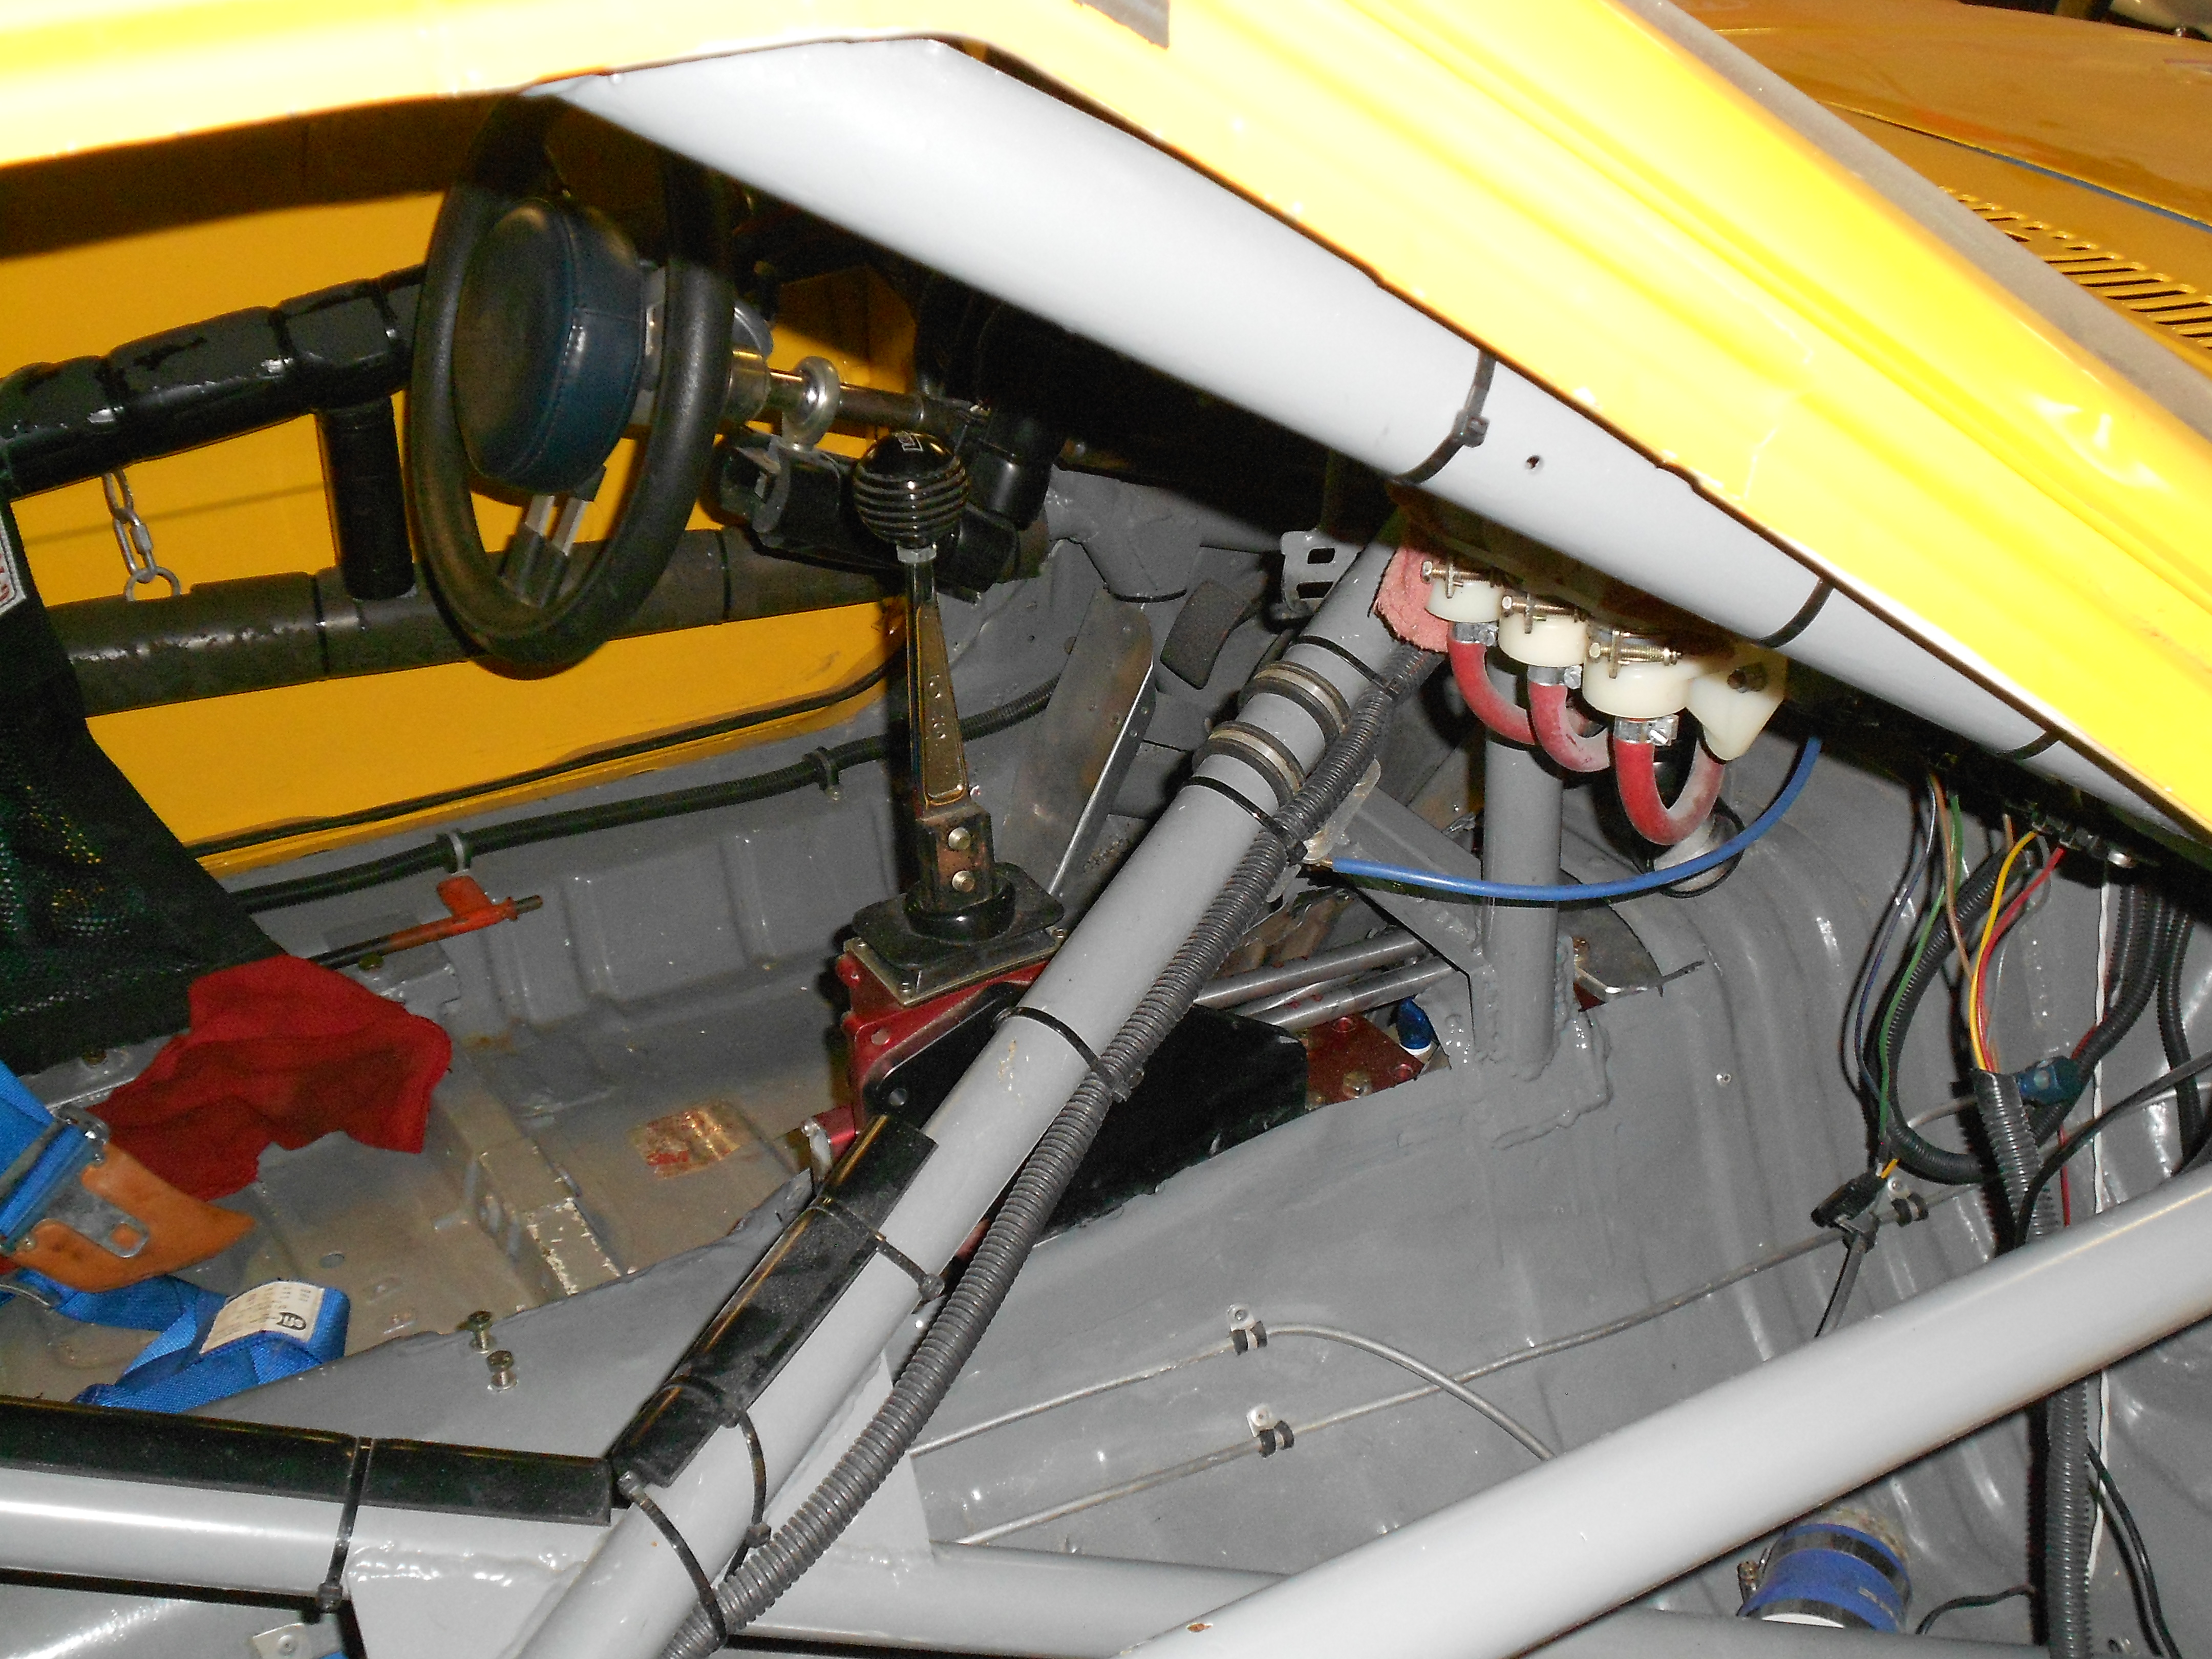
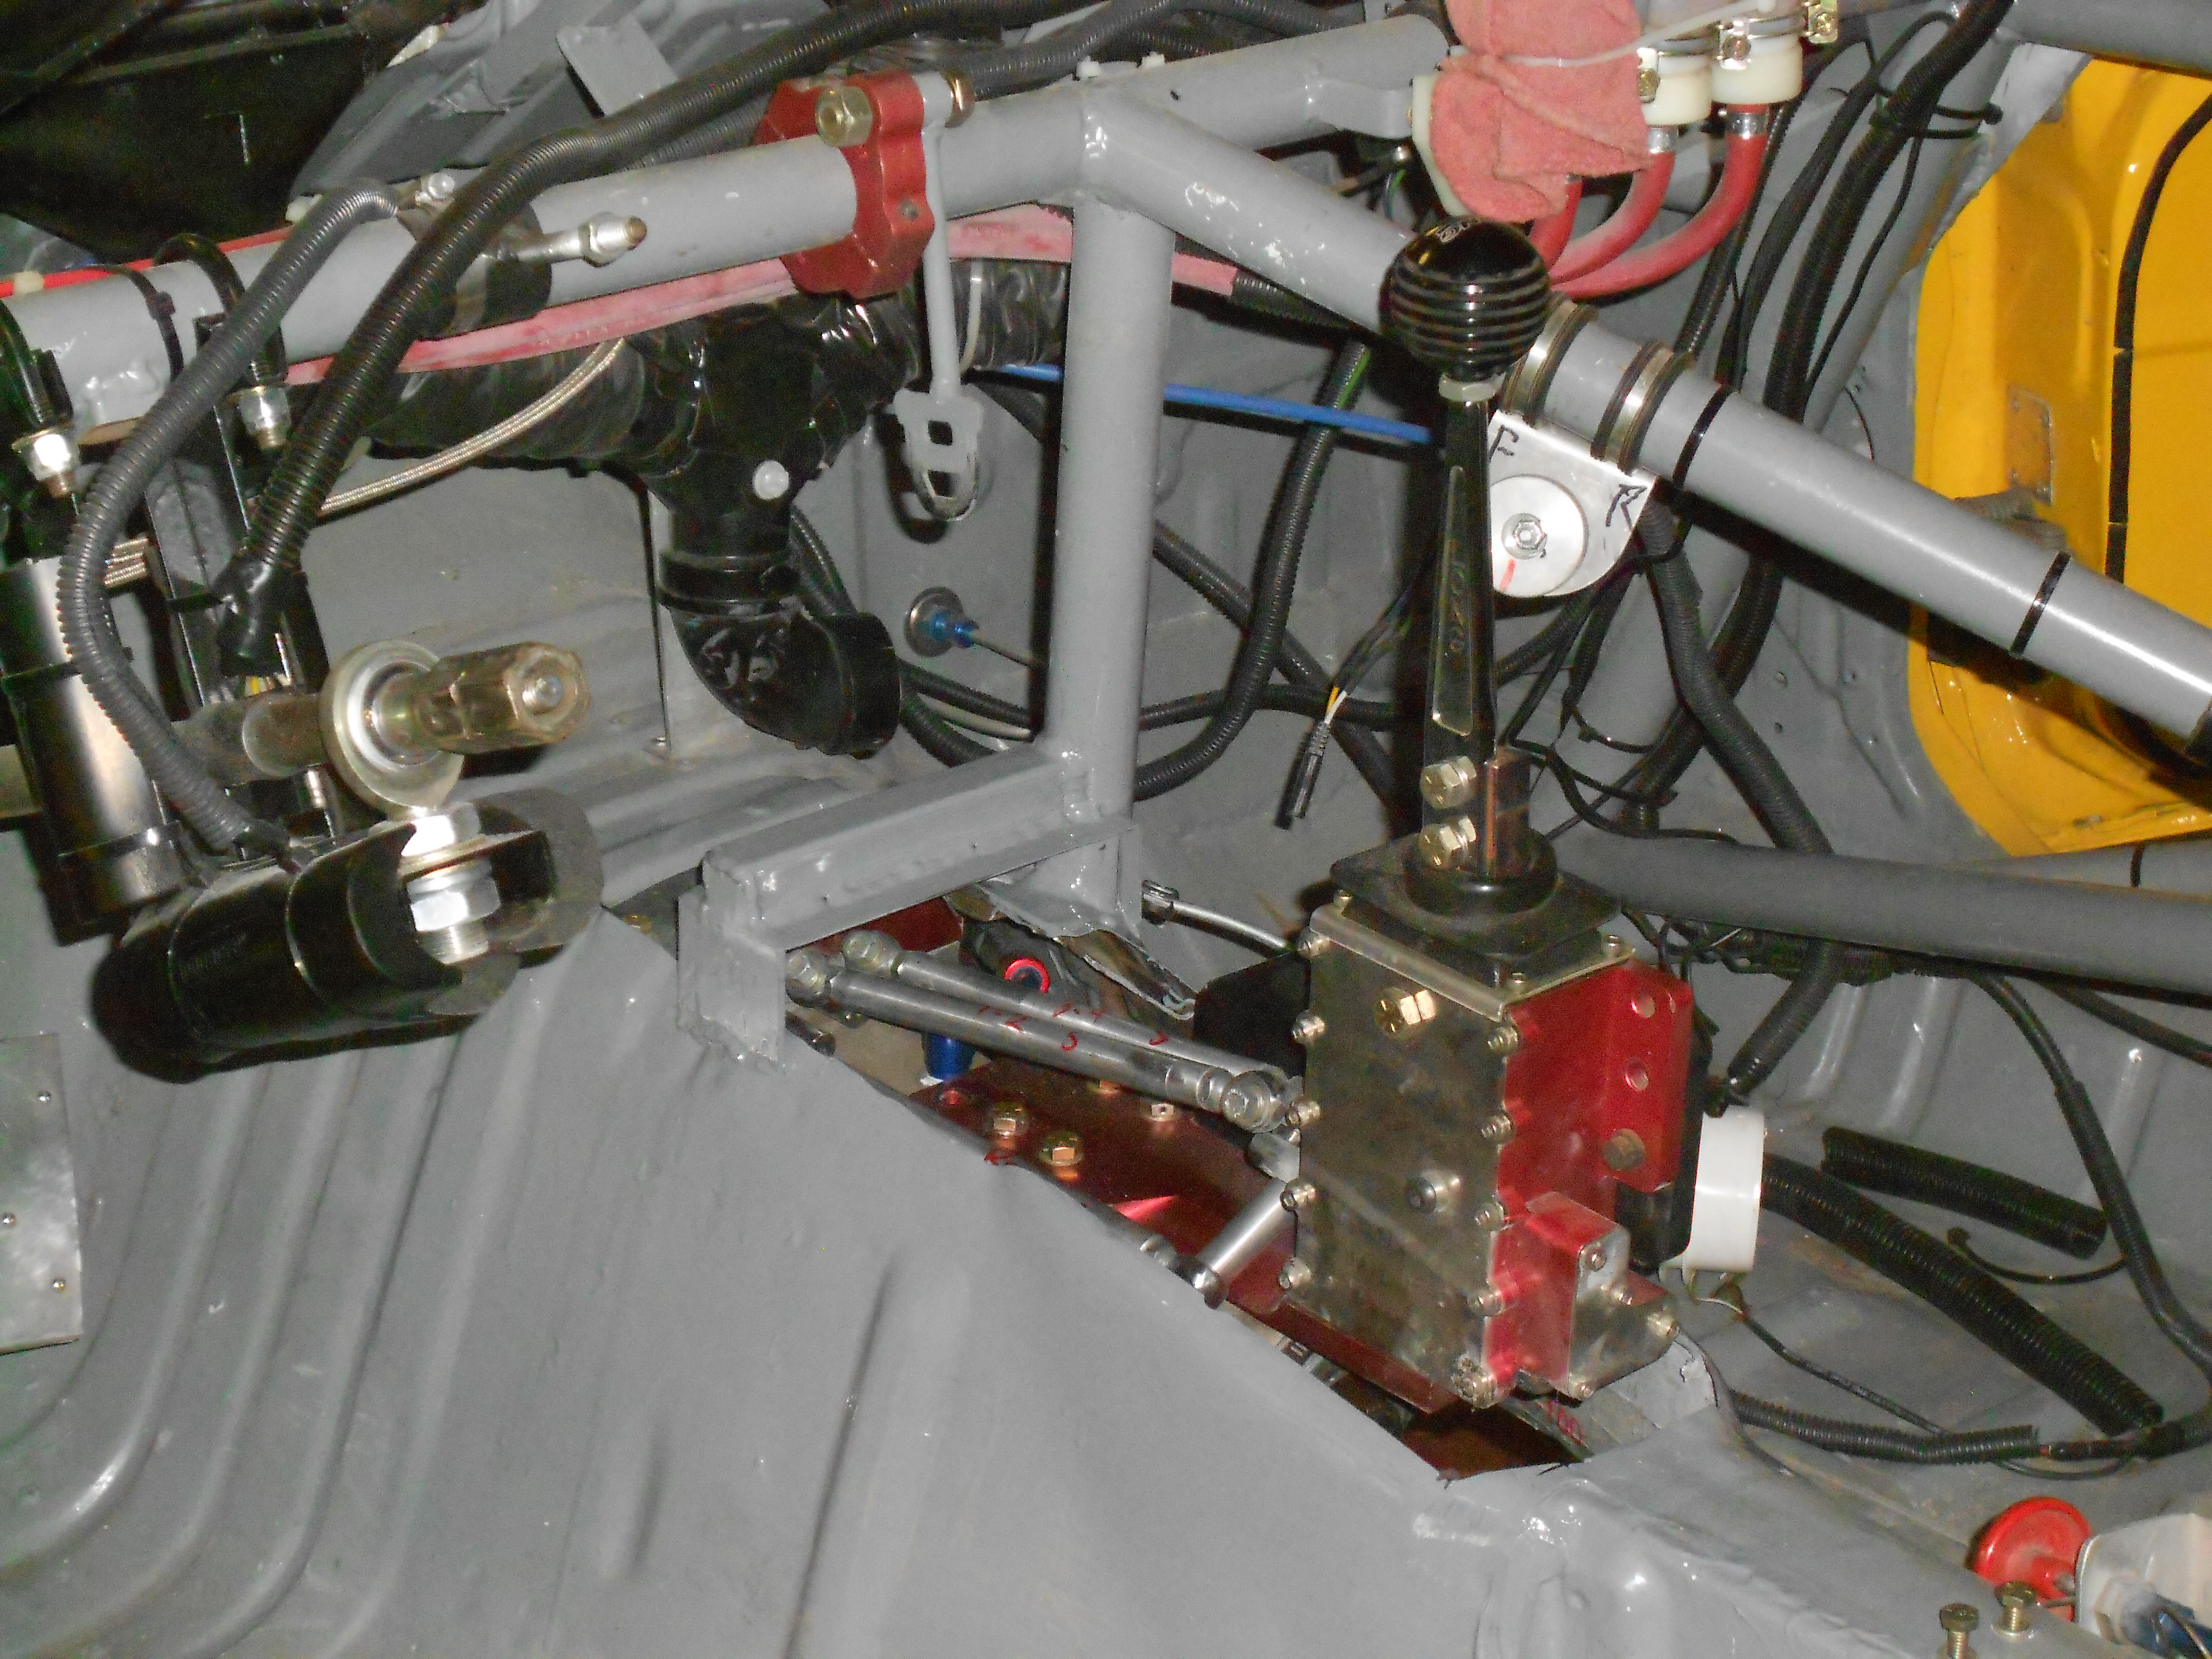
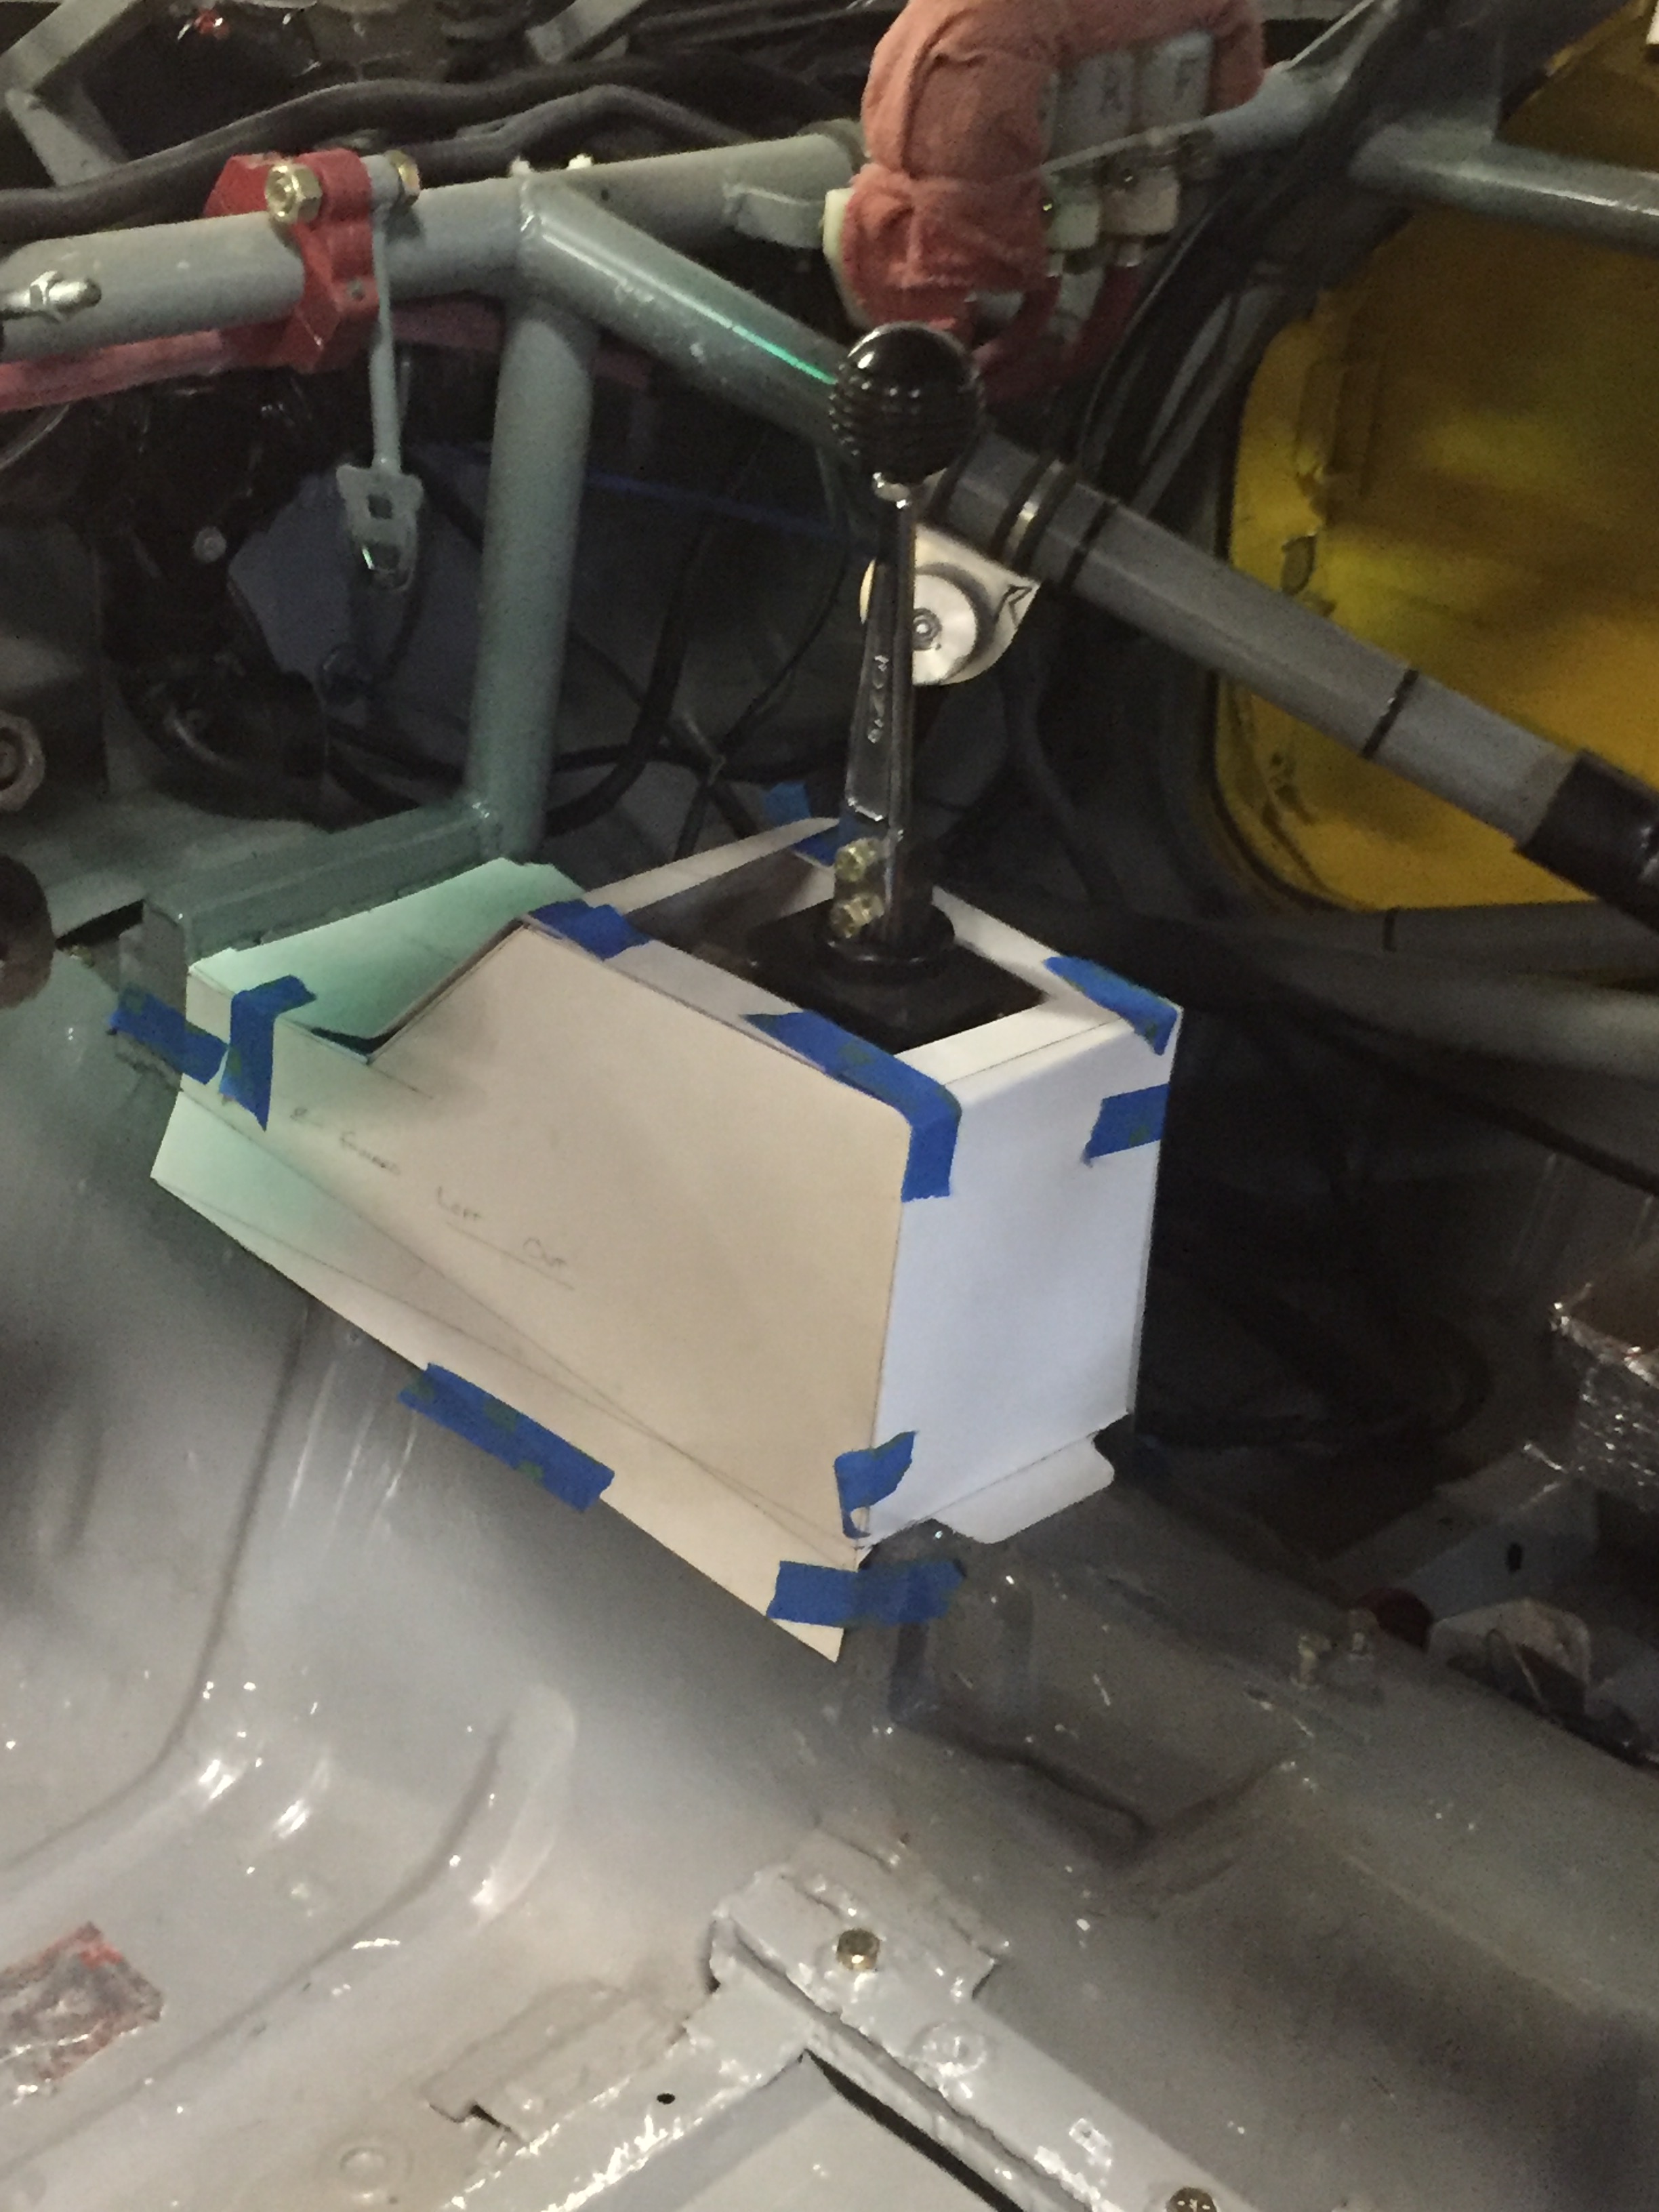
I had to cut a pretty big hole in the top of the tunnel to make room for the top mount shifter. As a part of this I cut through a double thickness reinforcement in the top of the tunnel that supports the transmission cross member mounts in the chassis. So this structure needed to be replaced while also making room for the forward gear shift rods as well as provide the space necessary to service the rods later. I used a 1" square tube welded to a cage element on the right side of the tunnel and some .125" plate on the left side of the tunnel.
Next up some CAD (Cardboard Aided Design) work to fab up a cover for all of this.
Next up some CAD (Cardboard Aided Design) work to fab up a cover for all of this.

 04-12-17, 11:49 PM
#394
Drive Shaft!
The factory drive shaft can no longer be used for my application. Yes it is possible to modify the factory shaft to use a trans slip yoke that fits a Jerico while leaving the OE rear end flange in place. This has been tried on a Jerico install. It failed. Twice.
The problem is that the Jerico slip yoke (32 Spline Turbo 400 style) requires a much larger u-joint than the OE Mazda rear end flange uses. The resulting mismatch creates a drive shaft that won't survive a 20 minute qualifying session. Keep in mind that in 4th gear an RX7 race car is spinning its drive shaft anywhere from 8000 to 9500+ rpms.
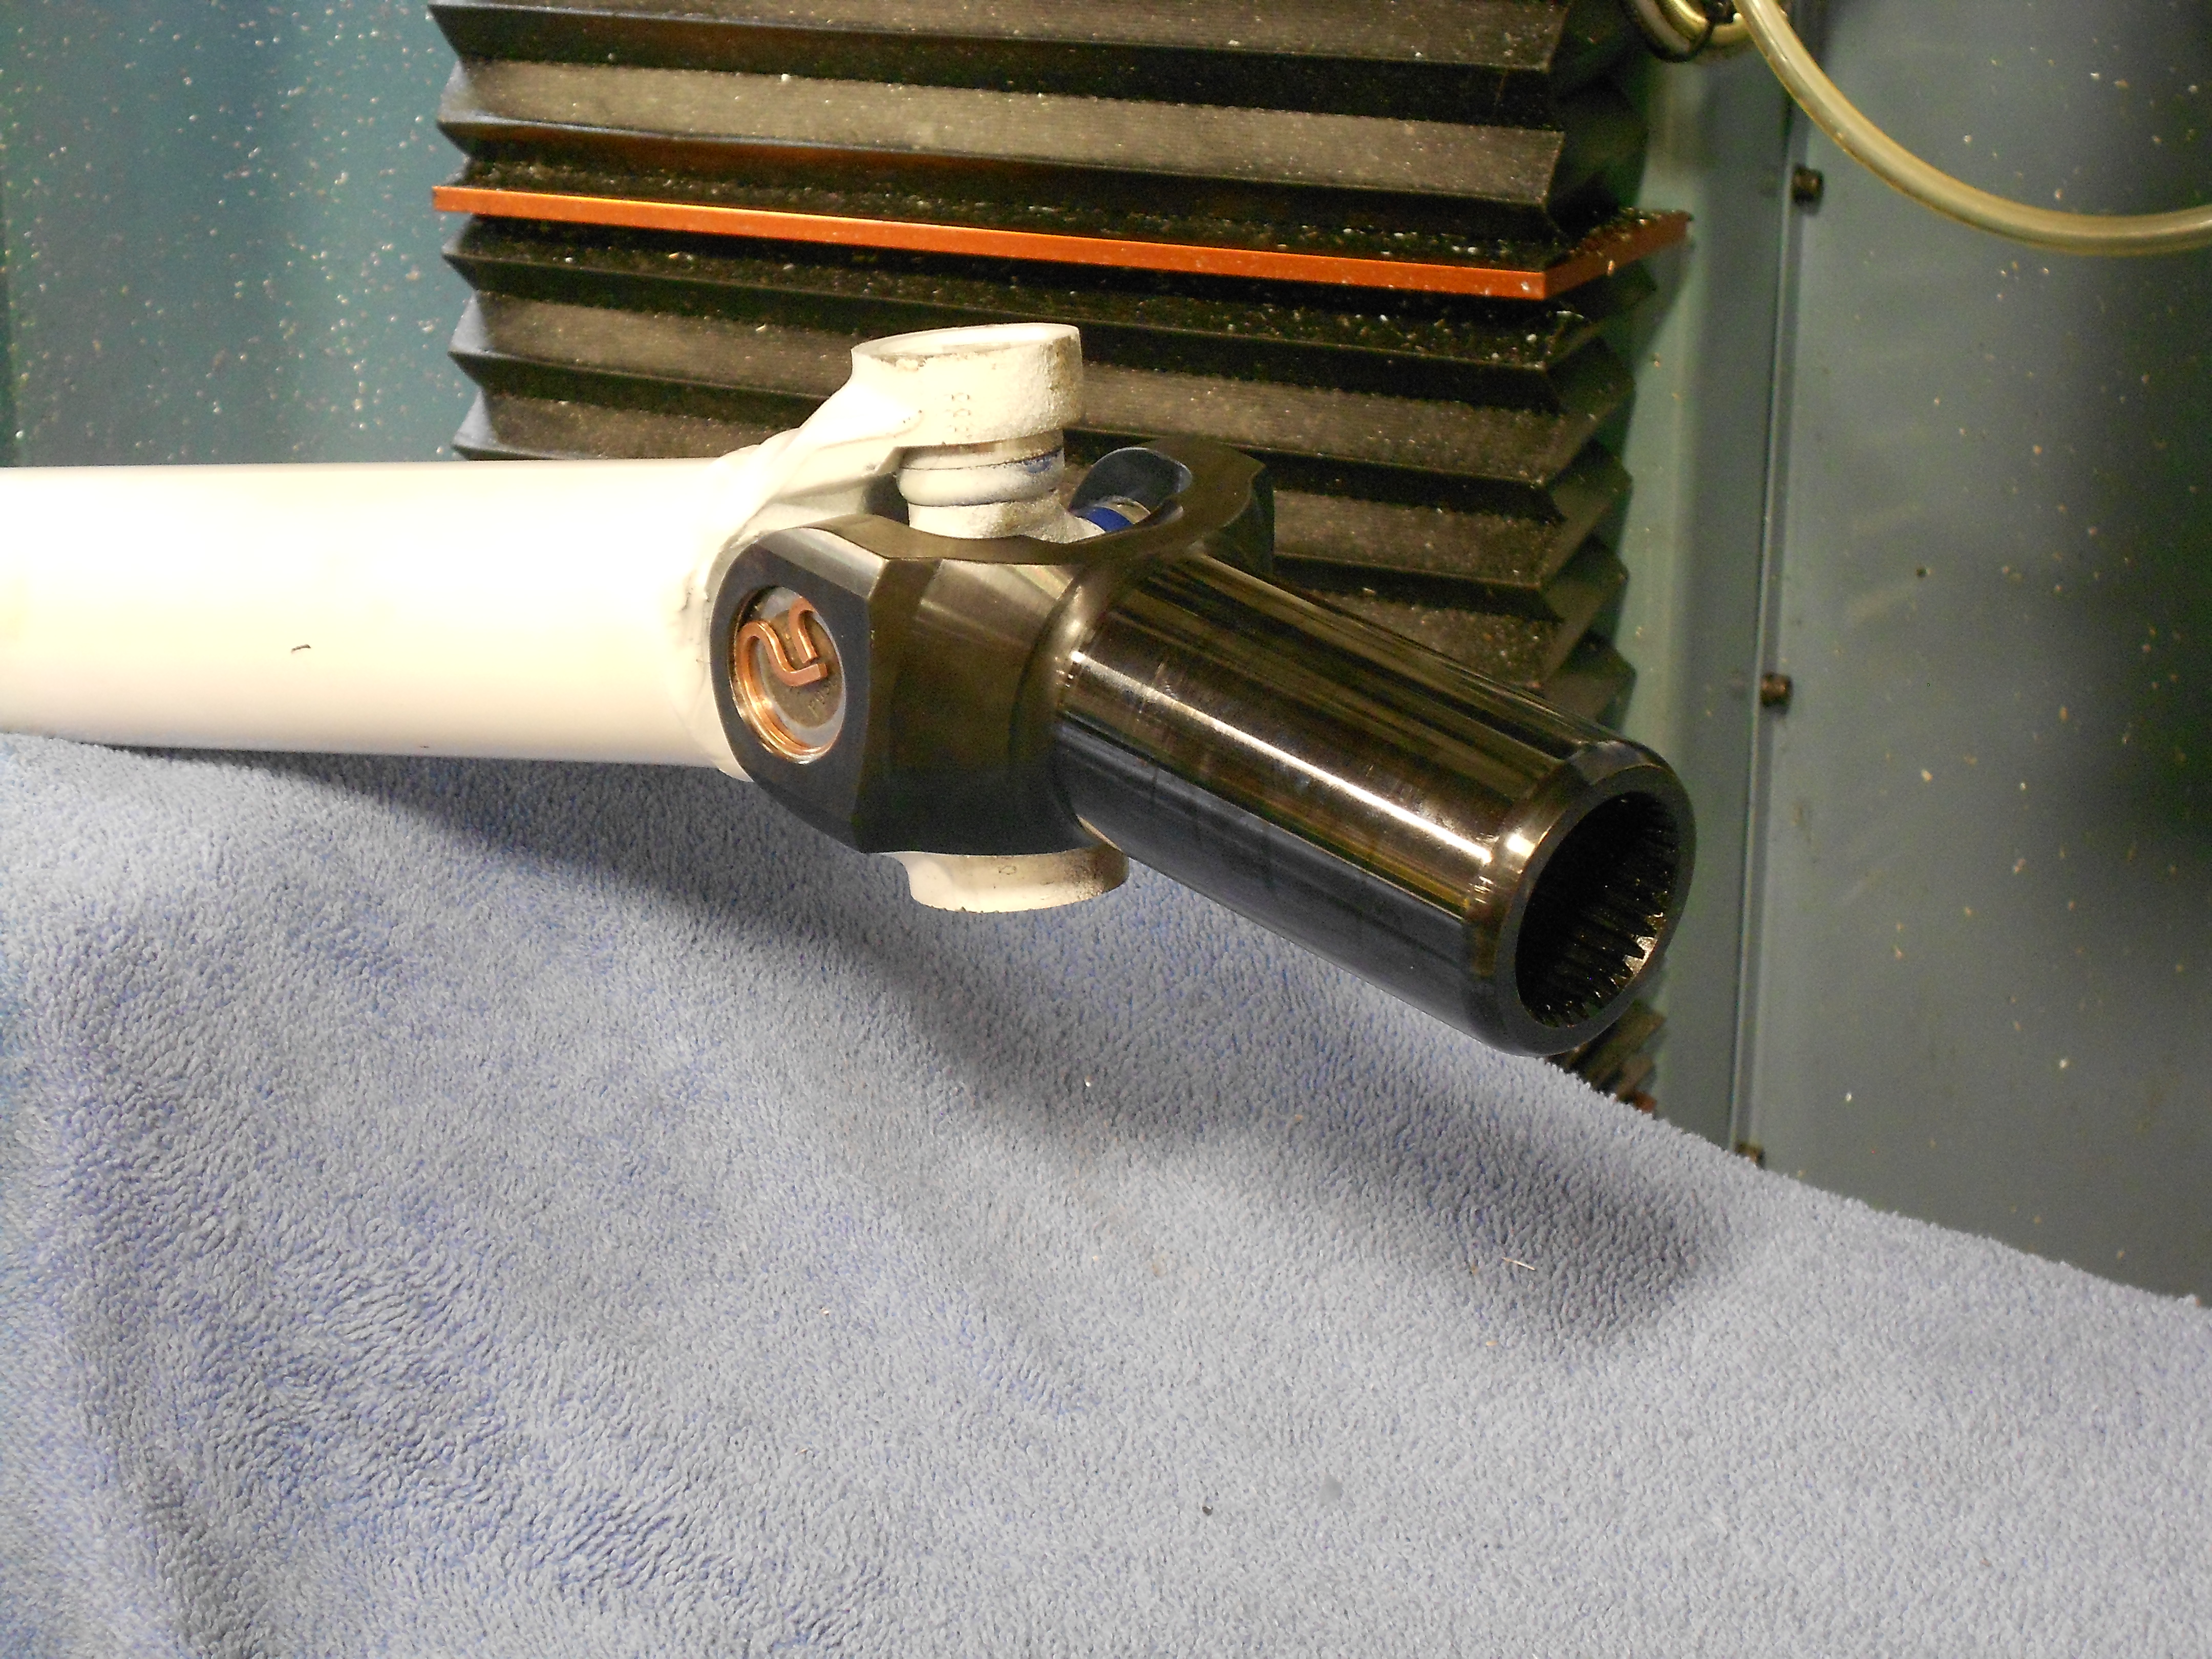
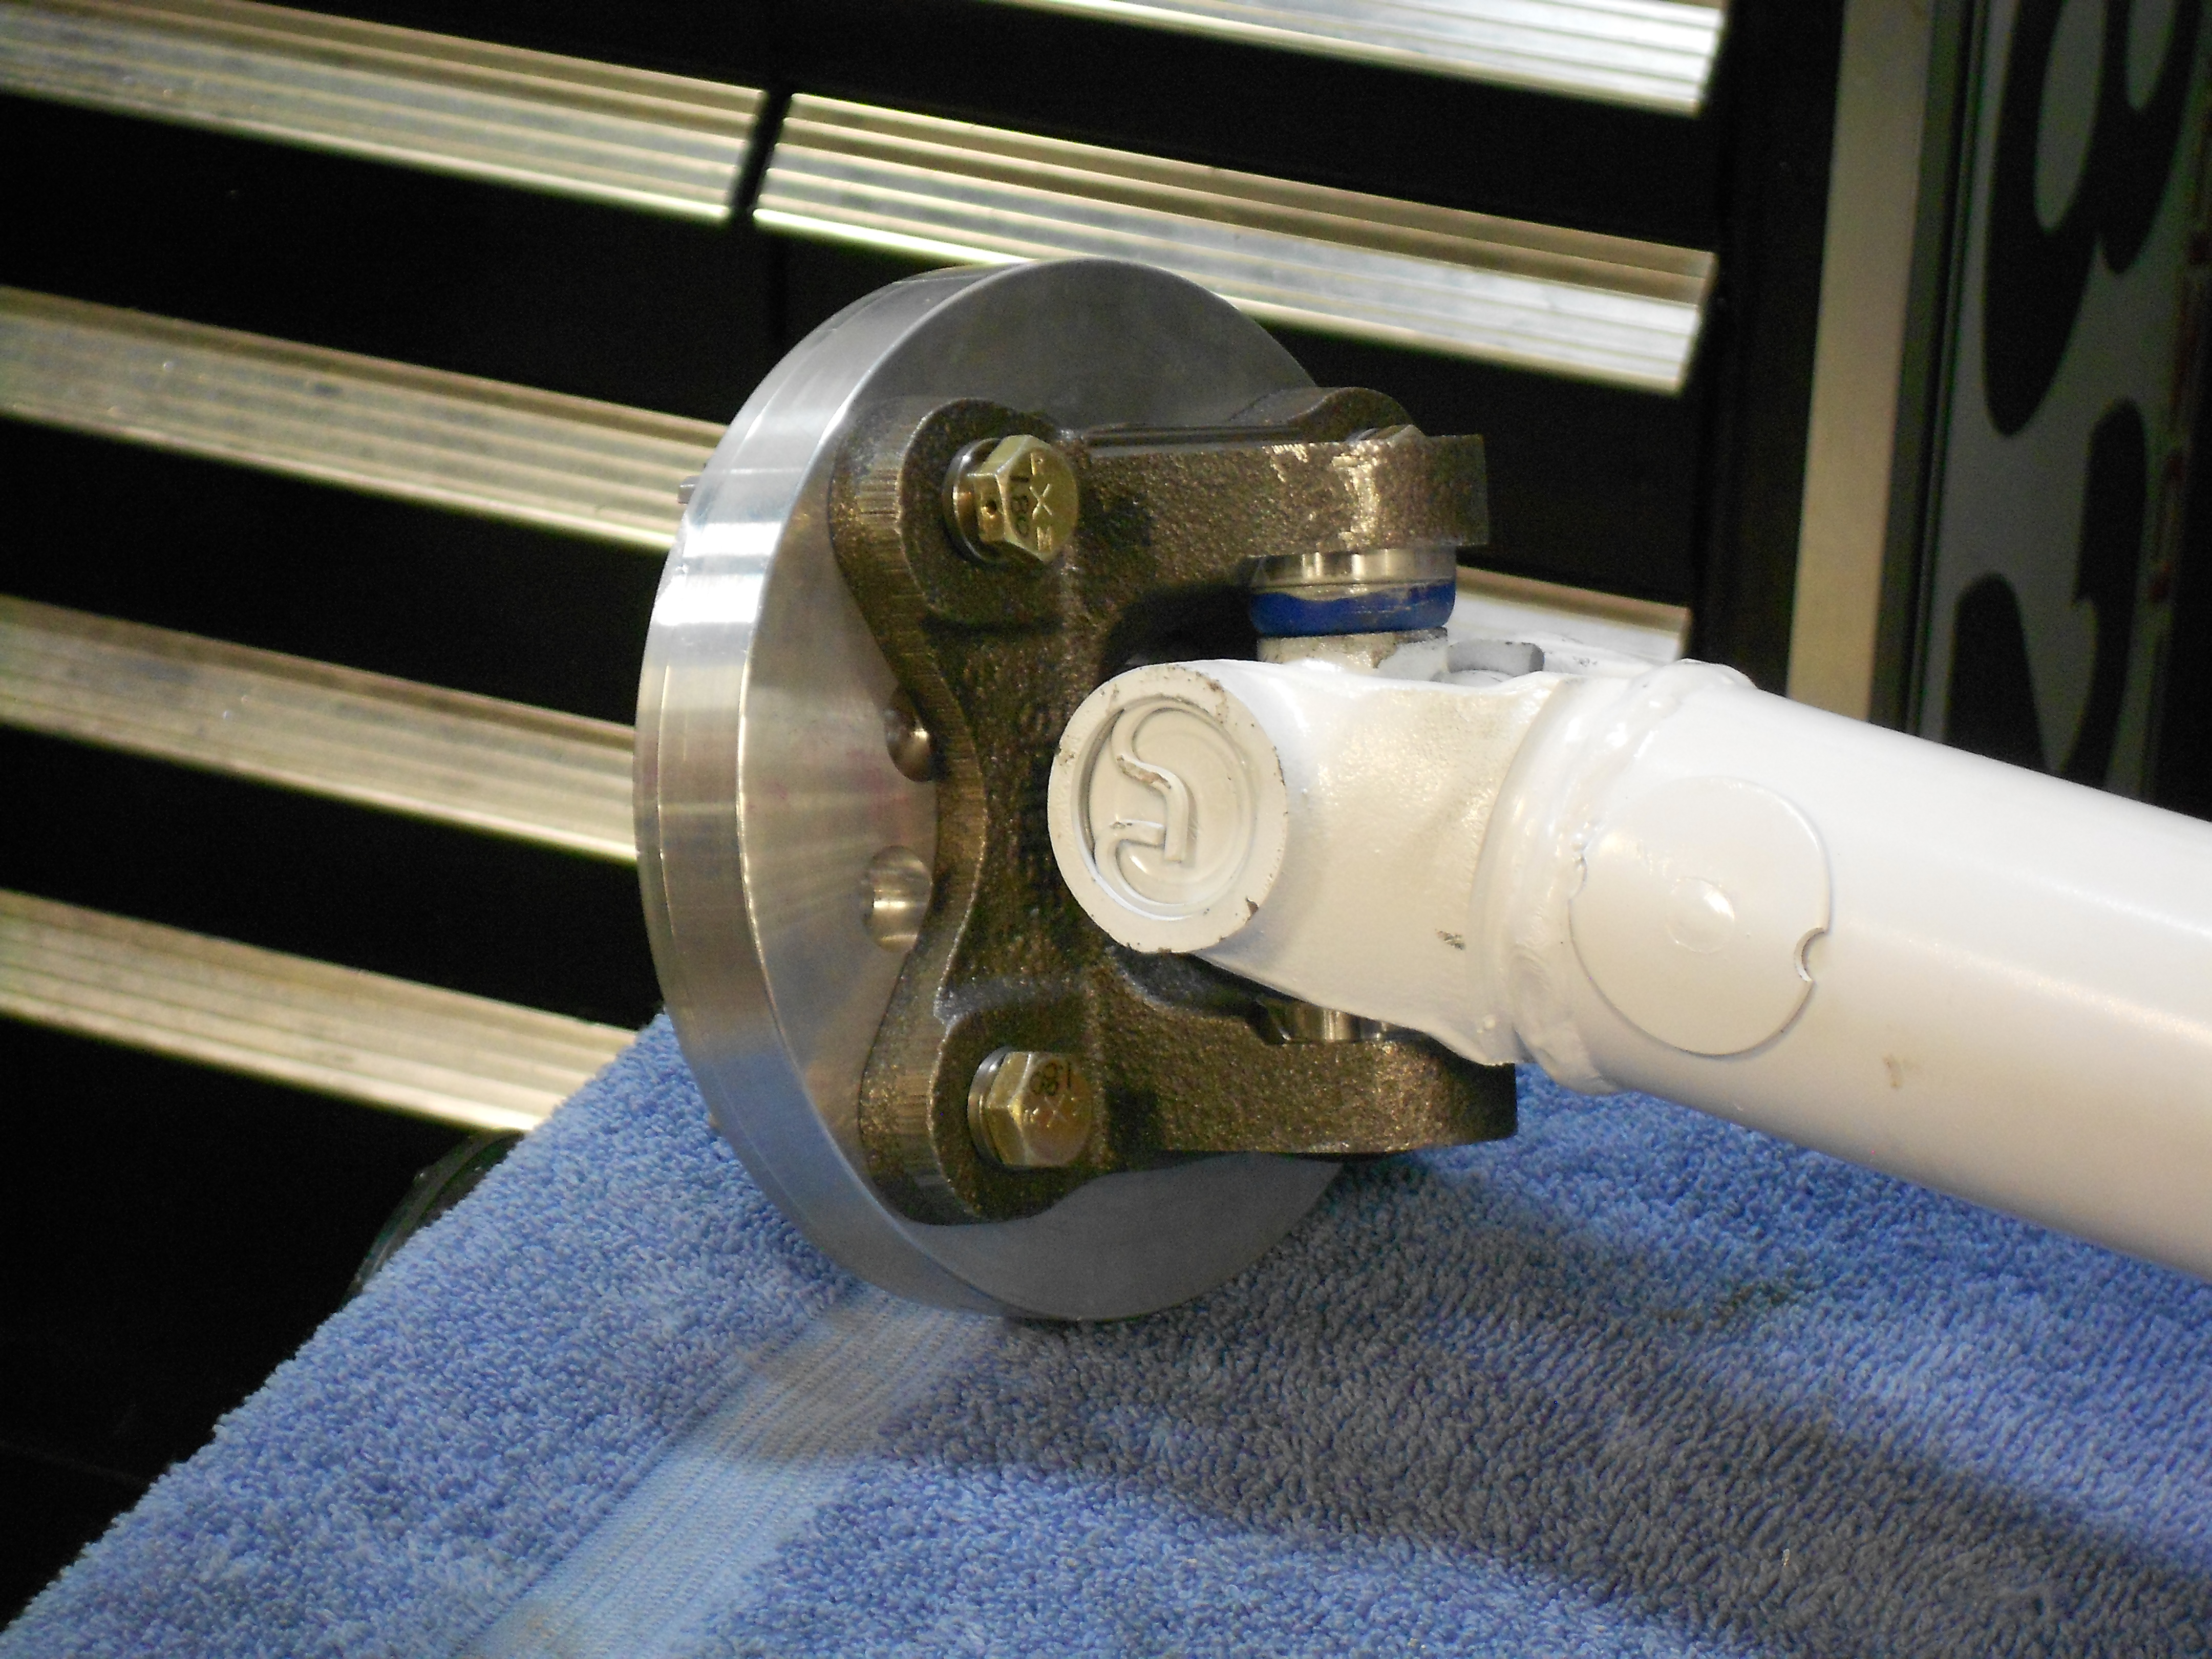
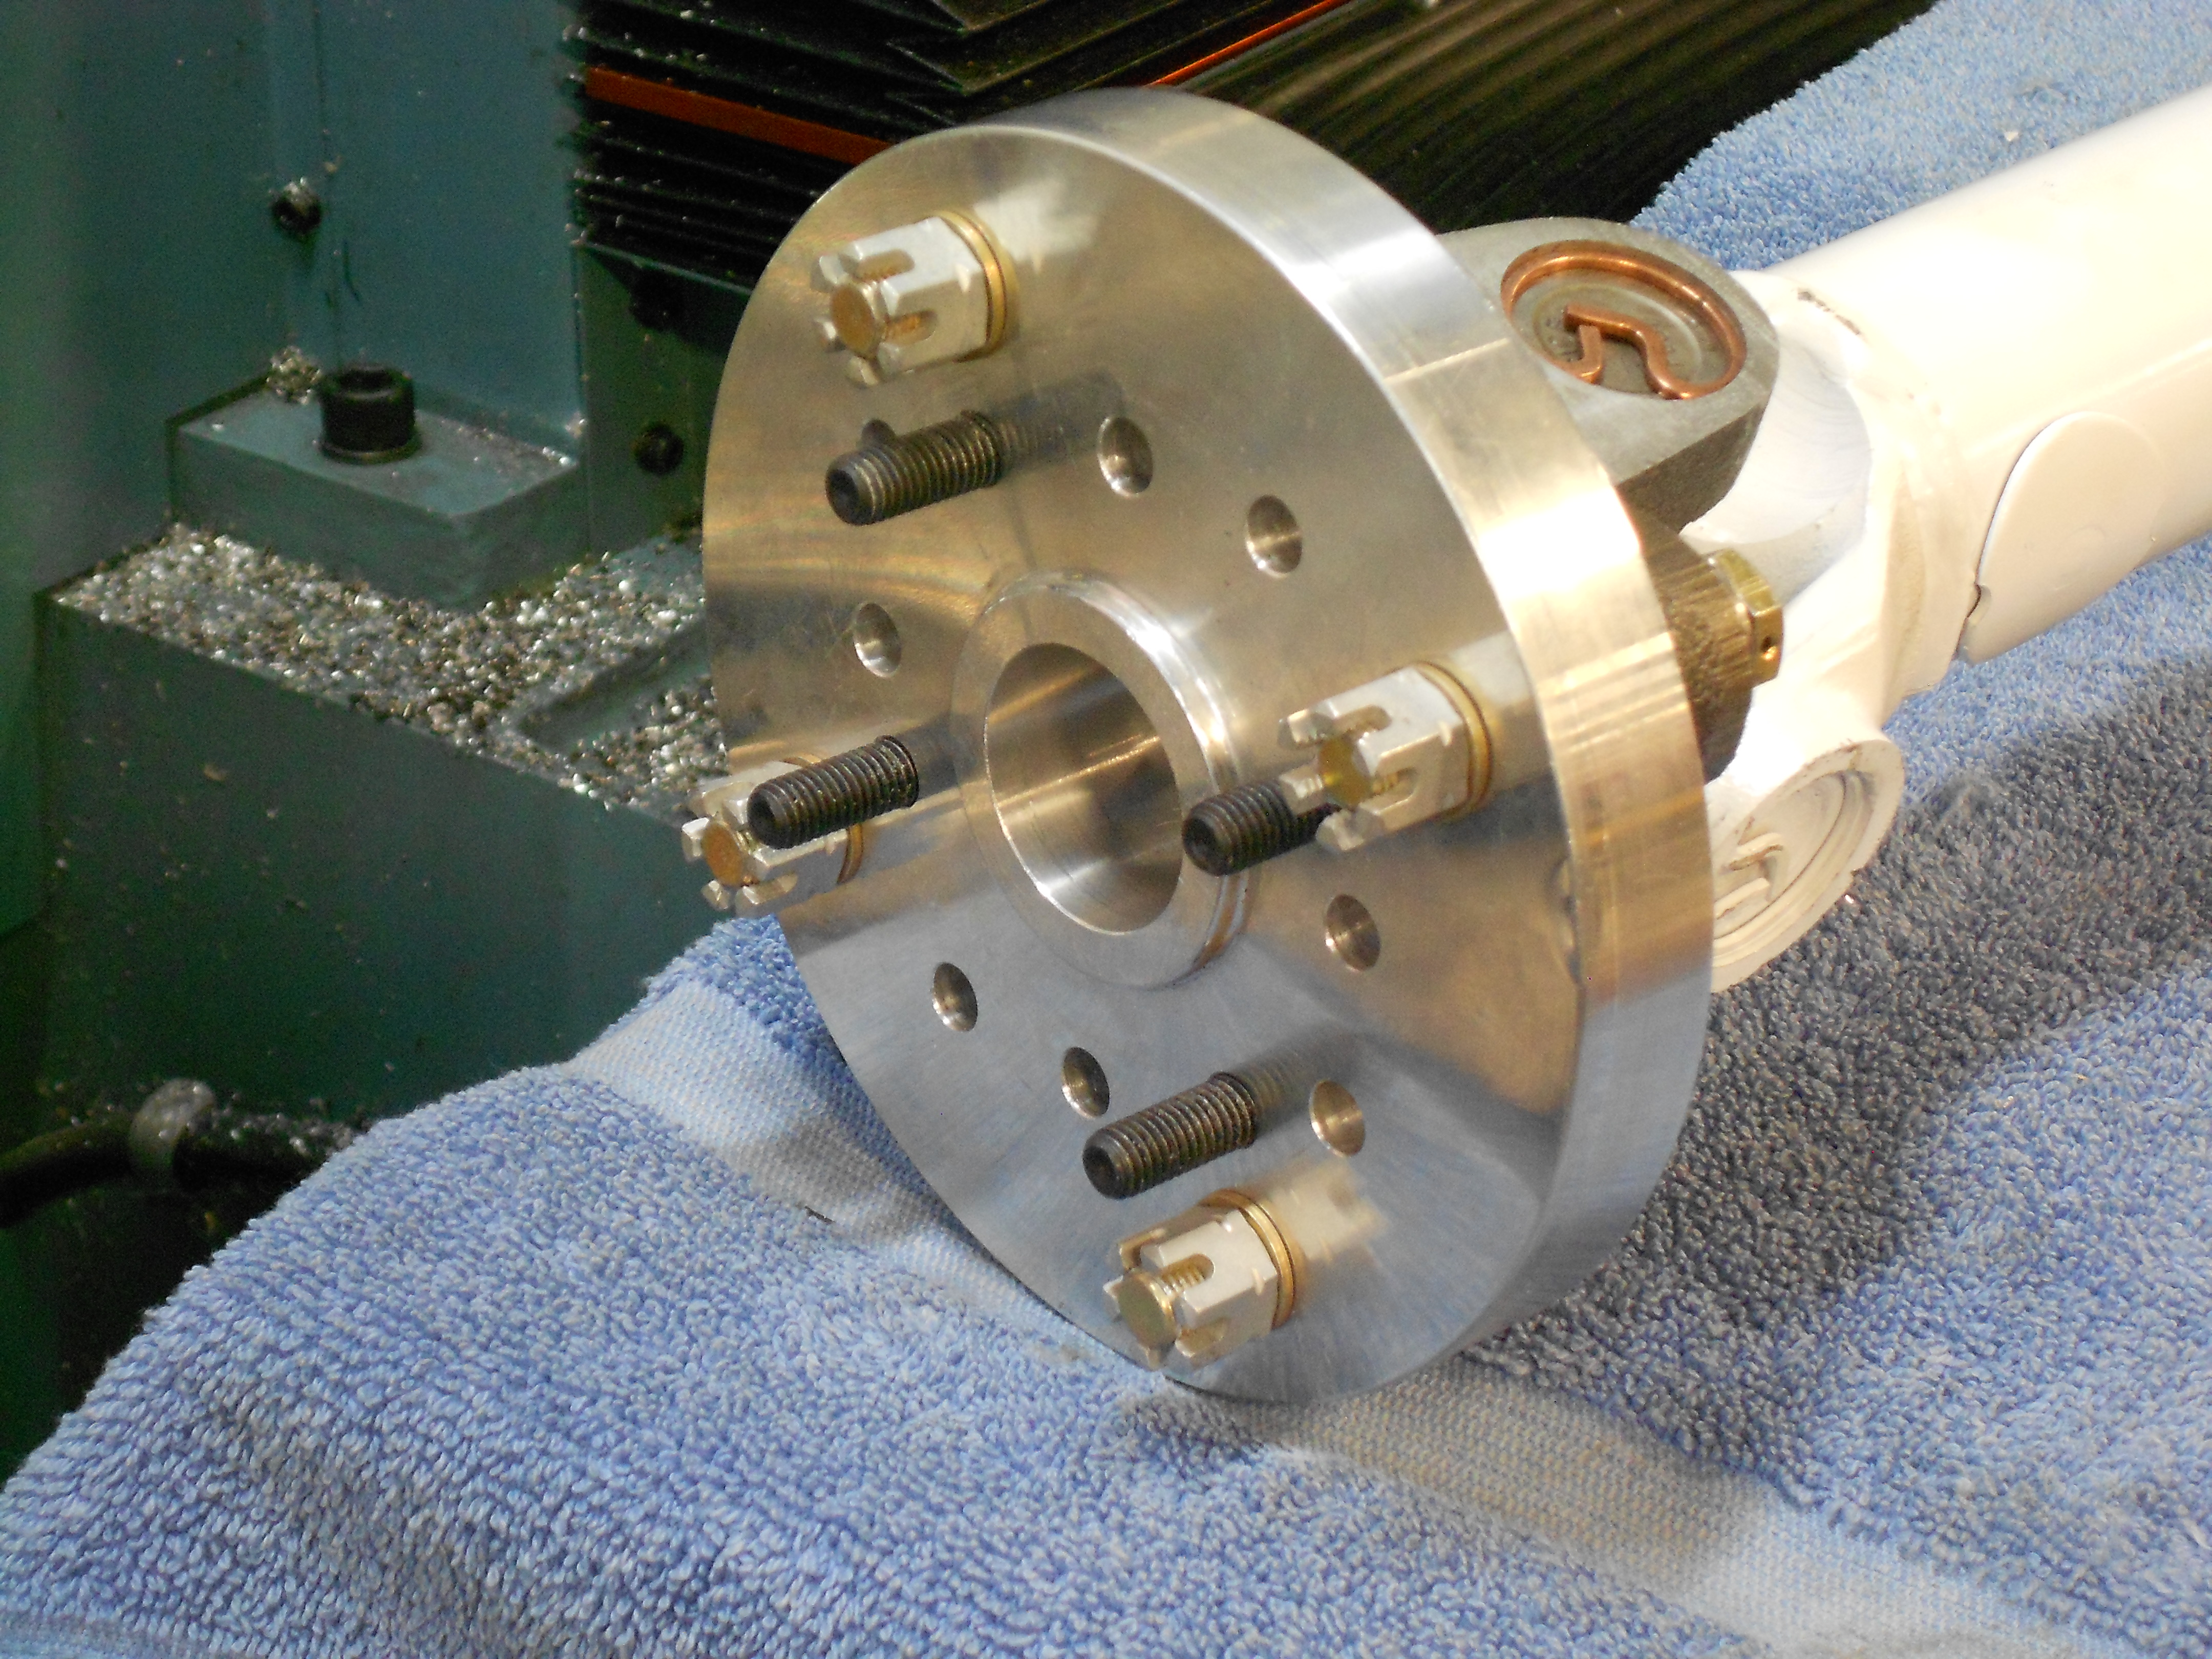
So just like everyone else that I know that has done this transmission shaft I needed a custom drive shaft that uses the same size u-joints at both ends. I ordered a custom drive shaft from pitstopUSA.com that uses 1310 u-joints and also is a smaller diameter than the stock shaft (more tunnel clearance). To fit the Jerico, I ordered a hardened steel 32 spline yoke (necessary because my trans had a needle bearing tail shaft bearing). To fit the rear end I bought a Ford 8.8 flange. Then David Long at Santa Fe Garage.com whittled an adapter out of 6061 T6 aluminum that fits the small pinion flange I use. The adapter was also drilled for a large Mazda flange.
The drive shaft is from Wiles and is made out of .083 x 2" DOM steel. Not that light but compact and made for racing applications.
Shaft and Adapter
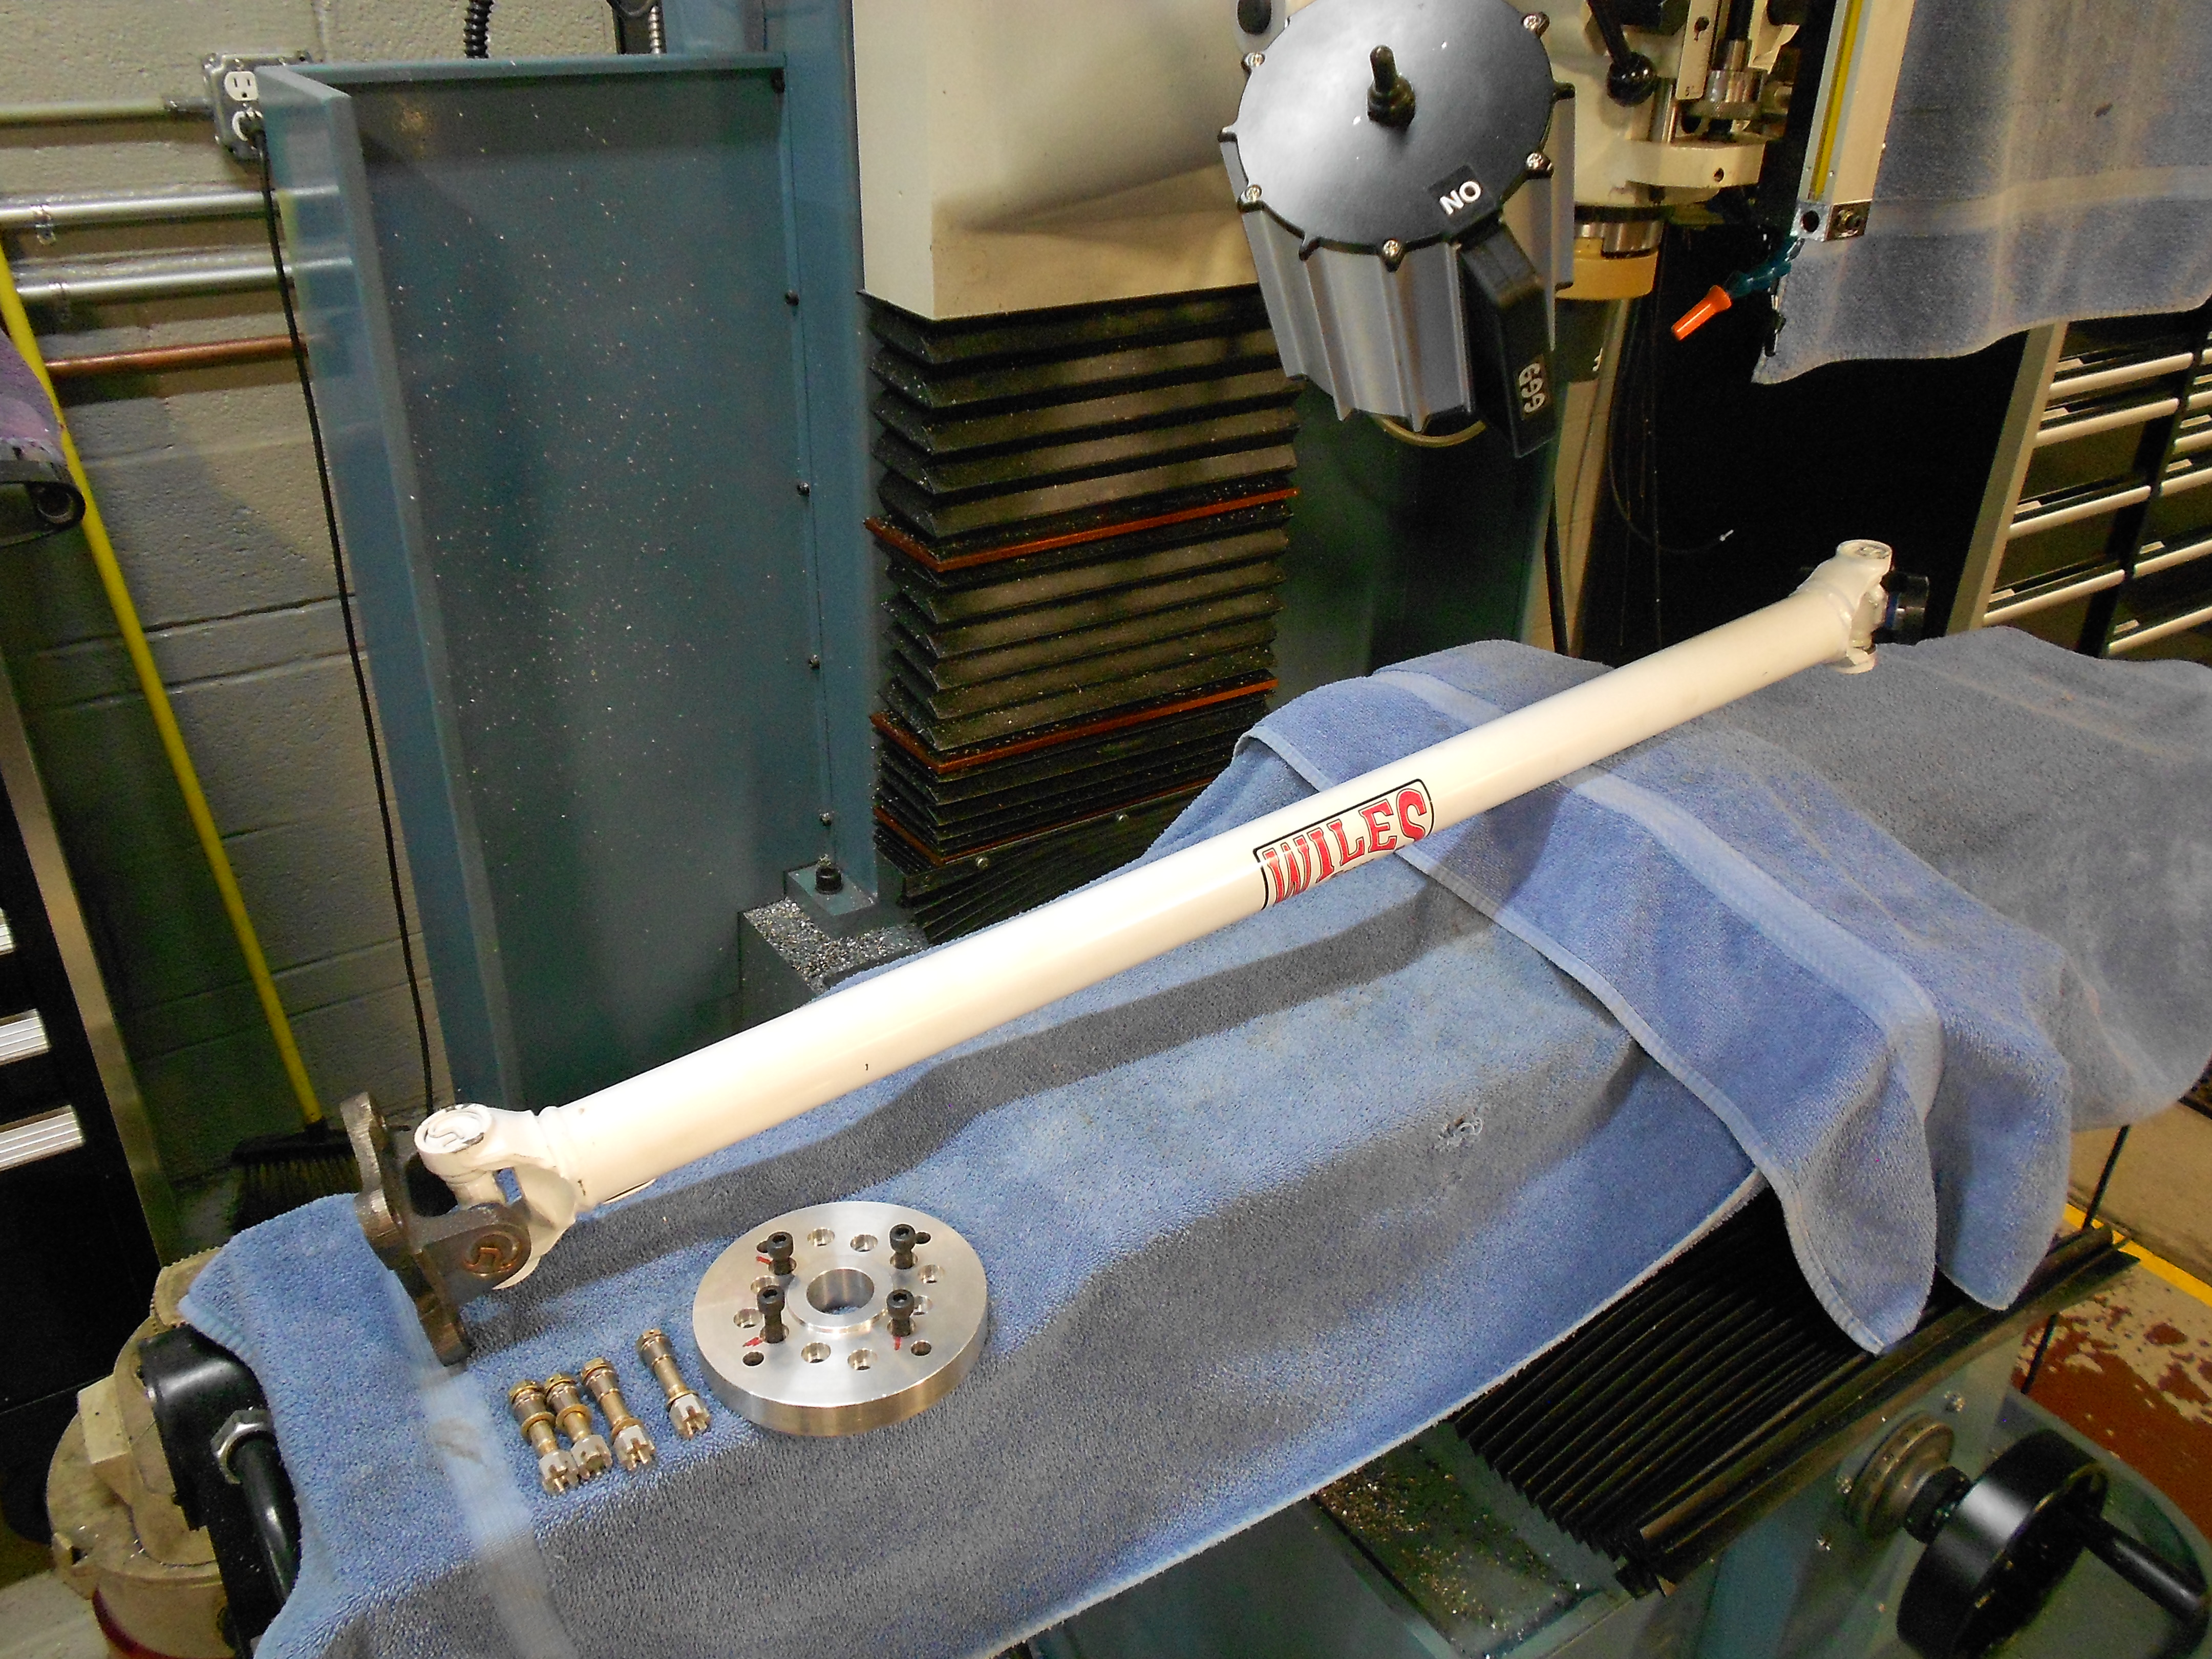
8.8 Flange and adapter
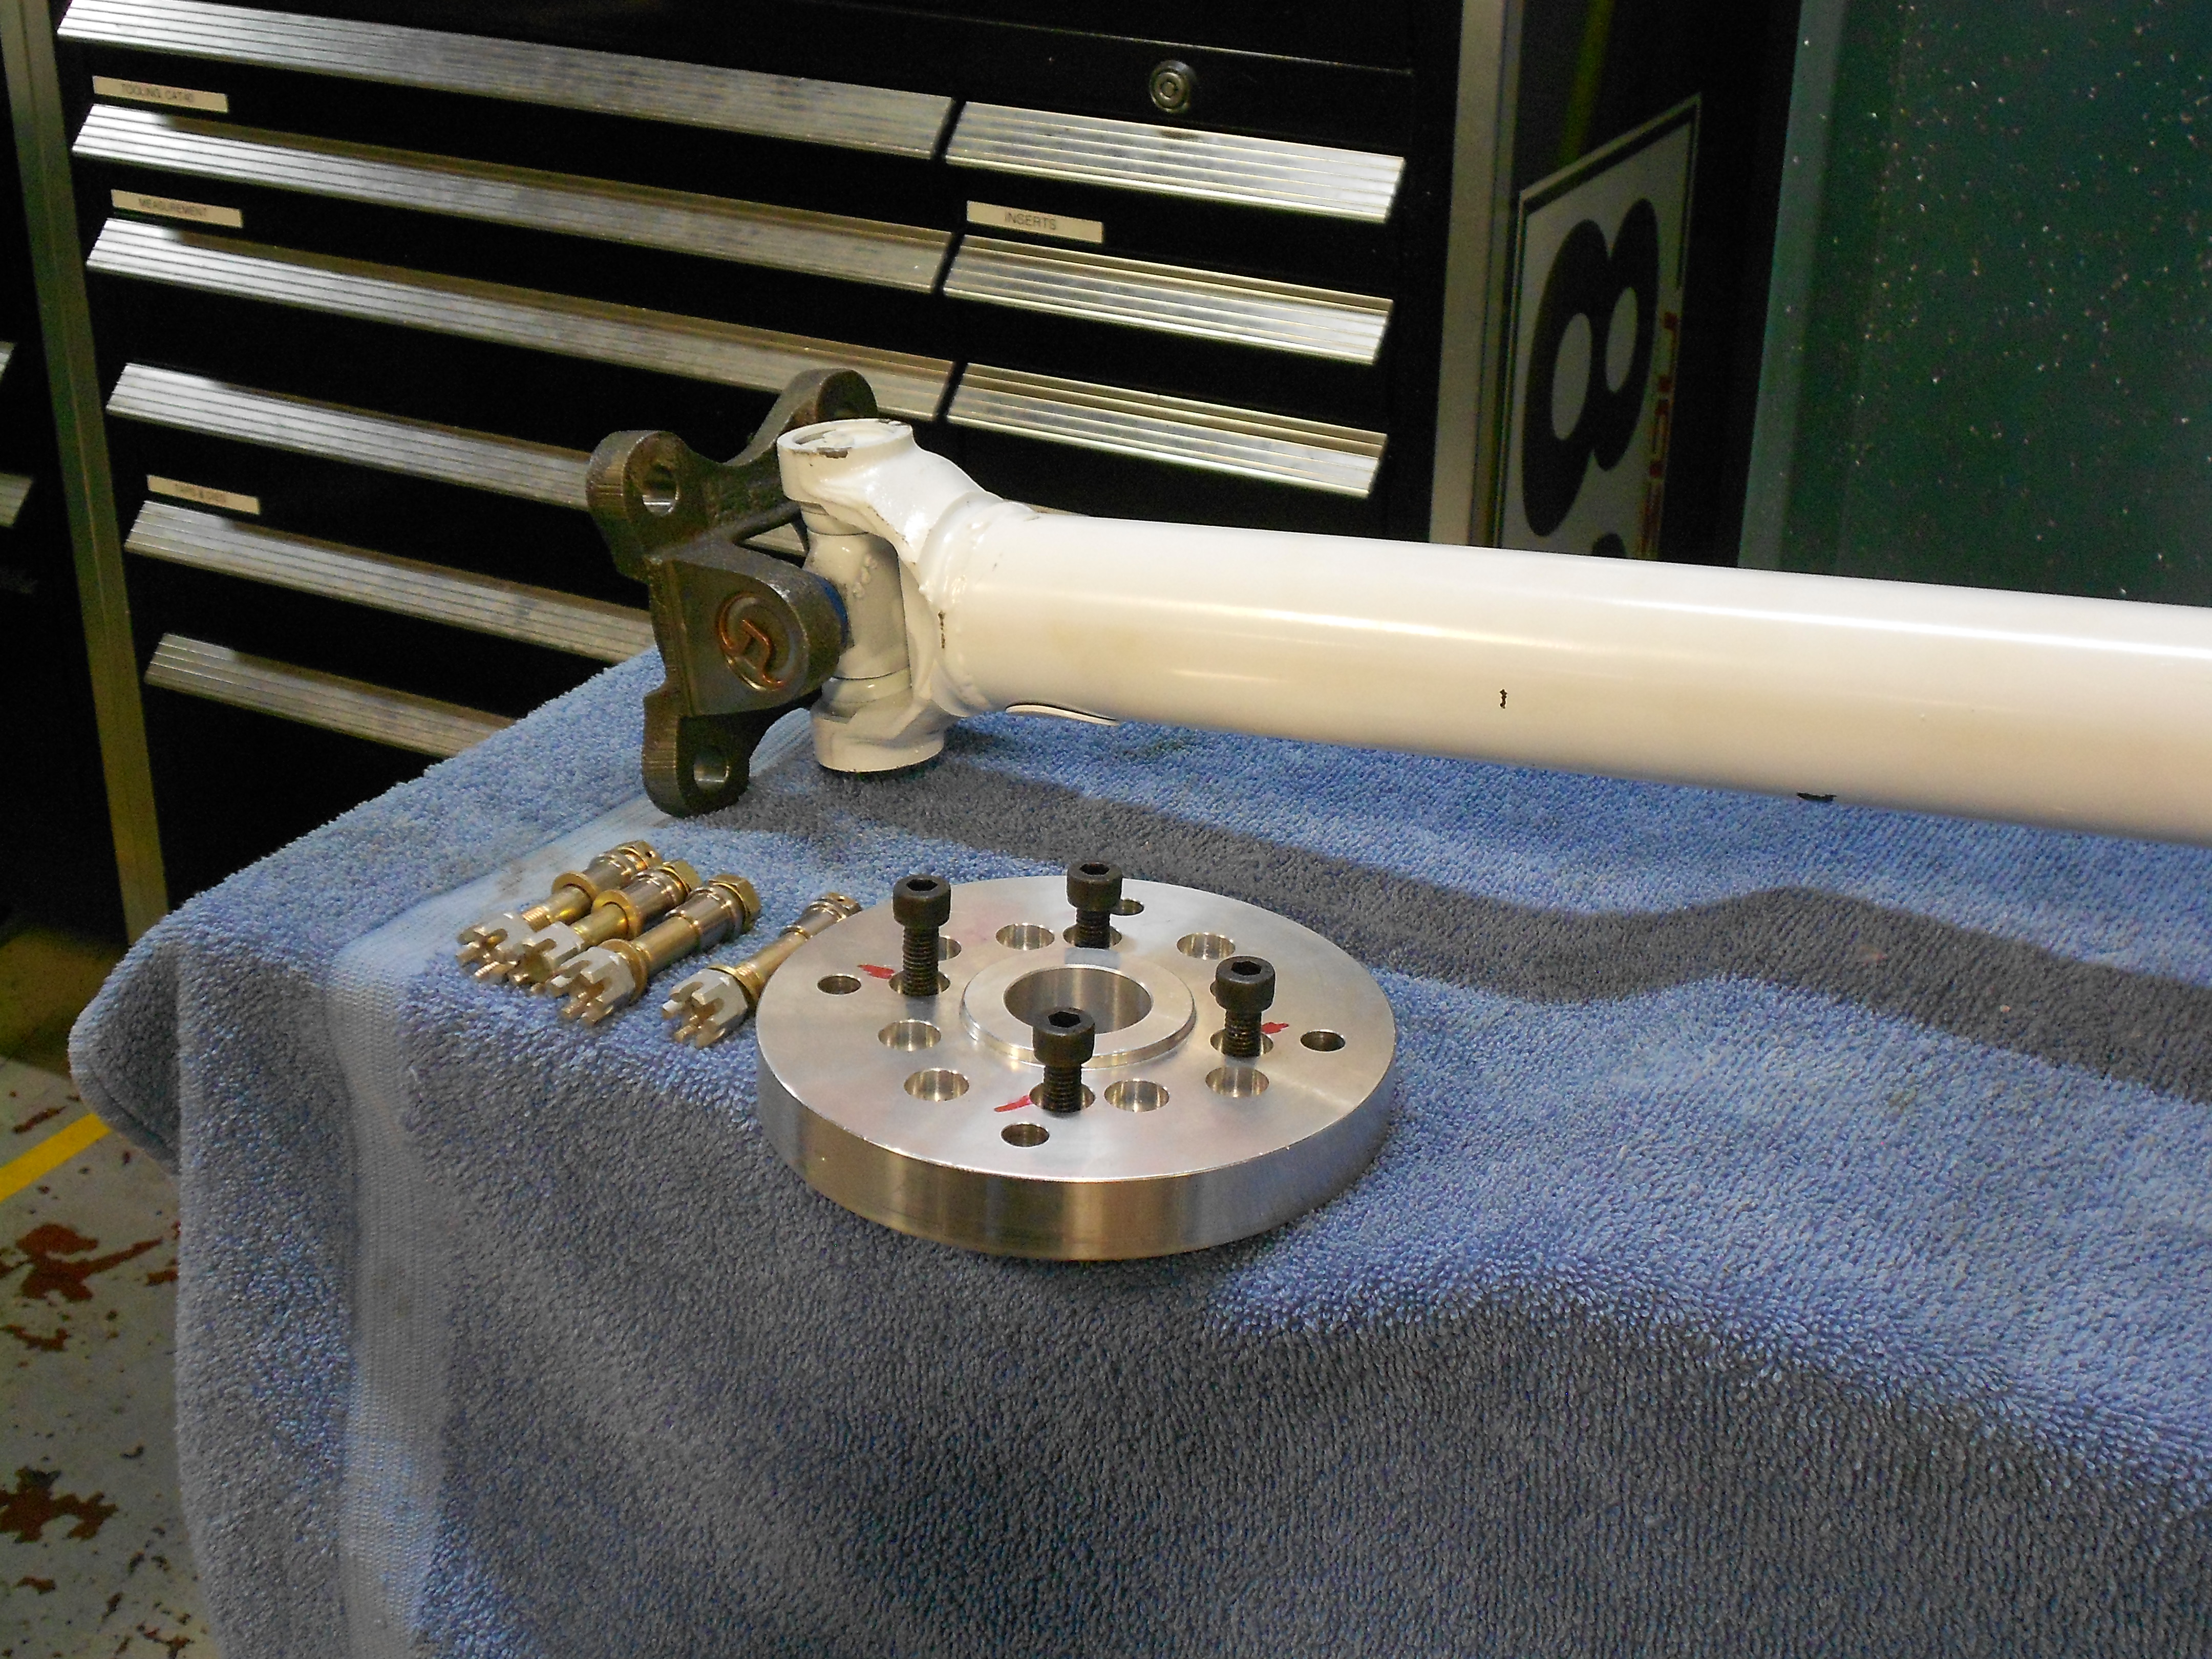
Hardened Slip Yoke
Adapter Installed
The factory drive shaft can no longer be used for my application. Yes it is possible to modify the factory shaft to use a trans slip yoke that fits a Jerico while leaving the OE rear end flange in place. This has been tried on a Jerico install. It failed. Twice.
The problem is that the Jerico slip yoke (32 Spline Turbo 400 style) requires a much larger u-joint than the OE Mazda rear end flange uses. The resulting mismatch creates a drive shaft that won't survive a 20 minute qualifying session. Keep in mind that in 4th gear an RX7 race car is spinning its drive shaft anywhere from 8000 to 9500+ rpms.
So just like everyone else that I know that has done this transmission shaft I needed a custom drive shaft that uses the same size u-joints at both ends. I ordered a custom drive shaft from pitstopUSA.com that uses 1310 u-joints and also is a smaller diameter than the stock shaft (more tunnel clearance). To fit the Jerico, I ordered a hardened steel 32 spline yoke (necessary because my trans had a needle bearing tail shaft bearing). To fit the rear end I bought a Ford 8.8 flange. Then David Long at Santa Fe Garage.com whittled an adapter out of 6061 T6 aluminum that fits the small pinion flange I use. The adapter was also drilled for a large Mazda flange.
The drive shaft is from Wiles and is made out of .083 x 2" DOM steel. Not that light but compact and made for racing applications.
Shaft and Adapter

8.8 Flange and adapter

Hardened Slip Yoke

Adapter Installed


 04-13-17, 09:51 AM
#396
Looking great as always! That sectioned trans crossmember is very similar to what I did for my T2 trans swap so I could use the stock studs and isolators to attach it to the body - rather than spacing it down like many seem to do.
I lol'd at the cardboard aided design comment haha, that's my common material of choice as well.
I might have missed it, but what kind of driveline angles are you running? I recently rebuilt my tri link and added more adjustability and can't seem to find an angle that makes everything happy - it's getting a nice resonance, for lack of a better term, while on power and I suspect something is out of wack... Any insight would be appreciated
04-13-17, 10:47 AM
#397
Looking great as always! That sectioned trans crossmember is very similar to what I did for my T2 trans swap so I could use the stock studs and isolators to attach it to the body - rather than spacing it down like many seem to do.
I lol'd at the cardboard aided design comment haha, that's my common material of choice as well.
I might have missed it, but what kind of driveline angles are you running? I recently rebuilt my tri link and added more adjustability and can't seem to find an angle that makes everything happy - it's getting a nice resonance, for lack of a better term, while on power and I suspect something is out of wack... Any insight would be appreciated
I lol'd at the cardboard aided design comment haha, that's my common material of choice as well.
I might have missed it, but what kind of driveline angles are you running? I recently rebuilt my tri link and added more adjustability and can't seem to find an angle that makes everything happy - it's getting a nice resonance, for lack of a better term, while on power and I suspect something is out of wack... Any insight would be appreciated
Some of the racers also slide the engine to the right (passenger side) about an inch to straighten the engine/trans relative to the rear end. They do this by redrilling the 4 holes in the engine cross member. I didn't do this mod.
No matter what I do I get a resonance in 4th gear around 95MPH that goes away once I get past that speed. With a stock port 12A the resonance appeared just before I reached terminal velocity at most tracks (100MPH or so). With the street port engine it appears and then goes away because the car is now 15-20MPH faster than before at the same track.
I stole CAD from the Brits doing Project Binky - check it out on YouTube.
04-13-17, 10:55 AM
#398
Yeah I can't run a OEM driveshaft anymore since I have the T2 trans - but this shaft (got it used on heer many years ago) has always been very smooth, and the diff I recently put in the car was from one of my other FB's and also never made a peep in that car so that's why I'm leaning toward the pinion angle being the culprit - I'll mess around with it this weekend. Thanks for the advice
Oh, another question since you've gone deeper into these transmissions than most seem to - do you have any idea where to get a new tailshaft bushing for the T2 transmissions? I've done some searching and it doesn't seem like a readily available part...
Oh, another question since you've gone deeper into these transmissions than most seem to - do you have any idea where to get a new tailshaft bushing for the T2 transmissions? I've done some searching and it doesn't seem like a readily available part...
05-15-17, 10:47 PM
#400
Cover
I got the cover fabricated several weeks ago. I started with a 4 piece poster board pattern that turned out to be close to perfect. I wasted allot of time beating on the aluminum parts I created and should just trusted what the paper was telling me. I figure this took about 15hrs of work from design to finished part.
The cover is held together with a mess of 3/16 closed end rivets and attached to the car using 22 10/24 stainless steel screws. The interior of the cover is insulated with DEI heat barrier and the Hurst boot seals everything at the top. The cover is removable to facilitate future trans R&Rs and shifter maintenance.
Pattern
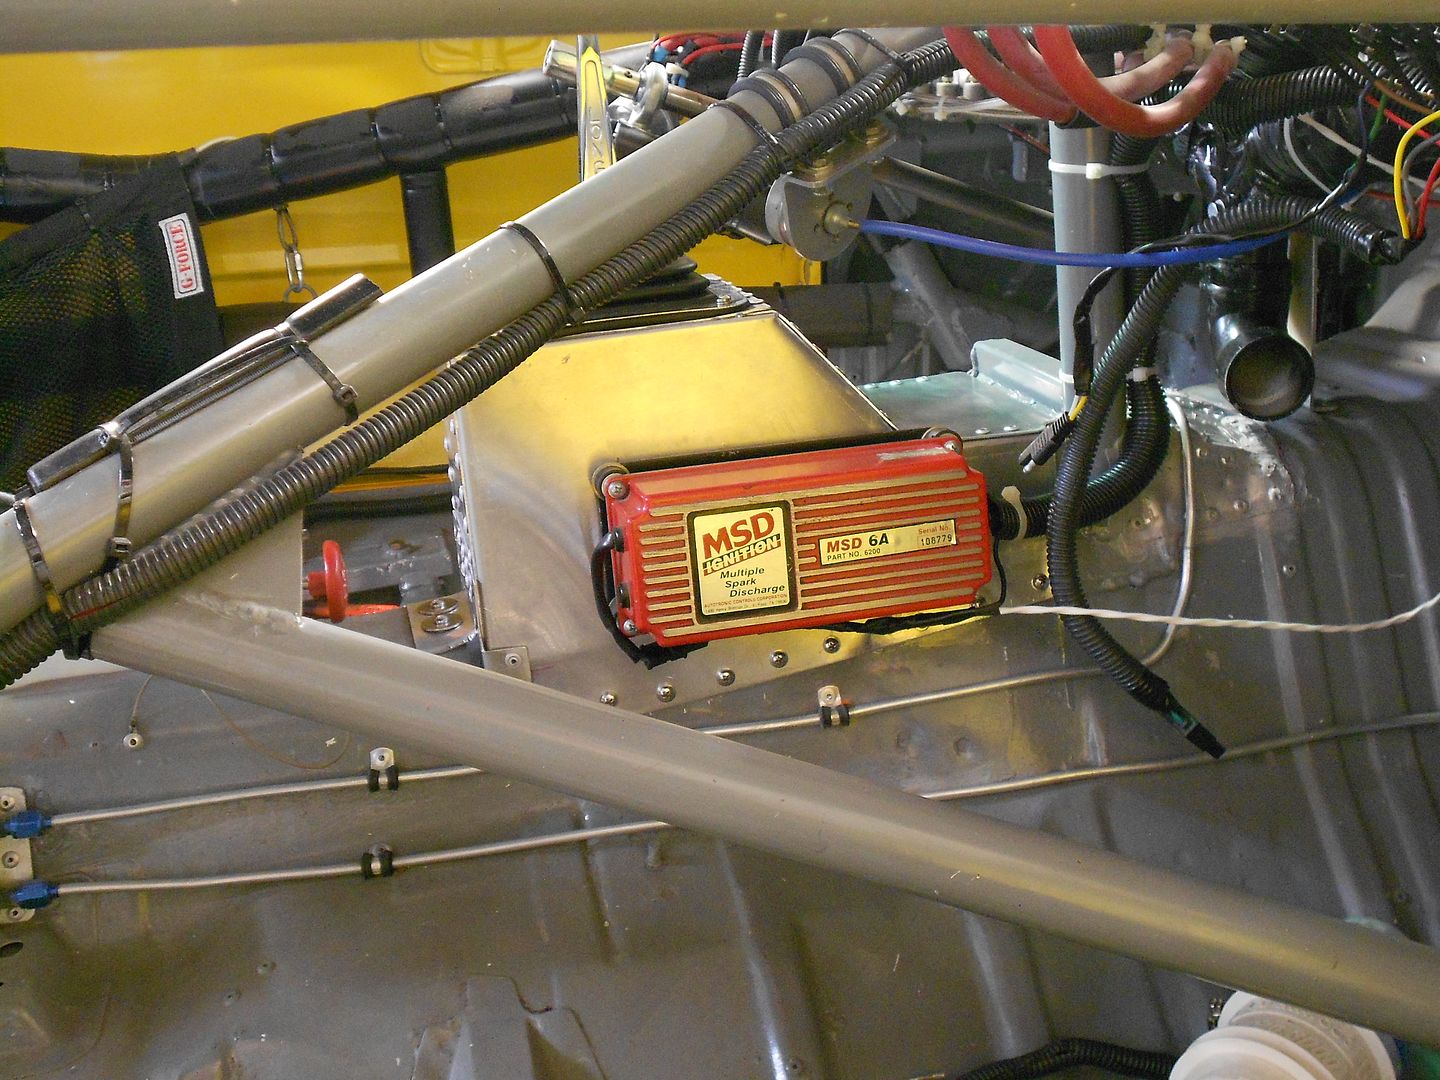
Finished Product
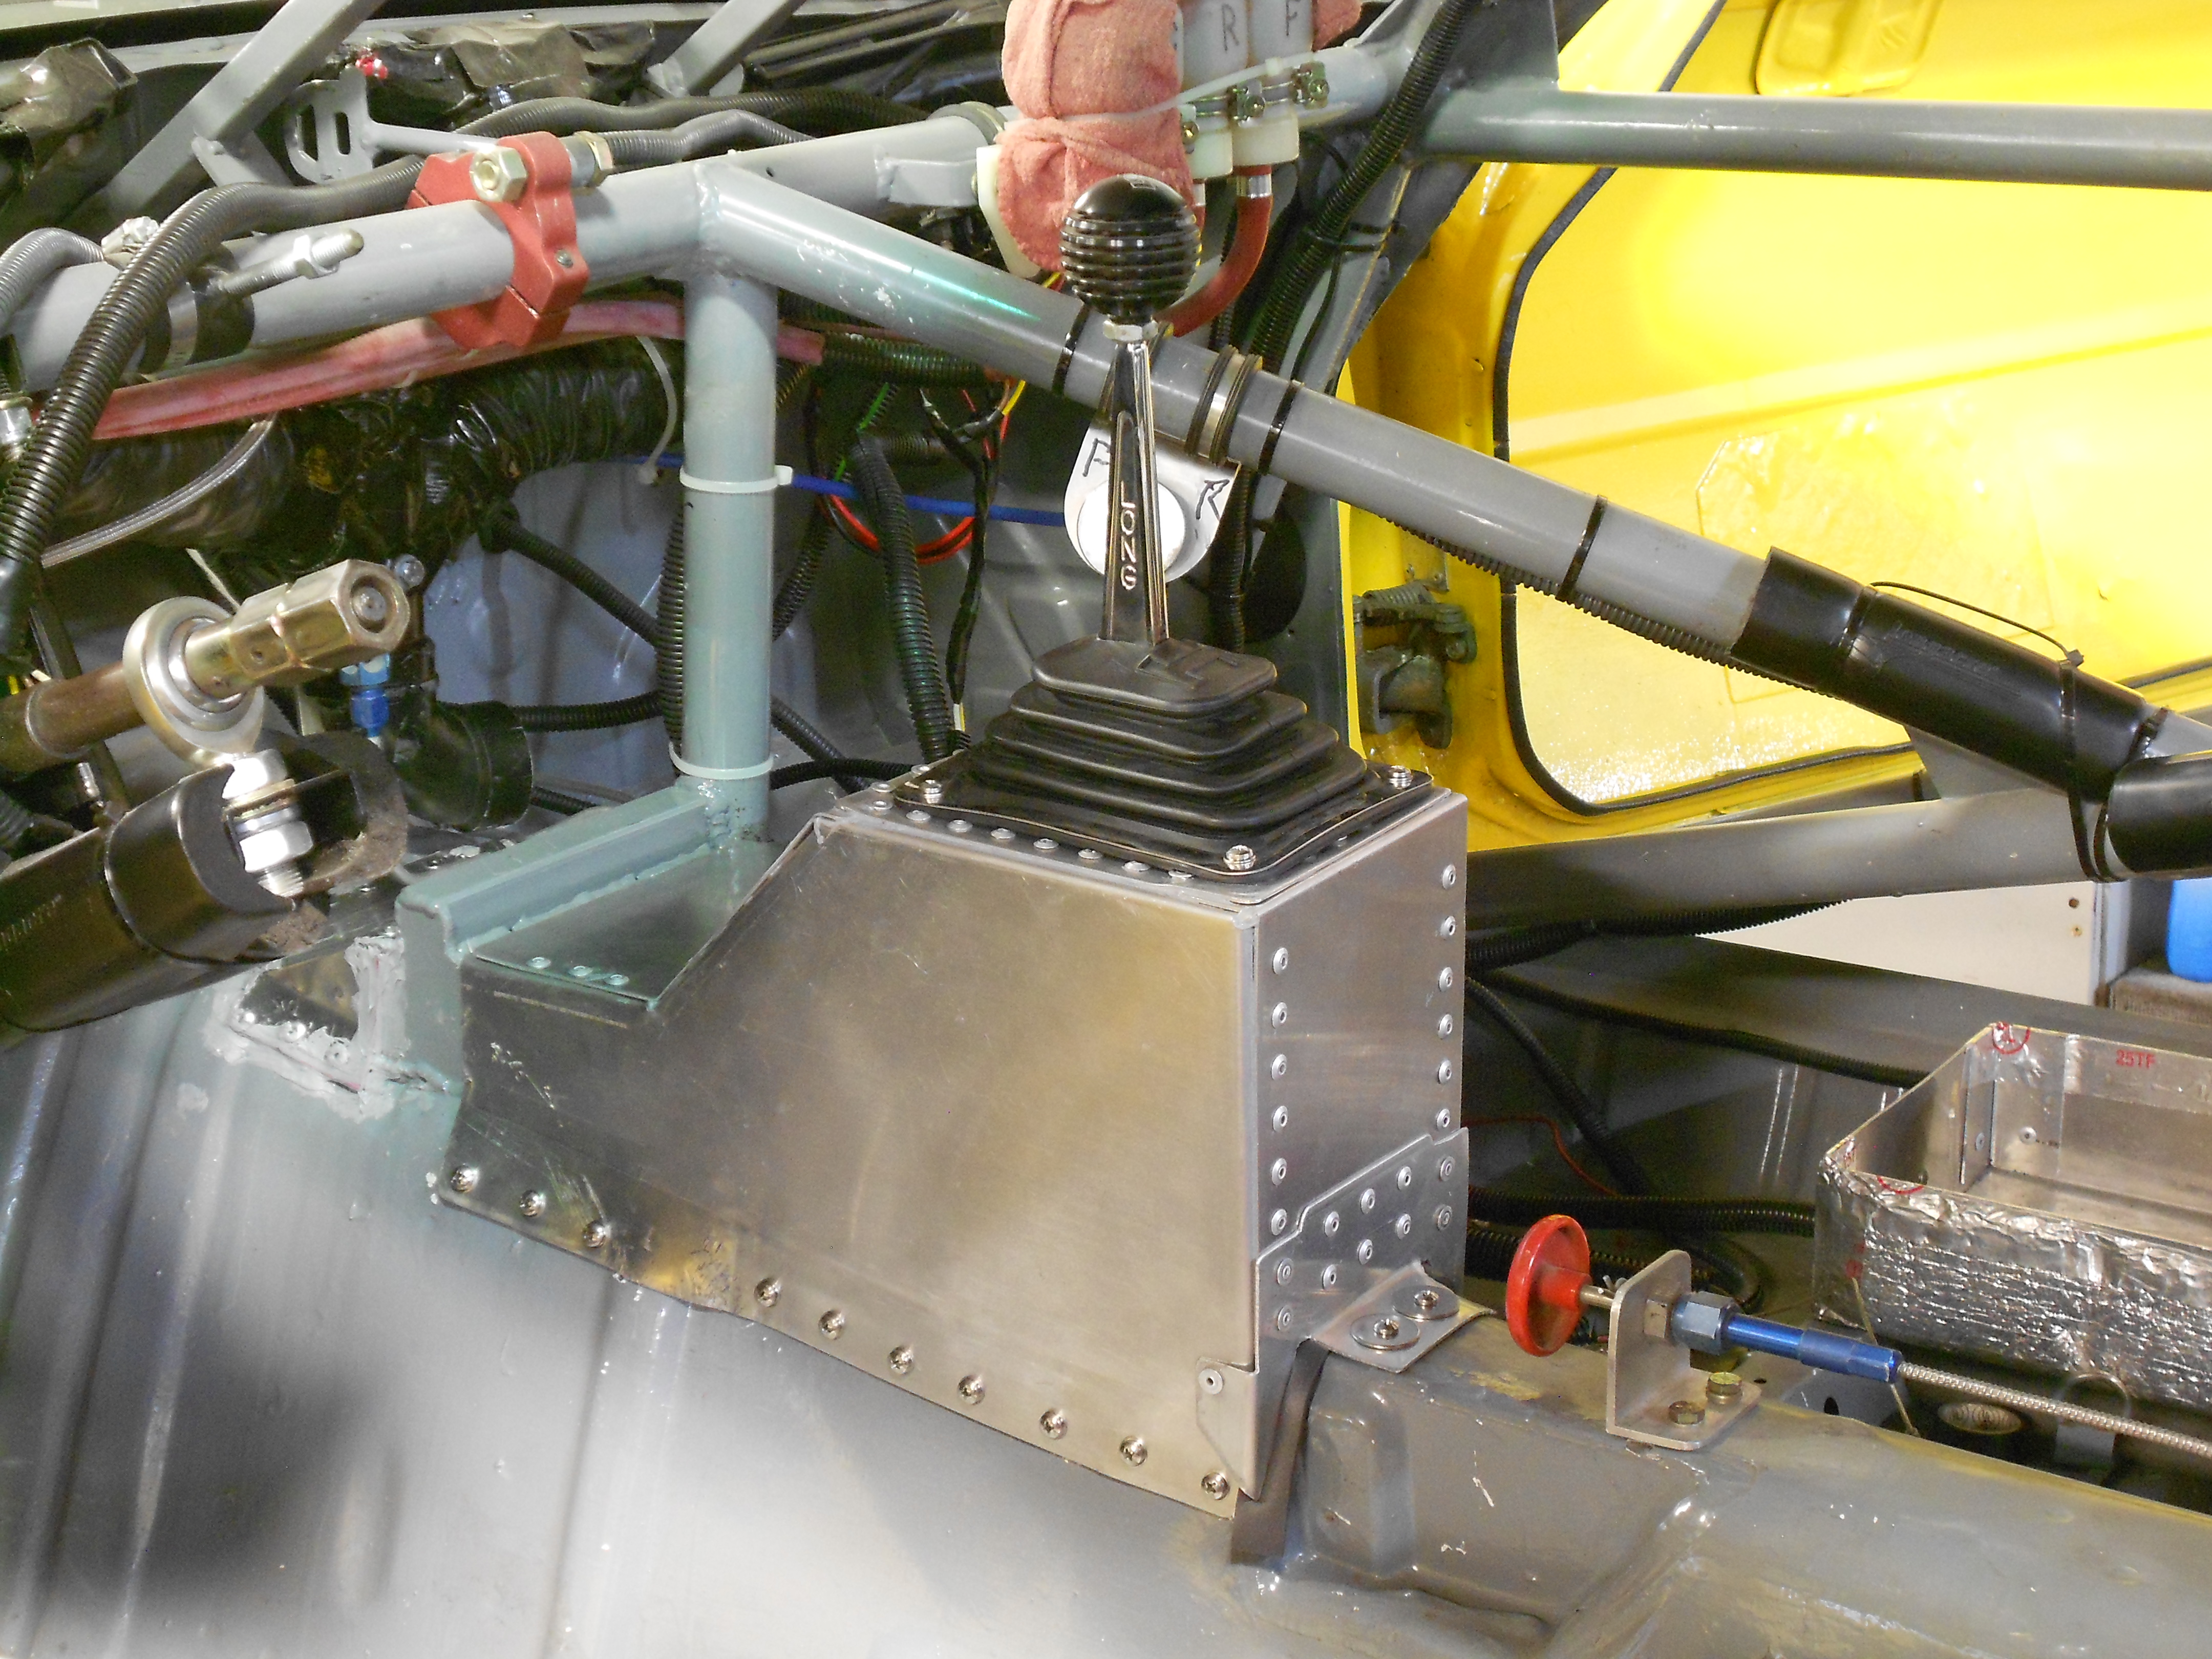
Doubles as an MSD mount
