Project Naomi III : End of Summer 2010 Update
 09-05-10, 01:21 AM
#1
Project Naomi III : End of Summer 2010 Update
For anyone looking for the other project threads:
Project Naomi I : New Project on an Old Favourite
Project Naomi II : Giant Rotisserie Pictures Update
Project Naomi III : End of Summer 2010 Update
Project Naomi IV : Almost Off The Rotisserie
Project Naomi V : Finally PAINT!
Project Naomi VI : IT LIVES!
Project Naomi VII : Coming Home
-----
Hey All,
Joe over at ClassicAuto has been absolutely awesome at keeping me up to date on the project. I, on the other hand, have been rather remiss on updating things here on the forum, so I'm lumping the last 5 update emails he sent me over the last two months into one big progress thread
The good news is that the project is still moving along. The bad news is that the battle has been a little harder than we initially anticipated. Every tool in the shop is being brought out in the fight against the evils of Rust!
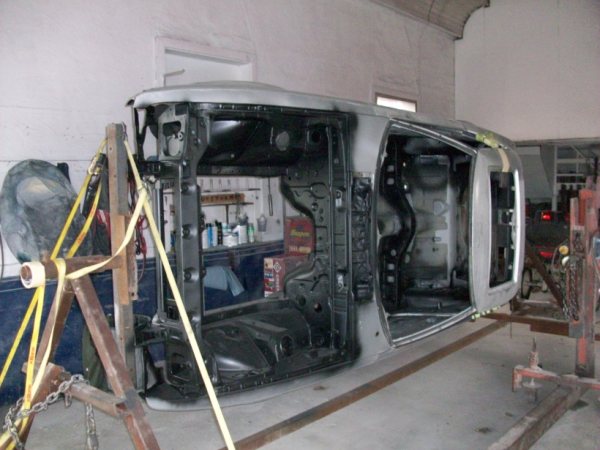
Last we checked in it was July, the car was stripped, the parts were ordered, and it was time to begin removing the tar from the underneath. Here are a few quotes from Joe's emails to give you an idea of what he's up against
Of course, a thousand other things happened in between this fight against 26 years of rustproofing tar, road grime, and anything else that ends up stuck underneath an rx7 with over 200,000km on it!
One of the trickiest parts to get ahold of was the replacement for this broken end link:
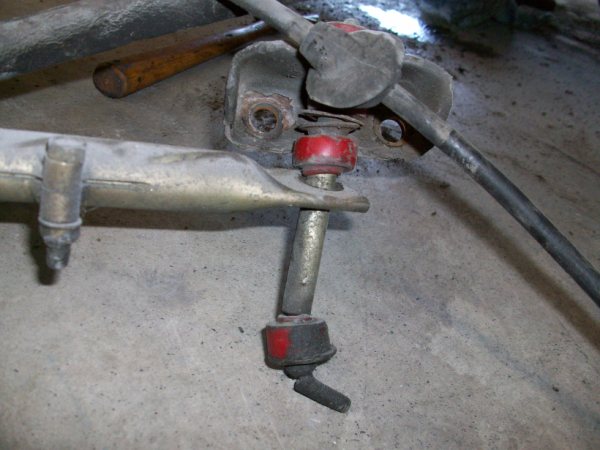
The end links came with my Racing Beat front and rear Swaybar kit. I actually broke that one the day I picked up the car from having the rear swaybar installed. I took the car from RPM's garage to a local car wash at a Petro Canada station, which had one of those guide-bar-belt things that pull your car through. The car sits so low that one of the guide bars made contact with the end link and bent it until it almost snapped. Suffice it to say, I wasn't amused. But, I drove with it bent like that for a season or two and never got around to fixing it.
I called Racing Beat about them, figuring it was better to order a brand new set of exactly the same ones that the sway bar was meant to go with, rather than risk buying something that might not fit properly. As it turns out, nobody had ever asked them for a set of the end links on their own before!
It took about three weeks, but they managed to order in a set of end links, give them a SKU, get them into inventory, send them out for galvanizing, come up with a price and then finally ship them out to me.
When all was said and done, a nice big pile of parts was sitting in Joe's office over at ClassicAuto waiting to be installed much later in the project:
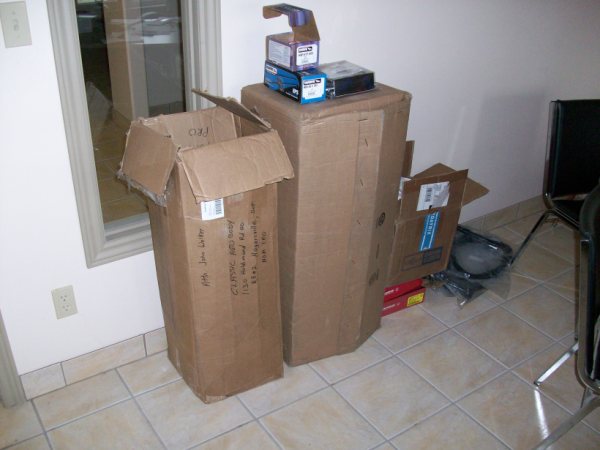
In total, we got:
- Front and Rear carpet kit from stockinteriors.com, black, made with "Plush Pile" and the added "Mass Backing" for more heat and noise insulation. Ordered a square yard of extra carpet for those odd spots that the kit doesn't cover.
- 80sq ft of Damplifier Pro Sound Deadening Material
- 36sq ft of Luxury Liner Pro Sound Absorbsion Material
- Two brand new rear discs, Hawk HPS Pads all around, and SS Brake Hoses all around
- Racing Beat replacement Rear End Links
- ReSpeed Poly Bushing Kit to replace ALL the bushings front and rear
- Door weatherstripping, window run channel and related rubber
Not to mention the parts car itself, which was $500 well spent! We'll be stripping the front passenger fender, bumper, valance, brake ducts, door panels, power window motors, and the entire rear end including Limited Slip Diff and Disc Brake Hadware from it.
So as August began, the undercoating was putting up a hell of a fight, and we started to cut the rustybits we saw in the last update
Which was a great start, but just a little while later...
And that came with a bunch of pictures that could make any car owner cringe:
More updates in just a sec...
Project Naomi I : New Project on an Old Favourite
Project Naomi II : Giant Rotisserie Pictures Update
Project Naomi III : End of Summer 2010 Update
Project Naomi IV : Almost Off The Rotisserie
Project Naomi V : Finally PAINT!
Project Naomi VI : IT LIVES!
Project Naomi VII : Coming Home
-----
Hey All,
Joe over at ClassicAuto has been absolutely awesome at keeping me up to date on the project. I, on the other hand, have been rather remiss on updating things here on the forum, so I'm lumping the last 5 update emails he sent me over the last two months into one big progress thread
The good news is that the project is still moving along. The bad news is that the battle has been a little harder than we initially anticipated. Every tool in the shop is being brought out in the fight against the evils of Rust!
Last we checked in it was July, the car was stripped, the parts were ordered, and it was time to begin removing the tar from the underneath. Here are a few quotes from Joe's emails to give you an idea of what he's up against
Originally Posted by Joe from ClassicAuto
... the under coating on that car has to be the most difficult to clean undercoat job I've ever run across LOL sitting in degreaser + hot water pressure washing has only removed part of it....have to do that process a few more times.
...(some time later)...
The undercarriage I've left soaking for about a week, re-applied some degreaser a few days ago as well. In the mean time I've been trimming around the known rusty areas, and poking around to find a few more
...
I'll be pulling it out to pressure wash the underside next week, so I should have some shots of it cleaned off at that point.
Of course, a thousand other things happened in between this fight against 26 years of rustproofing tar, road grime, and anything else that ends up stuck underneath an rx7 with over 200,000km on it!
One of the trickiest parts to get ahold of was the replacement for this broken end link:
The end links came with my Racing Beat front and rear Swaybar kit. I actually broke that one the day I picked up the car from having the rear swaybar installed. I took the car from RPM's garage to a local car wash at a Petro Canada station, which had one of those guide-bar-belt things that pull your car through. The car sits so low that one of the guide bars made contact with the end link and bent it until it almost snapped. Suffice it to say, I wasn't amused. But, I drove with it bent like that for a season or two and never got around to fixing it.
I called Racing Beat about them, figuring it was better to order a brand new set of exactly the same ones that the sway bar was meant to go with, rather than risk buying something that might not fit properly. As it turns out, nobody had ever asked them for a set of the end links on their own before!
It took about three weeks, but they managed to order in a set of end links, give them a SKU, get them into inventory, send them out for galvanizing, come up with a price and then finally ship them out to me.
When all was said and done, a nice big pile of parts was sitting in Joe's office over at ClassicAuto waiting to be installed much later in the project:
In total, we got:
- Front and Rear carpet kit from stockinteriors.com, black, made with "Plush Pile" and the added "Mass Backing" for more heat and noise insulation. Ordered a square yard of extra carpet for those odd spots that the kit doesn't cover.
- 80sq ft of Damplifier Pro Sound Deadening Material
- 36sq ft of Luxury Liner Pro Sound Absorbsion Material
- Two brand new rear discs, Hawk HPS Pads all around, and SS Brake Hoses all around
- Racing Beat replacement Rear End Links
- ReSpeed Poly Bushing Kit to replace ALL the bushings front and rear
- Door weatherstripping, window run channel and related rubber
Not to mention the parts car itself, which was $500 well spent! We'll be stripping the front passenger fender, bumper, valance, brake ducts, door panels, power window motors, and the entire rear end including Limited Slip Diff and Disc Brake Hadware from it.
So as August began, the undercoating was putting up a hell of a fight, and we started to cut the rustybits we saw in the last update
Originally Posted by Joe from ClassicAuto
I've cut the inner portions (of the wheel wells) off so we can blast between where those panels rotted.
Which was a great start, but just a little while later...
Originally Posted by Joe from ClassicAuto
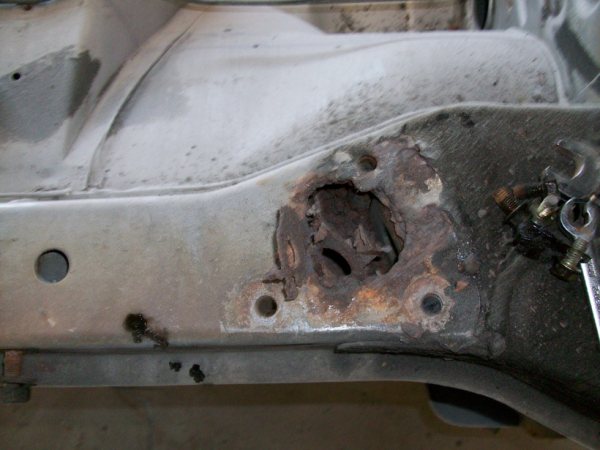
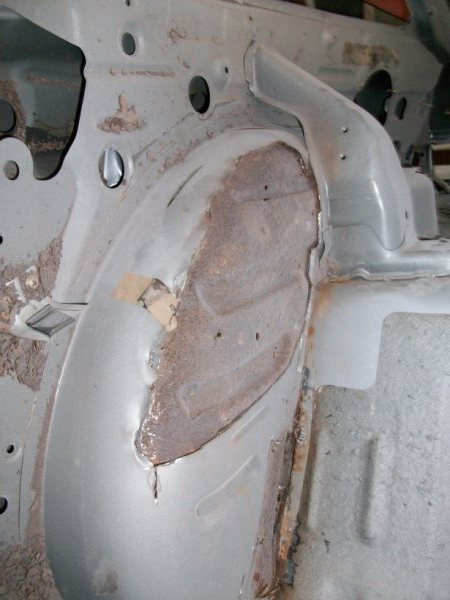
The surprise areas are in the driver's foot well (both panels rotted, its where your feet would sit by the pedals) and behind the passenger side rear mount for the subframe. You know those large triangle plates on the rack kit that sandwich the frame rail? Behidn there, a nice, rough hole.
...
The wheel wells in the rear (i've attached pics after trimming) are actually pretty rough. The way those panels are assembled is part of the problem too - they aren't really a true "two layer" panel, they are actually a bunch of pieces of single layer panel, doubled over in some spots. I have found holes that go through to the outside (some of which are on the mounts for those lower lateral arms for the diff) so there'll be some extensive metal work there. Basically, if you look at the pics of the wheel well, you'll see the areas I've cut off - the pieces that are left make up the wheel well in one layer, its just that they're small pieces...not sure if that makes sense or not, but hopefully it comes across
More updates in just a sec...
Last edited by vipernicus42; 08-23-15 at 10:02 PM.
 09-05-10, 01:40 AM
#2
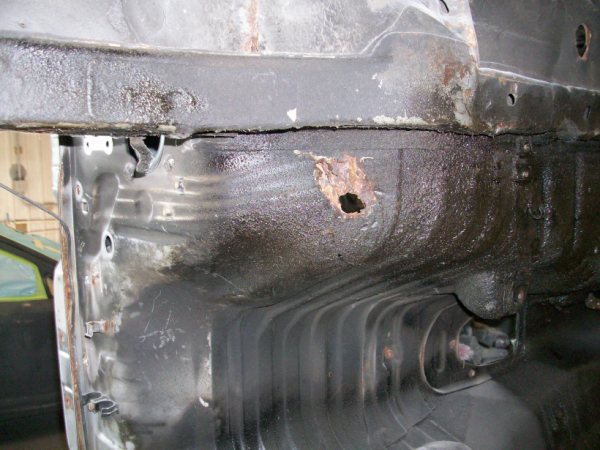
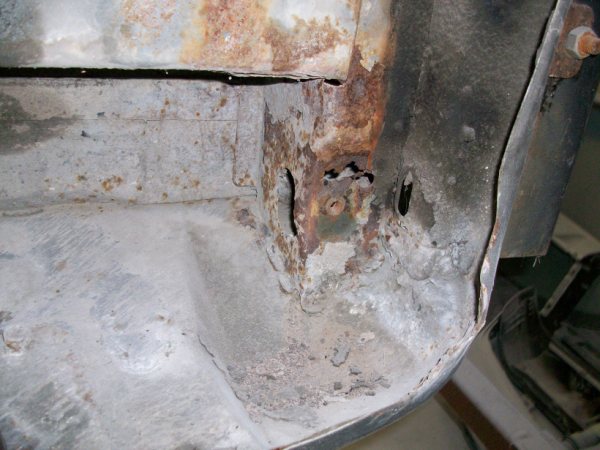
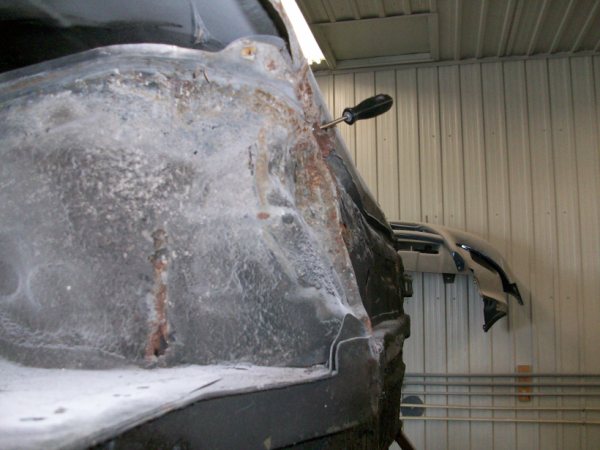
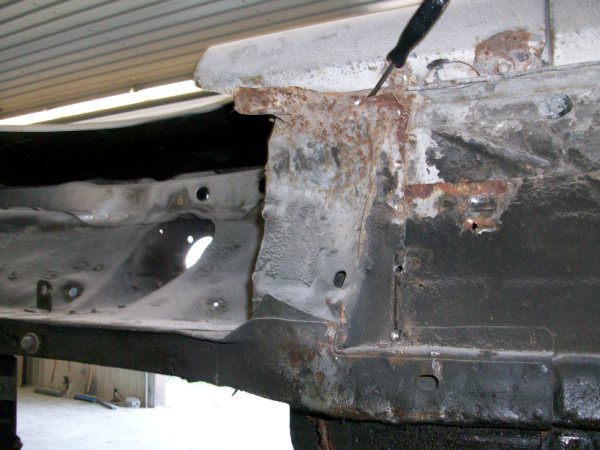
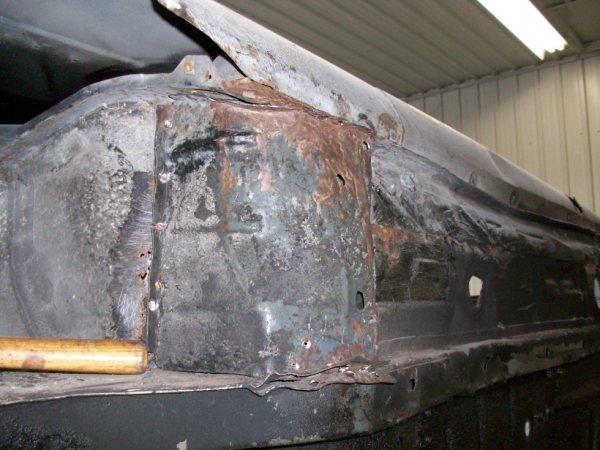
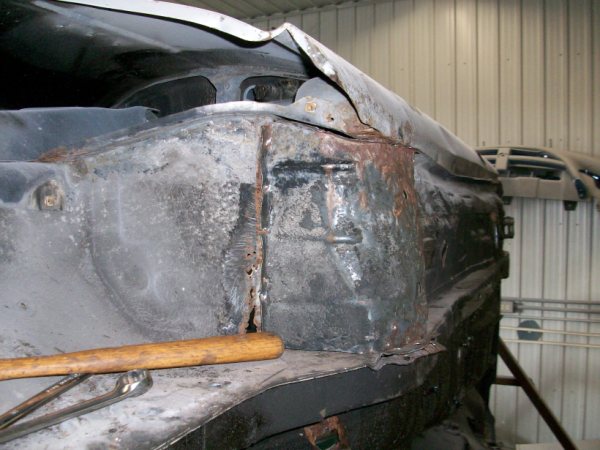
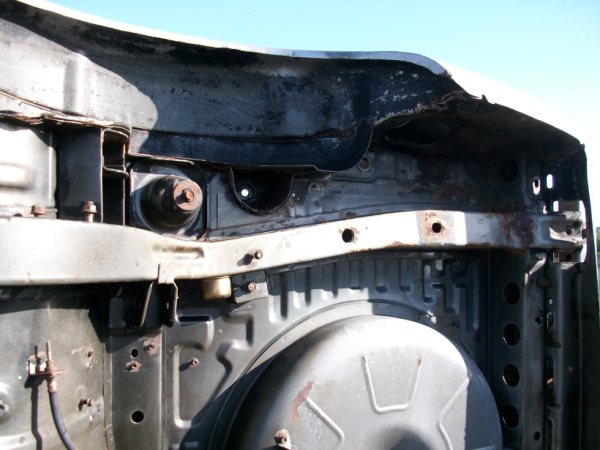
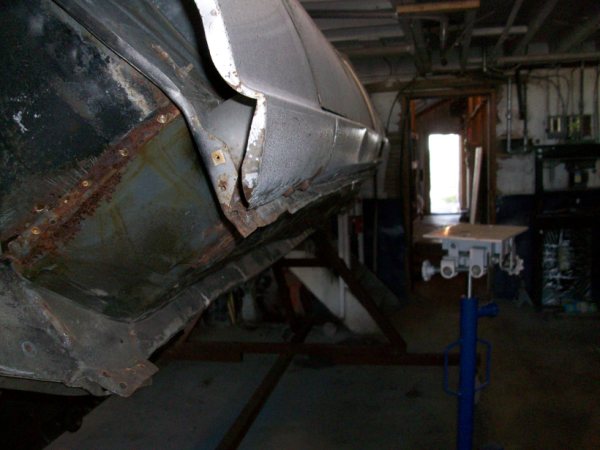
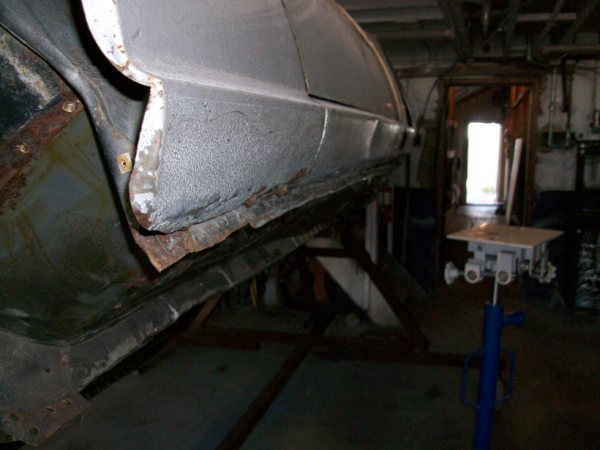
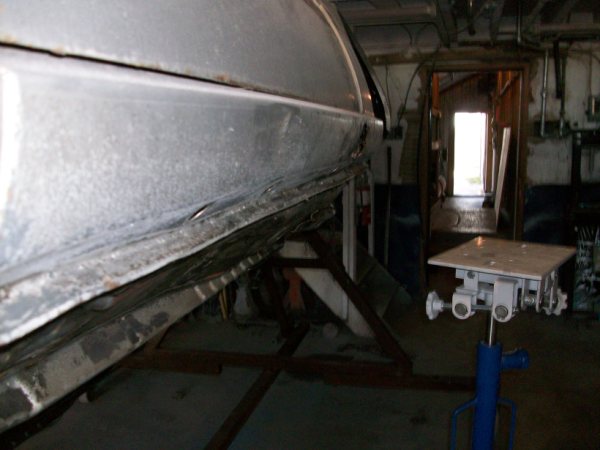
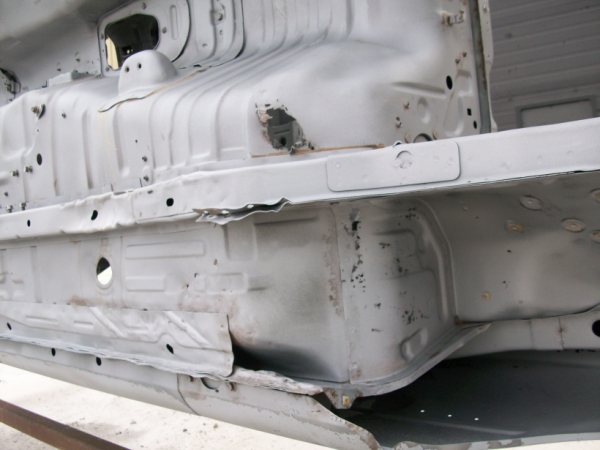
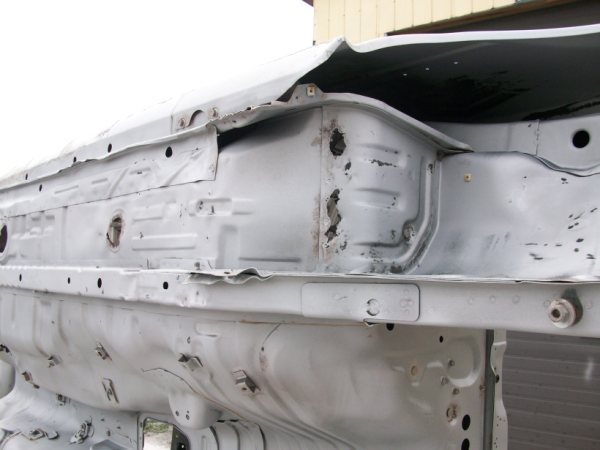
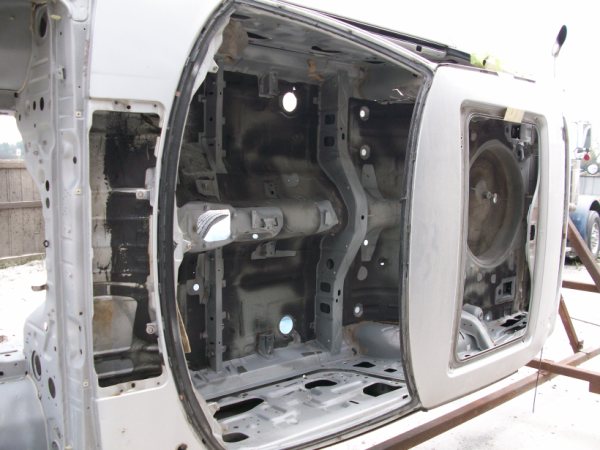
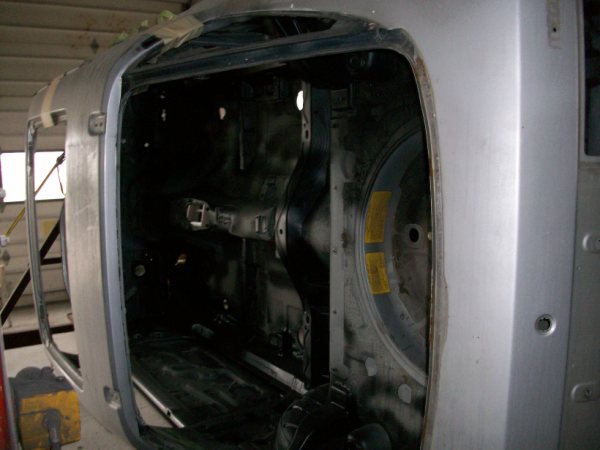
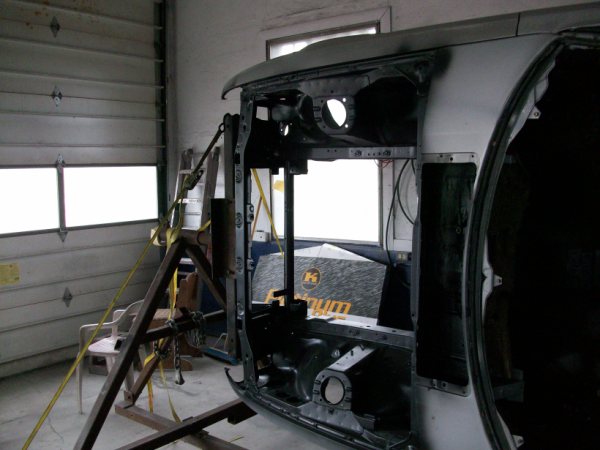
That brings us to the end of August. In the last update thread I showed some pictures of the rocker panels which had been bent along with the floor when the car got jacked up in the middle instead of at the jacking points. There was also floor damage further forward around where the jacking point actually is, and further inwards towards the transmission tunnel where rust had eaten through under the driver's feet.
Joe started working on those floors, and in the process found even more evil rust:
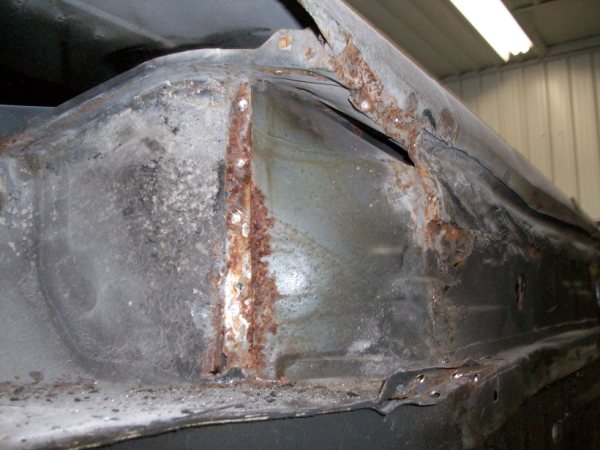
I just love what looks like a baseball batt that appears in these two pictures of the new floor sitting in its place. It's probably the handle of a mallet or sledge of some sort, but I'm sure there have been a few points where Joe wished he could take a bat to the car in frustration!
So at this point, it's very likely that the project will push past the end of the season into the winter. But as much as this update might sound like so much doom and gloom, I'm actually very enthusiastic and hopeful about the project now. There's nothing like a pile of new parts to get your spirits up, and this past week I helped my friend Joel get his FB on the road, and taught him to drive standard so that he could actually take it out for a spin.
I must admit that driving one again has definitely reminded me of what I've been missing whilst driving my comfy sedan around all summer, but it puts a smile on my face to know that next spring I'll have a "brand new" FB to drive around in, with all wheel discs, limited slip differential, a gorgeous paint job and not a single goddamn spot of rust on it!
Keep up the good work Joe, I can't wait to see the next chapter of this story unfold!
Jon
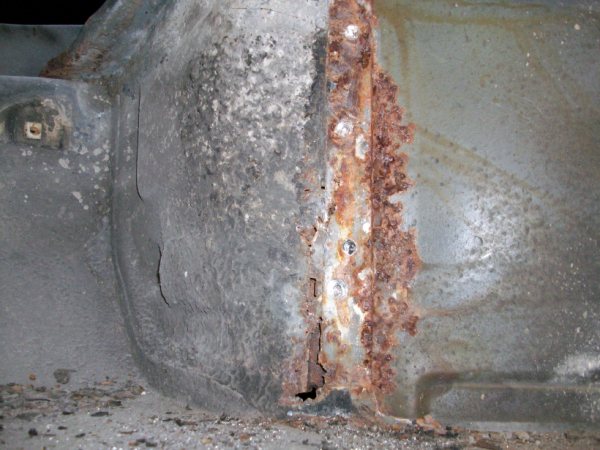
Joe started working on those floors, and in the process found even more evil rust:
Originally Posted by Joe from ClassicAuto
Have some pics of the floor section (under drivers feet) I'm straightening.
I had to drill the spot welds off of that section, remove it entirely, and hammer the damage out. The otherside I was able to get decent with studs and a slide hammer, but this side was just demo'd.
The last pics are the straightened part just sitting on there. Needs a couple little tweaks when it gets welded back on (after blasting/epoxy)
I'm running into alot of little areas like the seams pictured though. That seam is underneath the removed part, and is a joint for three pieces, the removed part, and the two rotted floor boards. I'm finding alot of seams that will need a section welded in because they're littered with pin holes....just more lovely surprises
I just love what looks like a baseball batt that appears in these two pictures of the new floor sitting in its place. It's probably the handle of a mallet or sledge of some sort, but I'm sure there have been a few points where Joe wished he could take a bat to the car in frustration!
So at this point, it's very likely that the project will push past the end of the season into the winter. But as much as this update might sound like so much doom and gloom, I'm actually very enthusiastic and hopeful about the project now. There's nothing like a pile of new parts to get your spirits up, and this past week I helped my friend Joel get his FB on the road, and taught him to drive standard so that he could actually take it out for a spin.
I must admit that driving one again has definitely reminded me of what I've been missing whilst driving my comfy sedan around all summer, but it puts a smile on my face to know that next spring I'll have a "brand new" FB to drive around in, with all wheel discs, limited slip differential, a gorgeous paint job and not a single goddamn spot of rust on it!
Keep up the good work Joe, I can't wait to see the next chapter of this story unfold!
Jon
09-05-10, 03:06 PM
#4
My 7 is my girlfriend.
iTrader: (5)
Join Date: Feb 2006
Location: London, Ontario, Canada
Posts: 3,162
Likes: 0
Received 1 Like
on
1 Post
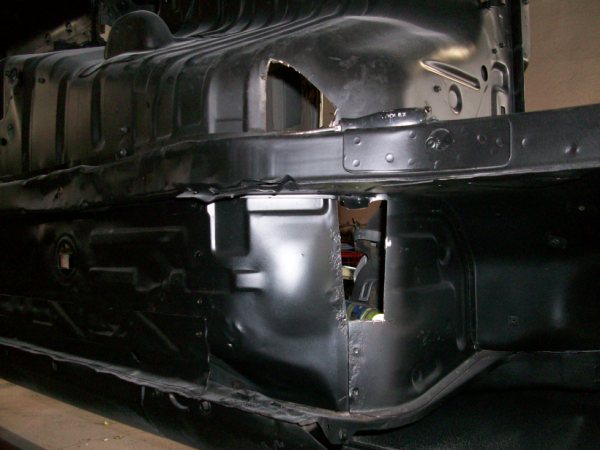
My car has that exact same hole on the passenger side frame rail in the engine bay. I ground it out and painted it, but that just made the hole a bit bigger. It's going to need some serious work like yours.
09-05-10, 08:59 PM
#6
See, that's what I *thought* was the worst I had. You really can't find a lot of this until the car is stripped to this level, or until it's too late. From all the inspection Joe and I did on the car before the project started, the only rust we could find was what looked to be a bit of surface rust in the wheel wells under the bins that hadn't perforated through yet. It wasn't until we got the car down to the bare shell that we started seeing this kind of thing.
It makes me glad I'm doing this project. I wouldn't have felt comfortable just buying a "clean shell" because I thought mine was a clean shell and look what we found.
I've seen too many cars get stripped down to find surprises under the paint, the carpets, and random panels to trust appearances. Even if I had a shell I was very sure was clean, I'd still want to do this level of project on it, to make sure that after 26 years we could put it back to factory. To reset the clock so to speak, to get another two decades or more out of her.
Jon
09-05-10, 09:03 PM
#7
Unfortunately, last year I had a lead on a shell that *was* stripped to this extent already and had no rust on it, and could have bought it for $300! (dude was getting a divorce and just had to get rid of it). But it was 600km away, I had nowhere to store it, no way to get it, and since it had no wheels, no way to get it to wherever I would store it. It would have been awesome to grab that shell and then just swap everything over, but I missed that chance.
Trending Topics
09-08-10, 09:58 AM
#8
Another update on the Tar-Of-Death on the underside of the car
It's insane. Who would have thought that one of the big challenges of this project would be removing the tar?
Jon
Originally Posted by Joe from ClassicAuto
I'll have some nice little pics in the nextt day or two. The pressure washing attempts just aren't cutting the mustard on the tar underneath that car.
Have a guy coming with an old school steamer tonite to blast at it. We use his services for cleaning grease off of transport truck frames (unreal job) so it should be super clean here very soon, then sandblasting!
Have a guy coming with an old school steamer tonite to blast at it. We use his services for cleaning grease off of transport truck frames (unreal job) so it should be super clean here very soon, then sandblasting!
Jon
09-11-10, 01:14 PM
#9
Tar-B-Gone!
In the words of Joe:
"1800psi of boiling water was all it took!"
But after all that, it's clean. Now it's time for sandblasting, epoxy, and any remaining metal work. The chassis gets that treatment first, then things like the rear end, control arms, etc...
"1800psi of boiling water was all it took!"
But after all that, it's clean. Now it's time for sandblasting, epoxy, and any remaining metal work. The chassis gets that treatment first, then things like the rear end, control arms, etc...
 09-13-10, 06:19 PM
#11
Well here's one case where my usual addage of "If at first you don't succeed, get a bigger hammer" doesn't quite work - when you're trying to pull dents *out* of metal like in the case of my rocker panels.
Joe got it covered though. When slide hammers weren't enough, some heavy duty chain, clamp and presumably a giant weight or puller somewhere off-camera were used to help pull these dents out.
It's quite the sight to behold. It looks like we're almost done repairing the damage that I managed to do to the car myself (way back when I didn't know better), that's gotta be progress!
And the email contained words that I've been just dying to hear:
Hell yes!
Pics! :
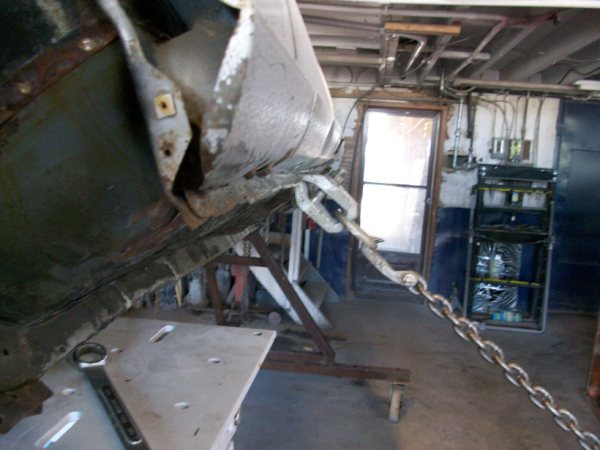
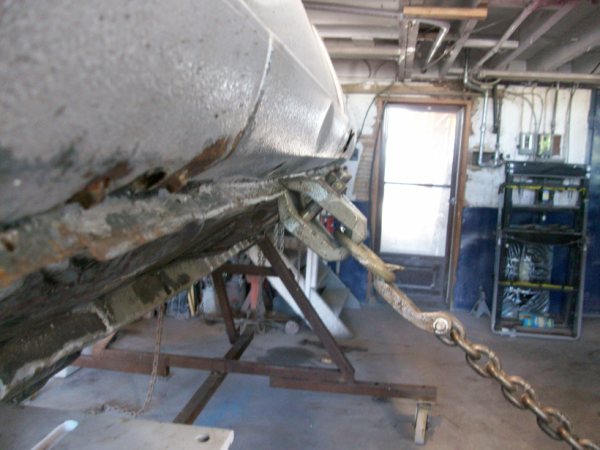

Joe got it covered though. When slide hammers weren't enough, some heavy duty chain, clamp and presumably a giant weight or puller somewhere off-camera were used to help pull these dents out.
It's quite the sight to behold. It looks like we're almost done repairing the damage that I managed to do to the car myself (way back when I didn't know better), that's gotta be progress!
And the email contained words that I've been just dying to hear:
Originally Posted by Joe from Classicauto
...
Sandblasting should take place thursday.
...
Sandblasting should take place thursday.
...
Pics! :
09-14-10, 03:56 PM
#12
Lives on the Forum
Very nice Jon. I didn't realize that it was Joe doing the work on your car. I've never met him, but have read a lot of his posts. Seems like he knows his stuff.
Can't wait to see the finished product. Maybe I'll be next in line...
.
Can't wait to see the finished product. Maybe I'll be next in line...
.
09-14-10, 04:36 PM
#13
Hey, Jon;
Would you ask Joe a question for me?
Note in your pic here:
That you've got some damage to the frame runner, looks like jack or jack stand crimping. Is this something that can be fixed by a body shop without disassembling the car or having to cut and weld sections?
I've got a similar area that I'd like to get fixed if it's not gonna break me.
Thanks!
09-14-10, 05:54 PM
#14
Jon
 09-14-10, 08:53 PM
#16
Lookin good! That frame rail reminds me of what Miata's can get to fix that:
http://www.good-win-racing.com/Mazda...ml?id=mKb9hbyF
Wonder if something like that could be made for the RX?
http://www.good-win-racing.com/Mazda...ml?id=mKb9hbyF
Wonder if something like that could be made for the RX?
09-14-10, 09:52 PM
#17
Lookin good! That frame rail reminds me of what Miata's can get to fix that:
http://www.good-win-racing.com/Mazda...ml?id=mKb9hbyF
Wonder if something like that could be made for the RX?
http://www.good-win-racing.com/Mazda...ml?id=mKb9hbyF
Wonder if something like that could be made for the RX?
09-15-10, 12:56 AM
#19
Wrkn Toyota, Rootn Wankel
Join Date: Sep 2007
Location: "Haystack" Hayward, CA
Posts: 1,642
Likes: 0
Received 1 Like
on
1 Post
I'd rather just cut the rails out and weld in new ones personally, I'd feel better knowing that new tube stock was supporting the frame than some pulled out/bolted on sheetmetal, but that's just me.
09-29-10, 07:06 PM
#20
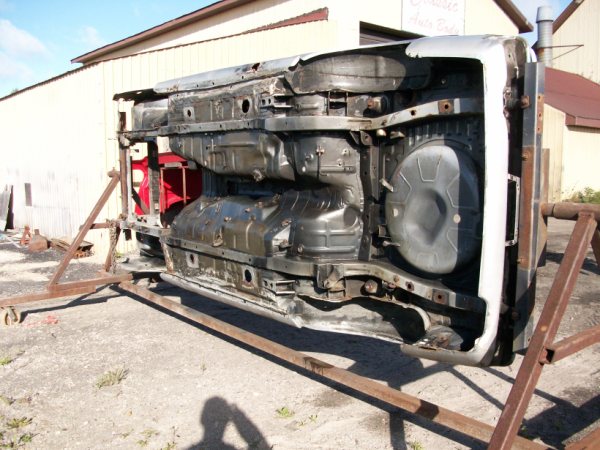
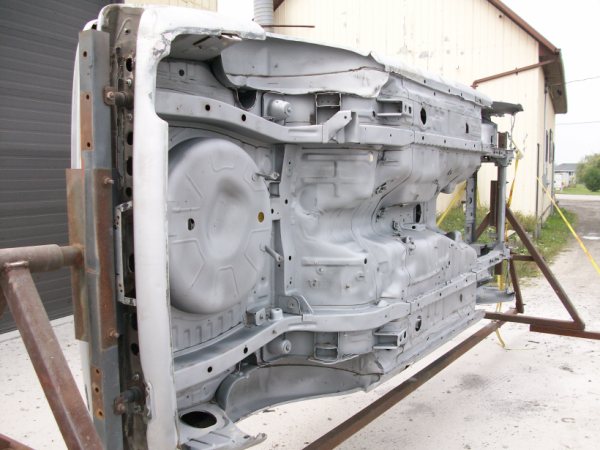
Another awesome update from Joe, and this one is the big milestone I've been waiting for!
We have finally removed all the paint, bondo, grease, grit, dirt, rust, and everything else that was covering the body of the car! Any perforations, any remaining imperfections in the body have been revealed and are now able to be dealt with. The paint hides no more secrets!
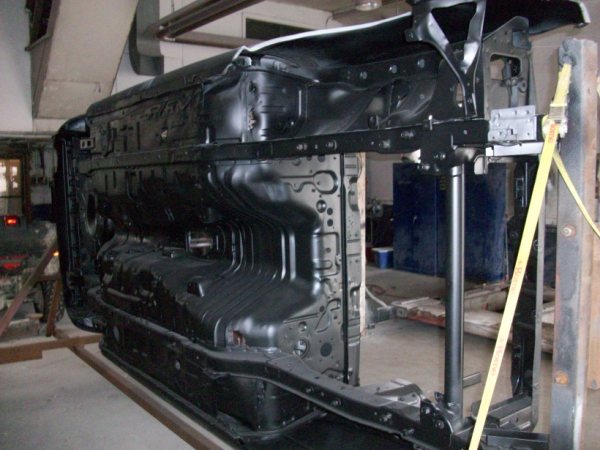
So here are some pictures of what it looks like after 26yrs of everything the world could throw at this car has been removed. As you can see we found a few holes, but nothing Joe's expert metalwork can't fix.
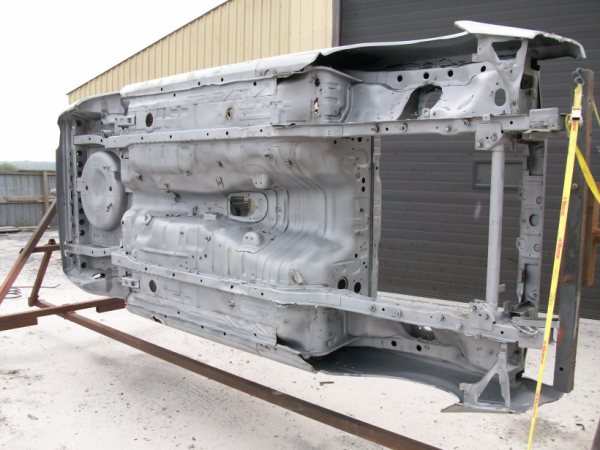
Originally Posted by Joe from ClassicAuto
OK, sandblasting got done last thursday, as it was pouring rain out the thursday before.
Here's the pics of bare chassis, and after epoxy. It still has to have the patching done, but the idea blasting first to expose any other weak areas as well as clean any saveable panels before being patched over (ie. the rear wheel wells).
So it was blasted and primed immediately to prevent any flash rusting. Now when areas get patched the spot will be ground, weld-thru primer applied, patched, and re-epoxy the area. Once thats done, it all gets scuffed, a light coat of epoxy for chem. adhesion, then bedlined.
So here are some pictures of what it looks like after 26yrs of everything the world could throw at this car has been removed. As you can see we found a few holes, but nothing Joe's expert metalwork can't fix.
09-29-10, 07:39 PM
#21
I did the same thing to the widebody and dj55b's shell car. I didn't have a rotisserie, laying under a car body and sandblasting is not fun. Sand gets everywhere one doesn't want it.  There's 2 easy ways to remove the undercoating. One is to freeze it with dry ice, the other is to rotate the body upside down, then lay shop towels on the tar and saturate with mineral spirits/paint thinner. Cover with plastic/Saran Wrap and let soak a couple days. Once frozen or softened it can be removed with a putty knife followed by a scotch pad and mineral spirits.
Kudos to Joe, he's done a fine job. I was wondering why he left the front fenders on?
There's 2 easy ways to remove the undercoating. One is to freeze it with dry ice, the other is to rotate the body upside down, then lay shop towels on the tar and saturate with mineral spirits/paint thinner. Cover with plastic/Saran Wrap and let soak a couple days. Once frozen or softened it can be removed with a putty knife followed by a scotch pad and mineral spirits.Kudos to Joe, he's done a fine job. I was wondering why he left the front fenders on?
09-29-10, 08:00 PM
#22
Yeah, and there was still quite a bit of work for Sam to do even then! So I know Joe has his work cut out for him still, even though this is a huge milestone to achieve.
I'll ask him about the fenders, because you're right that it would make more sense to sandblast them separately and blast underneath them as well... Especially since once of them is being replaced with one off the parts car anyway...
Jon
I'll ask him about the fenders, because you're right that it would make more sense to sandblast them separately and blast underneath them as well... Especially since once of them is being replaced with one off the parts car anyway...
Jon
09-30-10, 11:37 PM
#23
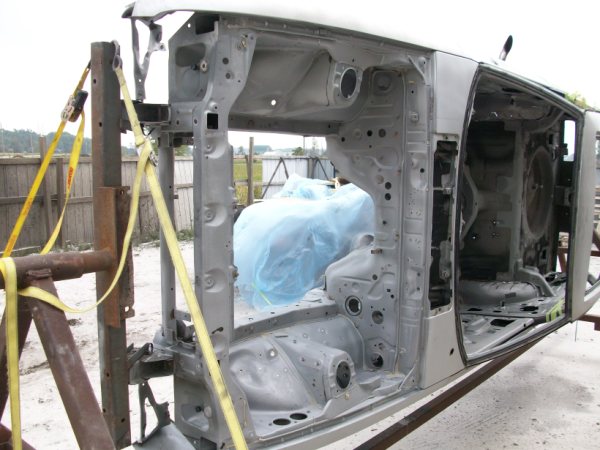
And I thought the sandblasting pics looked good (well, they did, but...), these pics look even better!
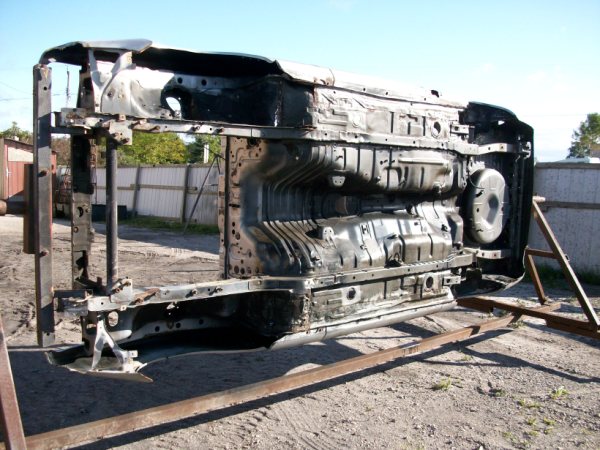
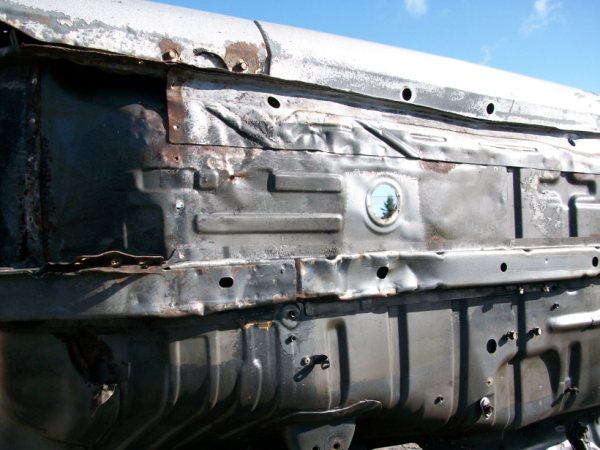
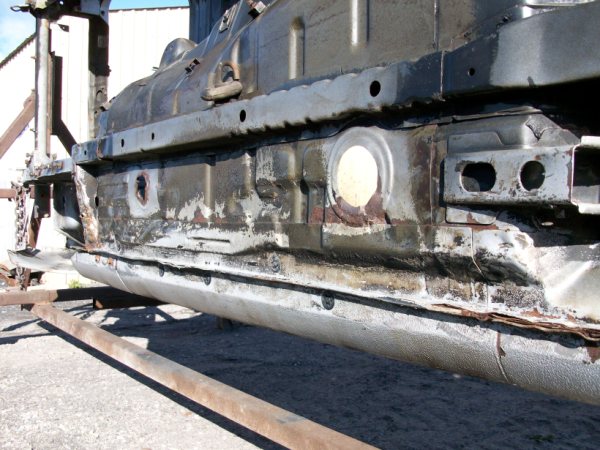
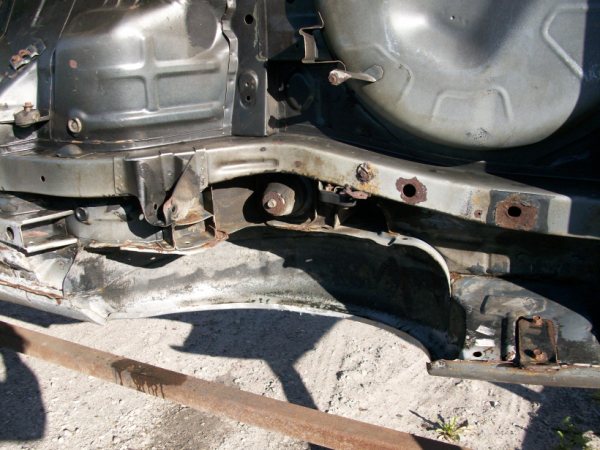
Joe sent over some pics of the underside and engine bay after their coat of epoxy. The remaining metal work for the underside is in progress, patching up any areas revealed by the sandblasting, as seen in the last pic. It should also straighten out that nagging question for anyone who was wondering why the doors and fenders were still on, since it might have been hard to tell that the rest of the car's body hadn't been sandblasted, since the paint is (or rather used to be) silver-ish.
The plan is to bring the underside to 100% completion including all metal work, epoxy and the "truck bed liner"-style super-tough undercoating. Then, do the same process on all the suspension parts including the rear axel, control arms, etc... Reassemble the suspension and take the car off the rotisserie, back onto its wheels.
From there the doors and fenders will be removed and blasted/painted separately, and the rest of the body will get the full treatment.
For now, enjoy some incredibly awesome pictures of the underside, engine bay and floors. If anyone was wondering why I was spending so much on this project, these pictures should speak a thousand words of explanation. If they don't, nothing I could say would ever convince you otherwise.
Last edited by vipernicus42; 09-30-10 at 11:41 PM.
10-01-10, 01:23 AM
#24

