When you click on links to various merchants on this site and make a purchase, this can result in this site earning a commission. Affiliate programs and affiliations include, but are not limited to, the eBay Partner Network.
I haven't really had a chance to work on the car much due to a guy at work getting hurt.I have been working on the wiring harness at home. Tonight I finally got a chance to work on the rust repair.
I forgot to mention that the patch that I previously made was way to thick and couldn't be shaped right with hand tools, I could have used it if I would have used multiple pieces to make it, but I just wanted to use one single piece. So I took a damaged hood that we had laying around the shop and cut the skin offand made my rough patch from that.here it is clamped in and slightly shaped
Here it is tacked in and the bolt hole for the suspension cut out
Here it is completely welded all except for the spot welds at the bottom which I will do with the spot welder. Tomorrow after work I will finish it and weld in the other plates
I got some more work done on the rust repair today.
Finished welding and grinding the first patch
After grinding all of the welds, I wrnt ovet them with panel bond as a added strength and sealing measure.
I also scraped out what was left of the non existing seam sealer and re sealed the wheel well with panel bond, when im all done with the outer patches and bodywork I will go over all of the seams with seam sealer
I started my rust repair on the passenger side. Thank God it's not as bad as the drivers side. This is the only rust on this side, one little patch and im done with the rust repair
I also got a few more parts in, aeromotive fpr, and a braided turbo oil supply line with filter
I got to work on the car for a little bit today, I got some work on the rust repair done.
I cut out all of the rusted metal, this side isn't that bad at all
Grinded all of the crap out of the wheel well, and wire wheeled what wad left of the seam sealer out, again this side not to bad
Re seam sealed the wheel well, tomorrow I'll weld my patch in and paint it
Then all of my rust work will be done, and then I can get started putting the engine and transmission back in and wiring it up
You'll have to remove that seam sealer near your weld joint and then hit it afterward, but you're well on your way! After welding I painted the entire wheel well with POR-15 to help prevent the rust from reforming, and then hit that whole area with truck bed liner so it should be good to go for the long haul.
You'll have to remove that seam sealer near your weld joint and then hit it afterward, but you're well on your way! After welding I painted the entire wheel well with POR-15 to help prevent the rust from reforming, and then hit that whole area with truck bed liner so it should be good to go for the long haul.
Yeah, I know. I didn't have a lot of time to work on it, and I wanted to get as much done as I could, that is why I did it this way.
I finally got done stripping down the turbo engines chassis harness.
I installed the new moog idler arm to make room for the turbo
Sanded and painted the metal tube that goes to the brake booster
Also did the metal coolant line that runs along the passenger side frame rail
I also painted the charcoal cannister, and some other random parts, and undercoated the front wheel wells and transmission tunnel. It's starting to get there
And some rotary emblems that I got off of eBay. I'm not sure where to put them, im thinking maybe on the fenders instead of the rx7 emblem.or just one of them above one of the tail lights
Did you get "lo springs"? That's what I ended up with. RB doesn't seem to ever have them in stock.
I've got 15" of ride height in the rear with 13.5" in the front.
I was going to wait to do the springs at work, but my oil return line decided to return the oil to the ground not the oil pan. I might get to the rear after work tomorrow maybe the front too.
I'm not too concerned with the supposed 1.4 inch drop. I figure worst case scenario I cut out some 1/2" perches for the springs to sit on.
I didn't get any springs because the only ones I found were lowering springs, I think I'm just going to take my stock ones out and clean them up and paint them
I started working on the suspension and engine compartment, cleaning them up, I forgot to take pictures of the engine compartment, I'll take some tomorrow when I get to work.
I removed the front struts, and disassembled them.I started to sandblast the bac kind plates and springs, but ran out of sand, I'll get more tomorrow and finish it up.
I got one spring and this much done on this plate before I ran out of sand
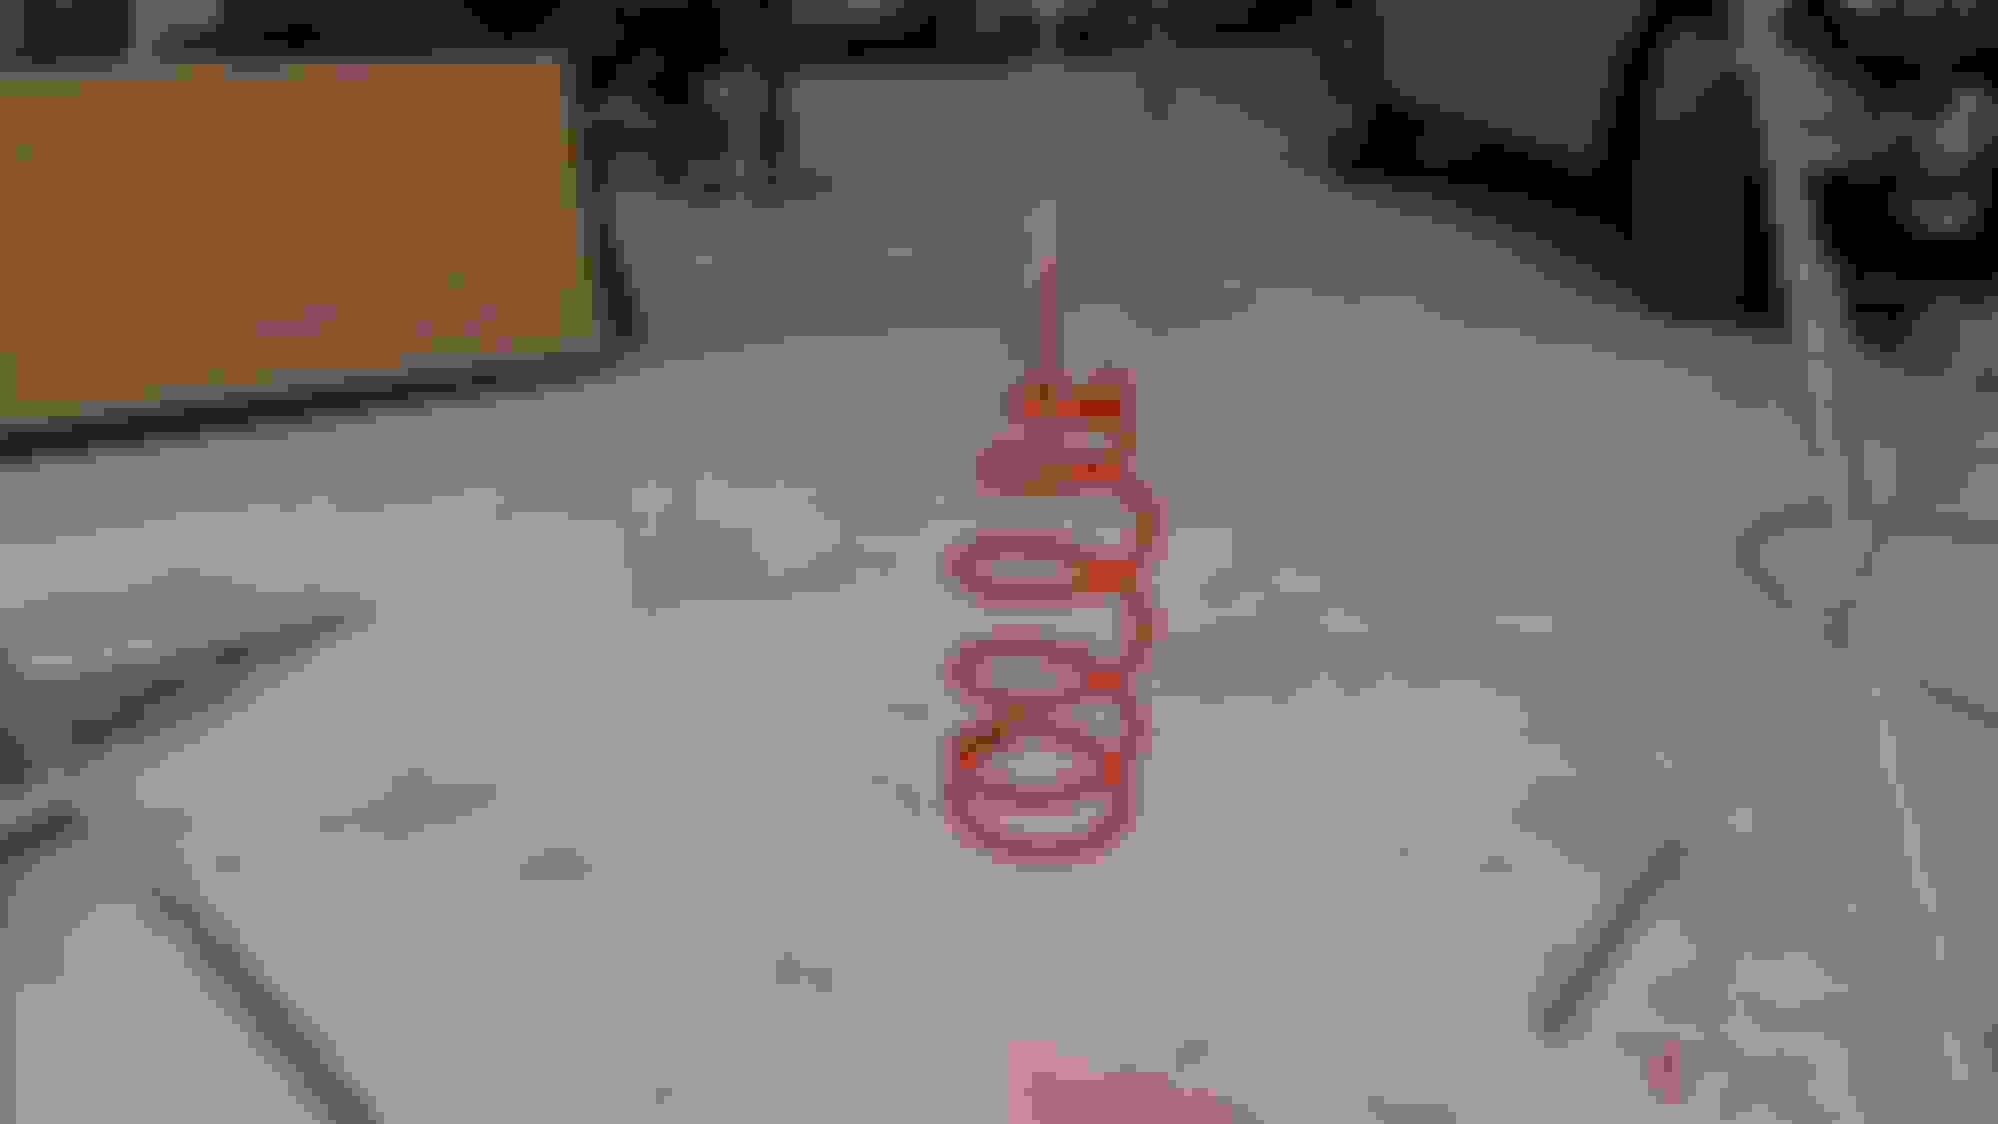
Here is the left front spring sandblasted and etch primed.
I decided to paint the springs the same exact color as the car. So I mixed up some rh sunrise red. Here it is with the base coat on
Here it is with the clear coat on.
I also got one of the strut inserts swapped over, tomorrow I'm going to try to finish the suspension and engine compartment so I can start putting the engine back in
Today I got the body work done on the engine compartment. There was some surface rust under the battery tray, and I'm not sure yet if I'm going to mount the battery there anyway and I don't want it to get worse, so I fixed it.
Here is the putty coat all sanded and wiped down with wax and grease remover
Here it is with etch primer. Tomorrow night after work, im going to cut in that section with paint.
I also got a little bit of work done on the suspension, the struts actually look pretty good painted, I can't wait to put them back together
I finally gotoff my *** and worked on the car this weekend. I went to put the struts back together, and the shaft was spinning, I tried everything to hold it. I ended up making a tool to hold the nut, so I could get a wrench on the shaft and spin it.
I cut a Harbour freight 22mm socket down so it is the same height as the nut, and Welded it to a Piece of flat steel bar.
I tried it out, but it stuck up a little too much on the one side to where I couldn't get a wrench on it, so I grinded the one side down. And it worked like a champ.
I also realized that I have been jumping around to much and finally finished my rust repair.
I also finished the bodywork and cut in the driver's side apron and rad support
I only did one coat on the rad support, because I might have to cut and move the lower brace to install the vmount. After I get that all pre fit I will finish cutting it in and clear it
I also got and installed a new set of door gaskets
Today I dropped the front sway bar and radius arms"not sure if mazda calls them that". Sandblasted the entire thing, while removing it the r/side sway bar link broke, they are pretty bad anyway, I am going to order new ones, I'm not sure if I should get energy suspension ones, or oem or another brand.
Here is the sway bar with a fresh coat of semi gloss black paint
I also finished blending in and clearing the driver's side apron, the camera on my phone doesn't seem to take good enough pictures to tell how shiny it is.tomorrow I'll clean and buff the rest of the apron to clean the blend up
Today I dropped the rest of the front suspension out, cleaned and painted the subframe, and the control arms. I also ordered energy suspension front and rear sway bar links .
Here is the subframe and control arms with a fresh coat of semi gloss black paint
I also ordered a carbon fiber hydrographic kit so I can do some of the interior pieces in carbon fiber, it should be here tomorrow, I'm dying to see how this stuff works
The "lo springs" and KYB shocks and strut inserts worked out well. They've compressed since I put them on. At first there was no lowering at all. They stayed the same height, but after a week and about 200 miles they sit about 1/2 inch lower than the springs that were on there. They are a good stiff ride; just what I was looking for.
Last night I finished cutting in the engine compartment. I painted from the strut towers forward, and both frame rails, and the radiator support.
I used my cheap harbor freight gun.I got it to spray the por 15 paint, because I don't want to spray that through my good spray gun. Believe it or not, it actually sprays really well
Here it is all taped up and scuffed.
Here it is with the last coat of clear on it , I got a few dirt nibs in it, nothing that won't wet sand and buff out.
Here is a picture of the rail and apron.I repainted the driver's side with the rest og what I painted, it just made it easier.now hopefully the fresh paint will hold up for 30 some years like the factory paint.
Now I shouldn't have any problems with rust getting in the engine compartment and frame rails. I used fast drying clear and hardener due to the fact that I painted it in the body shop and not in the paint booth so I couldn't bake it.hopefully it's dry enough when I get into work today so I can bolt the suspension back in.
 08-07-15, 08:51 PM