ZoomZoom's CYM- Imported from Canada; a Journey Begins... Again.


 02-18-17, 07:48 PM
#478
I picked up some new motor mounts, started putting the parts on the Upper and realized I need a new gasket for the IAC. Ordered one today. Put in an order on Amazon for an HPS Silicone elbow as the blue on on the V mount Rad doesn't quite fit with my theme.
Few photos. More by end of weekend.


Need to order a few pieces of hardware.
 02-19-17, 02:07 AM
#479
Really tidy looking build, the greddy elbow turned out awesome sanded back!
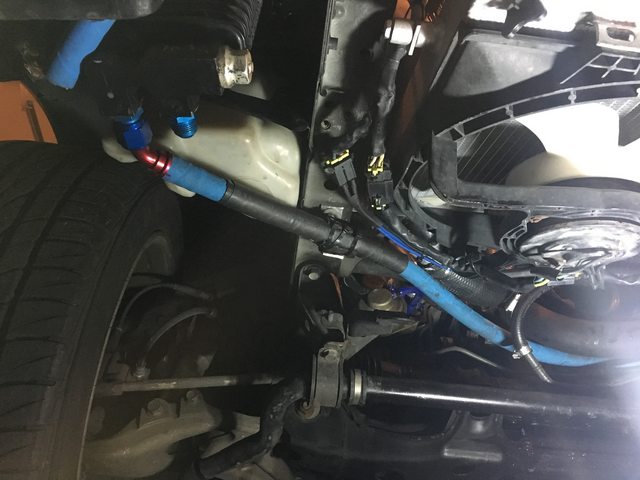
I was looking up the Tygon line that you used for the slave, you might want to put a heat sleeve on it due to the heat in that area:
Temperature range: �108 to 130�F (�78 to 54�C)
I was looking up the Tygon line that you used for the slave, you might want to put a heat sleeve on it due to the heat in that area:
Temperature range: �108 to 130�F (�78 to 54�C)
The following users liked this post:
ZoomZoom (04-29-18)
02-20-17, 06:53 AM
#482
Updates,
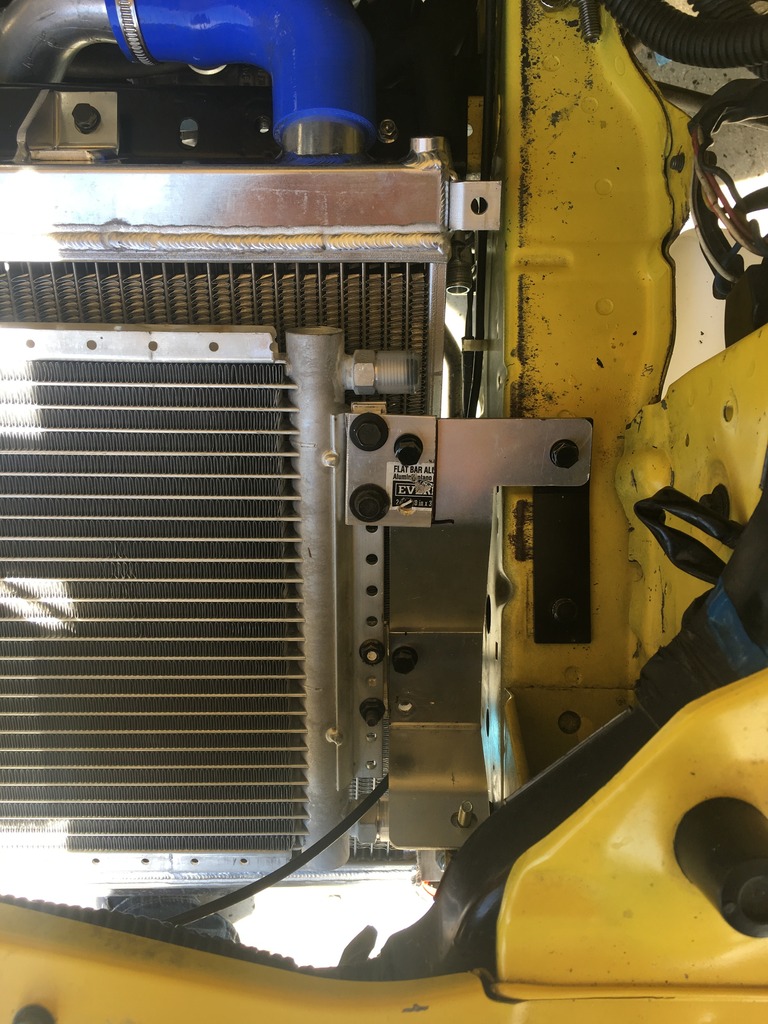
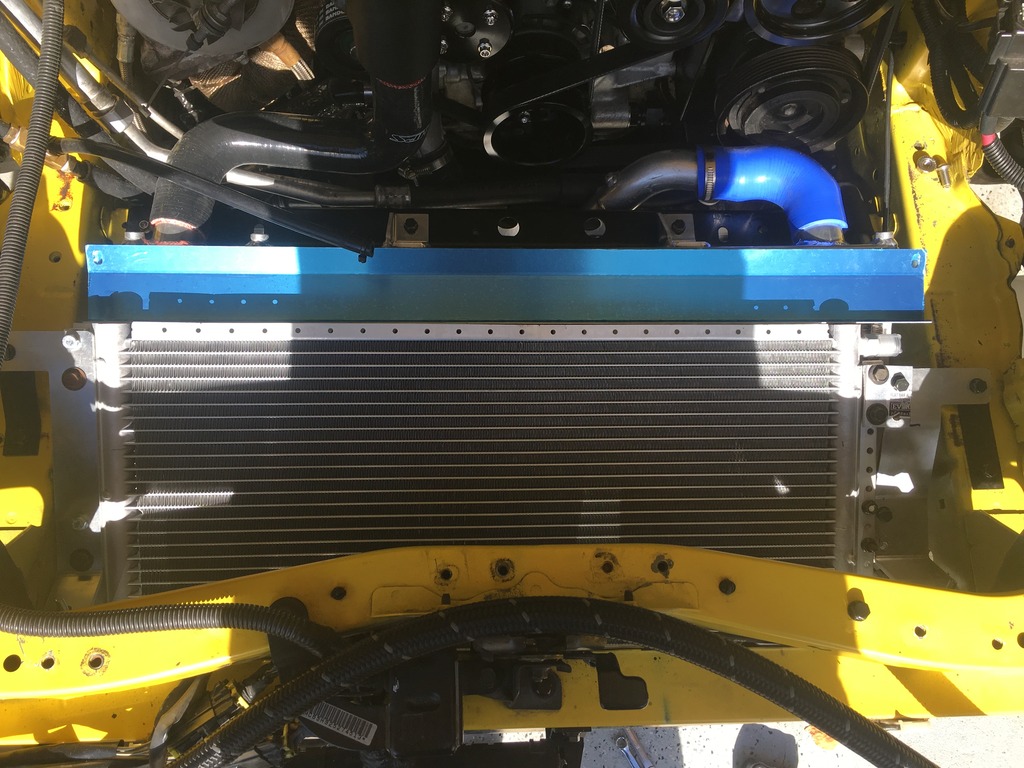
Jason came over bright and early and did a bunch of fab work. Got the universal condenser all mounted up. Lots of metal shavings to clean up from the driveway today
Almost got to start it. But I Fubar'd the install of the expansion tank. It was pissing coolant as I filled it. Need to take the back off and have a look at the thermostat seal.
All in all we got a lot done. Progress so far,
Jason came over bright and early and did a bunch of fab work. Got the universal condenser all mounted up. Lots of metal shavings to clean up from the driveway today


Almost got to start it. But I Fubar'd the install of the expansion tank. It was pissing coolant as I filled it. Need to take the back off and have a look at the thermostat seal.
All in all we got a lot done. Progress so far,
 02-20-17, 10:43 AM
#483
interesting approach.
i considering "splitting the V" (wow, that could be taken multiple ways) on my previous car and decided to attach the condenser directly to the radiator, and it worked very well. i am curious how yours will work, with less air going to the condenser and more going to the radiator.
i considering "splitting the V" (wow, that could be taken multiple ways) on my previous car and decided to attach the condenser directly to the radiator, and it worked very well. i am curious how yours will work, with less air going to the condenser and more going to the radiator.
 02-20-17, 12:49 PM
#485
So close! Can't wait to see the rest of that AC system. I know the GReddy kit use the condenser as kind of a splitter, but I didn't know the angle is that steep. Is the bumper opening going to allow airflow to the condenser?
Also, if you haven't put the bumper back on yet, I suggest upgrading the horns. Several times I almost get ran over by SUV or truck, because they can't see me nor hear my horns. I upgraded to RX-8 horns when I had the bumper off during V-mount install, with a little cutting and drilling the RX-8 bracket will work. Driver side can remain at stock location, the passenger side needs to be relocate and the wire extend, there's already a mounting point same as the driver side so it's quite straight forward.
Also, if you haven't put the bumper back on yet, I suggest upgrading the horns. Several times I almost get ran over by SUV or truck, because they can't see me nor hear my horns. I upgraded to RX-8 horns when I had the bumper off during V-mount install, with a little cutting and drilling the RX-8 bracket will work. Driver side can remain at stock location, the passenger side needs to be relocate and the wire extend, there's already a mounting point same as the driver side so it's quite straight forward.
02-20-17, 08:16 PM
#486
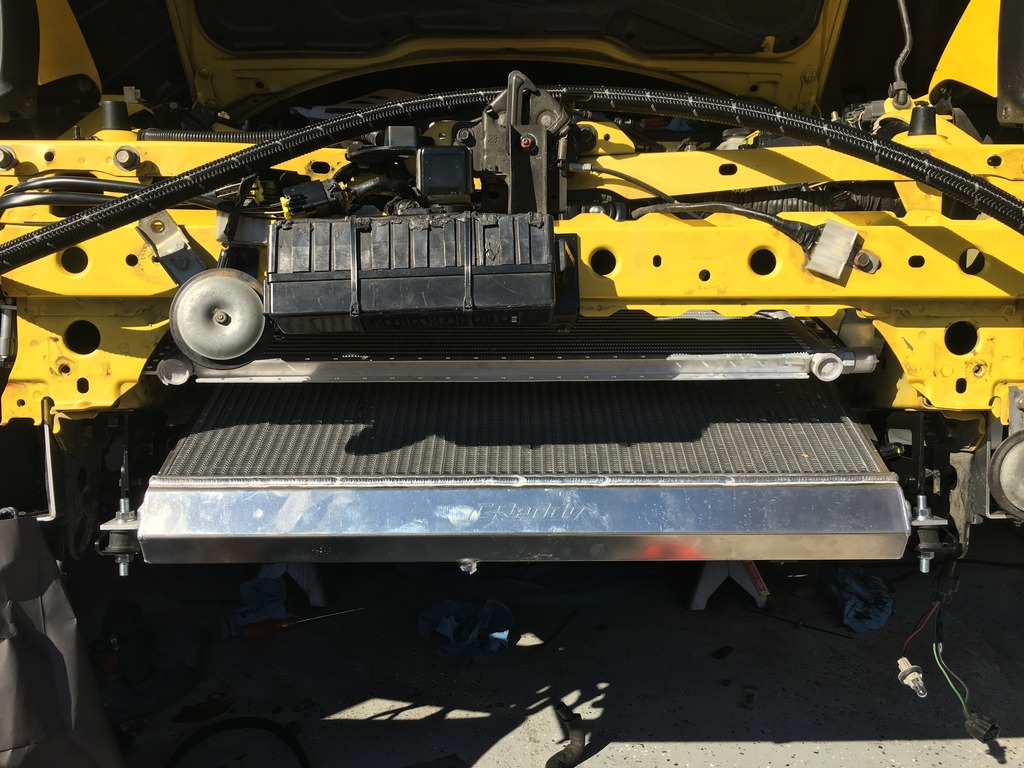
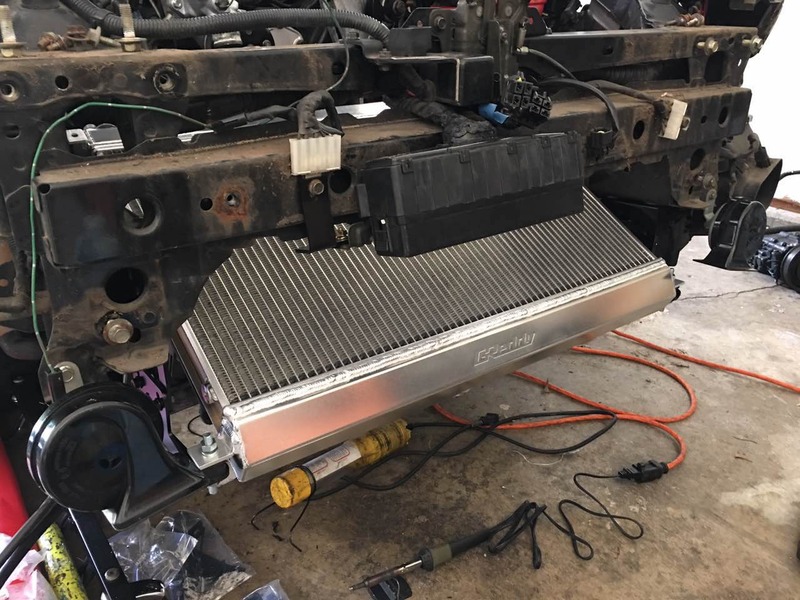
Ok so to answer some questions about the V mount.
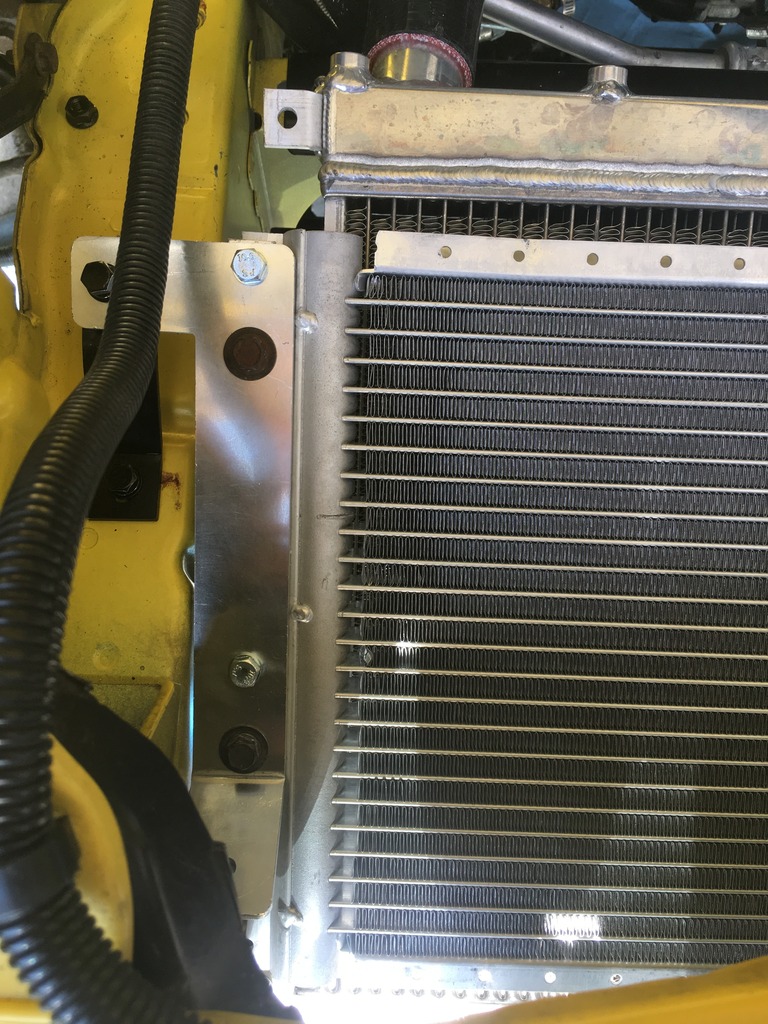
So the condenser does sit higher. The reason for this is the brackets on the factory condenser are at different levels. The universal one is not. We have it up a couple inches so we did not need to modify the Greddy brackets. This allows us to keep the brackets if we go back to a factory condenser or sell the kit in the future if the car gets a motor swap of some kind.
The way we modded it was with flat stock. Just cut a few equal length pieces and stacked them for the correct spacing. Drilled holes and used longer bolts. We also purposely kept the offset towards the passenger side so that we have clearance for custom made AC lines.
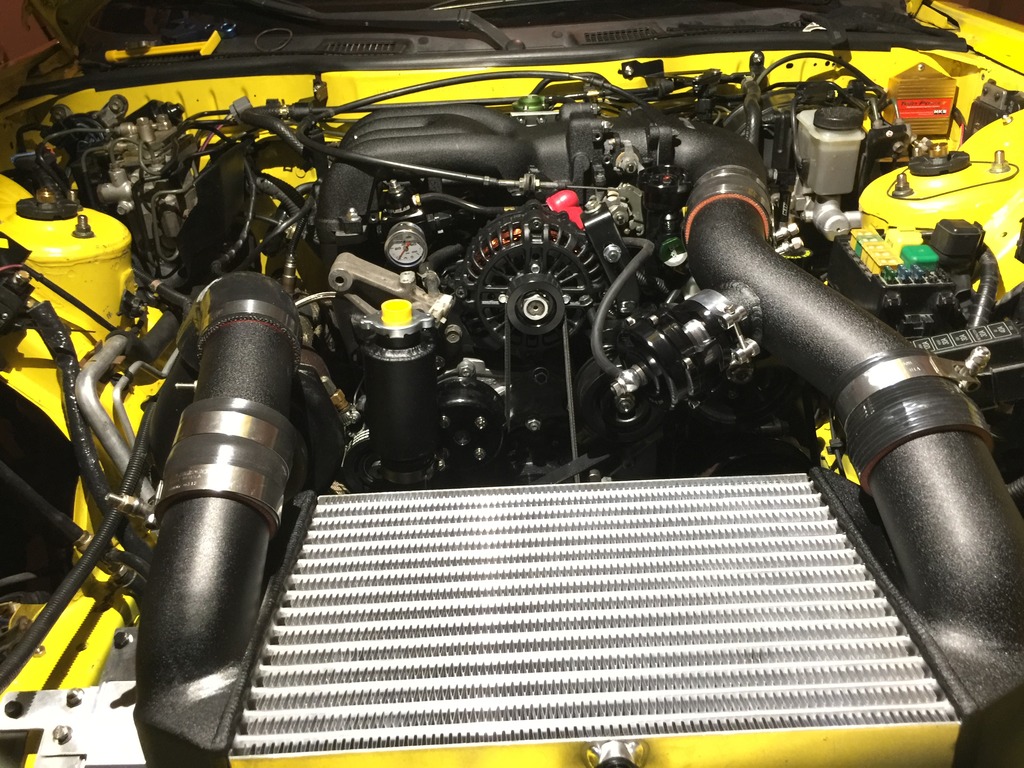
As far as having it up higher and how it will effect cooling. The whole setup is ducted, it's getting air pushed thru it just like the intercooler above it is. The radiator has fans under it so it gets heat removed and it will likely get a bit more air flow to the radiator. That's a plus. Condenser efficiency isn't really a huge worry. I will be running R12 somthe AC will be plenty cold.
If there is any disadvantage of having comdemser higher is the heat from the condenser possibly transferring more to the intercooler when the AC is running and the car idling with no air flow.
Intercooler efficiency at idle isn't a concern, I have water meth injection going in soon so intercooler efficiency is not an issue really anyway. But there is plenty of airflow at speed. Worst case is less cooling from AC at idle as the radiator fans won't effectively pull heat when it's not on top of the radiator.
It's not a concern. I won't be driving the car in 100 degree heat most likely and if I am it won't in stop and go traffic.
So the condenser does sit higher. The reason for this is the brackets on the factory condenser are at different levels. The universal one is not. We have it up a couple inches so we did not need to modify the Greddy brackets. This allows us to keep the brackets if we go back to a factory condenser or sell the kit in the future if the car gets a motor swap of some kind.
The way we modded it was with flat stock. Just cut a few equal length pieces and stacked them for the correct spacing. Drilled holes and used longer bolts. We also purposely kept the offset towards the passenger side so that we have clearance for custom made AC lines.
As far as having it up higher and how it will effect cooling. The whole setup is ducted, it's getting air pushed thru it just like the intercooler above it is. The radiator has fans under it so it gets heat removed and it will likely get a bit more air flow to the radiator. That's a plus. Condenser efficiency isn't really a huge worry. I will be running R12 somthe AC will be plenty cold.
If there is any disadvantage of having comdemser higher is the heat from the condenser possibly transferring more to the intercooler when the AC is running and the car idling with no air flow.
Intercooler efficiency at idle isn't a concern, I have water meth injection going in soon so intercooler efficiency is not an issue really anyway. But there is plenty of airflow at speed. Worst case is less cooling from AC at idle as the radiator fans won't effectively pull heat when it's not on top of the radiator.
It's not a concern. I won't be driving the car in 100 degree heat most likely and if I am it won't in stop and go traffic.
02-20-17, 08:30 PM
#487
Yes the horns. A while back I was on YouTube listening to all the horns. It's on the long list of things. I would like to get some of the small air horns but I hear the mini compressors are not reliable.
I didn't think to listen to RX-8 horns. I will have to listen to those and see how they sound.
I am placing some orders for a few items. You always seem to have forgot some thing or another when assembly day comes around.
Might have it running next week. I will be busy at work. 4 day week and maybe work Saturday and squeeze 58 hours at the office in there.
I am ordering the SakeBomb AP Big brake kit front and rear and the HID headlights. Right now they seem to be backordered for a few parts otherwise I'd have them already.
The car still needs the ride height set, corner balance and alignment. We need to bleed the clutch and finish up a few things.
I want to swap to a 30 degree bend on the hot side of the intercooler pipe. That means more stuff to get powdercoated.
Also we are making our own intake. I need to order the filter and coupler/claps for that.
This project may go on for the next year or so. But should have the car running, driving and doing some events this summer once it's tuned and aligned.
We skipped some things I wanted to do just because I had some many projects going at once. We will revisit those one at a time on weekends.
Steering rack bushings, axle shafts and boots. I have a torn boot. May as well do the axle upgrades while I visit that. More interior restoration and some other dodads.
02-20-17, 08:52 PM
#489
AP Competition Brake System (FD3S RX-7) - SakeBomb Garage LLC
SBG Competition Rear Brake System (FD3S RX-7) - SakeBomb Garage LLC
This is my 3rd FD so I know what it will be like. I've done most of these kind of upgrades before and had this same brake kit on my last FD.
This car is maybe the nicest one of the 3. An enormous amount of time, money and effort has gone into this car.
With so many 4 rotor projects I've seen pop up it's kinda given me a fever for one.
I will see how this goes. If it blows up... I've already talked to GoodfellaFD3S about building a 4 rotor for this car.
But that's gettin a bit ahead of myself. Let's finish this up first
 02-21-17, 10:55 PM
#491
02-22-17, 04:46 PM
#492
My first FD I ran a small battery. A Miata battery. As long as the car started on he doesn't or second try it wasn't an issue. If you end up with a problem you will wish you had more stored power. Like if your motor starts having low compression and it won't hot start well, you could find yourself with a dead battery quickly. I have a red top in the rear bin.
02-26-17, 07:37 PM
#494
Thanks. I've been making plenty of progress lately and I will share some things along the way I hope everyone can benefit and anticipate along the way on their own builds. Some things go smooth and some things don't.
I ran into a small hitch today with installing the New SakeBomb billet sway bar mounts for lowered cars.
I ran out of day light so I called it a day.
Here are some photos of the sway bar mounts next to the new AWR mounts I installed a few months ago. The Greddy PS cooler line will need a slight modification to work with these mounts. But so far here we are. Will update when I mod the PS cooler line.
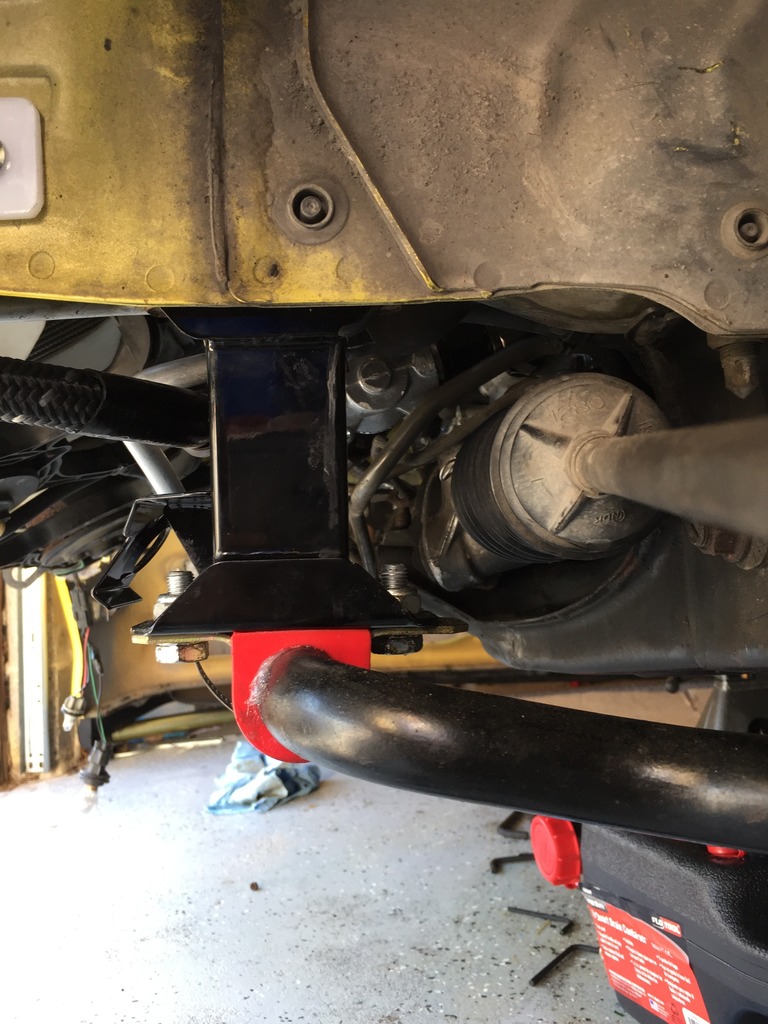
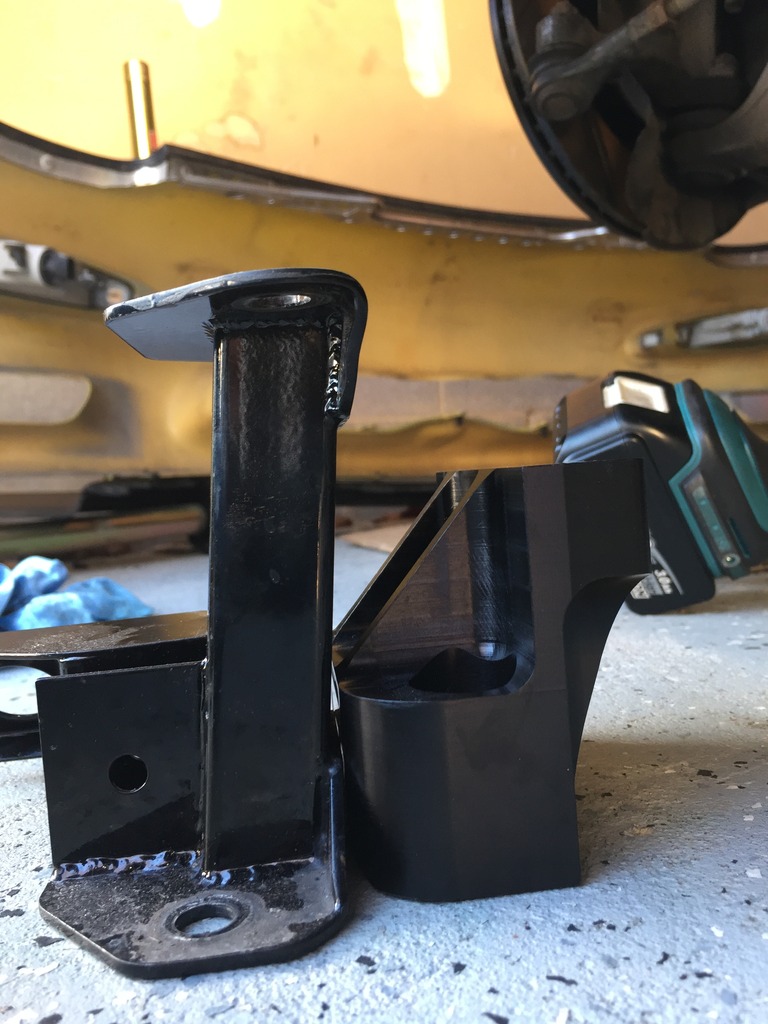

I took a video. If you watch the video you can see the Greddy PS cooler that came with the Greddy Vmount has interference with the SakeBomb Sway bar mounts. On the passenger side where the PS cooler goes up into the hose can be cut and it should raise up the passenger side of the PS cooler. To get clearance on the drivers side there are at least 2 options I see. Either slightly bend the cooler so the sway bar can go up through the gap in the PS cooler line or bend the drivers side of the cooler up for clearance.
Either way should accomplish what I need.
Why not keep the AWR mounts or use the optional spacer on the SakeBomb mounts to keep it at stock height? The point of the mounts is not just strength over the stock mounts but to keep the sway bar at it's ideal height. How much does that matter? I haven't looked at the data or done any kind of tests myself but like any other suspension component there is a range of motion and it was engineered to be at particular angles at stock ride height. When you lower a car you need to make adjustments with the cars alignment to keep those angles. The sway bar cannot be adjusted unless you shorten the mounts, buy adjustable end links or buy a different bar that's bent for the new angle the car sits at when lowered.
The SakeBomb sway bar mounts solve 2 issues in one product. One is to replace the cheap and weak stock mounts that are like Swiss cheese and easily bend. Two is to correct the sway bar angle for lowered cars. It's also a stronger solution for changing the angle than adjustable sway bar end links. It also raises the bar and mounts up away from the road where it can hit RR tracks, road imperfections and make contact with Debris so it's less likely to damage things under there.
I will post up when I come up with a final solution.
I ran into a small hitch today with installing the New SakeBomb billet sway bar mounts for lowered cars.
I ran out of day light so I called it a day.
Here are some photos of the sway bar mounts next to the new AWR mounts I installed a few months ago. The Greddy PS cooler line will need a slight modification to work with these mounts. But so far here we are. Will update when I mod the PS cooler line.


I took a video. If you watch the video you can see the Greddy PS cooler that came with the Greddy Vmount has interference with the SakeBomb Sway bar mounts. On the passenger side where the PS cooler goes up into the hose can be cut and it should raise up the passenger side of the PS cooler. To get clearance on the drivers side there are at least 2 options I see. Either slightly bend the cooler so the sway bar can go up through the gap in the PS cooler line or bend the drivers side of the cooler up for clearance.
Either way should accomplish what I need.
The SakeBomb sway bar mounts solve 2 issues in one product. One is to replace the cheap and weak stock mounts that are like Swiss cheese and easily bend. Two is to correct the sway bar angle for lowered cars. It's also a stronger solution for changing the angle than adjustable sway bar end links. It also raises the bar and mounts up away from the road where it can hit RR tracks, road imperfections and make contact with Debris so it's less likely to damage things under there.
I will post up when I come up with a final solution.
02-26-17, 09:31 PM
#496
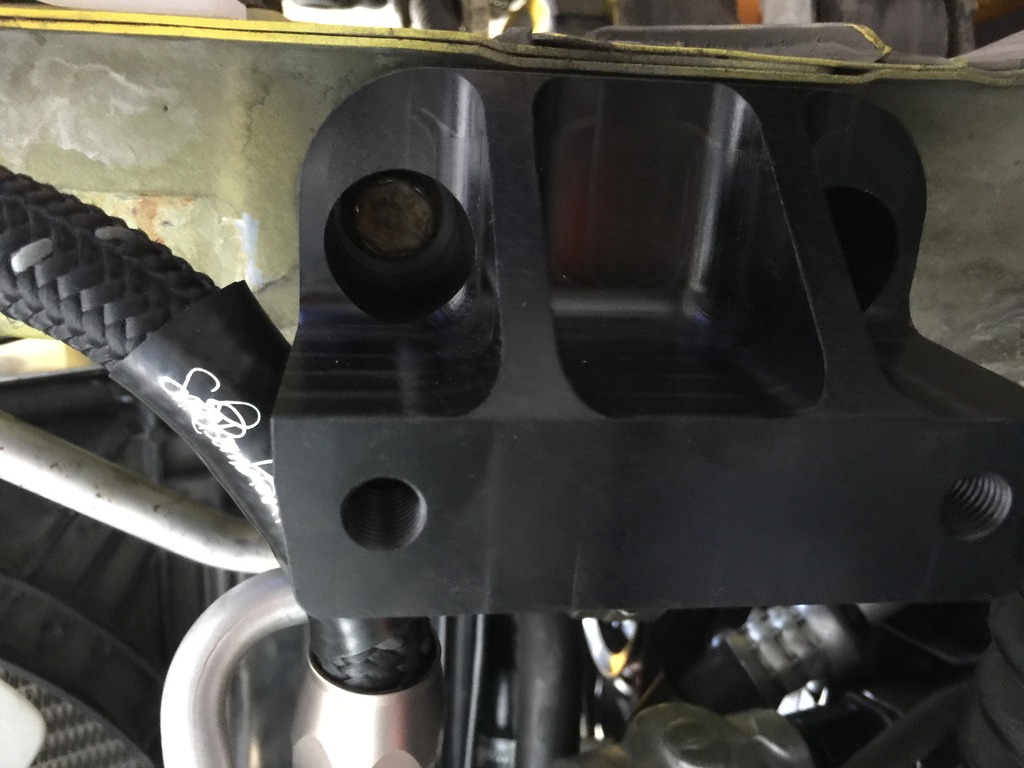
Yes it's touching it. The sway bar mounts have a bit of a relief there so if you look up to one of the photos posted above you can see it's resting on a flat surface. It has a bit of protection already on that part of the line so I'm not as worried about that as having it against a knife edge but if it bothers anyone you can always put a thin piece of rubber in between where it touches. It's how they deal with a lot of machinery in close quarters on ships and submarines.
They call it chaffing gear. It's usually bits of fire hose cut to size and lashed to a part where friction with another could be an issue due to vibration over time. As Jacob is pointing out, it will wear where there is contact, given enough service time the oil line will get worn through at that point of friction with the mount. In this case it would take a very long time but it will wear. Faster if it were a knife edge. Thanks for pointing that out but I had noticed it.
They call it chaffing gear. It's usually bits of fire hose cut to size and lashed to a part where friction with another could be an issue due to vibration over time. As Jacob is pointing out, it will wear where there is contact, given enough service time the oil line will get worn through at that point of friction with the mount. In this case it would take a very long time but it will wear. Faster if it were a knife edge. Thanks for pointing that out but I had noticed it.
02-27-17, 09:37 AM
#497
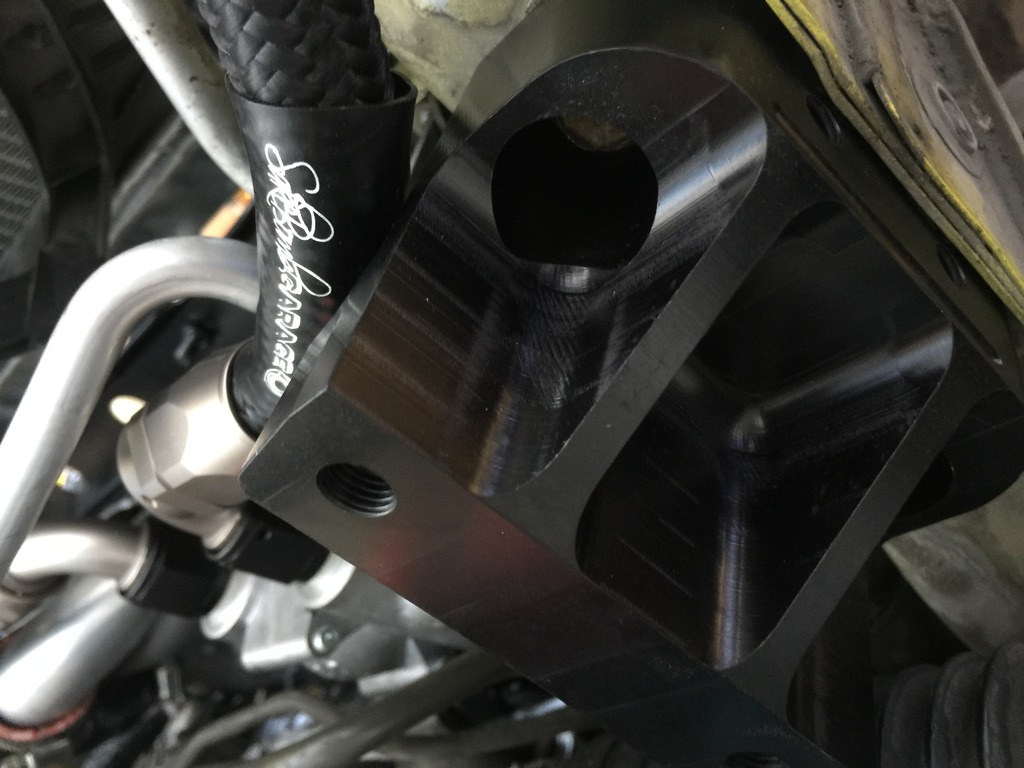
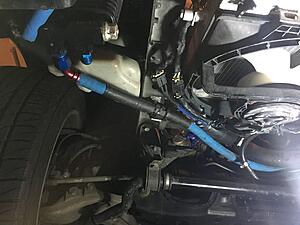
So I think I found a solution to the sway bar touching the Ps cooler. I may attempt this tonight and post pics. If you look at this photo. You can see there is likely clearance above the PS Cooler for the sway bar once it's bolted in.
I would like to keep from cutting and bending the Greddy PS cooler. It's not something I want to mess up, crack or otherwise destroy by modifying it if I can help it. I'm scared from bending AC lines to fit and it turned out badly lol.
It adds effort to carefully remove and install the sway bar around and above the cooler. But it does look like it will work. If you tinker a lot and find yourself disconnecting the sway bar on occasion you may hate my solution as it adds more effort to the process. If you plan to do this once and never have it apart after its back together it will likely work for you without issue.
02-27-17, 10:05 AM
#498
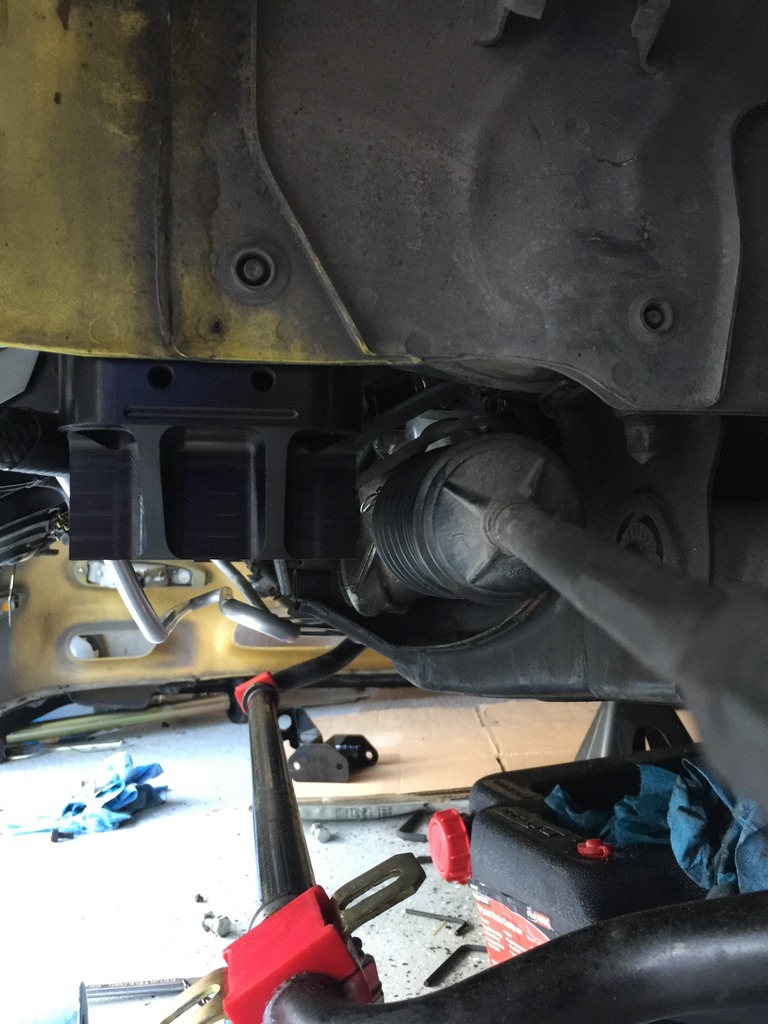
about the cooler lines, I've been doing exactly that (ziptie'ing some radiator hose around the hose and securing the hose to a solid attachment point so it's not wiggling).
I've found that the pushlok rubber hose is much more "forgiving" when rubbing up against things when compared to the stainless hose especially. the issue I've had with the stainless hose (other than being a nightmare to actually assemble the ends) is the hose itself rubbing up against other non-stainless metal in the engine bay. I had one hose nearly rub through one of my power steering rack hard lines on my red FD.
the Kevlar or other fabric hose I haven't used, but it seems it would be similar to the push lock, still requiring some protection/attachment from/to the chassis.
example from my recent endeavor (not the most beautiful, but effective):