When you click on links to various merchants on this site and make a purchase, this can result in this site earning a commission. Affiliate programs and affiliations include, but are not limited to, the eBay Partner Network.
I had the car down for about two weeks earlier last month doing some much needed upgrades/changes. So, time to disassemble...
Oil Coolers:
First job was to install a second oil cooler. I bought these about a year ago, I had been hunting for one and found a set off Papsmagu's old car (the one that was totalled and parted out sadly) but it had seen better days and needed refurbishing. I started off by straightening all the fins with a small flat head screw driver and tweezers, believe it or not. The trick here is to use the flat head to kind of bend all the fins back up and then use the tweezers to actually give them the correct shape and orientation. Some areas of the cooler were beyond saving, but overall I'm happy with the outcome.
Before:
After:
As you can see, they look a heckuva lot better than they did before! And, more importantly, the fins are all straight which makes a difference in how they cool the oil. The temperature difference is pretty substantial in as well. Cruising on the highway, I would have oil temps between 180*F and 200*F with the one oil cooler. Now, with the dual coolers, I'm seeing between 150*F and 175*F. It also appears like water temps are down marginally as well, probably due to the better cooling efficiency of the oil, now.
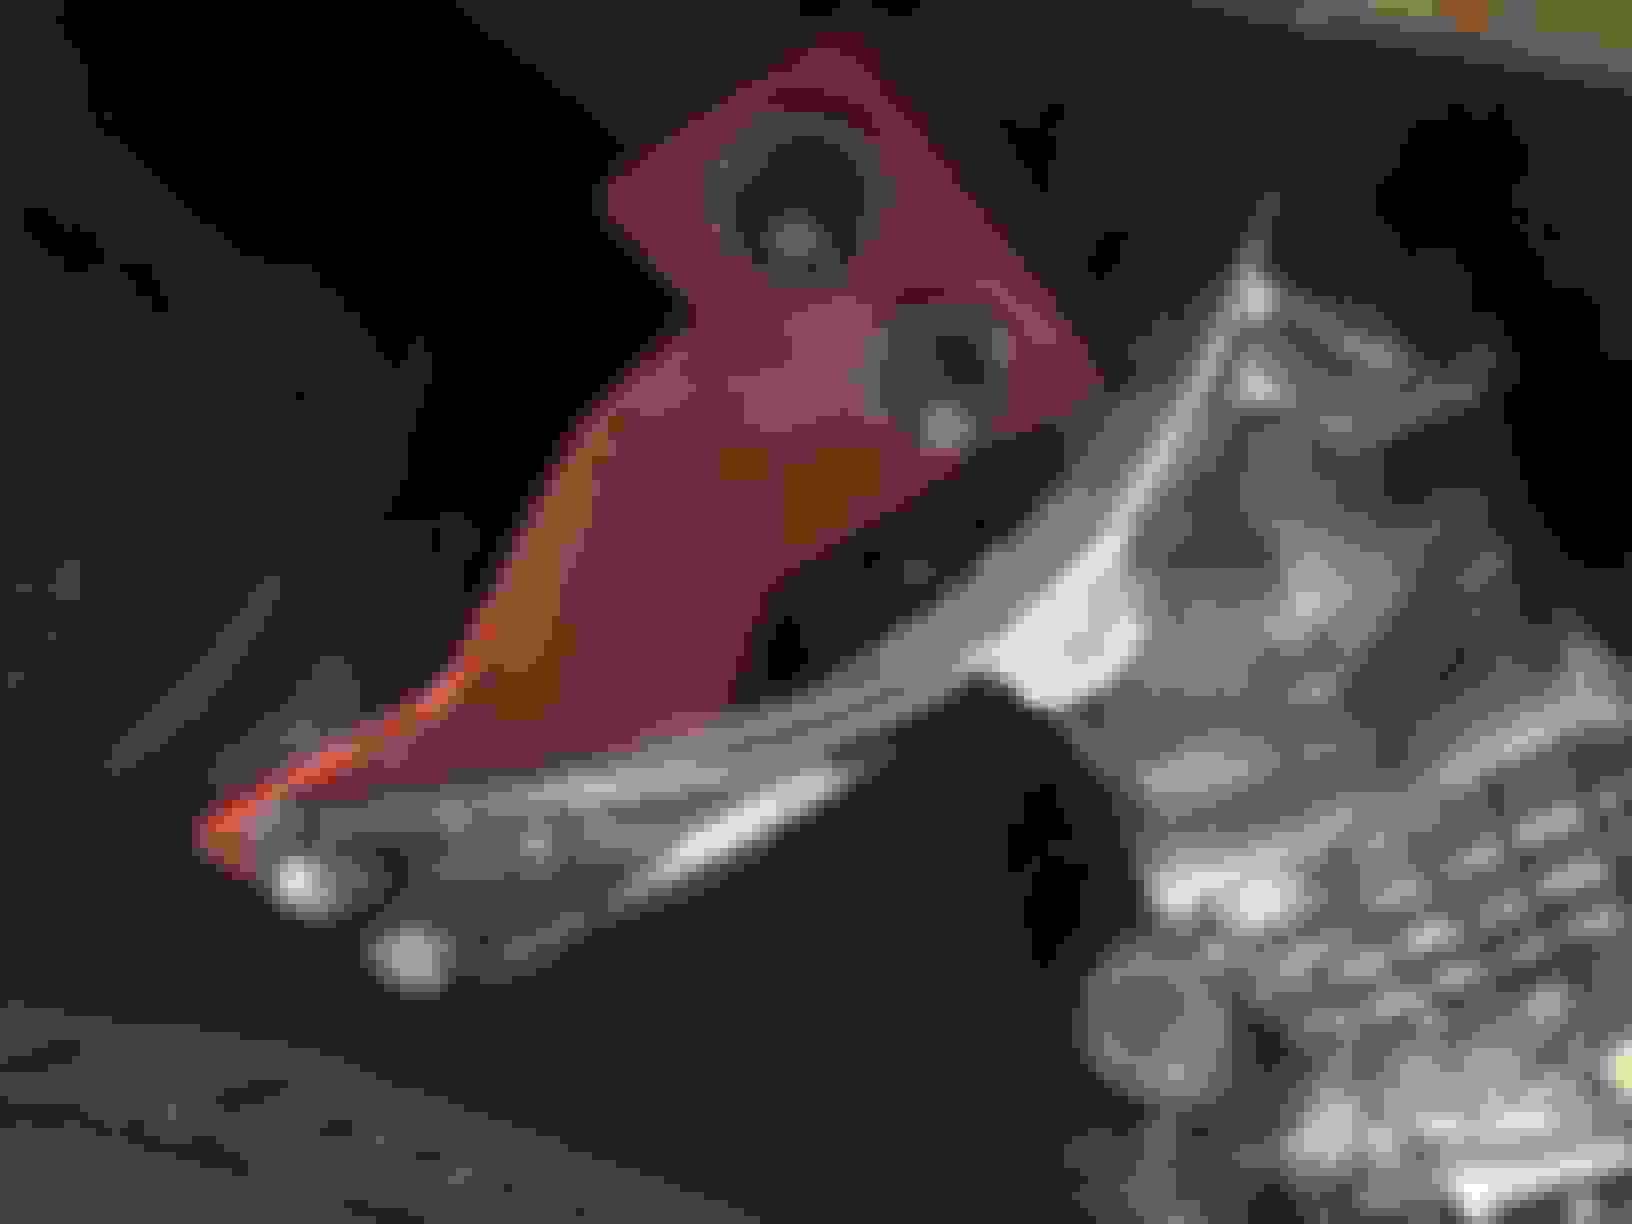
One thing to look out for, if you're going to do your own oil cooler addition, you will need a bracket for the passenger side oil cooler that doesn't come on the base models. When purchasing your set, always ask for this bracket that ties in the bottom of the oil cooler, to the horizontal structure that the headlights and crash bar bolt into. I had to make my own bracket, cause I didn't want to pay $45 to the dealer. You can see it in grey here. I had a steel radiator support lying around from a job and we didn't need it. Cut it, sectioned it, grinded it, and bent it, into the shape you see here, which I must say -- fits perfect. It's not the most beautiful thing but it's solid and fits right.
Also sporting a new Mazda oil cooler duct. Worth it at $45 for a new one, when people are selling used sets for about the same. If you only need the one, it will fit noticeably tighter and seal better than the "used" one.
...continued...
Last edited by Brilliant7-LFC; 01-04-17 at 02:19 PM.
The next change, I also purchased about a year ago -- a set of OEM fans. The previous owner of my car decided it'd be a great idea to ditch the stock fans in favor of Flex-A-Lite garbage. So, I've had to reconstitute the OEM set. The job itself was pretty straight forward, had to re-wire some, but no big deal. As with everything I wire up on my car, I used high quality butt connectors and heat shrink. NO ELECTRICAL TAPE!
I didn't really think to take any other pics of the fans, as this would just look like your fans you already have. Not too sexy. Now, getting them to work properly with my Microtech, that is a little more sexy. I sought out help from Jesus at Kilo Racing, as he has a ton of experience with Microtech, and he built my engine.
It's relatively straight-forward. Basically, all you have to do is set the AuxFan to On with whatever temperature you want, I chose 99* C. From there, splice into the green/black wire on the harness that comes out of the Electronic Load Unit, which is located in the same passenger kick panel area, tucked up under the dash. For '94+ this is a different color wire! Consult the service manual if it's a 94+ car.
What you're doing is locating the negative trigger from the EL unit, to the fan relays. With the splice complete, the Microtech will provide the negative trigger at the specific temperature and presto! Your fans will turn on at the temperature you put into the Microtech. In this case, 99*C.
The only downside is, it appears I only have LOW and MEDIUM speed available. If I'm not using AC, the fans will only come on LOW, once the coolant temperature reaches 99* C. At that point, if I want to increase to MEDIUM, I would have to turn on the AC.
Sway Bar Mounts:
Once that was done, I turned my attention to my sway bar mounts. I had a little offroad mishap recently and actually bent up my drivers side sway bar mount, so I needed new ones. I chose to go with Widefoot, because they have the reputation for being the most robust and best quality upgrade in this area. Installation was pretty straight-forward, but beware that the fit of the radiator will be slightly different. It does afterall raise the radiator up a bit. As a result, my intercooler duct fits a bit more snug than it used to and doesn't quite line up like before. I plan to go with a custom stock mount intercooler down the road, using a Pettit duct, so I'm not sweating it.
Unfortunately, I'm a bit of an idiot and forgot to take a picture of them installed, but here is a pic Fritz sent me before I bought 'em.
I also reconstituted the original coolant reservoir, as the previous owner again, decided he knew better than Mazda and put a hideous looking aftermarket bottle, on the drivers side of the car. If you look at the first picture in these posts, you'll see it on the right side of the engine bay. However, I've put it back where it belongs, and a brand new unit from Mazda. Same with the washer bottle. Why? Cause the old one looked like this:
You would change it too, right?
During this process, I also decided to tackle a slight coolant leak issue I had been having from the water pump housing and the lower radiator hose. The clamps were believed to be the issues, so I went with new constant torque clamps from McMaster Carr that look great and fit perfect. Word to the wise, which is anyone not me really, put a dab of RTV on the metal portions first, before installing these, if you have these same leaks. Turns out, the clamps weren't the problem, but instead the metal is slightly pitted and it's still leaking! But the clamps are sexy...
While I drained everything out, I decided to also go with a blend of the Mazda ethylene glycol and distilled water in a roughly 35:65 ratio (coolant:water). In Miami, it never get's below 40*...like ever. So, having the higher water content should aide in my cooling efforts.
Moving right along, I found some dodgy wiring to be sub-par. The battery was relocated to the bins, which is good - except for it being mounted on the driver side and not counter-balancing the driver's weight by being on the left...but I digress; the new power wire was tapped into the fuse box, as stock. However, the manner in which it was done and the quality of the job, was very much lacking.
Before:
Look at that electrical tape! And the crumby install! It needed to go. So, I did some research and found an AWESOME write up, which you can see here, and duplicated his connection point idea.
After:
I'm very proud of this mod because to my eye, it's a small item that makes a huge difference in the fit and finish of the engine bay. Those are sometimes the most satisfying mods.
The final results of all my hard work are barely noticeable cosmetically. But, they're still vital in my view, to the overall condition of the vehicle and ultimately, bring me one step closer to my vision of what this car will be, one day.
Thanks for looking guys!
Nick
Last edited by Brilliant7-LFC; 01-04-17 at 03:30 PM.
I'm embarrassed to say, I haven't gotten the sound system up and running yet. I just took over my family's business and it needs a lot of attention and financial investment. This, I haven't had the time or money to finish it.
Having said that, the front speakers will be powered by a 4 channel amplifier, bridged to two channels. I have a spare Infinity amp that I'll use in the interim until I have the money to buy what I want: JL HD 600.4 and a JL 10w7v3. I have an HD 750.1 already for the sub, just need the sub.
Lastly, I plan to run a second set of tweeters which I will integrate into the A pillars - "imaging tweeters" from what I've been told. They'll be the same C5 tweeters that came with the 650's.
So, the next step really is to drill holes in the door jams so I can run the wires and buy the tweeters. I've also already got my head unit, a Pioneer DEH80-PRS with burr brown processors. It's bad *** and I can't wait to hear the system!
Nick
Follow up question on this setup. I just received the same PVC adapters. Did you close up the adapter completely for the woofer, or just seal up what is shown in the pics? Is the woofer open to the door on back side?
Such a big fan of the new OEM coolant and washer tanks, at this stage of the game just about every FD could benefit from those two parts
Thanks Rich! Yeah, I'd agree with that. It's the little things that sometimes make a big difference. I was looking at David Haye's build thread and noticed his browning bottles and thought; "man his car looks sick...if only he had some new bottles" lol
Originally Posted by NJ-JDM
Follow up question on this setup. I just received the same PVC adapters. Did you close up the adapter completely for the woofer, or just seal up what is shown in the pics? Is the woofer open to the door on back side?
Thanks
Hey buddy. No, I did not seal the back of the speaker adapter. They need a certain amount of space to work effectively. The door acts as the enclosure. If you seal the rear, the speakers will sound pretty terrible. You want to create a seal so the rear of the speaker opens up into the door panel. You then need to make sure that the door panel is sealed as well, for the best speaker performance.
Again, think subwoofer. The same concept. The door panel is the box.
Nick
P.S. The "door panel" I'm referring to is the inner metal portions. In particular, the space between the outter skin of the door and the inner panel that supports the interior panel and the handle mounts in to, etc..
Nice OCD on the windshield washer tank.
It's in my "to-do" list and your opening my eyes on the subject.
With the battery mode,that corner of the engine bay looks much nicer.
Thanks man! I'm happy with it. I'll be looking to make further enhancements in this area in the way of a new intercooler setup and some stage in the future.
Hey guys, I've been a little slow with progress lately, as I've been focused on my business and not dumping too much money in the car. So, for the next several months, there probably won't be a whole lot of action in this thread. However, I did do a few things of late:
First, I became an Idemitsu dealer! Yay me!
So, you can imagine where all those lovely fluids have gone. I now am sporting an all Idemitsu fluid car. The 75w90 is in the diff and transmission, 20w50 in the engine and as usual, the premix. Luckily, I was able to hook up some of my local homies with incredible deals on the stuff at the same time, so smiles all around!
Five quarts, just about does it...
Up next, another minor mod; I added a transmission brace that I got form badrx7 (or something like that) -- his name is Tom, in any case. The brace is a big improvement performance-wise and in that regard, I'm pleased. It does however, cause a lot more vibration than before, which I expected but, I may be doing away with it soon...
I've been lugging around a jump pack every weekend I take my car home for about a month now. Batteries aren't cheap, so I have been putting it off but I installed a new battery. I know that doesn't really sound like a big deal, but as is the case with most of the wiring pre-me, it wasn't up to my standards, so I re-did most of it. Truth be told, I would have had to re-wire anyway because my old Odyssey PC925 was left side positive, and this battery is right side positive. So, I ran new power wire and ground wire.
I found that the connections were very poor. The ground for the battery was 4 gauge, which is fine, but it was done up with a small sheet metal screw to a spot on the body. Not to my standards. So, I decided I would utilize the nice and chunky 17mm bolt for the seat belt instead. I used a die-grinder with a wire brush type bit and ground it down to bare metal, under the carpet. Then, just terminated my galvanized ring terminals to that spot. Finished it off with some CRC battery terminal spray, to prevent any rust from forming. Job done.
On the power wire side of things, I found that the old ring connectors slid right off when I pulled on them. There's a good chance that the dis-charge issues I've been having were actually charging issues! Meaning, because the ring terminals were so poorly connected to the nasty wire they used before, my alternator may not have been charging so well.
Now, they're rock solid and I've also run the power wire from the fuel pump, directly to the terminal on the battery, where before they had it run to my circuit breaker, thereby allowing the fuel pump to be powered up, even with the circuit breaker cut.
I chose a Braille B3121. Awesome cranking power and it's lightweight. In fact, despite it being the same size as the PC925, it's about 7 pounds lighter! Got a good deal on it as well.
The previous owner's setup is what I've retained in the above picture. I plan to build a totally new mount system from the ground up, as well as implement an auxiliary fuse block, but that is for another day and another post...
Lastly, I decided it was time for a change in the exhaust department. I have had this PFS exhaust since I got the car and while I liked it, it wasn't really my style. My friend Phil got his hands on an old school GReddy Power Extreme exhaust and I figured, "hell, let me try it" and I love it compared to my PFS. It's HUGE lol but to me that's what this car is about, not understated simplicity but loud, in your face huge exhausts and the like.
In truth, I won't keep this exhaust forever, but it's suiting my needs for the time being. When I reach baller status (yes, Rich I'm talking about you) I'll opt for a titanium exhaust at some point.
Here's what she looks like:
Oh yeah, that's not the last mod! I forgot about my gauge pod! I've had this thing for like six months now and I've been waiting to buy another gauge to install it. I waited patiently for FlyRx7 to make another batch, emailed him incessantly, and here we are...
Day
Night
The gauge pod looks awesome, and I'm really pleased with the quality of his work. It truly is head and shoulders better than the other designs out there. Word on the street is, he's going to build a column pod too...
Speaking of column pods, that's the next do-hicky for the interior on my list. Once I get the column pod, I will relocate my Innovate AFR gauge to it, so I can keep a close eye on my AFR's. The previous owner has it mounted in the 2nd DIN beneath the radio. You know, where you have to look down to see it! So, at present I am constantly weighing out the value of my life, versus the value of my engine, cause I can only look at the road, or the gauge -- not both!
Anyway, I leave you with a couple pics from the local drag event at Homestead Miami Speedway. We had five FD's in total show out, which was real cool. Anyone local, do get in touch and we'll get a bigger turnout next time!
We should get together dude. I mentioned in your build thread that Phil and I go to the track each month. Last time, we had five in total. I'm sure we can even coax Rich into coming to some kind of event down this way and have our three cars (all black) together for a little photo shoot or something.
Thanks again for the comments and hope to see you soon bud.
^^ What he said. Frank is a really cool guy and his quality of work is unmatched when it comes to these gauge pods. You may have to wait to get one, but it's worth the wait for sure!
We should get together dude. I mentioned in your build thread that Phil and I go to the track each month. Last time, we had five in total. I'm sure we can even coax Rich into coming to some kind of event down this way and have our three cars (all black) together for a little photo shoot or something.
Thanks again for the comments and hope to see you soon bud.
Nick
Sign me up, I'll blast across Alligator Alley with a quickness
The Tree Tops Park Meet is coming up on April 2 from 12-6pm. You should come up for it and convince Phil as well...
I'll have to work out world hunger or something else, because the miracle of getting Phil to an event where there isn't smoking tires and racing, is a no-go.
Originally Posted by GoodfellaFD3S
Sign me up, I'll blast across Alligator Alley with a quickness
Rich, if you wanna meet up with us and go on April 2nd, I'm down dude...
I just spoke to him about it and he might be changing his tune all the sudden...but he's baked in an excuse, if his car isn't "running right" then he won't go. So, let's see if the full-time mechanic and owner of an RX-7 since '93, who has rebuilt no less than 30 engines...can fix his car by then! lol

 01-04-17, 02:16 PM

 sadly) but it had seen better days and needed refurbishing. I started off by straightening all the fins with a small flat head screw driver and tweezers, believe it or not. The trick here is to use the flat head to kind of bend all the fins back up and then use the tweezers to actually give them the correct shape and orientation. Some areas of the cooler were beyond saving, but overall I'm happy with the outcome.