My black and red build thread
 06-16-11, 12:24 AM
#101
*******
Thread Starter
iTrader: (9)
Join Date: Dec 2001
Location: NJ
Posts: 1,784
Likes: 0
Received 0 Likes
on
0 Posts
Thanks man! I was at Sevenstock this year paying attention to clean engine bays more than anything, your FD was my favorite.
Thank you, I will be at Rotorslam in a few weeks with the car.
Will do, my tank just barely fits. I had my heart set of hiding the tank in that location so I did a bunch of measuring before buying my kit. Coolingmist did not have the best user reviews than some of the others but I am happy with it so far.
 06-16-11, 12:39 AM
#102
*******
Thread Starter
iTrader: (9)
Join Date: Dec 2001
Location: NJ
Posts: 1,784
Likes: 0
Received 0 Likes
on
0 Posts
OK! Time for an update to this thread. Things were going really well, and I had the car running in time for DGRR back in April (my goal). THEN TRAGEDY STRUCK!
Well, more like I made a really stupid mistake. The car melted the air filter while being dyno'd, so much that I had to pry it off with a screw driver and it was pretty much destroyed from pulling it off.
I decided to take the car out on the street for the first time and forgot that the filter was just sitting on the compressor housing. Long story short, it got sucked into the compressor wheel.
RIP.. Precision PT67 Billet DBB


I sent the turbo back to Precision and they assured me this happens more often than you'd think! They replaced the compressor wheel, compressor housing, compressor housing back plate, and turbine shaft and wheel. I dealt with Wes at Precision and turn around time was shockingly fast. Also I decided to upgrade to a larger 1.00 divided exhaust housing as the consensus was that my .84 was too small.
Well, more like I made a really stupid mistake. The car melted the air filter while being dyno'd, so much that I had to pry it off with a screw driver and it was pretty much destroyed from pulling it off.
I decided to take the car out on the street for the first time and forgot that the filter was just sitting on the compressor housing. Long story short, it got sucked into the compressor wheel.
RIP.. Precision PT67 Billet DBB
I sent the turbo back to Precision and they assured me this happens more often than you'd think! They replaced the compressor wheel, compressor housing, compressor housing back plate, and turbine shaft and wheel. I dealt with Wes at Precision and turn around time was shockingly fast. Also I decided to upgrade to a larger 1.00 divided exhaust housing as the consensus was that my .84 was too small.
06-16-11, 12:52 AM
#103
*******
Thread Starter
iTrader: (9)
Join Date: Dec 2001
Location: NJ
Posts: 1,784
Likes: 0
Received 0 Likes
on
0 Posts
Next up was worrying how much, if any damage was done to the engine. A lot of the destroyed compressor wheel was in the passenger side of my IC. I took my Greedy elbow off and saw this:
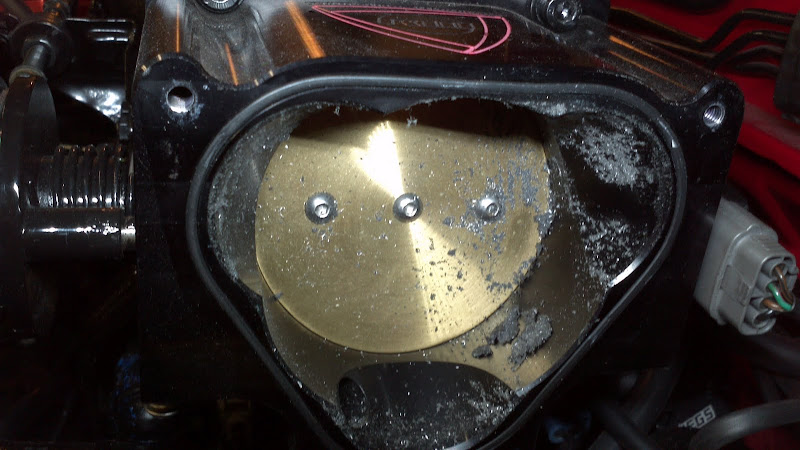
What I ended up doing was bringing my IC to a local radiator guy and having him clean and flush it out. Everything else I disassembled and cleaned myself. Once I had the LIM and exhaust manifold off I poured two stroke oil into the intakes and cranked the engine with a shop towel catching any debris at the exhaust end. Not much of anything other than a little rubber came out.
After receiving the turbo back and putting it all back together she fired up without issue. Since then I have put a few hundred miles on the car without any signs of engine damage. I haven't boosted the car much since it needed to be retuned for the larger hotside.
 06-16-11, 04:07 PM
#106
Sir Braps A lot
Damn that damage sucks, i love you build though. everything you did is pretty much what i wanted to do if i bought a VR FD all black everything, all though im going to wrinkle finish everything when i do my 20B!!! thanks for inspiring me while making me jealous lol.
06-16-11, 08:56 PM
#107
brap brap mf
iTrader: (14)

Join Date: May 2004
Location: clifton, NJ (north jersey)
Posts: 402
Received 0 Likes
on
0 Posts
prew,
ouch! hopefully everything will turn out ok with no damage internally. i probably won't make it to rotorslam this year, too much left to do on the rx7 b4 i get my weekends back.
ouch! hopefully everything will turn out ok with no damage internally. i probably won't make it to rotorslam this year, too much left to do on the rx7 b4 i get my weekends back.
06-22-11, 04:47 PM
#108
*******
Thread Starter
iTrader: (9)
Join Date: Dec 2001
Location: NJ
Posts: 1,784
Likes: 0
Received 0 Likes
on
0 Posts
Thanks guys.
Now that the car seemed to be running OK again, I decided to finally listen to a friend and do a boost leak test.

What I found was that I had a large boost leak at my secondary injectors. The fuel rail I was using was a homemade POS that didn't have the injectors straight up and down in the injector pockets. After fiddling around with them one of my injectors actually started leaked from being tightened down at an angle, great!
So I called Bill at Fuel Injector Connection and sent my 2000cc injectors back to him to look at. Turns out the top of the injector was just coming loose from being tweaked. He fixed up my 2000s and I also ordered a set of 1000cc primaries from him.
I decided to get a quality fuel rail setup, so I contacted Charles at CJ Motorsports. The rails are seriously top notch and are 10x nicer than the stuff I had before.


The new rails fixed my boost leak. I still have a small boost leak in the front of my Rotary Works throttle body, behind the spring. I am not sure how important fixing this is, or how I'd go about doing it.
I recently put on a new Shine 99-spec undertray. Its fits my bumper much better than stock and is nice piece for the price.

That's all for now. The car needs to be tuned for the larger turbine housing and new primary injectors. Hopefully I will be posting new dyno numbers soon!
Now that the car seemed to be running OK again, I decided to finally listen to a friend and do a boost leak test.
What I found was that I had a large boost leak at my secondary injectors. The fuel rail I was using was a homemade POS that didn't have the injectors straight up and down in the injector pockets. After fiddling around with them one of my injectors actually started leaked from being tightened down at an angle, great!
So I called Bill at Fuel Injector Connection and sent my 2000cc injectors back to him to look at. Turns out the top of the injector was just coming loose from being tweaked. He fixed up my 2000s and I also ordered a set of 1000cc primaries from him.
I decided to get a quality fuel rail setup, so I contacted Charles at CJ Motorsports. The rails are seriously top notch and are 10x nicer than the stuff I had before.
The new rails fixed my boost leak. I still have a small boost leak in the front of my Rotary Works throttle body, behind the spring. I am not sure how important fixing this is, or how I'd go about doing it.
I recently put on a new Shine 99-spec undertray. Its fits my bumper much better than stock and is nice piece for the price.
That's all for now. The car needs to be tuned for the larger turbine housing and new primary injectors. Hopefully I will be posting new dyno numbers soon!
01-21-12, 07:54 AM
#109
Very nice build! How's it coming along so far? Are you going to DGRR this year?
I am looking to run a set of SSR Competitions in the same size as yours (18x10.5 +43) with 285's all around as well. I am wondering how you were able to fit them, especially with a 10mm spacer in the rear. I am definitely going to need at least a fender roll. Do you have your suspension and alignment specs?
Thanks
01-21-12, 10:51 AM
#111
Original Gangster/Rotary!

iTrader: (213)
Steve, regarding your turbine gasket, take a peek at these guys:
http://www.twinsturbo.com/index.php?...emart&Itemid=8
Consider switching back to an OEM stock TB, I'm not convinced that any of the gains will be seen if you're getting a boost leak from the aftermarket piece.
http://www.twinsturbo.com/index.php?...emart&Itemid=8
Consider switching back to an OEM stock TB, I'm not convinced that any of the gains will be seen if you're getting a boost leak from the aftermarket piece.
01-22-12, 01:10 AM
#112
*******
Thread Starter
iTrader: (9)
Join Date: Dec 2001
Location: NJ
Posts: 1,784
Likes: 0
Received 0 Likes
on
0 Posts
Very nice build! How's it coming along so far? Are you going to DGRR this year?
I am looking to run a set of SSR Competitions in the same size as yours (18x10.5 +43) with 285's all around as well. I am wondering how you were able to fit them, especially with a 10mm spacer in the rear. I am definitely going to need at least a fender roll. Do you have your suspension and alignment specs?
Thanks
I am looking to run a set of SSR Competitions in the same size as yours (18x10.5 +43) with 285's all around as well. I am wondering how you were able to fit them, especially with a 10mm spacer in the rear. I am definitely going to need at least a fender roll. Do you have your suspension and alignment specs?
Thanks
As far as the wheels, they fit pretty easily with moderate camber and fender rolling. I wanted an agressive look so I did the 10mm spacer out back and 5mm up front, but they serve no purpose other than looks. I had the ride height, alignment and corner balancing done by R/T Tuning and they did give me some paperwork showing the specs. I'm not home at the moment, but I will try to scan it and add that to the thread.
Steve, regarding your turbine gasket, take a peek at these guys:
http://www.twinsturbo.com/index.php?...emart&Itemid=8
Consider switching back to an OEM stock TB, I'm not convinced that any of the gains will be seen if you're getting a boost leak from the aftermarket piece.
http://www.twinsturbo.com/index.php?...emart&Itemid=8
Consider switching back to an OEM stock TB, I'm not convinced that any of the gains will be seen if you're getting a boost leak from the aftermarket piece.
No big changes have been made to the car lately, just enjoying having a running car. I did put the car on a dynojet and it managed 454whp at 24psi. Lower than what most people make with this turbo, so I'll be trying to figure that out this winter as well.
Here's a video of it on the dyno:
http://www.youtube.com/watch?v=QgReljbISr4
The chart, rpm is doubled and no torque because it's a brand new dyno and the guys couldn't figure it out:
 01-22-12, 09:28 PM
#113
As far as the wheels, they fit pretty easily with moderate camber and fender rolling. I wanted an agressive look so I did the 10mm spacer out back and 5mm up front, but they serve no purpose other than looks. I had the ride height, alignment and corner balancing done by R/T Tuning and they did give me some paperwork showing the specs. I'm not home at the moment, but I will try to scan it and add that to the thread.
01-22-12, 10:00 PM
#114
*******
Thread Starter
iTrader: (9)
Join Date: Dec 2001
Location: NJ
Posts: 1,784
Likes: 0
Received 0 Likes
on
0 Posts
I will be heading down on Thursday afternoon and getting to Nantahala pretty late. How about you?
Here are the alignment and ride height specs:
http://i42.tinypic.com/2j35hld.jpg
http://i39.tinypic.com/1zogfmw.jpg
Here are the alignment and ride height specs:
http://i42.tinypic.com/2j35hld.jpg
http://i39.tinypic.com/1zogfmw.jpg
01-23-12, 05:32 AM
#115
The CJ Motorsports rails really are top notch and Charles provides excellent customer service. The injectors have black tops because they are from http://fuelinjectorconnection.com.
01-24-12, 02:54 AM
#116
*******
Thread Starter
iTrader: (9)
Join Date: Dec 2001
Location: NJ
Posts: 1,784
Likes: 0
Received 0 Likes
on
0 Posts
Glad to hear it Alpsta, they are both stand up guys selling great products.
I just realized I never really updated much after the turbo failure so I will back track a bit to share some pictures.
After I got the new turbo I drove the car untuned for a few months to shake it down. It was tough not to boost it at all. Here's a video showing some pretty big flames on the highway from this summer.
http://www.youtube.com/watch?v=HDIiJbPyc3A
Also during that time I decided the 4" exhaust wasn't for me. I only had one muffler and I still had a 3" downpipe. I had all the noise without the power gain, so I decided to sell the custom 4"

At this point I was kicking myself for selling my RSR (same as RB single) catback to someone on the forums for next to nothing. Luckily I found a Tanabe Medalion Touring being sold by Amazon Warehouse Deals. They said it was used, but it was brand new with a damaged box and I got it for $200 shipped. At the same time I got an rx7store resonated midpipe. So I went from having one of the loudest FDs to the one of the quietest without cats which my neighbors are probably really happy about.
Tanabe before I painted it black with charcoal grill paint haha:

Then the car was ready to go back to Enzo's. Again we had a successful tuning sessions and the car made better numbers because of the larger turbine housing .84 to 1.00. The HP was in the 390s on Enzo's dyno which calculates to roughly 470 at 24 psi.

After that I was able to actually boost the car and have some fun it with. I ended up going to a few Edgewater meets towards the end of the year. One of my oil lines had been rubbing on the bottom of my radiator and ruptured leaving me stranded there though. Luckily Benny was there with tools, by the time I got off the phone with AAA he had my bumper off - what a guy.
A great turnout at Edgewater:

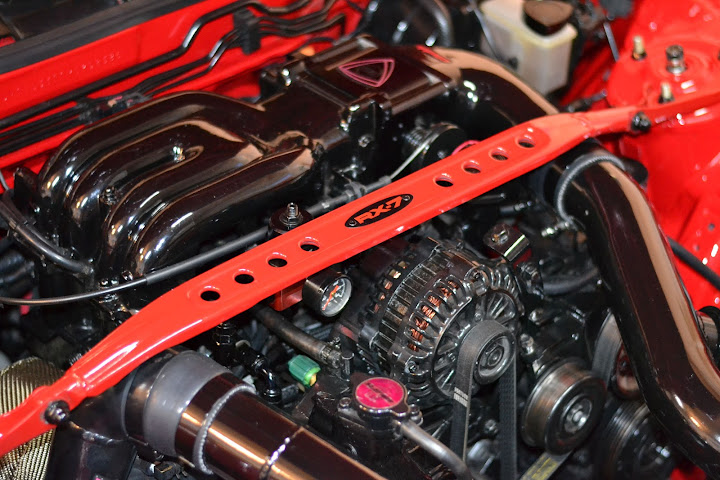
Also towards the end of the summer I met up with a professional photographer to get some pictures of the completed car. His names Robert MacMillan and he takes really amazing photos. My favorite from the day was this engine bay shot:

The rest are here: https://picasaweb.google.com/stevepr...eat=directlink
For Christmas my father had a local sign painter finish off my strut bar RX-7 logo for me. I had powder coated the silver plate black and the RX-7 letters were still raised enough to see them. I tried painting it myself half a dozen times with poor results so I had pretty much forgot about it.

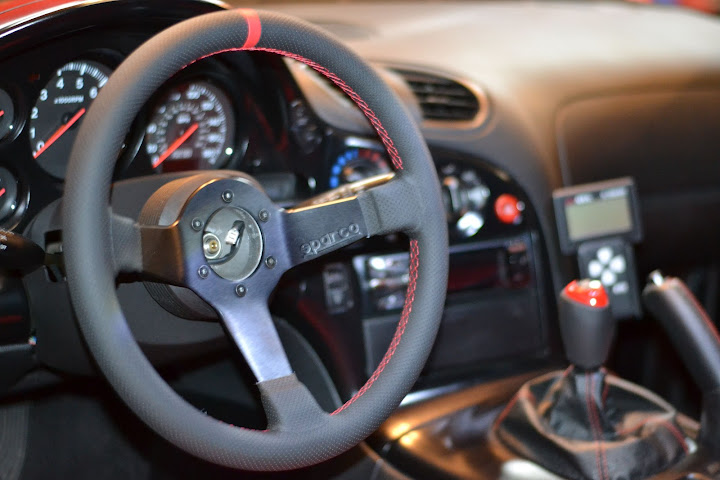
Also for Christmas my wonderful girlfriend got me the steering wheel that I had been drooling over. I was using a NRG/eBay wheel that I took off another car because I couldn't make my mind up on what to buy. It's a 330mm Sparco Limted Edition wheel.
Currently I am fighting with the horn and have a separate thread trying to figure that out.
I just realized I never really updated much after the turbo failure so I will back track a bit to share some pictures.
After I got the new turbo I drove the car untuned for a few months to shake it down. It was tough not to boost it at all. Here's a video showing some pretty big flames on the highway from this summer.
http://www.youtube.com/watch?v=HDIiJbPyc3A
Also during that time I decided the 4" exhaust wasn't for me. I only had one muffler and I still had a 3" downpipe. I had all the noise without the power gain, so I decided to sell the custom 4"
At this point I was kicking myself for selling my RSR (same as RB single) catback to someone on the forums for next to nothing. Luckily I found a Tanabe Medalion Touring being sold by Amazon Warehouse Deals. They said it was used, but it was brand new with a damaged box and I got it for $200 shipped. At the same time I got an rx7store resonated midpipe. So I went from having one of the loudest FDs to the one of the quietest without cats which my neighbors are probably really happy about.
Tanabe before I painted it black with charcoal grill paint haha:
Then the car was ready to go back to Enzo's. Again we had a successful tuning sessions and the car made better numbers because of the larger turbine housing .84 to 1.00. The HP was in the 390s on Enzo's dyno which calculates to roughly 470 at 24 psi.
After that I was able to actually boost the car and have some fun it with. I ended up going to a few Edgewater meets towards the end of the year. One of my oil lines had been rubbing on the bottom of my radiator and ruptured leaving me stranded there though. Luckily Benny was there with tools, by the time I got off the phone with AAA he had my bumper off - what a guy.
A great turnout at Edgewater:
Also towards the end of the summer I met up with a professional photographer to get some pictures of the completed car. His names Robert MacMillan and he takes really amazing photos. My favorite from the day was this engine bay shot:
The rest are here: https://picasaweb.google.com/stevepr...eat=directlink
For Christmas my father had a local sign painter finish off my strut bar RX-7 logo for me. I had powder coated the silver plate black and the RX-7 letters were still raised enough to see them. I tried painting it myself half a dozen times with poor results so I had pretty much forgot about it.
Also for Christmas my wonderful girlfriend got me the steering wheel that I had been drooling over. I was using a NRG/eBay wheel that I took off another car because I couldn't make my mind up on what to buy. It's a 330mm Sparco Limted Edition wheel.
Currently I am fighting with the horn and have a separate thread trying to figure that out.
 01-24-12, 04:39 PM
#119
REPU Garage
iTrader: (17)

Join Date: Jun 2007
Location: Northern Colorado
Posts: 623
Likes: 0
Received 0 Likes
on
0 Posts
Awesome car, I love the dedication to detail. I am currently towards the end of my build and I want to tuck the engine bay wiring like you did, thanks for posting details on this!
Was that YouTube exhaust clip of the 4" exhaust system or the new Tanabe system?
Was that YouTube exhaust clip of the 4" exhaust system or the new Tanabe system?
 01-24-12, 08:03 PM
#121
*******
Thread Starter
iTrader: (9)
Join Date: Dec 2001
Location: NJ
Posts: 1,784
Likes: 0
Received 0 Likes
on
0 Posts
That was the 4" exhaust in the video with the flames. The dyno video I posted before that was with the Tanabe.
10-04-12, 02:31 PM
#122
*******
Thread Starter
iTrader: (9)
Join Date: Dec 2001
Location: NJ
Posts: 1,784
Likes: 0
Received 0 Likes
on
0 Posts
A member PM'd me asking for more info on how I relocated my main body harness and hid all of the relays, fuses and diagnostic box.
Before you decide to do it my way you should know that it makes changing fuses and relays a huge pain in the ***. In order to get to the fuses, relays or diagnostic box I have to take off my drivers side wheel and fender liner. For me it hasn't been much of an issue. I've owned the car for 10 years and have never blown a fuse. I did have to change a relay though because water got in the front relay box because I have it hung upside down.
My main goal was to get rid of the fuse and relay boxes so my engine bay would look cleaner. I saw that Scrub relocated his to the bins and wanted to achieve the same look. I was planning to do this too but once I looked at how many wires I'd have to extended and solder I knew I'd screw something up along the way.
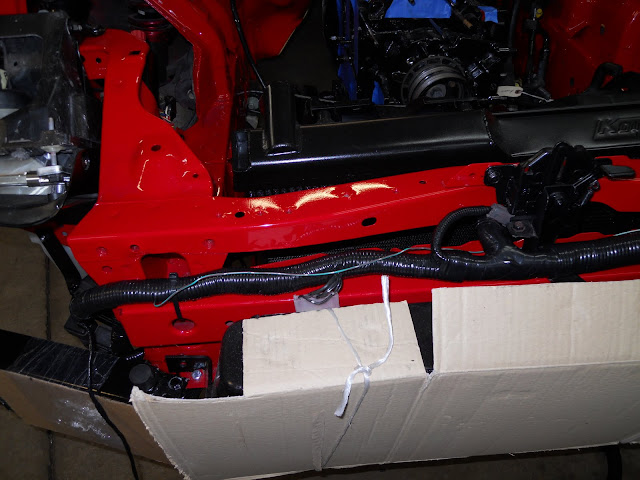
So I disconnected the main body harness from both ends, the ecu on the passenger side of the car and the drivers side fuse block. My bumper was off and I totally removed the harness from the car and unloomed it. I held it together with zip ties so it wouldn't loose its shape and so that small off-shoots of the harness would be retained.
Then I laid the harness on the front of the radiator support instead of under it.

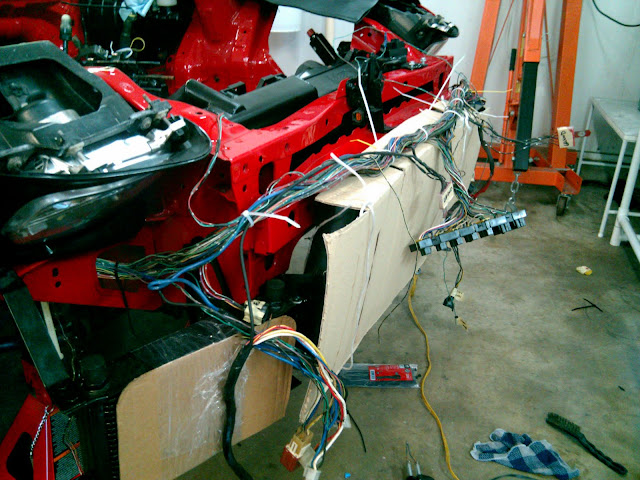
At this point I had wires pretty much going everything and tried to figure out how to route things so that it would be hidden from the engine bay. In the pic above you will notice how my harness runs under the passenger side headlight - it does this on both sides. On the passenger side this required lowering the coolant overflow tank a bit.

You can see the harness running between the coolant overflow tank and body in the pic above. You can also see the that I mounted the cooling fan relays under the passenger side headlight. I used flat aluminum stock to make brackets, bent in a vice if need be.
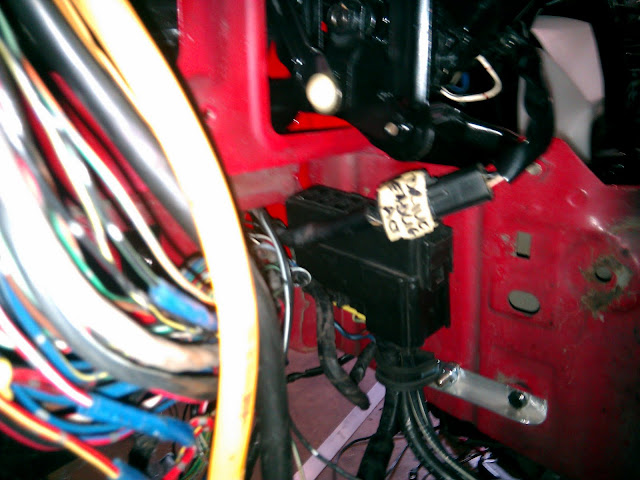
Under the drivers side headlight I mounted the relay fuse block. The bracket to hold this box is shaped like a J.

Then behind that I mounted the diagnostic box and headlight relay side by side.

In the last picture you can also see where I mounted the main fuse block. Note: I don't run a windshield washer tank.
The last thing to mount is the front relay box which I have upside down behind the radiator support.
From the top:

Looking up from underneath:

In order to get the relay box through the small opening in the rad support you might have to take the box apart. Also I attached it with velcro and zip ties, you can see the zip ties go through the corners of the box. The bottom (now top) of the relay box must be sealed so that it doesn't take on water. I sealed mine using a cut water bottle neck and a lot of electric tape.
That's the bulk of it. The only wires I had to extend during this process were to the fans and the passenger side turn signal. I made all my brackets and mounted everything when the harness was unloomed first. Then I took it back off to completely tape it up.
Also while you are doing this and have your fender liners off, make sure your harness is up past the frame of the car. A lot of people rub through their harness especially on the passenger side. There is enough slack to secure it above where the tire would rub metal so that this can't happen.
Before you decide to do it my way you should know that it makes changing fuses and relays a huge pain in the ***. In order to get to the fuses, relays or diagnostic box I have to take off my drivers side wheel and fender liner. For me it hasn't been much of an issue. I've owned the car for 10 years and have never blown a fuse. I did have to change a relay though because water got in the front relay box because I have it hung upside down.
My main goal was to get rid of the fuse and relay boxes so my engine bay would look cleaner. I saw that Scrub relocated his to the bins and wanted to achieve the same look. I was planning to do this too but once I looked at how many wires I'd have to extended and solder I knew I'd screw something up along the way.
So I disconnected the main body harness from both ends, the ecu on the passenger side of the car and the drivers side fuse block. My bumper was off and I totally removed the harness from the car and unloomed it. I held it together with zip ties so it wouldn't loose its shape and so that small off-shoots of the harness would be retained.
Then I laid the harness on the front of the radiator support instead of under it.
At this point I had wires pretty much going everything and tried to figure out how to route things so that it would be hidden from the engine bay. In the pic above you will notice how my harness runs under the passenger side headlight - it does this on both sides. On the passenger side this required lowering the coolant overflow tank a bit.
You can see the harness running between the coolant overflow tank and body in the pic above. You can also see the that I mounted the cooling fan relays under the passenger side headlight. I used flat aluminum stock to make brackets, bent in a vice if need be.
Under the drivers side headlight I mounted the relay fuse block. The bracket to hold this box is shaped like a J.
Then behind that I mounted the diagnostic box and headlight relay side by side.
In the last picture you can also see where I mounted the main fuse block. Note: I don't run a windshield washer tank.
The last thing to mount is the front relay box which I have upside down behind the radiator support.
From the top:
Looking up from underneath:
In order to get the relay box through the small opening in the rad support you might have to take the box apart. Also I attached it with velcro and zip ties, you can see the zip ties go through the corners of the box. The bottom (now top) of the relay box must be sealed so that it doesn't take on water. I sealed mine using a cut water bottle neck and a lot of electric tape.
That's the bulk of it. The only wires I had to extend during this process were to the fans and the passenger side turn signal. I made all my brackets and mounted everything when the harness was unloomed first. Then I took it back off to completely tape it up.
Also while you are doing this and have your fender liners off, make sure your harness is up past the frame of the car. A lot of people rub through their harness especially on the passenger side. There is enough slack to secure it above where the tire would rub metal so that this can't happen.