When you click on links to various merchants on this site and make a purchase, this can result in this site earning a commission. Affiliate programs and affiliations include, but are not limited to, the eBay Partner Network.
Like many of you out there the FD has been a dream car for me for as long as I can remember. I've owned two miata's previously but they always felt like something to tide me over until I knew I would get an RX7. My most recent car was a 135i that, sadly, is no longer around (keep it on the track guys!).
Recently I came into a promotion at work that has allowed me to finally purchase my very own money-pit!
Pre-touch up to front bumper and side-skirts. Not a fan of the headlights at all.
I wanted to keep the purchase to a certain budget and I managed find a car that needed some work, but fit into the budget I wanted to stick with. After a CRAZY amount of back and forth, trying to get the car smogged, alternative buyers trying to snipe the car out from under me, I was able to secure the deal.
In typical FD fashion something broke, before I even went to pick up the car. There was a small fuel leak that developed and was noted during a pre-sale inspection and the most likely culprit was either the fuel pulsation damper or a fuel line based on the location of the leak. I made the 8 hour trek from NorCal to San Diego armed with my mechanic friend, a crap load of tools, 200 bucks in replacement parts, and lots of caffeine.
Driving up the Grapevine
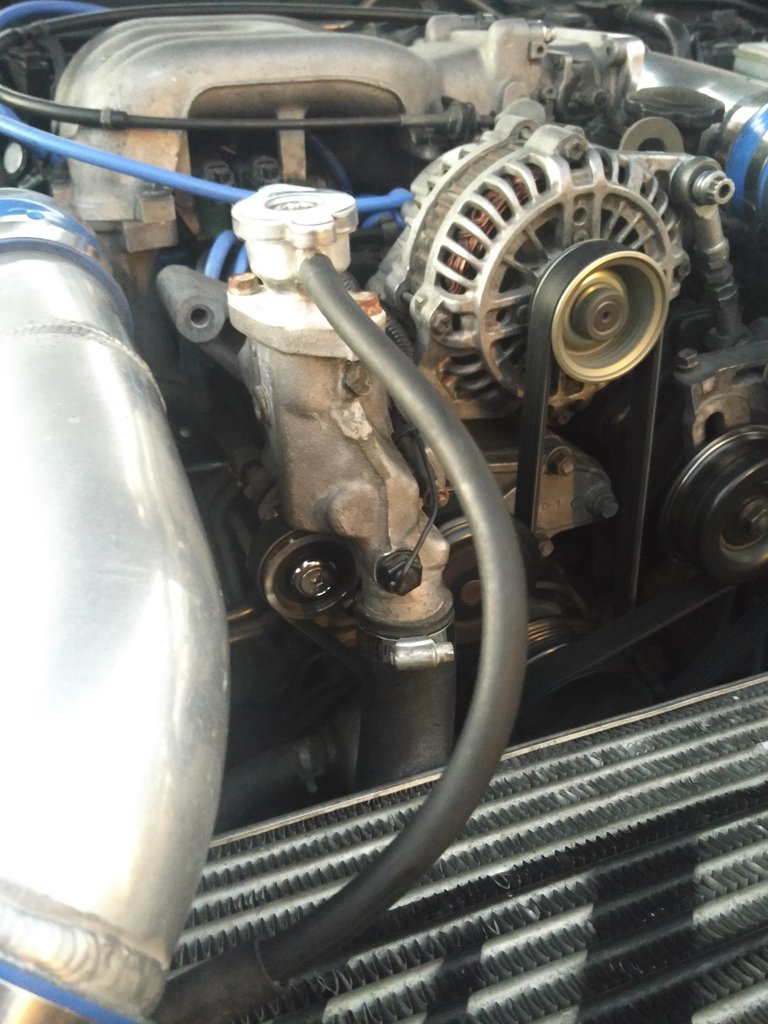
I don't think any amount of guide prepared us for the absolute pain in the *** it is to replace the fuel pulsation damper (FPD)... Is there a special tool? Who knows. We spent several hours trouble shooting and trying to fab up a tool to get the screws out that were blocked by the bell housing. Removing the rats nest was out of the question given that we were in the previous owners backyard and under a time crunch.
Fuel leak under the UIM
Friend pulling the UIM
The future headache, put back together.
By the end of the day we had replaced the broken FPD, a length of rotten coolant hose, and two rubber vacuum lines. It was clear that there more than likely going to be a lot of hoses and lines that needed to be replaced, but that was a project for another day.
The car drove home like a champ, HOORAY!
Profile shot as the sun was rising.
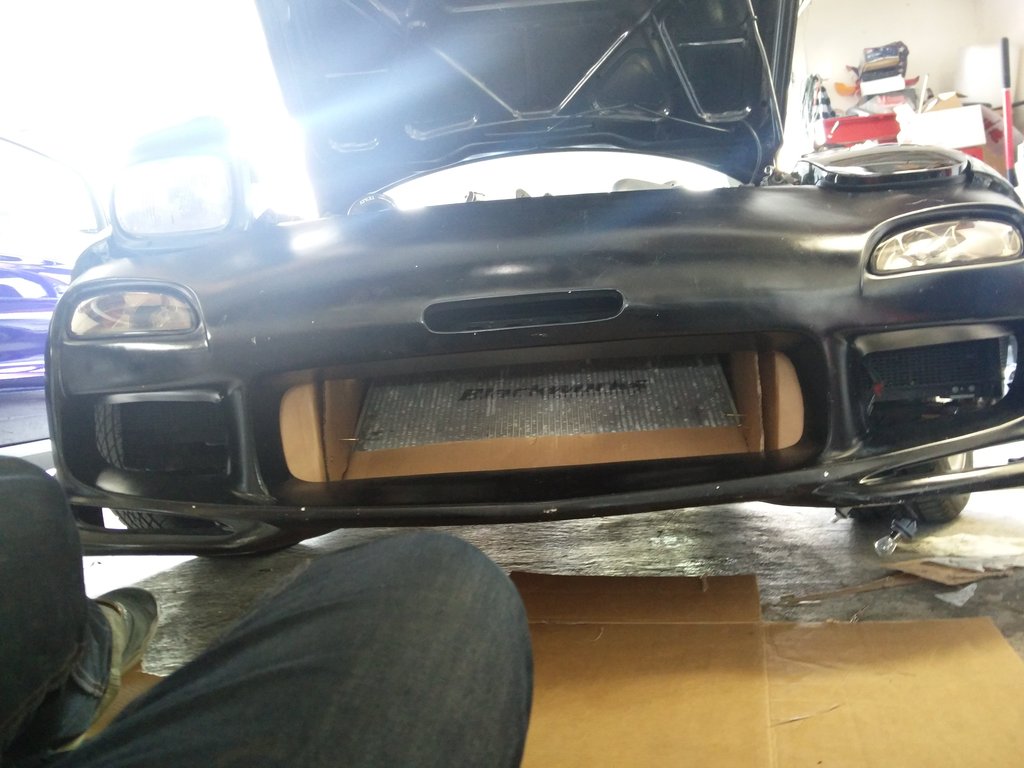
The car had some glaring issues that I wanted to address right away to get out to a few car meets with the new ride - firstly, bunch of cracking and scratching on the front bumper. I have already ordered all of the 99-spec front bumper assembly, but in the meantime I decided to try my hand at sanding and repainting the front bumper so I didn't hate staring at it. The results were not bad!
After complete sanding with 200, 400, 800, and 1000 grit
Priming the bumper
First pass with black
Finished paint and reattached. MUCH better.
The next major issue for me was the headlights. The pop up assemblies came with the car luckily, so all I needed was new covers and to get those painted. Rather than rattle can the OEM covers I purchased I had those sent to a paint shop to get done up right.
OEM Bags!
Obvious major projects that are up on the list: POPUP HEADLIGHTS, Front bumper, shift ****, all vacuum lines, coolant hoses, etc, wheels+tires, suspension, paint job/wrap, steering wheel change (maybe), proper tune, proper alignment, possible different seat or a different rail to lower the seat, replace squeaky pulleys.
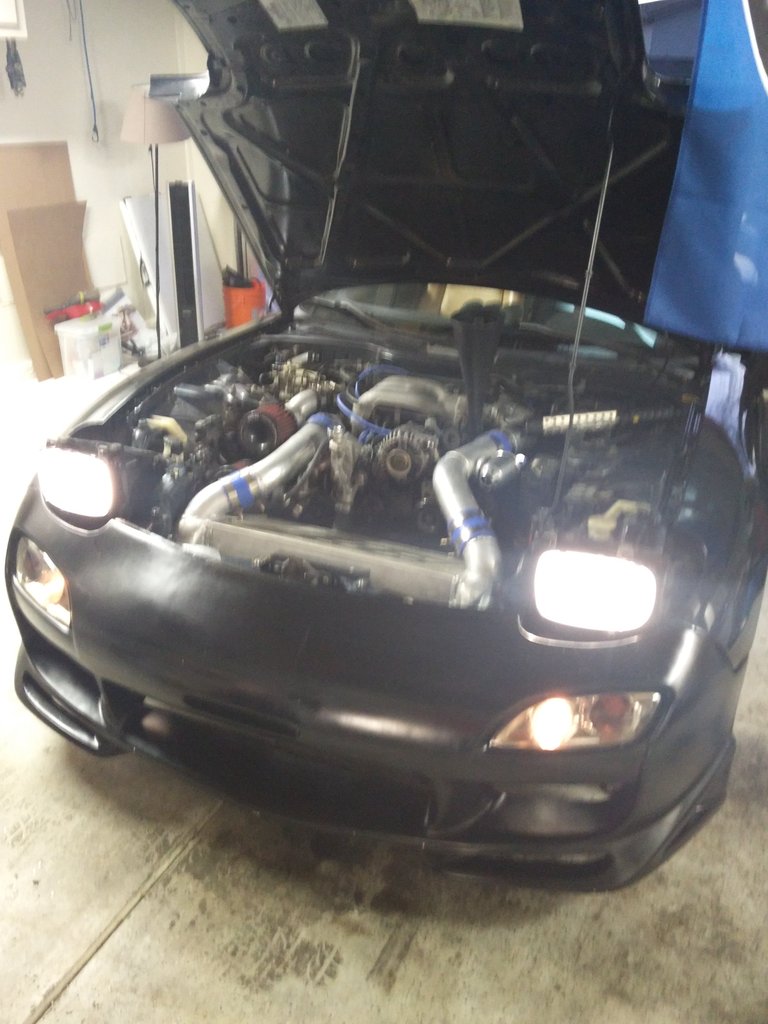
Current modifications: Apexi Intake, Power FC, Greddy Elbow, Invidia Exhaust, custom vmount dual core intercooler, dual oil coolers, larger radiator, unknown downpipe, hi-flow cat, HKS BOV, Momo steering wheel w/ quick release hub, Buddy Club seat w/ 5 point harness, Vishnu shift **** (that doesn't fit properly), autometer sportcomp boost, oil temp, oil pressure, and water temp gauges, greddy turbo timer, ignition kill switch.
I'm really looking forward to chasing down my dreams on with this car and any feedback is greatly appreciated. More to come!
How the interior? That is my biggest frustration... these interior parts are so brittle....
Thanks man! Yeah, it seems like it's never going to end, but you know we all love that stuff.
As for the interior, I only have one shot handy...
It's a bit of a potato photo... The interior is very clean considering the condition of the paint (not good). No creaking, no missing pieces, I was pleasantly surprised. Leaves mainly the suspension work and body to be dealt with.
@borisf @ZoomZoom The only spot where it's kind sketchy on the interior is the driver side arm rest/door handle thing/window controls. The plastic just feels like it's moving around a lot more than it should. Maybe there are brackets broken inside/under it? Not entirely sure... I'm assuming this is a common issue.
The other day I went on a spirited drive up a local mountain road and about half-way up noticed that my boost had seemingly disappeared and my idle was getting lumpy. After inspecting under the hood I noticed that two vacuum lines had come undone.
They have since been replaced but now i'm noticing that the car is not boosting after shifting gears at high boost. Digging around the forums it seems like it might be a check valve or a line further down that has broken/popped off. I guess it's time to rip off the UIM and replace all of the lines. Pics to come.
Another very common issue is the plastic Y pipe will hairline crack. You will get boost and transition the first pull and then the rest of the drive it won't transition. The stock system needs to see at least 8 psi on the primary to transition to the secondary turbo, if there is a crack in the piping along the way and it doesn't achieve at least 8'psi you end up with no transition to the secondary turbo. I would see about 4 or 5 psi only when that would happen. The Y pipe is a common failure point and was upgraded by Mazda in 96. The new part is known as the Efini Y pipe. It's metal! So no more issues with cracked Y pipes. I chased down boost leaks and sequential issues until I went single turbo on my first FD. It wasn't until I ripped out the whole system that I noticed the Y pipe crack. It is a little bit of a chore getting to the Y pipe and replacing it. Its the first place I would look. Anything plastic on these cars is a good place to look for failure points.
Btw if it was the vacuum line popping off your map sensor on the fire wall that's a quick way to blow a motor. Make sure that vacuum line is zip tied from manifold to sensor. If it was the map sensor that lumpy idle may be an apex seal gone. Wouldn't be a bad idea to do a compression check if the idle didn't return to normal after plugging back in your vacuum line.
@ZoomZoom compression was good when I purchased the car. I've decided to keep it sitting until I have some time to rip off the UIM and check the lines. It only gave me any idle issue after the line behind the UIM came off. I sincerely hope it is not an apex seal as everything checked out fine on the car and it made the drive back from San Diego without any incident.
The car will build boost, but if I am shifting at high RPMs, it will intermittently not build boost after shifting, but if I lift off the throttle and then reapply throttle, the boost will come on. Very odd! Just going to replace all the plastic and all the lines.
I'm sure compression was fine but that was before you may have boosted it while ECU not seeing boost on the map sensor. Not saying you did blow your motor but if the car was boosting without the ECU seeing it via the map sensor it cannot add the fuel it needs as it doesn't know where on the fuel map you are based off load (boost).
I hope you lucked out here as that's the single worst vacuum line that could have popped off. It only takes one pull under boost without the map sensor vacuum line on and its toast.
If it's still idling like crap then pull the EGI relay, pull a spark plug on rear rotor and crank the car and listen for an even compression pattern. You will hear the sound that sound like a Woosh! On each compression face. If it's missing that even sound then you lost an apex seal. If not then put the plug back in and pull one from the front rotor and do the same test.
FYI that's known as the Poor mans compression test. You can do a search if you need a more comprehensive explanation.
If it's got a rough Idle and is difficult to hot start then you will be pulling more than just the manifold.
I do not believe it was the one connected to the map sensor, but i'll need to confirm. The idle is only a little bit rough for a few seconds at a time, usually after coming to a stop, but then it clears up. Also, no issue hot or cold starting, fires right up.
I think the best approach for me here is to just stop guessing and actually pull the thing apart and confirm what is what. No sense scaring myself with what could be wrong.
I do appreciate the advice and the reality check. I'll be sure to document things for this thread.
Last edited by Taylor_Jalopmeets; 08-02-16 at 08:42 AM.
@lo7 Thanks man, long way to go before i'm at your level haha.
Checked on the vacuum line leading to the map sensor, totally fine, no issues there. Car sat idling totally fine. No issue on start up, turned it off after about 15 minutes, restarted, no smoke, no issues.
I've seen a ton of these listings close out. No idea how or why. I will highly consider dropping a sledge hammer on them to Geto Boys - Still. Just for you guys.
Firstly - still waiting to get my painted headlight covers back (hopefully Thursday) but i've already started the process of tearing out the fixed lights and prepping the new (original OE) lights.
I've done a few test fits and should have pictures Thursday of the complete set up.
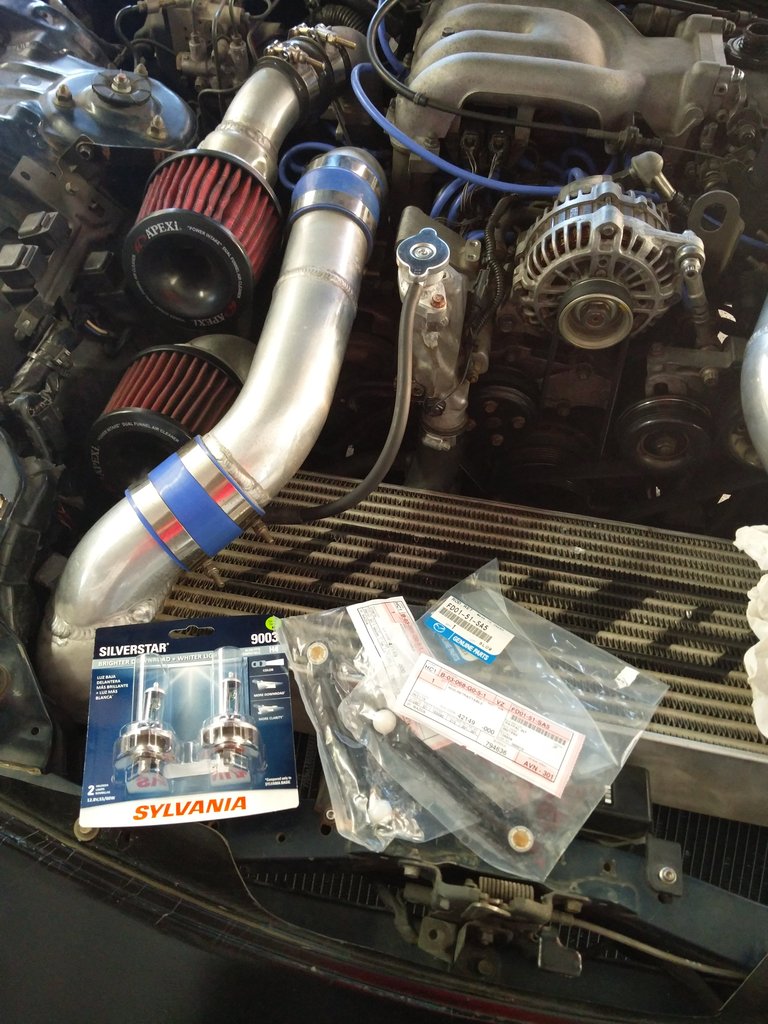
"While i'm in here�" I started working on the silicone hoses, replacement throttle body gasket, and viton check valves (courtesy of the great Dale Clark)
Before... After...
Everything was going super smooth until I snapped the plastic on a switching solenoid, so that's in the mail and should be here tomorrow. Some of the check valves were so completely backed up that it didn't matter how much I tried to pass air through them, it just made a tiny squeak.
I found this hilarious.
Another item I wanted to take care of was the idler pulley which was not done when the original owner did the smog pump delete, so that will be going in tomorrow as well.
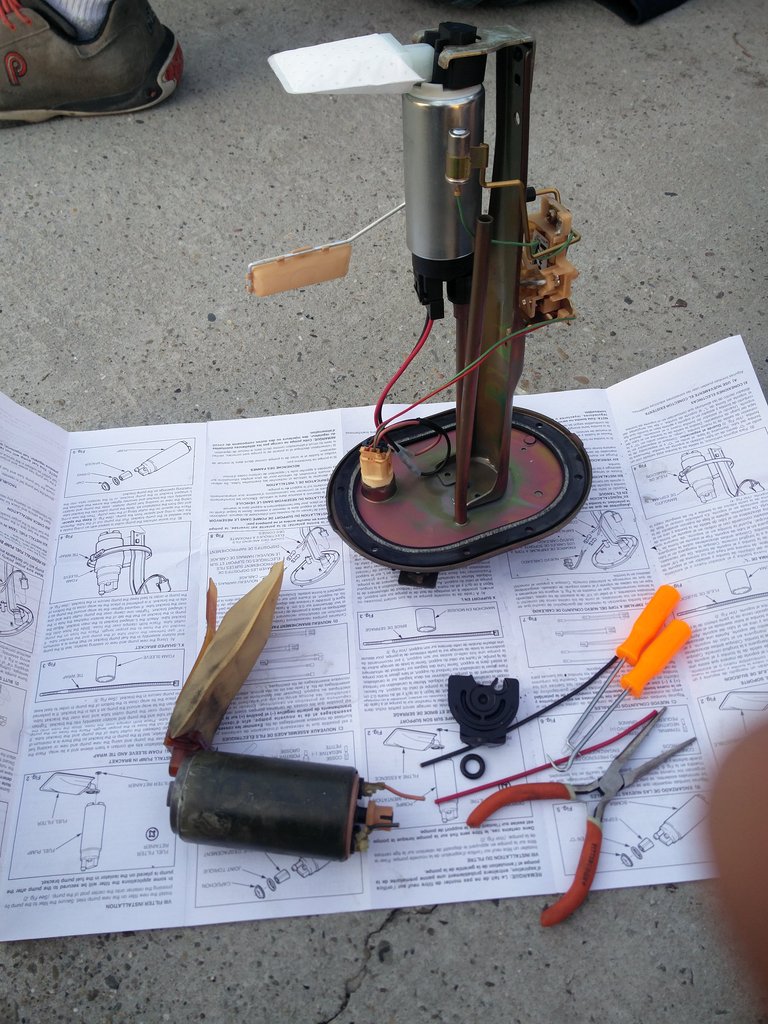
Hopefully this resolves my boost issue! I'm also going to be upgrading the fuel pump to a Walbro 255 as the car has so many power adders and getting a formal tune at a local shop.
Wow! It's been a little while since I made my last post, but lots has happened since then. Overall i'm trying to get the car to a place where it feels a bit more reliable as things progress i'd like to clean up the exterior a bit.
As such the first order of business was target the areas that were more obviously in need of enhancement.
The previous owner had removed the airpump but did not have an electric waterpump or pineapple pulley installed so as a safety precaution I went ahead and put one in.
Next on the list was taking care of the fuel pump. With all of the mods already on the car, I wanted to remove the chances of the car leaning out due to the fuel pump not being up to snuff so I went with a Walbro 255 as I do not have immediate dreams HUGE POOOOOOWER. Wideband AFR gauge to come soon.(Although by the end of this post you may question my decision.)
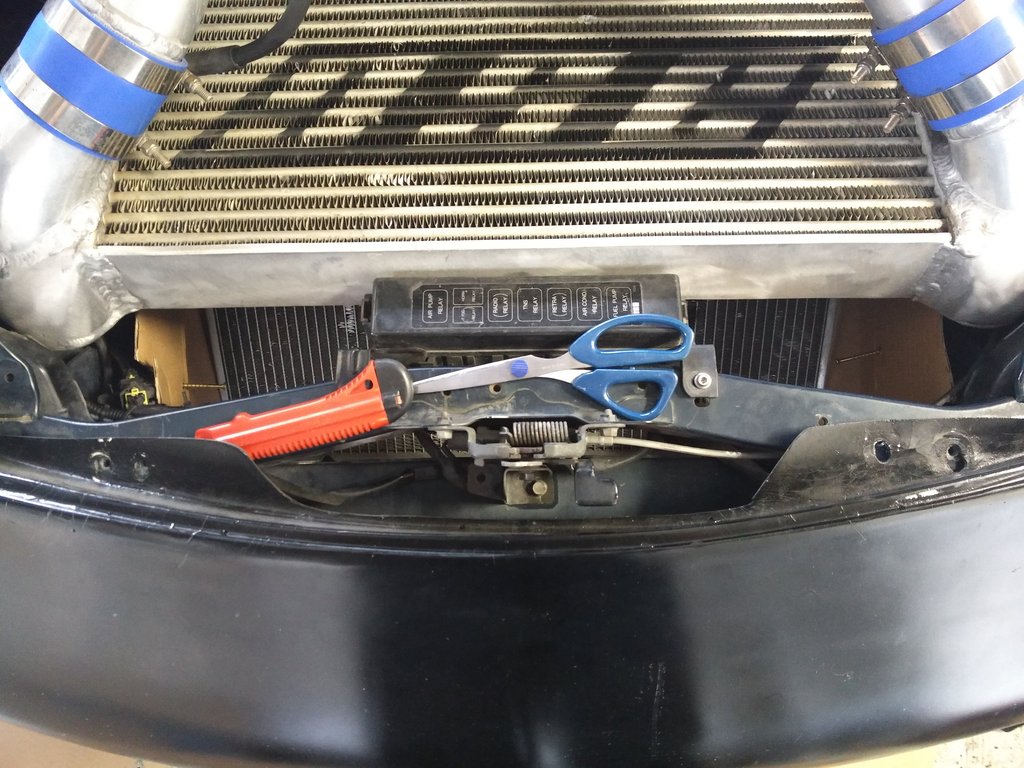
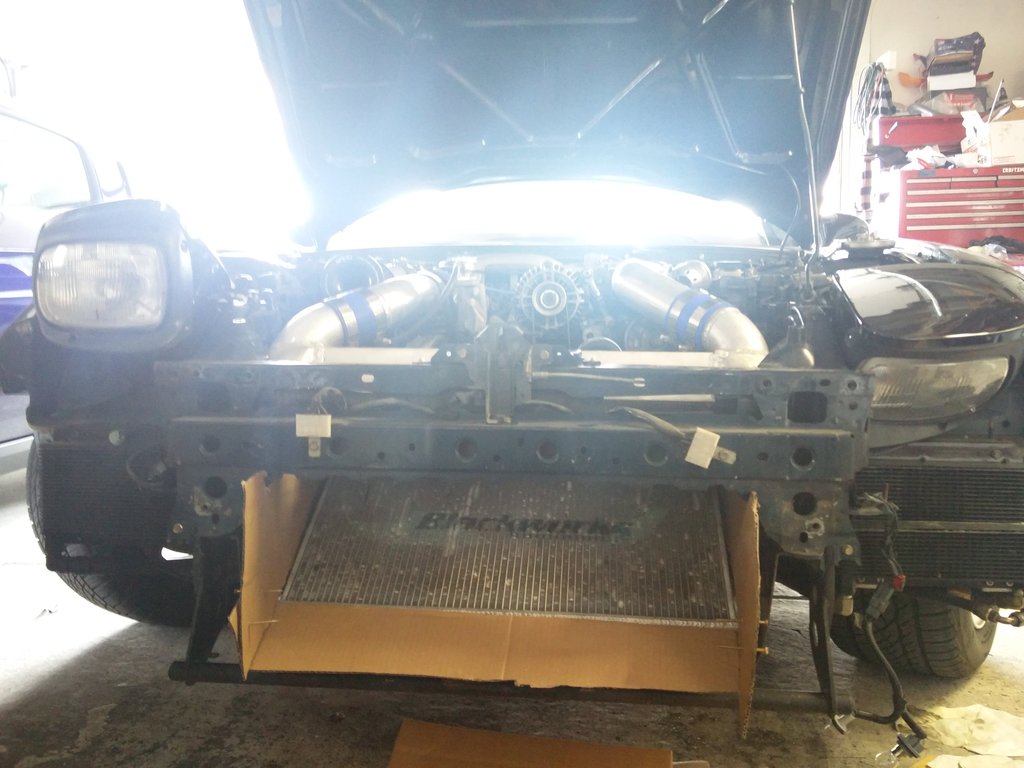
Recently i'd gone on a few spirited drives with the FD and noticed the car getting a little bit hotter than i'd like to see it and determined the INSANE LACK OF DUCTING to be a major culprit to the rising temperatures. As the car currently sits it is completely open on the bottom, around the oil coolers, radiator, and intercooler. I decided to fabricate some ducting with thick cardboard to get measurements for putting together some aluminium ducting.
I also purchased new OEM headlight rods and some updated lighting to help me see at night and to get rid of the bounce on the popups. A small and quick job, but it made a world of difference on night drives.
On to the way more fun things... The stock taillights are great, but 99 spec lights are the dream to me. Local RX7 parts reseller had a perfect condition set available and I picked them. In love with this:
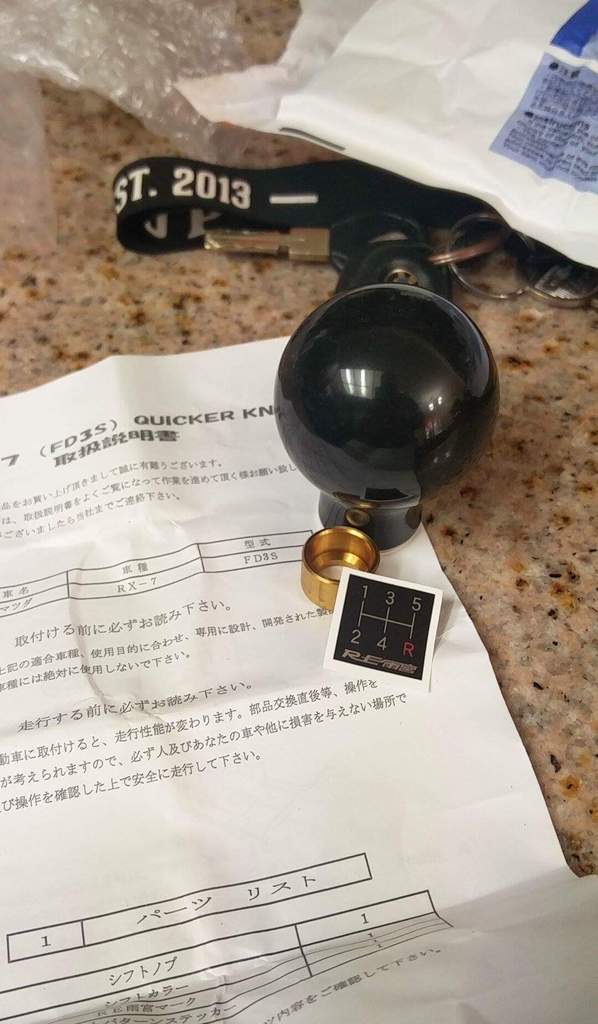
Back to the interior of the car, a few more changes here. Picked up a RE Amemiya shift ****. The **** from the previous owner was falling off as it did not fit correctly and was held on with some tape. Not up to my standards the old **** had to go.
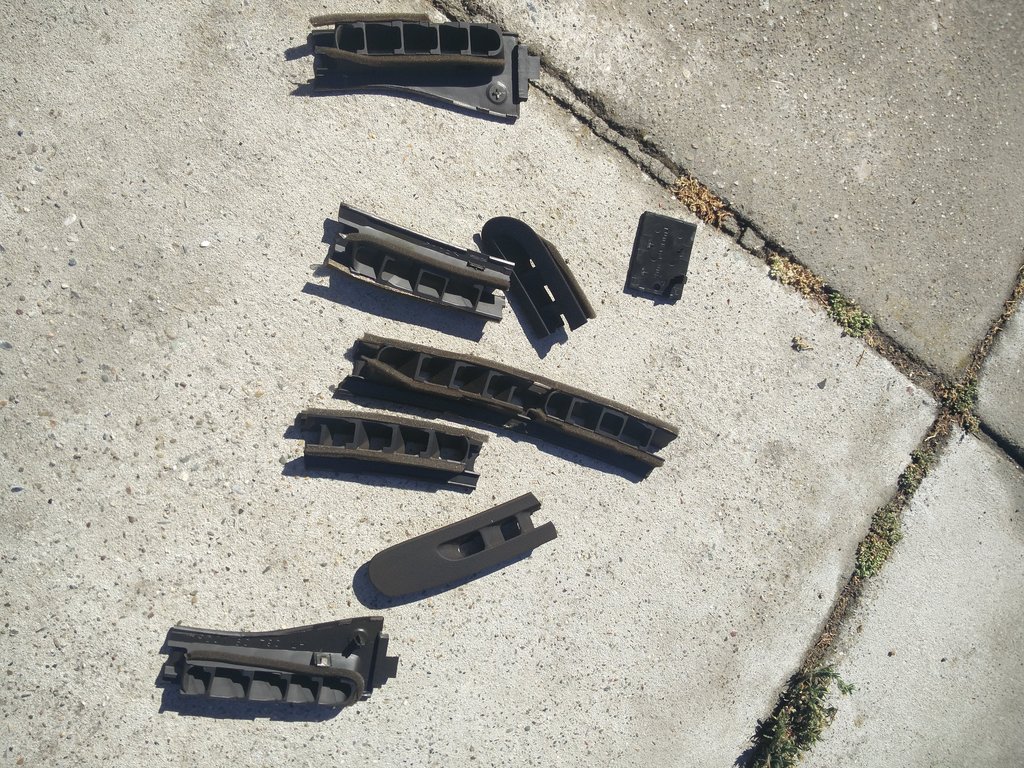
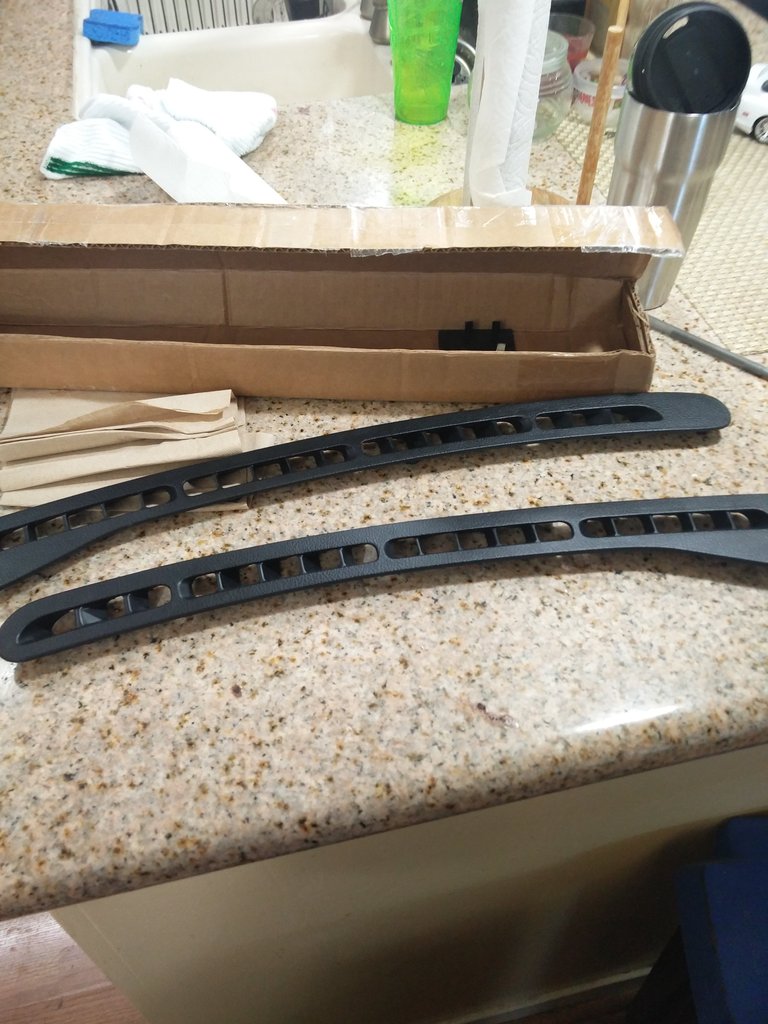
These awful defroster vents have fallen to pieces which seems to be a really common problem for us! I picked up some new ones and i'll just have to keep the sun off the dash
Next post for more fun...
Last edited by Taylor_Jalopmeets; 10-20-16 at 02:23 PM.
Recently i'd gone on a few spirited drives with the FD and noticed the car getting a little bit hotter than i'd like to see it and determined the INSANE LACK OF DUCTING to be a major culprit to the rising temperatures. As the car currently sits it is completely open on the bottom, around the oil coolers, radiator, and intercooler. I decided to fabricate some ducting with thick cardboard to get measurements for putting together some aluminium ducting.
For a V-mount the air exits the radiator at the bottom, so you don't need duct there. You do need duct on the sides and the mouth to keep air from bypassing either the radiator or the IC. Does it have any fans installed?
For a V-mount the air exits the radiator at the bottom, so you don't need duct there. You do need duct on the sides and the mouth to keep air from bypassing either the radiator or the IC. Does it have any fans installed?
Tomu, it does not have ducting on the bottom currently, I was looking to do a half-duct offered by LRB that doesnt block the Vmount. I'll see if I can provide some pictures.
It has 2 fans installed under the radiator on the bottom. Not sure on sizing, but they are set controlled by the ac fan controls.
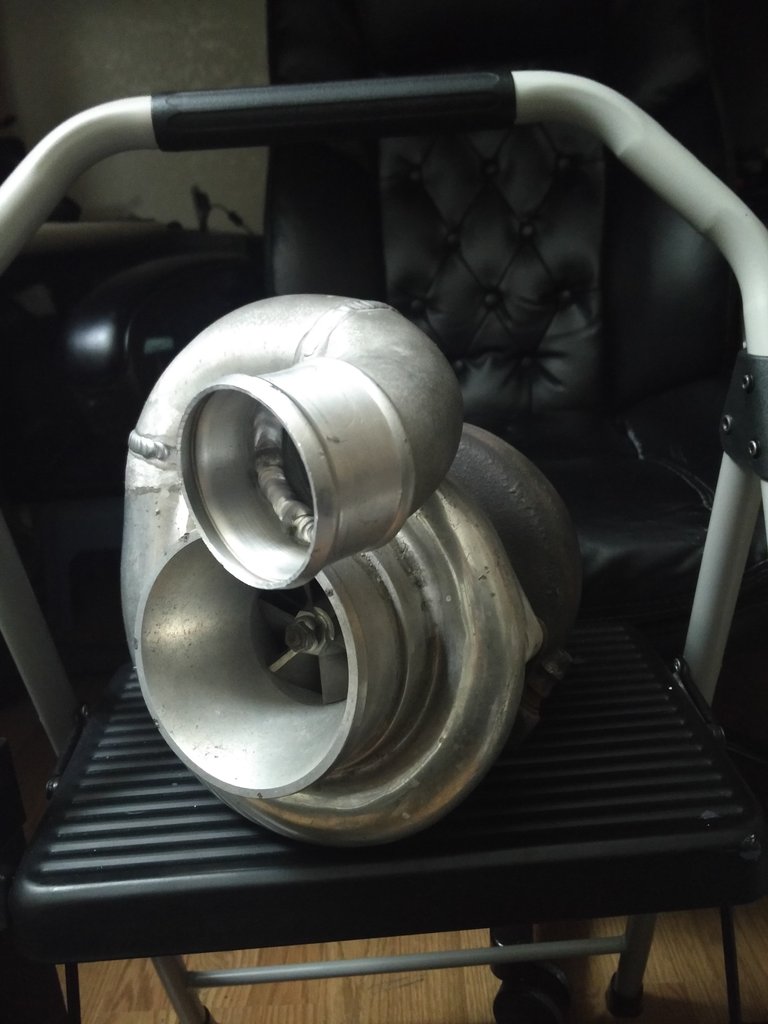
So I guess i'm going single. With all the boost issues, trouble shooting leading to nowhere, etc; I just couldn't walk away from this deal. I picked up a 90% complete GT35R turbo kit from a local RX7 guy and i'm very excited to get everything switched over. Of course i'll need to get it tuned and make sure I have the right injectors... I'm really just looking to make a reliable 350whp. When the boost crave strikes ill upgrade to a better fuel pump.
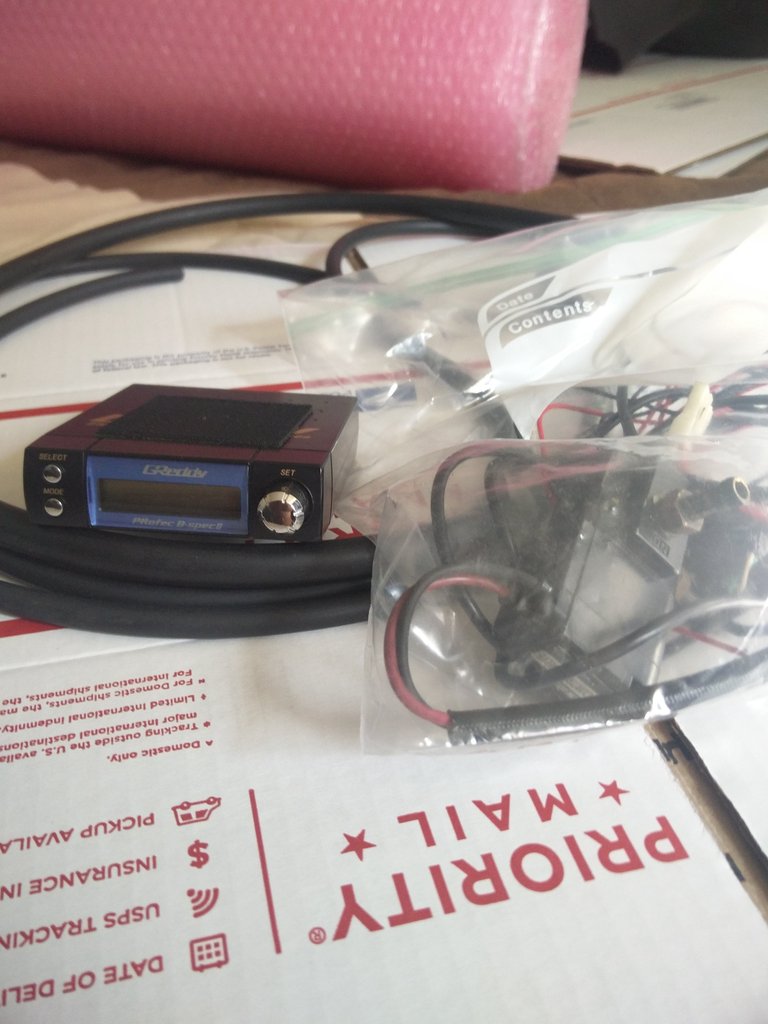
To keep the boost in check I picked up a GReddy Profec Spec II from a forum member. It's in great condition.
Lots more updates coming soon, I have some wheels sitting in my other car right now, just need some rubber. New front bumper soon. Doing a complete fluid flush and change and some SS brake lines. Stay tuned
Tomu, it does not have ducting on the bottom currently, I was looking to do a half-duct offered by LRB that doesnt block the Vmount. I'll see if I can provide some pictures.
The LRB undertray is for protection, not for cooling. I would improve it by adding screens to the cut openings.
Couldn't see your pictures before, but your cardboard mockups look spot on and should help cooling dramatically once you get it fabed up
The LRB undertray is for protection, not for cooling. I would improve it by adding screens to the cut openings.
Couldn't see your pictures before, but your cardboard mockups look spot on and should help cooling dramatically once you get it fabed up
Yeah, I had a bit of a chat with LRB and they confirmed that point. I didn't do a very good job of explaining what i'm doing hehe.
Glad the duct fabs look good, hoping to put some grinder time in this weekend to get everything together before a drive next week. Pretty pleased with the work overall thus far considering I haven't done much of my own wrench work since my first 2 miatas almost 10 years ago.
 07-28-16, 02:04 PM