Going to make my own WI kit

 01-28-09, 06:50 PM
#27
looking for 82-83 corolla
iTrader: (6)
Join Date: Aug 2005
Location: ar
Posts: 451
Likes: 0
Received 0 Likes
on
0 Posts
Thats a pretty niffty nozzle design its kinda like the atomization nozzles for the HVLP paint guns. Itl'l be interesting to see how it flows with just air flow compared to air and fluid pressure. If it were to flow enough you wouldnt even need to pressurize the tank. Just something to think about i guess, or maybe you have. I'd love to see how this works out for you im interested in tring this on my twins for a month or so while i sourse the rest of my parts for my single. Let us know how it goes once installed maybe a pic or two of the install locations?
cool setup
z
cool setup
z
01-28-09, 07:23 PM
#28
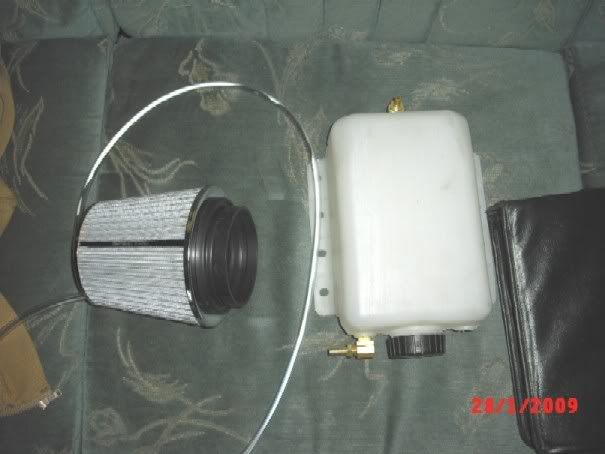
Alright I have an update. The new turbo is all hooked up and I have a basic tune on it up to 11 psi. I'm also pretty much done with the WI kit. All that's left is to bench test it and put it in the car.
Today I mounted the water atomizing nozzle inside the air filter, and drilled and tapped the tank for the 1/4" brass fittings. I spent almost $30 in various brass fittings, and stainless steel nut, bolt and washers at Lowes.
__________________________________________________ _
Mounting the Nozzle:
Originally, I was going to use the nut on the front of the nozzle, close to the tip and mount it on the outside of the filter with just the sprayer tip inside. But the only filter I found to work well in the space provided did not have enough clearance for the nozzle body and hoses on the outside. At this point I pondered an alternative location, or a way to modify the filter to work. I decided to mount the nozzle inside the filter and I actually prefer this location.
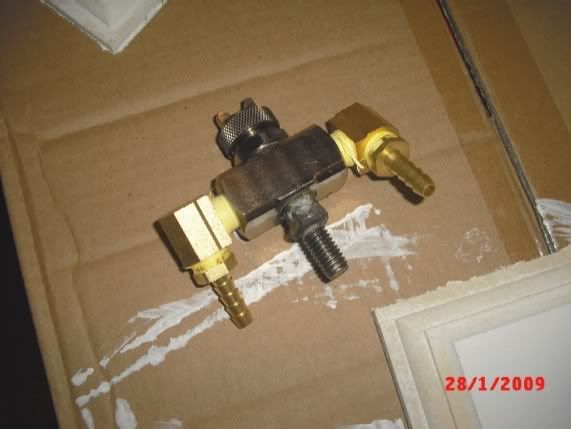
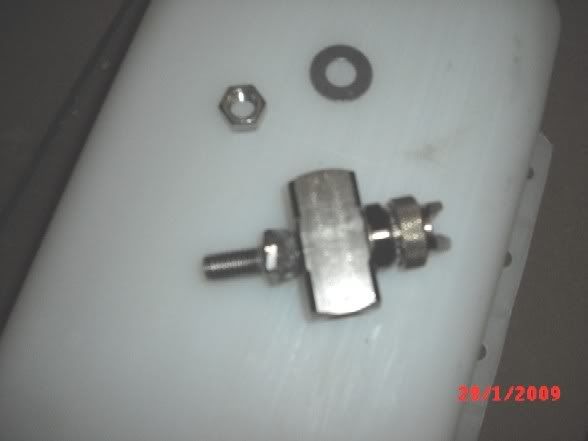
The WI nozzle has a bolt with weird threads screwed into the backside of the nozzle. It's designed to be removed so you can screw a needle clean-out or other options from the manufacturer. Well I wanted to use this spot to bolt the nozzle to the filter.
I purchased a stainless steel bolt (2 in a pack) and tig welded it to the back side of the other stainless steel bolt so that I could thread it into Nozzle body and then have threads I could use to bolt it to the filter. Both bolts are stainless steel, but seemed to have different melting points, the result was a PIA, ugly, yet functional weld that will never be seen.
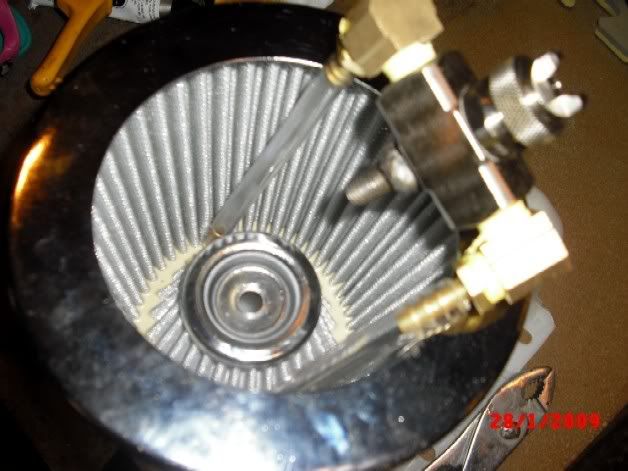
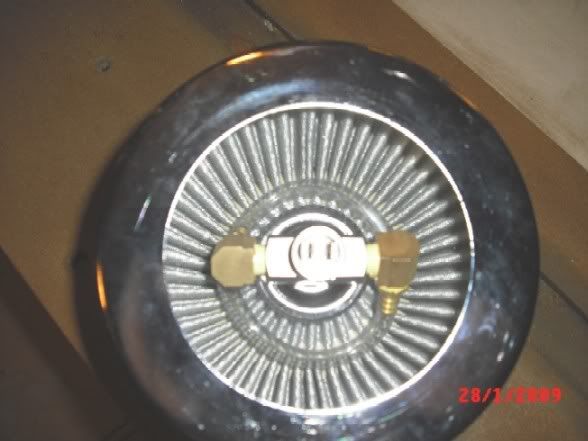
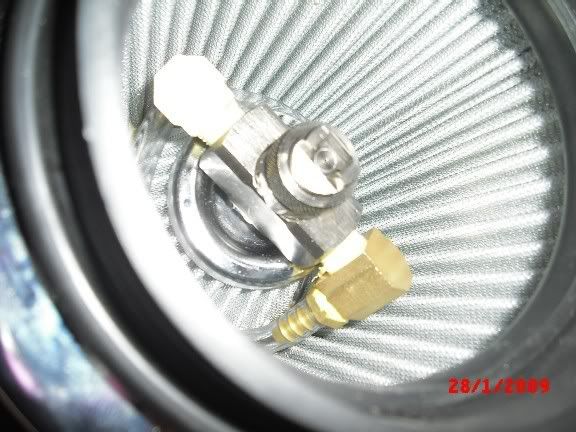
I then drilled a hole dead center in this small, stout, chrome button that helps keep the filter elements together. I was then able to bolt the nozzle directly to the inside of the filter and have the nozzle point directly at the compressor nut. Perfect location very durable, and to remove the nozzle it's only 1 nut.
I installed 1/4" NPT 90* brass fittings in each end of the nozzle body with 1/4" Barb fittings screwed into the 90's. I angled the 90* fittings slightly so that when the hoses are connected everything has a nice flow and plenty of room.
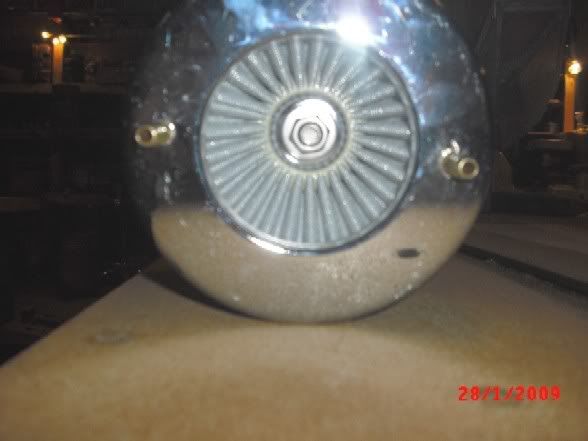
Next I drilled 2 holes into the chrome ring around the front of the filter. The holes are barely larger then a 1/4" straight hose barb. The holes had to be perfect to clear each side of the filter element on the inside.
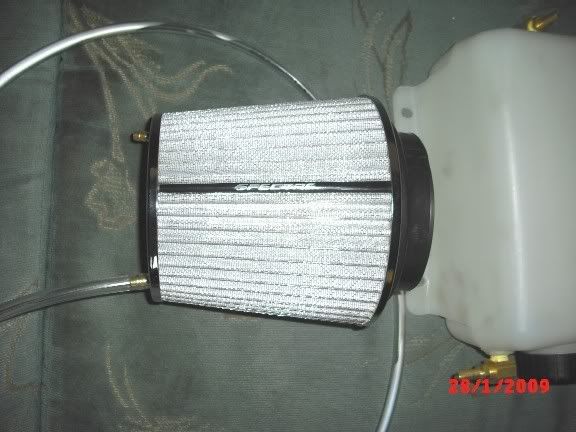
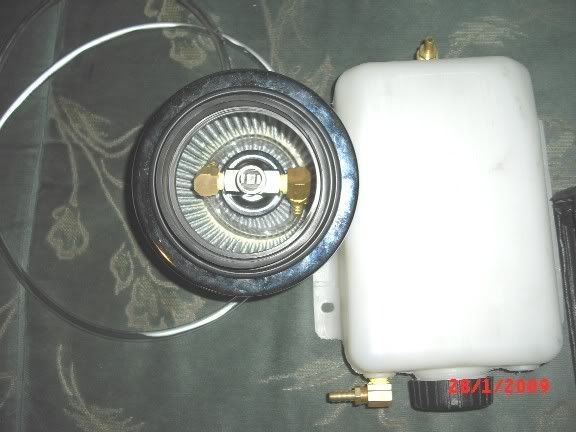
I connected 2 short hoses to each end of the Nozzle's new hose barbs and pushed the straight barbs into the other end of the short hoses, then pushed them through the end of the filter's ring where I drilled my holes. I now have nipples on the Left and Right side on the front of the air filter. Left = Liquid and Right = Air.
_____________________________________
TANK:
I drilled and tapped my tank at the top and bottom for 1/4" NPT and threaded brass fittings in. The bottom has a 90* and then a hose barb.(water OUT) And I still need to go buy a brass T for the top location. (air IN)
______________________________________
Pics to better explain what I wrote:
Today I mounted the water atomizing nozzle inside the air filter, and drilled and tapped the tank for the 1/4" brass fittings. I spent almost $30 in various brass fittings, and stainless steel nut, bolt and washers at Lowes.
__________________________________________________ _
Mounting the Nozzle:
Originally, I was going to use the nut on the front of the nozzle, close to the tip and mount it on the outside of the filter with just the sprayer tip inside. But the only filter I found to work well in the space provided did not have enough clearance for the nozzle body and hoses on the outside. At this point I pondered an alternative location, or a way to modify the filter to work. I decided to mount the nozzle inside the filter and I actually prefer this location.
The WI nozzle has a bolt with weird threads screwed into the backside of the nozzle. It's designed to be removed so you can screw a needle clean-out or other options from the manufacturer. Well I wanted to use this spot to bolt the nozzle to the filter.
I purchased a stainless steel bolt (2 in a pack) and tig welded it to the back side of the other stainless steel bolt so that I could thread it into Nozzle body and then have threads I could use to bolt it to the filter. Both bolts are stainless steel, but seemed to have different melting points, the result was a PIA, ugly, yet functional weld that will never be seen.
I then drilled a hole dead center in this small, stout, chrome button that helps keep the filter elements together. I was then able to bolt the nozzle directly to the inside of the filter and have the nozzle point directly at the compressor nut. Perfect location very durable, and to remove the nozzle it's only 1 nut.
I installed 1/4" NPT 90* brass fittings in each end of the nozzle body with 1/4" Barb fittings screwed into the 90's. I angled the 90* fittings slightly so that when the hoses are connected everything has a nice flow and plenty of room.
Next I drilled 2 holes into the chrome ring around the front of the filter. The holes are barely larger then a 1/4" straight hose barb. The holes had to be perfect to clear each side of the filter element on the inside.
I connected 2 short hoses to each end of the Nozzle's new hose barbs and pushed the straight barbs into the other end of the short hoses, then pushed them through the end of the filter's ring where I drilled my holes. I now have nipples on the Left and Right side on the front of the air filter. Left = Liquid and Right = Air.
_____________________________________
TANK:
I drilled and tapped my tank at the top and bottom for 1/4" NPT and threaded brass fittings in. The bottom has a 90* and then a hose barb.(water OUT) And I still need to go buy a brass T for the top location. (air IN)
______________________________________
Pics to better explain what I wrote:
01-28-09, 07:45 PM
#29
Thats a pretty niffty nozzle design its kinda like the atomization nozzles for the HVLP paint guns. Itl'l be interesting to see how it flows with just air flow compared to air and fluid pressure. If it were to flow enough you wouldnt even need to pressurize the tank. Just something to think about i guess, or maybe you have. I'd love to see how this works out for you im interested in tring this on my twins for a month or so while i sourse the rest of my parts for my single. Let us know how it goes once installed maybe a pic or two of the install locations?
cool setup
z
cool setup
z
Without pressurizing the tank no water would flow, the air and liquid sides are separate until they exit the nozzle and then they mix. Some nozzles will draw liquid as the air flows, this one doesn't. It's actually a good thing to pressurize the tank, it allows a more variable flow rate. That way the water flow will be higher at higher boost levels. The nice thing about these nozzles is they atomize the water very well even at low pressures. Down as low as 3psi.
The one thing I am worried about is the nylon hose. It's rated to around 175 or so degrees, and the engine bay is going to cook the **** out of it. I was going to go with silicone vacuum hose but Autozone and o'reilly's don't carry it anymore. I'll be keeping an eye the hose, and will most likely order some silicone hose to replace it with. I do like the clear though.
01-28-09, 09:23 PM
#30
Nice looking setup!! Very cool.
I've checked out similar nozzles, mostly ones used for small touch up guns...that one is very nice! On the topic of similarity to a spray gun - any of them (that aren't pressure pot/airless types) will have an external mixing nozzle. The air comes out of multiple cavities, the largest being at the tips/ends of the "U" and the liquid is fed out the bottom of the "U".
In this application, especially with the nozzle being in a mild vaccum when its spraying, should get some pretty fine atomization.
How much of an intake is on the turbo? Is the filter mounted directly to the comp. housing?
Also, there is some good nylon tubing nylon tubing out there...I use some stuff from aircraft spruce that works very well on my AI system (just a traditional snowperformance kit) and it can be formed with a heat gun. But with your barbed fittings, you're probably right to go with silicone down the road.
Keep it up,good stuff - I want to see how this baby sprays, take a video if possible
01-29-09, 07:10 AM
#31
Yeah the filter is mounted directly to the compressor housing, and the nozzle is probably about 4-5" away from the compressor wheel. At some point I might try to fab a cold air intake to the turbo and relocate the sprayer to that. We'll see how this does first, and how my intake temperatures fair with high boost. I don't have alot of room to route a cold air, but I think I can figure something out if I decide to go that route.
I'll take a video with my phone when I bench test the system in the next couple days. I'll also take pics of everything mounted in the car.
I'll take a video with my phone when I bench test the system in the next couple days. I'll also take pics of everything mounted in the car.
01-31-09, 01:02 AM
#32
Just turn up the boost!
iTrader: (1)
Join Date: Jul 2007
Location: HELL
Posts: 662
Likes: 0
Received 0 Likes
on
0 Posts
pre-turbo FTW! lookin good man but i think when you make a cold air setup (if possible) and move the nozzle a little farther away you will see a little better results. you will have great results regardless
 02-01-09, 09:26 PM
#34
Thanks guys, i'm interested in seeing how it works as well. I really need to get more equipment to monitor the results further. Mostly need to get some egt probes to log. I would also like to get a faster reacting AIT sensor. I read of a couple that have a similar curve as the stock AIT except are much faster.
Lately I've just been tuning the new turbo up to 15 psi, and tweeking the timing a bit for better response. My other turbo spooled so quick timing adjustments didn't make a noticeable difference.
Will have the water injection installed this week. Will need to get a 3 bar map sensor and rescale my maps. I do have one laying around from a greddy profec e01 that i might be able to use. I would just need to figure out the scale and offset values.
02-05-09, 10:08 PM
#35
Video!
Alright I took a Video of the system after I installed it in the car today. I will go out and take pics of everything soon. The video was taken on a cell phone it's good enough to see but not super high quality. The water comes out in a very fine mist, should work very well. I haven't tested it out yet, that will be tomorrow. Click to play. (opens in photobucket)
02-06-09, 02:34 AM
#37
Yeah, It's been awhile though. Usually we go to Houston, but it's about equal distance to both H-town and Austin from where I am.(about an hr and a half)
A few of us have been talking about going shifter kart racing in Austin soon.
-Brent V
A few of us have been talking about going shifter kart racing in Austin soon.
-Brent V
 02-06-09, 12:53 PM
#39
It started at 0 and went up to around 10 psi. Thats just i guess, I didn't use the solenoid valve in the test for the on off effect, just an air compressor hooked in where the boost line goes. The pressure bleeds off once i stop filling the tank which is also when my pressure gauge gets a reading.
02-06-09, 01:45 PM
#40

Interesting project! great work and thanks for sharing! 
one question, will you have to use a drain plug in your intercooler since your spraying water pre turbo? there is no chance of condensation when flowing through the intercooler?
one question, will you have to use a drain plug in your intercooler since your spraying water pre turbo? there is no chance of condensation when flowing through the intercooler?
02-06-09, 03:43 PM
#41
Any extra water should be pushed through the intercooler by boost pressure. From all the research i have done the air temperatures come out lower with preturbo water injection, so even if the intercooler was less efficient from any condensation of water inside, the system as a whole still reduces AIT temperatures more. Depending on how much of a drop I see I might try bypassing the intercooler, then depending how that goes I might try some meth/water mixes.
I think at higher boost pressures and maybe even lower boost pressures due to the temperature of the compressor housing, some of the water will turn to steam cooling AIT's before the intercooler, it will then condense in the intercooler allowing it to enter into the engine as water again to cool things down and act as a knock deterrent.
I've read countless theories on the whole subject of water injection, and especially preturbo water injection, I honestly don't know which ones are accurate, but the general consensus is that it works really well. So whatever the reactions are between the nozzle and the tailpipe doesn't matter so much as the end result and that the engine is happy with it and I can make lots of safe power so that I can be happy with it too. LOL
02-08-09, 09:31 AM
#42
Rotary Enthusiast
iTrader: (1)
Join Date: Jan 2008
Location: Austin, TX
Posts: 762
Likes: 0
Received 0 Likes
on
0 Posts
Where exactly are you connecting to get pressure to the water tank?
Are you pressurizing the water tank through a small tube like you show connected to the nozzle?
If yes, my concern would be the time it takes for the tank to build up pressure. If you are feeding air pressure to the tank with a small hose, wouldn't the tank pressure lag your actual boost pressure?
Also, what do you expect the pressure drop to be through the tank and hose to the nozzle? If you are boosting 20psi, do you think the nozzle with actually experience 20 psi of pressure?
Thanks,
ian
02-08-09, 02:04 PM
#43
I have my pressure source right off the turbo housing it's a 1/4" ID line going from the turbo to the tank. Same size everywhere else. The tank pressurizes almost instanly. If there is any lag at all from filling the tank it is of little concern. I hooked a gauge up to the tank and it shot up to 20 psi within a second or so with a regulated 20 psi source. I don't think the pressure drop is very much in the lines, the lines are all pretty short.
The important thing is the water flow. I can't easily measure it, but it looks like it's flowing quite a bit of water to me. Another thing about the way I have mine set up is that tank sees boost at the turbo, whereas the engine will have a pressure drop through the piping, intercooler and UIM. So the tank should see more pressure then the engine does which will increase flow.
If you look up rice racing's kit mine is very similar to his.
02-10-09, 09:52 AM
#46
"Elusive, not deceptive!�
The important thing is the water flow. I can't easily measure it, but it looks like it's flowing quite a bit of water to me. Another thing about the way I have mine set up is that tank sees boost at the turbo, whereas the engine will have a pressure drop through the piping, intercooler and UIM. So the tank should see more pressure then the engine does which will increase flow.
If you look up rice racing's kit mine is very similar to his.
If you look up rice racing's kit mine is very similar to his.
Spray at 20 psi for 15 seconds into a calibrated container, then multiply by 4. You need about 300-400 cc/min. A baby bottle or measuring cup will do.
The next step is the hardest for me.... trusting that the engine will not detonate with this new added mixture!
Keep your eye on knock values!
Good Luck, Barry
02-10-09, 11:44 AM
#47
Thats a good idea i'll try that. The nozzle is rated at 380 cc at 20 psi so it should be about right. I've been running the system lately and the car feels stronger. I have it coming on pretty early and either the car is building boost faster or i'm getting used to the lag. I'm going to integrate a switch in the car so i can turn it on and off and get a better comparison.
02-10-09, 09:13 PM
#50
Thanks guys.
The nylon hose that's connected to the turbo housing isn't holding up very good, it melted right at the nipple making a small hole thats bleeding off the boost to the tank, so I ordered some extra thick silicone hose to replace it. The other locations seem to be doing just fine so far.
Today at Lowes I saw some interesting poly hose. The connectors are actually the interesting part. They were little push and lock fittings, I tried to think of a way to integrate them into the system instead of the brass and rubber, but decided it would be too much hassle and little benefit, plus they wouldn't work very good at the filter location. I do really like them though and will keep them in mind for future projects or if I feel like changing anything with the design on my kit.