My crappy suspension...look
 02-15-04, 02:32 PM
#1
Senior Member
Thread Starter
My crappy suspension...look
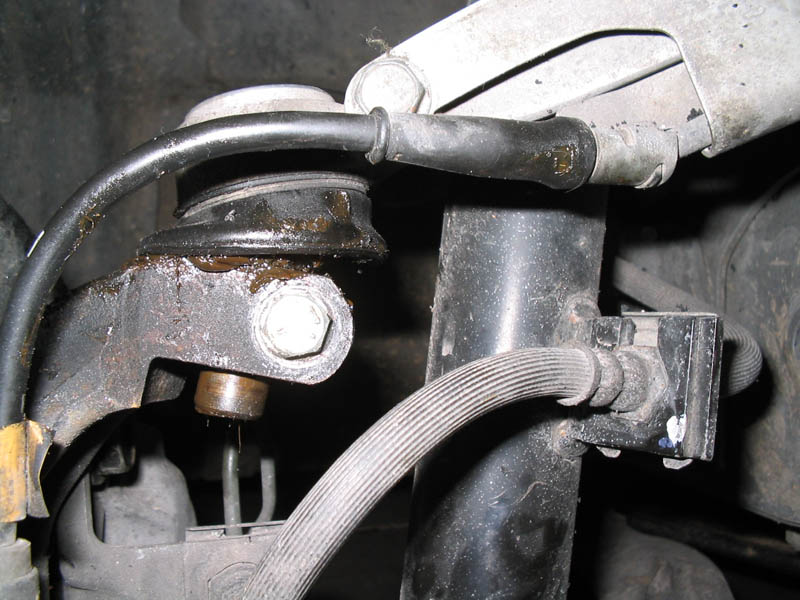
A few weeks ago my control arm popped out of the socket going down the highway. So I thought i fixed it, but now I'm not so sure. Take a look....
The first picture is of the passenger side, the side that popped out going down the road.
The first picture is of the passenger side, the side that popped out going down the road.
Last edited by racerfoo; 02-15-04 at 02:46 PM.
 02-15-04, 02:44 PM
#5
Senior Member
Thread Starter
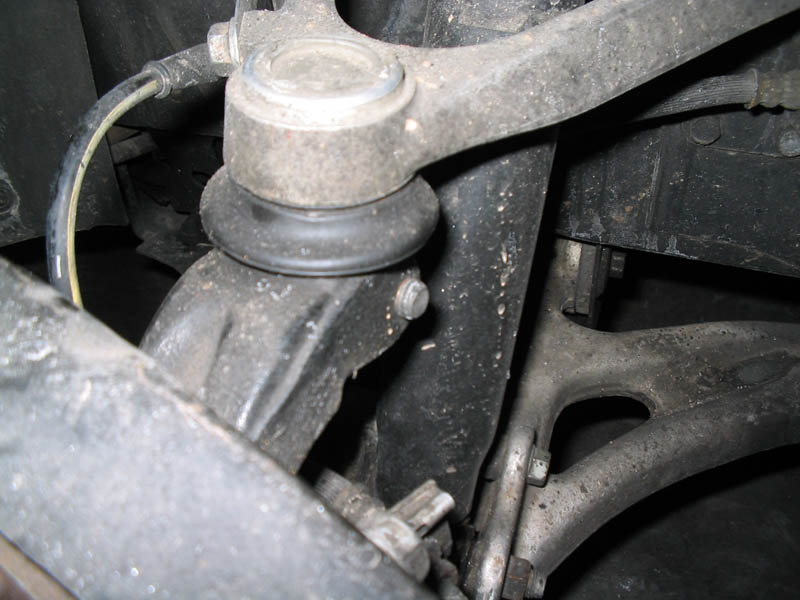
and the drivers side bolt....with no nut?!?! maybe this is normal. should there be a nut on the end here?
but as you can see from all the pics, the passenger side is way different that the drivers side. whats up with my car and what is the right way to fix it? i dont know which side is screwed up anymore.
but as you can see from all the pics, the passenger side is way different that the drivers side. whats up with my car and what is the right way to fix it? i dont know which side is screwed up anymore.
Last edited by racerfoo; 02-15-04 at 02:55 PM.
02-15-04, 03:34 PM
#7

you will need new a upper control arm, the balljoints are not the ones you can buy and press in. they were integrated in the arm starting with the 89 and up rx7s. also there should not be a nut on the passenger side. the spindle assembly is threaded.
Trending Topics
02-15-04, 03:47 PM
#8
Rotary Freak
Hijack... Sorry.
For 50K miles, I have had a noise on the right side of my car that sounds like it is coming from the glovebox(?) I wonder if I could be having a problem with my balljoints?
What is the normal lifespan of these balljoints? Probably not the 200K I have on the car.
For 50K miles, I have had a noise on the right side of my car that sounds like it is coming from the glovebox(?) I wonder if I could be having a problem with my balljoints?
What is the normal lifespan of these balljoints? Probably not the 200K I have on the car.
 02-15-04, 04:27 PM
#11
The Overattempter
iTrader: (3)
Join Date: Apr 2003
Location: Iowa
Posts: 197
Likes: 0
Received 0 Likes
on
0 Posts
It looks like the bolt in the pass side is the wrong one..cant tell cause the nut is on. Tha bolt is threaded into the spindle and pinches the balljoint, If this has been a proble before then the bolt might have been replaced...with the wrong one and I believe the pin on the balljoint has a groove in it that the bolt rides against which locks the pin in. If the replacement bolt is smaller (looks lite it is from the pic) it wont hold the pin in the spindle.
02-15-04, 04:59 PM
#12
PV = nRT
Join Date: Jan 2003
Location: New Zealand (was California)
Posts: 2,250
Likes: 0
Received 0 Likes
on
0 Posts
This is why one has to *maintain* cars.
It's all part of job when removing wheels to do other work, etc.
Ball joints, CV joints, etc. they all wear out and must be replaced eventually.
Also, might want to replace the weather covering on your steering rack too, it's on it's way out.
It's all part of job when removing wheels to do other work, etc.
Ball joints, CV joints, etc. they all wear out and must be replaced eventually.
Also, might want to replace the weather covering on your steering rack too, it's on it's way out.
02-15-04, 07:07 PM
#13
Rotary Freak
Originally posted by clayne
This is why one has to *maintain* cars.
It's all part of job when removing wheels to do other work, etc.
Ball joints, CV joints, etc. they all wear out and must be replaced eventually.
Also, might want to replace the weather covering on your steering rack too, it's on it's way out.
This is why one has to *maintain* cars.
It's all part of job when removing wheels to do other work, etc.
Ball joints, CV joints, etc. they all wear out and must be replaced eventually.
Also, might want to replace the weather covering on your steering rack too, it's on it's way out.
02-15-04, 08:39 PM
#14
Originally posted by TitaniumCranium
It looks like the bolt in the pass side is the wrong one..cant tell cause the nut is on. Tha bolt is threaded into the spindle and pinches the balljoint, If this has been a proble before then the bolt might have been replaced...with the wrong one and I believe the pin on the balljoint has a groove in it that the bolt rides against which locks the pin in. If the replacement bolt is smaller (looks lite it is from the pic) it wont hold the pin in the spindle.
It looks like the bolt in the pass side is the wrong one..cant tell cause the nut is on. Tha bolt is threaded into the spindle and pinches the balljoint, If this has been a proble before then the bolt might have been replaced...with the wrong one and I believe the pin on the balljoint has a groove in it that the bolt rides against which locks the pin in. If the replacement bolt is smaller (looks lite it is from the pic) it wont hold the pin in the spindle.
-Max
02-15-04, 09:51 PM
#16
don't race, don't need to

Your pass side is screwed. Someone got cute and decided to strip out the cast in threads on the steering knuckle, and replaced it with a nut and bolt. The nut and bolt DO NOT provide the clamping force necessary to hold the ball joint properly. That's why the ball joint on the pass side has moved down into the steering knuckle, squeezing out the grease. Your driver's side is normal looking but for the aformentioned steering linkage cover, which SHOULD be replaced, as this allows dirt into the steering set up and causes premature wear.
So. Replace the steering knuckle AND upper control arm on the pass side. replace the cover for the steering linkage on the driver's side (do the pass side as well to be thorough). Go directly to a chassis set up shop and have them re-align the steering, and you should be road worthy once more. Good luck!
So. Replace the steering knuckle AND upper control arm on the pass side. replace the cover for the steering linkage on the driver's side (do the pass side as well to be thorough). Go directly to a chassis set up shop and have them re-align the steering, and you should be road worthy once more. Good luck!
02-15-04, 11:08 PM
#19
Super Snuggles
FD15-34-200 - Control arm, upper (R)
FD15-34-250 - Control arm, upper (L)
FD15-33-021 - Knuckle, steering (R)
FD15-33-031 - Knuckle, steering (L)
If you replace a knuckle, you'll have to either transfer over your wheel bearing and hub or replace them...
GA55-26-15X - Bearing & Hub
LA01-33-042B - Wheel bearing nut
GA2A-26-071 - Cap, hub
The cheapest solution is probably to drill out the damaged threads as Max suggested and then use a bolt with a smooth shaft for part of its length and of the proper size to retain the ball joint shaft. A lock nut or some Loctite on a nut should keep it from going anywhere, but a castle nut and cotter pin (through a hole drilled in the shaft of the bolt) would probably be the safest solution.
02-15-04, 11:20 PM
#20
PV = nRT
Join Date: Jan 2003
Location: New Zealand (was California)
Posts: 2,250
Likes: 0
Received 0 Likes
on
0 Posts
Drill it out and re-tap it.
Way more cost effective and just as safe.
Although you're going to have to seperate the knuckle from the lower ball joint as well - you've got your work cut out for you.
Don't use a pickle fork unless you plan on replacing the lower ball joint as well.
Way more cost effective and just as safe.
Although you're going to have to seperate the knuckle from the lower ball joint as well - you've got your work cut out for you.
Don't use a pickle fork unless you plan on replacing the lower ball joint as well.
02-16-04, 12:07 AM
#22
Super Snuggles
Originally posted by clayne
Drill it out and re-tap it.
Drill it out and re-tap it.

The bolt is a 14mm, I believe, so the shaft is probably 10mm x 1.5 thread pitch, but you'd want to double check, obviously. Running a tap through might clean up the threads good enough, and then you could just buy a new bolt, PN 9YA15-1001.
Last edited by jimlab; 02-16-04 at 12:11 AM.
02-16-04, 12:07 AM
#23
Putting a nut and bolt through the hole will give the correct clamping force but the bolt diameter is most likely threaded in the area it should be smooth and solid.
I'd replace the part that the bolt should be tapped into without a nut/bolt.
DO NOT use a pickle fork. Pickle forks will ruin the aluminum that is pressed around the ball joint to hold it in. Take a big hammer and hammer on the side of the hole where the ball joint connects to the spindle. This will pop the ball joint taper out of the spindle part.
02-16-04, 12:37 AM
#24
PV = nRT
Join Date: Jan 2003
Location: New Zealand (was California)
Posts: 2,250
Likes: 0
Received 0 Likes
on
0 Posts
Originally posted by turbojeff
DO NOT use a pickle fork. Pickle forks will ruin the aluminum that is pressed around the ball joint to hold it in. Take a big hammer and hammer on the side of the hole where the ball joint connects to the spindle. This will pop the ball joint taper out of the spindle part.
DO NOT use a pickle fork. Pickle forks will ruin the aluminum that is pressed around the ball joint to hold it in. Take a big hammer and hammer on the side of the hole where the ball joint connects to the spindle. This will pop the ball joint taper out of the spindle part.
And if doing the lowers, leave the suspension damper connected and jack up the knuckle with a jack on the inner part of the brake rotor. This will apply opposing force to the lower ball joint making it much easier to pop out when you hammer the knuckle.
Upper shouldn't need that same trick, it has the weight of the suspension pulling on it already.
02-16-04, 03:51 AM
#25
Avoid the Noid
Join Date: Aug 2003
Location: SL,UT
Posts: 1,707
Likes: 0
Received 0 Likes
on
0 Posts
Good luck. My car had a similar problem. It is now 4 months/$4000/new control arms and two sets of JIMLAB bushings later and I am just finishing.
Cheers to CLAYNE, as maintaining is key!
Cheers to CLAYNE, as maintaining is key!