Making a custom downpipe


 09-10-16, 10:39 AM
#28
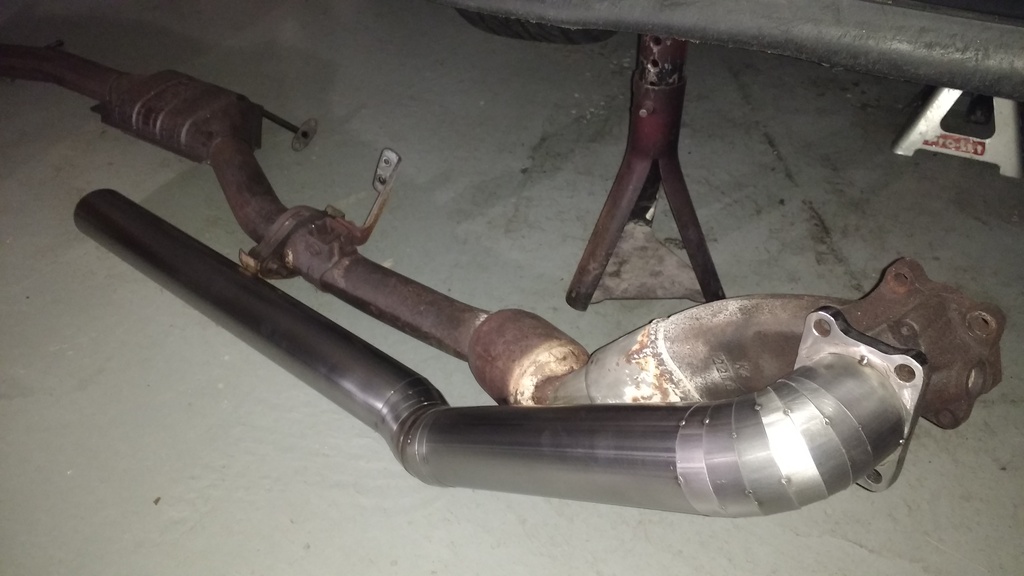
 The exhaust is on the car and put together, but can get some pictures from underneath. I used OEM heatshields and gold-tape on the frame to avoid paint damage.
The process to get it done was pretty straight forward if you know your way around tools. I used a regular tower drill to make the holes the same place the OEM pipe has them, and then threaded them with the correct threads.
The HKS is made from proper quality cast iron so it was a pretty easy job to drill and thread. The heat shield needed a few persuasive nudges with a rubber mallet to fit, but it worked out great.
Here you can see the mnounting holes on the OEM pipe, and that the HKS pipe has the same lumps where you can drill and thread.

 11-06-16, 09:09 AM
#31
Senior Member
Thread Starter
Got all the flanges and 8' of 304 stainless pipe to make my own downpipe. However, I want to change my turbo manifold studs for bolts to make fitment easier. I actually decided to make a one piece downpipe/midpipe with a restrictor at the end going into a stock cat-back.
Anyways, does anyone know the thread size for those manifold studs?
Thanks in advance for any help.
Anyways, does anyone know the thread size for those manifold studs?
Thanks in advance for any help.
11-25-16, 05:31 PM
#32
Senior Member
Thread Starter
Got the downpipe section completed today :-D still needs to get welded up and drill holes for two O2 sensors.
Other than that just need to finish the midsection and order new exhaust bolts. The original bolts and studs were pretty jacked up upon removal of stock exhaust.
Can't wait to hear the new exhaust!
Other than that just need to finish the midsection and order new exhaust bolts. The original bolts and studs were pretty jacked up upon removal of stock exhaust.
Can't wait to hear the new exhaust!

 11-26-16, 02:07 PM
#34
Senior Member
Thread Starter
^ I started out just doing the downpipe but after realizing that the original downpipe and midsection are permanently fried together i decided not to worry about hacking them apart and instead just to make a one piece downpipe/midsection. However, i got to see how installation is going to go from under the car it's a real tight space constraint with 3" pipe. Worst scenario i will have to weld two v-band flanges on a straight section.
I'm also making this to be able to install a racing beat presilencer if i decided to in the future. But first i want to find out how it's going to sound like with just a straight 3" exhaust going into a stock muffler.
I'm also making this to be able to install a racing beat presilencer if i decided to in the future. But first i want to find out how it's going to sound like with just a straight 3" exhaust going into a stock muffler.
11-26-16, 04:57 PM
#36
^ I started out just doing the downpipe but after realizing that the original downpipe and midsection are permanently fried together i decided not to worry about hacking them apart and instead just to make a one piece downpipe/midsection. However, i got to see how installation is going to go from under the car it's a real tight space constraint with 3" pipe. Worst scenario i will have to weld two v-band flanges on a straight section.
I'm also making this to be able to install a racing beat presilencer if i decided to in the future. But first i want to find out how it's going to sound like with just a straight 3" exhaust going into a stock muffler.
I'm also making this to be able to install a racing beat presilencer if i decided to in the future. But first i want to find out how it's going to sound like with just a straight 3" exhaust going into a stock muffler.
12-13-16, 08:37 PM
#37
Senior Member
Thread Starter
Just a small update, I got around to finishing the midpipe section. I really hate fabbing under the car on jack stands. Lol. But the main design is finally completed.
Started welding on the midsection, than will join it to the downpipe section and it seems so far that i will not need a v-band flange.
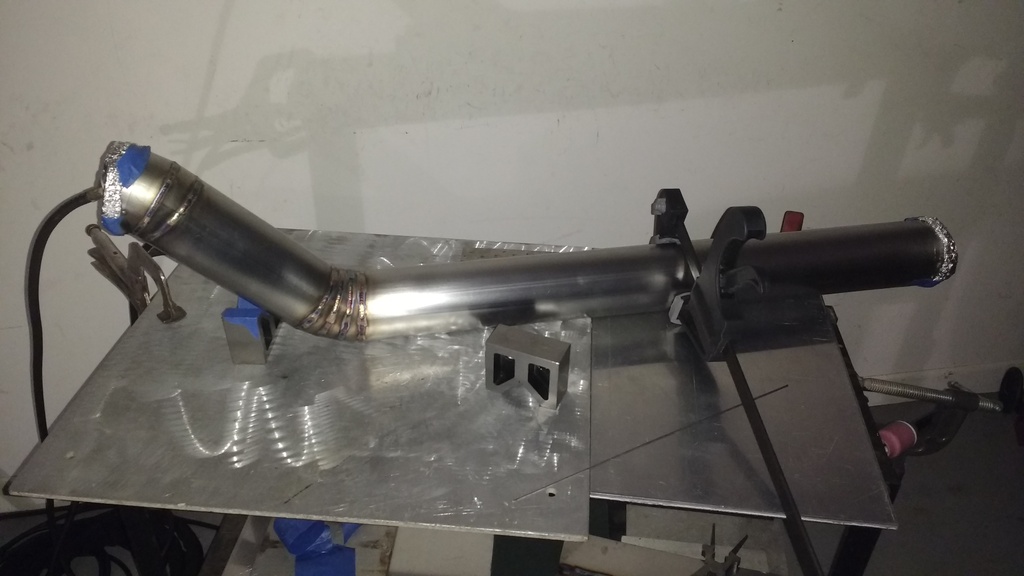
It's getting closer to completion but I still need to finish welding everything up and drilling two holes for the O2 sensors. Also, need to fit up the flange for the cat back, i have in place but don't have any realistic way to tack it under the car... will have to figure something out. All in all, i enjoy this project it was made for fun!
7-XR, thanks for the suggestion. I would not mind to track this car in the future but for now i just want to enjoy daily driving it for a while. This has been my dream car for about 15 years and i'm just thrilled to having it my garage and working on it at this time.
Started welding on the midsection, than will join it to the downpipe section and it seems so far that i will not need a v-band flange.

It's getting closer to completion but I still need to finish welding everything up and drilling two holes for the O2 sensors. Also, need to fit up the flange for the cat back, i have in place but don't have any realistic way to tack it under the car... will have to figure something out. All in all, i enjoy this project
it was made for fun!7-XR, thanks for the suggestion. I would not mind to track this car in the future but for now i just want to enjoy daily driving it for a while. This has been my dream car for about 15 years and i'm just thrilled to having it my garage and working on it at this time.
 12-14-16, 04:48 PM
#39
Senior Member
Thread Starter
^Hey man, thanks again for hooking me up with that flange piece!
Yeah, i decided to purge it all. It's a nice car and I wanted to make a nice exhaust for it that would last for a long time. The sugaring on the inside makes it more prone to rust formation. Even though it would still probably take awhile.
The way I received it...
After reworking it...
Yeah, i decided to purge it all. It's a nice car and I wanted to make a nice exhaust for it that would last for a long time. The sugaring on the inside makes it more prone to rust formation. Even though it would still probably take awhile.
The way I received it...

After reworking it...
 12-14-16, 09:36 PM
#40
Very nice metal fab work Bridgeport! I have seen many welders out there, but only a few that can fab and weld assemblies like that.
You may want to consider welding a second bung on for another O2 sensor, so will you have the option of adding a good A/F gauge.
You may want to consider welding a second bung on for another O2 sensor, so will you have the option of adding a good A/F gauge.
12-17-16, 08:53 PM
#41
Senior Member
Thread Starter
Whitelight7, hey man thanks. I actually did just that today.
Have had a spare wideband gauge dangling around for about 5 years and thought this car could really benefit from one. Ha-ha (I love hoarding car parts).
Got the o2 sensor bungs installed today, actually decided to use mild steel threadlings because I felt a little sketchy about using stainless bungs from a previous experience with SS turbo bolts. I didn't take all the millscale off of them to help them not attract rust...that naturally made it weld like crap.
Also started welding on the downpipe section and made a simple heatsink for the flange out of two 1/4" aluminum plates.
 12-24-16, 05:47 AM
#42
Senior Member
Thread Starter
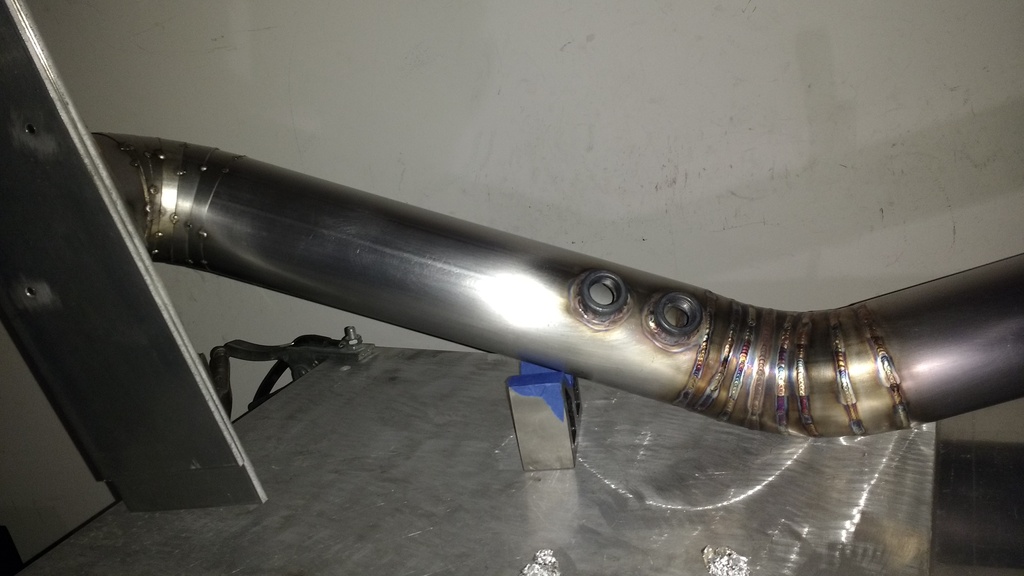
Have been busy doing/working on other things lately but still managed to weld up the hardest section of this project. It was a pain just because of how close everything is.
Hope everyone is going to have a Merry Christmas!
Hope everyone is going to have a Merry Christmas!

 12-25-16, 04:23 PM
#45
Senior Member
Thread Starter
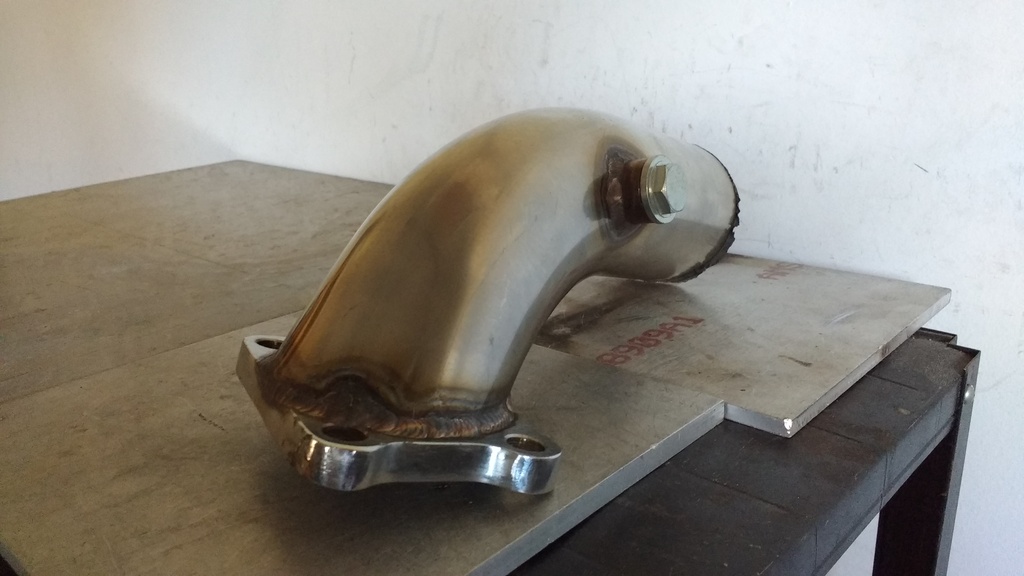
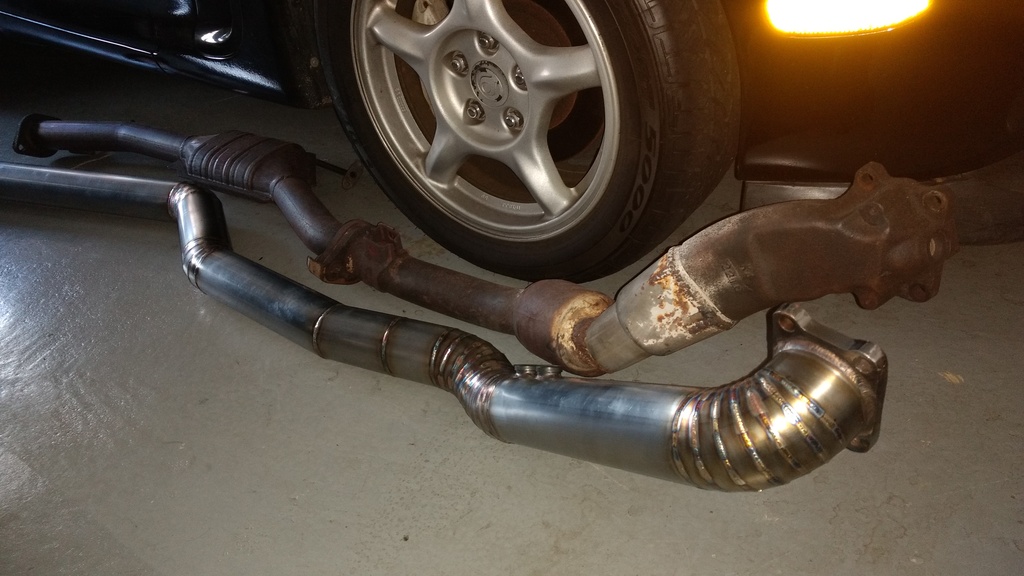
Ran into a small problem today, went to install the exhaust up under the car so I could fit up the flange at the catback. Than realized that the hole assembly shifted and also shrunk by about a 3/4".LOL
Not sure yet how I'm going to fix that, was a little disappointed. :-/
On the bright side of things, the downpipe now sits closer to the turbos and further from the firewall. Got to take the good with the bad sometimes.
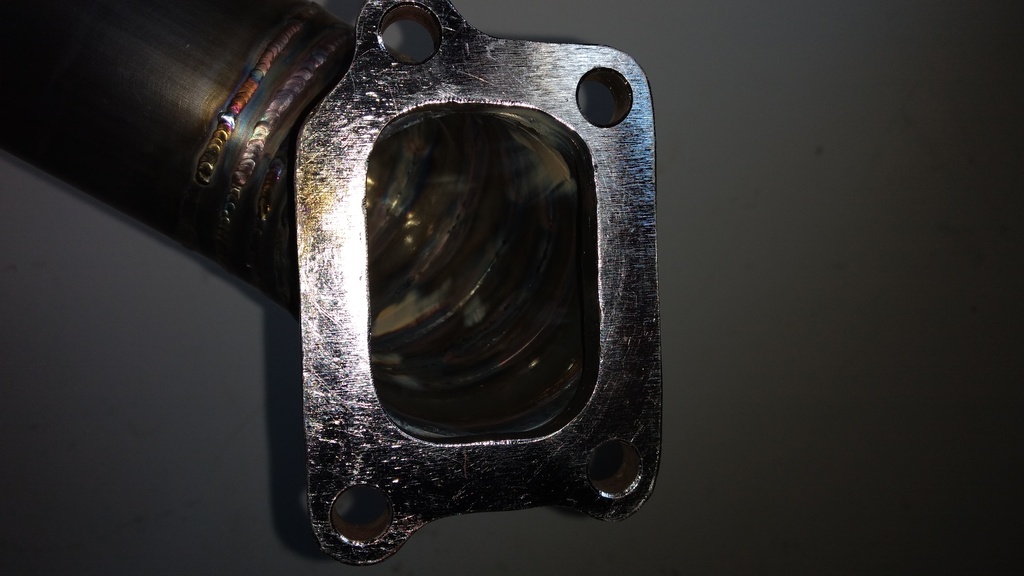
Here is the inside of the flange for those that want to see, I did actually get a little sugar at the flange in the upper left corner. It was hard to stick the torch in there and I moved too slow because it was uncomfortable. Nothing a little die grinder won't clean up though.
Not sure yet how I'm going to fix that, was a little disappointed. :-/
On the bright side of things, the downpipe now sits closer to the turbos and further from the firewall. Got to take the good with the bad sometimes.
Here is the inside of the flange for those that want to see, I did actually get a little sugar at the flange in the upper left corner. It was hard to stick the torch in there and I moved too slow because it was uncomfortable. Nothing a little die grinder won't clean up though.
 01-14-17, 05:19 PM
#46
Senior Member
Thread Starter
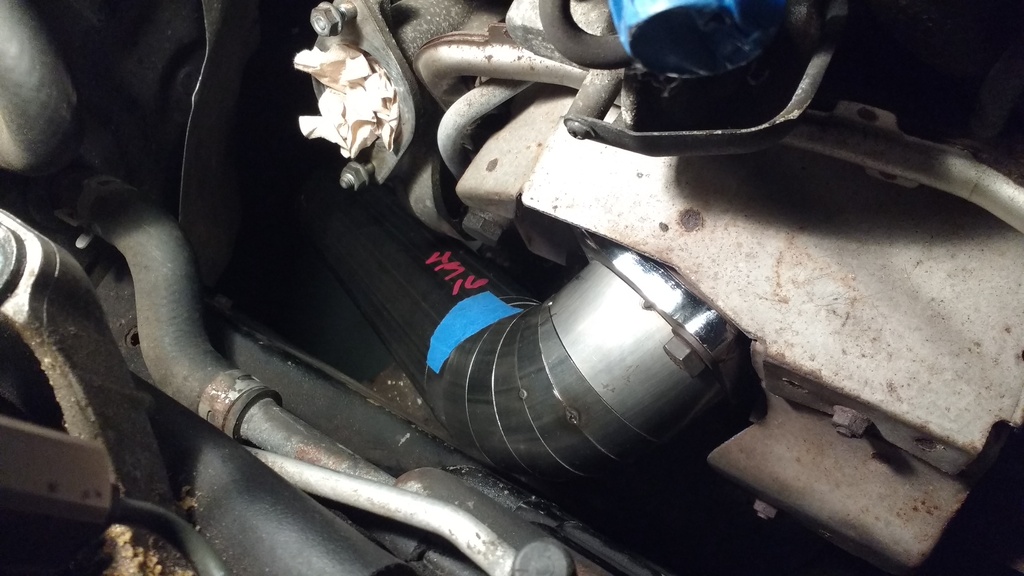
Have to be honest, I got tired of seeing the car sitting on jackstands and decided to get this project finished.
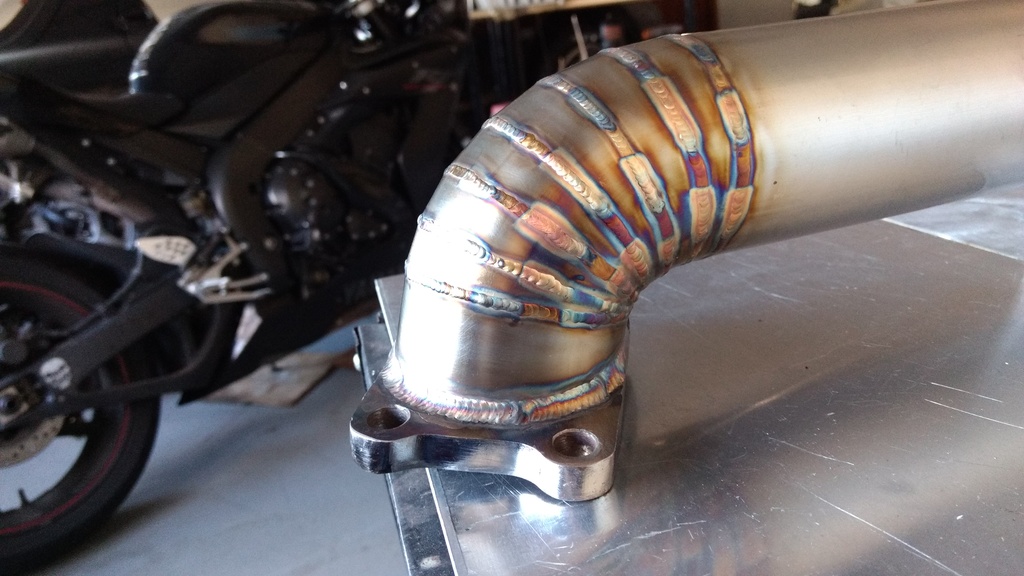
Since the last post I also ended up welding the turbo flange on the inside and than took it to a machine shop to get it surfaced. No exhaust leaks!
As I mentioned before my initial design warped and shrunk on me so I had to cut it all up and rework it. On top of that I also started running out of 304 tube and had to reach into the scrap pile to finish off the piece. It still worked out ok but because of that I have an extra 4 welds in the middle section. A little disappointed about that but still pretty happy overall
 01-15-17, 09:33 AM
#48
Senior Member
Thread Starter
Fair point, this wasn't really intended for performance and no way I'll be doing this again with so many pie cuts. It was way more work than necessary, I just felt like extra torch practice at the time. And it was definitely a good challenge for me.
With that said, it should definitely flow much better than the stock exhaust that was on there before. And I was careful when joining pieces, if I I stall a premade aftermarket exhaust instead of this one I really doubt I would see much difference if any on the Dyno. A properly running car isn't gonna suffer because of a few extra welds. Just like a crappy running car won't be saved with a fancy aftermarket exhaust system.
With that said, it should definitely flow much better than the stock exhaust that was on there before. And I was careful when joining pieces, if I I stall a premade aftermarket exhaust instead of this one I really doubt I would see much difference if any on the Dyno. A properly running car isn't gonna suffer because of a few extra welds. Just like a crappy running car won't be saved with a fancy aftermarket exhaust system.
01-15-17, 10:27 AM
#49
Senior Member
Thread Starter
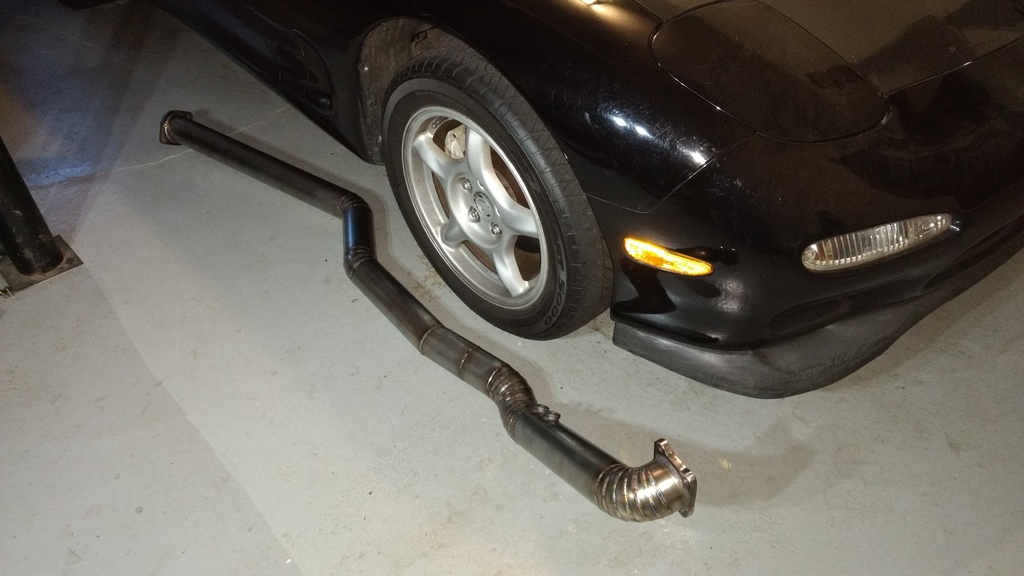
Took a shot of it next to an OEM exhaust before installing it back on the car.
The middle section where the flange normally goes was supposed to be straight by original design before things shifted and moved on me. The bends could've been a little bit more shallow but I wanted to be sure to be able to install a resonator in the future if desired. Also, I chose not to remove or modify the transmission drip pan.
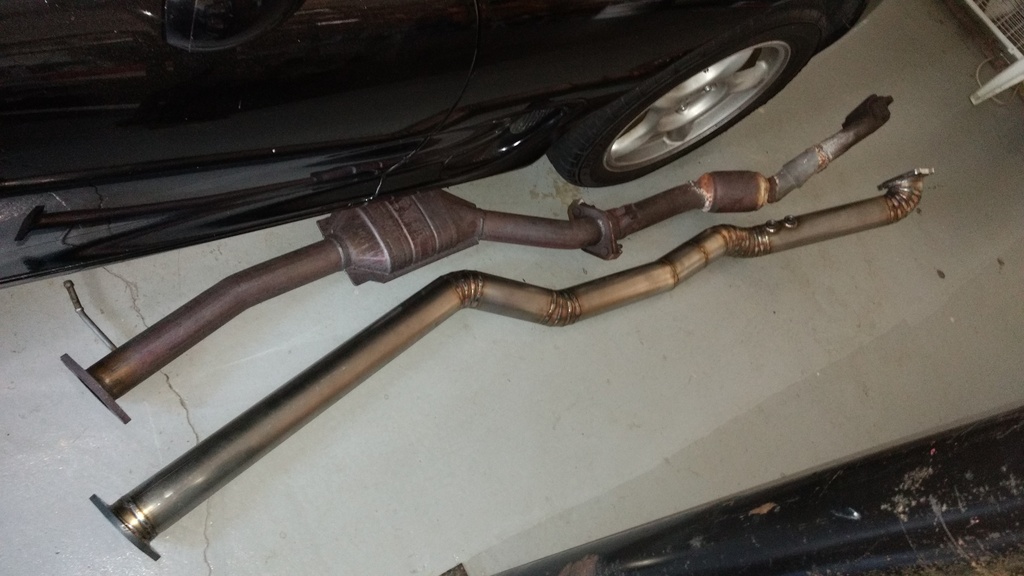
The middle section where the flange normally goes was supposed to be straight by original design before things shifted and moved on me. The bends could've been a little bit more shallow but I wanted to be sure to be able to install a resonator in the future if desired. Also, I chose not to remove or modify the transmission drip pan.


Last edited by 12abridgeport; 01-15-17 at 10:34 AM.
01-19-17, 08:48 PM
#50
Senior Member
Thread Starter
Just to follow up a bit on this thread. Had to wrap up a few loose ends before starting the car, than earlier today it finally happened....and omfg this thing sounds absolutely amazing.
To be honest I was very worried it would sound loud/obnoxious or even worse... like a Honda! I've heard a few 7's even an FD from a recent thread on here with a reputable member sound like a honda. To my surprise it was none of the above. With the stock catback at idle it had a slight hint of that srt4 sound (very slight) and while driving it sounded like a resonated racing beat exhaust, also to my surprise. OMG, the turbos themselves, as expected, had a new sound of their own!
It's very quiet but also very nice and aggressive sounding.
Bottom line, I can't drive this car anymore without a WB installed, it's very hard, if not almost impossible to keep the foot out of it with how it feels right now.
Unfortunately, the car somehow also developed a big fuel leak that I got to go and hunt down before even thinking about driving it again Always something...
To be honest I was very worried it would sound loud/obnoxious or even worse... like a Honda! I've heard a few 7's even an FD from a recent thread on here with a reputable member sound like a honda. To my surprise it was none of the above. With the stock catback at idle it had a slight hint of that srt4 sound (very slight) and while driving it sounded like a resonated racing beat exhaust, also to my surprise.
OMG, the turbos themselves, as expected, had a new sound of their own!It's very quiet but also very nice and aggressive sounding.
Bottom line, I can't drive this car anymore without a WB installed, it's very hard, if not almost impossible to keep the foot out of it with how it feels right now.
Unfortunately, the car somehow also developed a big fuel leak that I got to go and hunt down before even thinking about driving it again
Always something...

Thread
Thread Starter
Forum
Replies
Last Post