3rd Generation Specific (1993-2002) 1993-2002 Discussion including performance modifications and Technical Support Sections.
Sponsored by:

Greddy Vmount Installation/Questions/Pictures thread

Thread Tools
 
Search this Thread
 
Old 07-26-16, 03:37 PM
  #51  
Rotary Freak

iTrader: (15)
 
FourtyOunce's Avatar
 
Join Date: Feb 2001
Location: Old Bridge, NJ
Posts: 2,007
Received 175 Likes on 105 Posts
It won't be NPT, but likely BSPT / BSP. They are somewhat similar, but different enough that using one on the other may result in a leak.
Old 07-26-16, 03:39 PM
  #52  
Senior Member
 
Marf's Avatar
 
Join Date: May 2013
Location: Sussex, UK
Posts: 300
Likes: 0
Received 2 Likes on 2 Posts
Originally Posted by ptrhahn
Well, that makes some sense—though I may try it with some actual 1/ NPT plugs, the ones it came with don't seem to go in very tight even with pipe tape.

I'm not sure how you'd use them to air bleed without spilling coolant, but hopefully it's not really necessary.

Thank you!!

P


No problem, and I see what you mean about the slight difference.

Let me know how they fit
Old 07-26-16, 09:54 PM
  #53  
Boilermakers!

iTrader: (157)
 
ZE Power MX6's Avatar
 
Join Date: Nov 2002
Location: Chicago, IL
Posts: 3,686
Received 359 Likes on 263 Posts
Originally Posted by ptrhahn
Well, that makes some sense—though I may try it with some actual 1/ NPT plugs, the ones it came with don't seem to go in very tight even with pipe tape.

I'm not sure how you'd use them to air bleed without spilling coolant, but hopefully it's not really necessary.

Thank you!!

P
The hex screw on mine actually pretty tight toward the last few threads, and that's without tape. Also, the drain plug use the same type of thread, and they use a screw with an o-ring, perhaps we can do the same with the bleeder?
Old 07-26-16, 10:04 PM
  #54  
Lives on the Forum

iTrader: (9)
 
ptrhahn's Avatar
 
Join Date: Feb 2002
Location: Arlington, VA
Posts: 9,022
Received 498 Likes on 272 Posts
My experience with pipe thread is, it gets REALLY tight quickly.. these didn't really feel that way, it's sort of a gradual tightening, even with tape. I'm not inclined to crank on it and strip the aluminum.

I guess in absence of any more sound experience, I'll just have to fill it and see what happens. I'm going to be really pissed off if as soon as it gets hot I get three little jets of coolant everywhere.
Old 07-26-16, 10:45 PM
  #55  
Senior Member

iTrader: (1)
 
collectiv's Avatar
 
Join Date: Apr 2007
Location: Fort McMurray, AB
Posts: 290
Likes: 0
Received 1 Like on 1 Post
So we have to drill into this radiator to provide mounting holes for the fan assembly?
Old 07-26-16, 10:49 PM
  #56  
Senior Member

iTrader: (1)
 
collectiv's Avatar
 
Join Date: Apr 2007
Location: Fort McMurray, AB
Posts: 290
Likes: 0
Received 1 Like on 1 Post
Also I didn't realize that this kit came with a P/S return cooler line.. I actually went and purchased a brand new one.
Old 07-27-16, 10:45 AM
  #57  
Lives on the Forum

iTrader: (9)
 
ptrhahn's Avatar
 
Join Date: Feb 2002
Location: Arlington, VA
Posts: 9,022
Received 498 Likes on 272 Posts
No, you don't need to drill anything for the fans. Everything goes together great. They tell you to drill a small hole to zip tie one of the side shields for the radiator. I wouldn't bother, it's already held in by two bolts.
Old 07-27-16, 01:45 PM
  #58  
Lives on the Forum

iTrader: (9)
 
ptrhahn's Avatar
 
Join Date: Feb 2002
Location: Arlington, VA
Posts: 9,022
Received 498 Likes on 272 Posts
So far so good. No leaks, just getting the coolant system burped.
Attached Thumbnails Greddy Vmount Installation/Questions/Pictures thread-photo3.jpg  
Old 07-27-16, 01:54 PM
  #59  
Boilermakers!

iTrader: (157)
 
ZE Power MX6's Avatar
 
Join Date: Nov 2002
Location: Chicago, IL
Posts: 3,686
Received 359 Likes on 263 Posts
Looks good! So did you just tape the hex screw and screw them in all the way?
Old 07-27-16, 01:57 PM
  #60  
Lives on the Forum

iTrader: (9)
 
ptrhahn's Avatar
 
Join Date: Feb 2002
Location: Arlington, VA
Posts: 9,022
Received 498 Likes on 272 Posts
I put pipe tape on them and screwed them in as much as I dared to. They aren't as tight as I could get them even with the short end of the Allen wrench, but I didn't want to strip anything.
Old 07-27-16, 02:01 PM
  #61  
Boilermakers!

iTrader: (157)
 
ZE Power MX6's Avatar
 
Join Date: Nov 2002
Location: Chicago, IL
Posts: 3,686
Received 359 Likes on 263 Posts
Right, that's what I did, I would be interested to see how well yours hold up after some driving.
Old 07-27-16, 02:01 PM
  #62  
Senior Member
 
Marf's Avatar
 
Join Date: May 2013
Location: Sussex, UK
Posts: 300
Likes: 0
Received 2 Likes on 2 Posts
Looking good chief.

I see you didn't want to use the greddy silicon parts either
Old 07-27-16, 02:03 PM
  #63  
Boilermakers!

iTrader: (157)
 
ZE Power MX6's Avatar
 
Join Date: Nov 2002
Location: Chicago, IL
Posts: 3,686
Received 359 Likes on 263 Posts
I didn't either, I got my couplers and spring loaded t-bolt clamps from MBS.
Old 07-27-16, 02:15 PM
  #64  
Lives on the Forum

iTrader: (9)
 
ptrhahn's Avatar
 
Join Date: Feb 2002
Location: Arlington, VA
Posts: 9,022
Received 498 Likes on 272 Posts
I would have been happy to use the greddy stuff but for the color. I'd have no way to match it with other hoses. I even like baby blue, but nobody else makes it.
Old 07-27-16, 07:04 PM
  #65  
Senior Member

iTrader: (1)
 
collectiv's Avatar
 
Join Date: Apr 2007
Location: Fort McMurray, AB
Posts: 290
Likes: 0
Received 1 Like on 1 Post
Did anyone have any missing pieces to the 99 spec greddy kit from sakebomb? Looks like im missing the pipe that goes from the output of the radiator to the input of the thermostat housing. The one where you have to cut your existing hose in half.
Nevermore. . Pictures threw off the actual size of it.. found it in a small box

Last edited by collectiv; 07-27-16 at 08:04 PM.
Old 07-27-16, 10:52 PM
  #66  
Sponsor
iTrader: (41)
 
IRPerformance's Avatar
 
Join Date: Apr 2003
Location: NJ
Posts: 11,347
Received 317 Likes on 190 Posts
The extra bungs in the radiator are for temperature sensors. I never had an issue plugging them with the provided hardware and Teflon paste. The stock fans bolt right on.

The Japanese AC condenser is different. It takes minor modification of the mounting brackets to make it work. Cut off the bottom passenger tab on the condenser. Re-drill holes where you need them. I've installed about 2 dozen of these kits and its not too difficult to make the ac work.
Old 07-28-16, 11:06 AM
  #67  
Senior Member
 
Marf's Avatar
 
Join Date: May 2013
Location: Sussex, UK
Posts: 300
Likes: 0
Received 2 Likes on 2 Posts
Originally Posted by ptrhahn
I would have been happy to use the greddy stuff but for the color. I'd have no way to match it with other hoses. I even like baby blue, but nobody else makes it.
Twas the colour for me too, I want black couplers as I'm tempted to do this under the bonnet

https://www.rx7club.com/attachments/...-7670-fd3s.jpg

Shiny isn't really my bag

Last edited by Marf; 07-28-16 at 11:14 AM.
Old 07-28-16, 11:44 AM
  #68  
Sponsor
iTrader: (41)
 
IRPerformance's Avatar
 
Join Date: Apr 2003
Location: NJ
Posts: 11,347
Received 317 Likes on 190 Posts
I wouldn't recommend using that clear silicone tubing Greddy provides for coolant. Its not reinforced or rated for pressure.
Old 07-28-16, 12:27 PM
  #69  
Senior Member
 
Marf's Avatar
 
Join Date: May 2013
Location: Sussex, UK
Posts: 300
Likes: 0
Received 2 Likes on 2 Posts
Thanks, good info
Old 07-28-16, 12:43 PM
  #70  
Lives on the Forum

iTrader: (9)
 
ptrhahn's Avatar
 
Join Date: Feb 2002
Location: Arlington, VA
Posts: 9,022
Received 498 Likes on 272 Posts
I took the opportunity while this was apart to swap out all coolant hoses, either with the HPS full molded silicone set, or with reinforced silicone heater hose. Both HPS and Vibrant sell it. Zero rubber left. I also bypassed the throttle body and eliminated the separate AST with the integrated AST/Filler neck, and made sure every hose clamp was the right size/same brand for easier time working on it.

I used the foam that came with it, plus some more I had, plus a little extra carbon fiber and bulb sealer to maker shields so the radiator and the drivers side are 100% sealed, and still easy to take apart and work on.

I've got an idea to widen the M2 carbon fiber intake box I have leftover to make a truly sealed/ducted cola air intake.
Old 07-29-16, 10:09 AM
  #71  
Senior Member

iTrader: (4)
 
briansfd's Avatar
 
Join Date: Aug 2012
Location: Plano, TX
Posts: 354
Received 45 Likes on 25 Posts


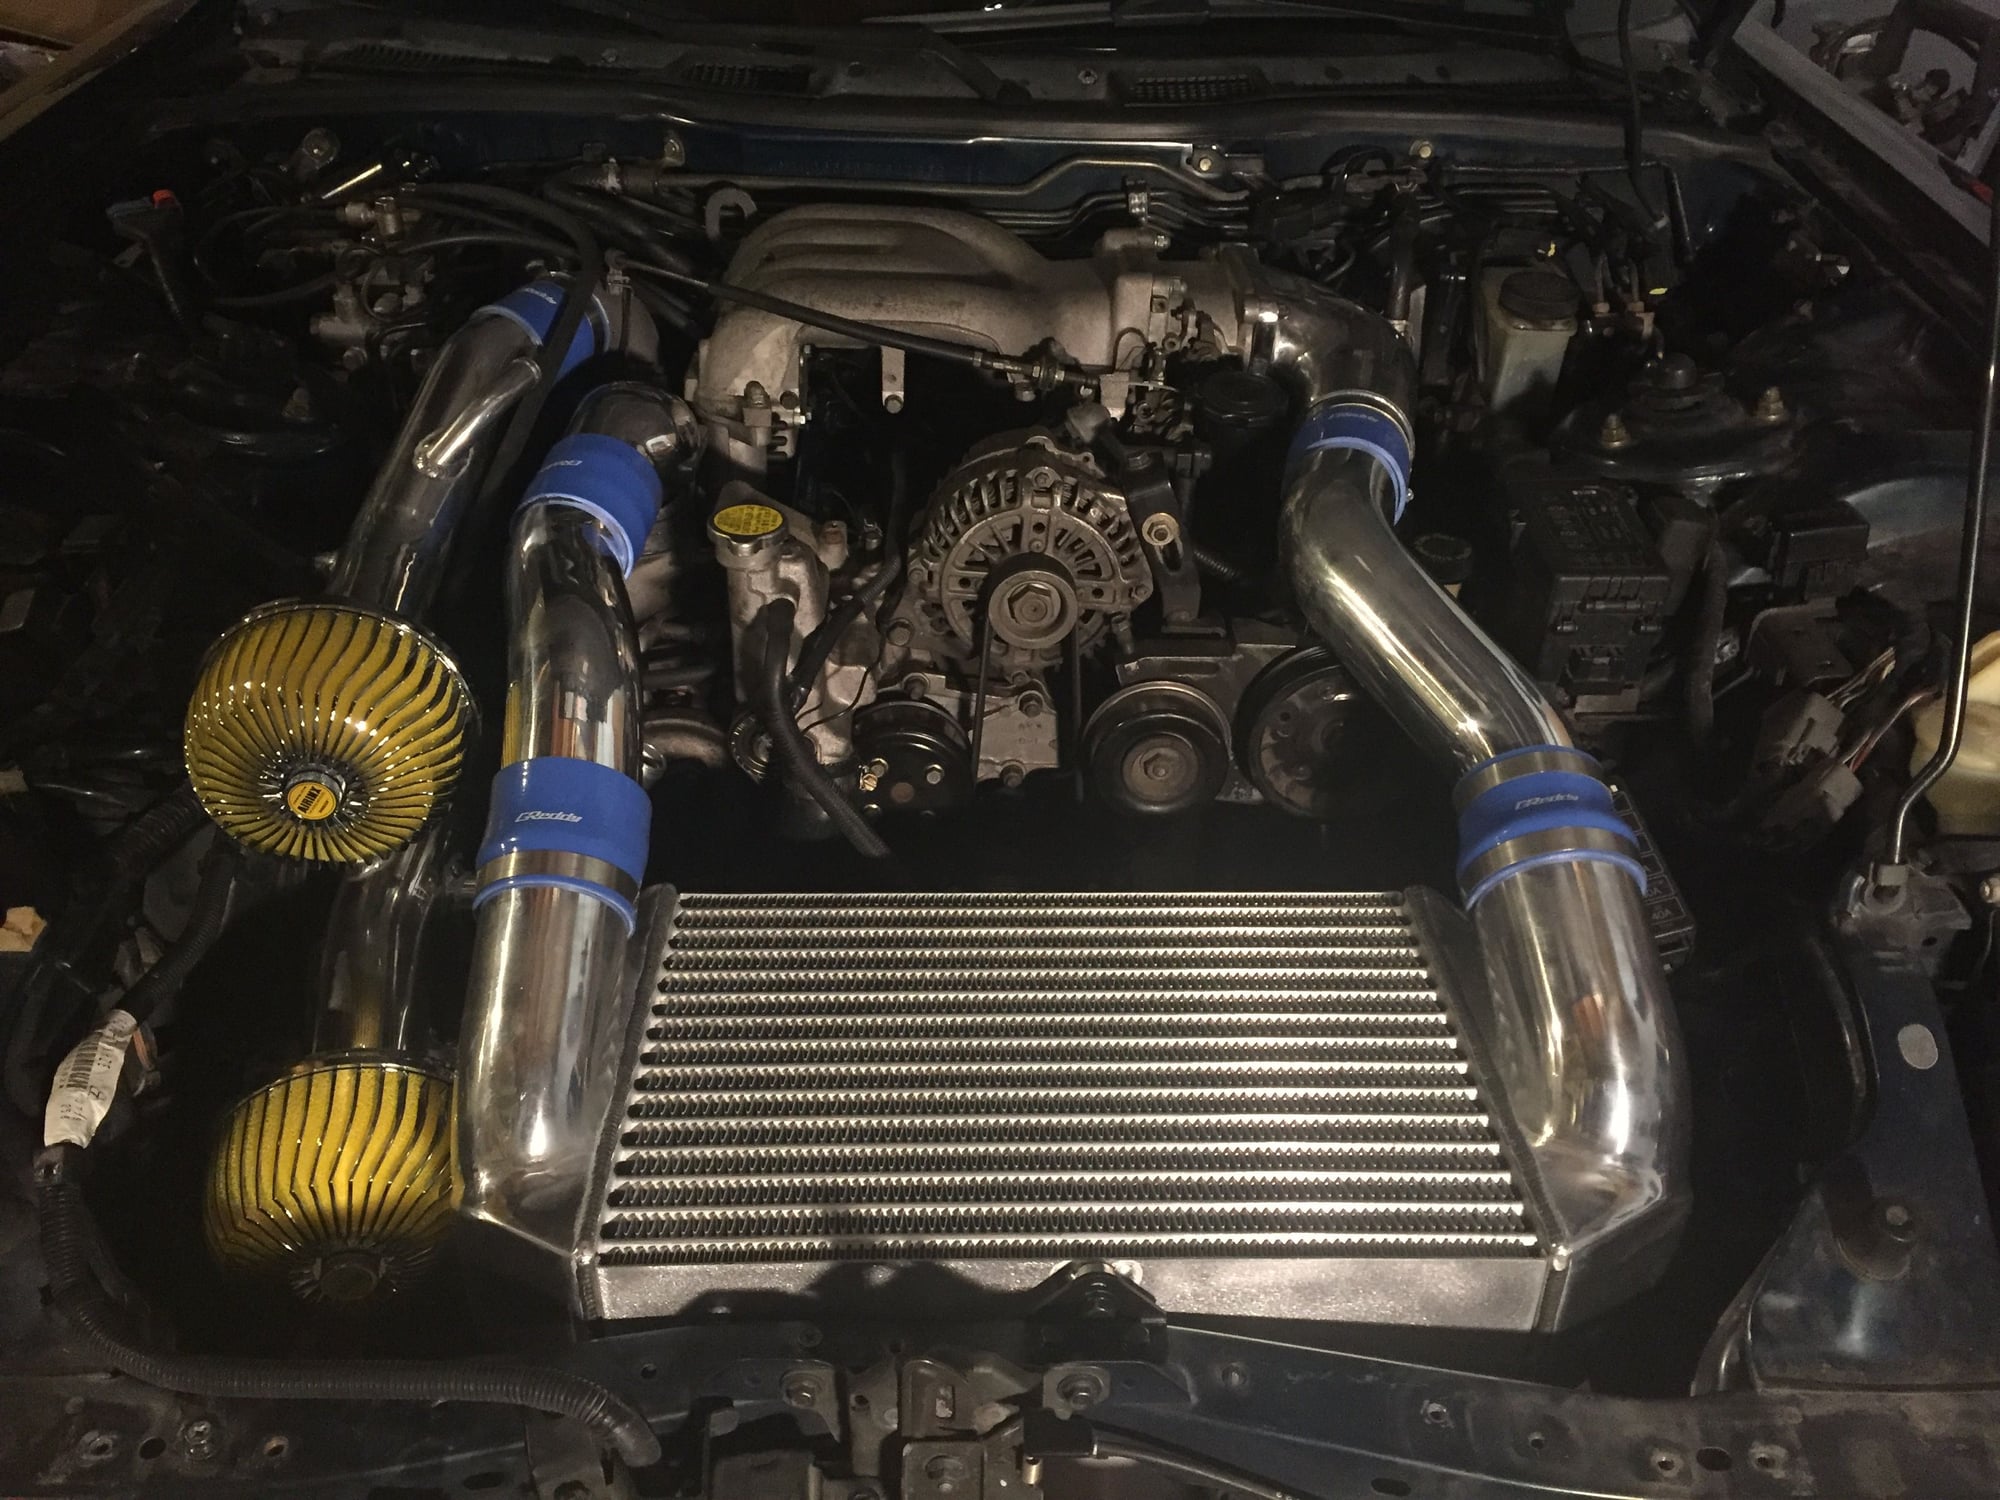
Didn't install one of the ducting plates. Felt the intakes could use some airflow as well. Also didn't install the a/c compressor since the provided aluminum brackets but after readying some posts it shouldn't be too hard.
Old 07-29-16, 10:31 AM
  #72  
Rotary Freak

iTrader: (15)
 
FourtyOunce's Avatar
 
Join Date: Feb 2001
Location: Old Bridge, NJ
Posts: 2,007
Received 175 Likes on 105 Posts
Looking good. Here is a pic of a recent build ee completed. We ended up shifting the intercooler over slightly to make room for the smaller PC680 battery.
Attached Thumbnails Greddy Vmount Installation/Questions/Pictures thread-photo710.jpg  
Old 07-29-16, 11:02 AM
  #73  
Boilermakers!

iTrader: (157)
 
ZE Power MX6's Avatar
 
Join Date: Nov 2002
Location: Chicago, IL
Posts: 3,686
Received 359 Likes on 263 Posts
^ Nice, that hood prop needs to go tho.
The following users liked this post:
Sniper3818 (09-08-19)
Old 07-29-16, 11:37 AM
  #74  
Rotary Freak

iTrader: (15)
 
FourtyOunce's Avatar
 
Join Date: Feb 2001
Location: Old Bridge, NJ
Posts: 2,007
Received 175 Likes on 105 Posts
It's no longer there. Hood struts are now installed.
Old 07-29-16, 12:52 PM
  #75  
Form > Function

iTrader: (107)
 
MattGold's Avatar
 
Join Date: Dec 2003
Location: Metro Detroit
Posts: 1,644
Received 198 Likes on 100 Posts
Originally Posted by FourtyOunce
Looking good. Here is a pic of a recent build ee completed. We ended up shifting the intercooler over slightly to make room for the smaller PC680 battery.
That's a fantastic looking engine bay.


Quick Reply: Greddy Vmount Installation/Questions/Pictures thread


All times are GMT -5. The time now is 11:17 AM.