3D Printing parts for our cars -- my first 3d printed parts
 08-21-16, 10:14 AM
#1
Haven't been on here in awhile, mostly stick to Facebook groups these days.
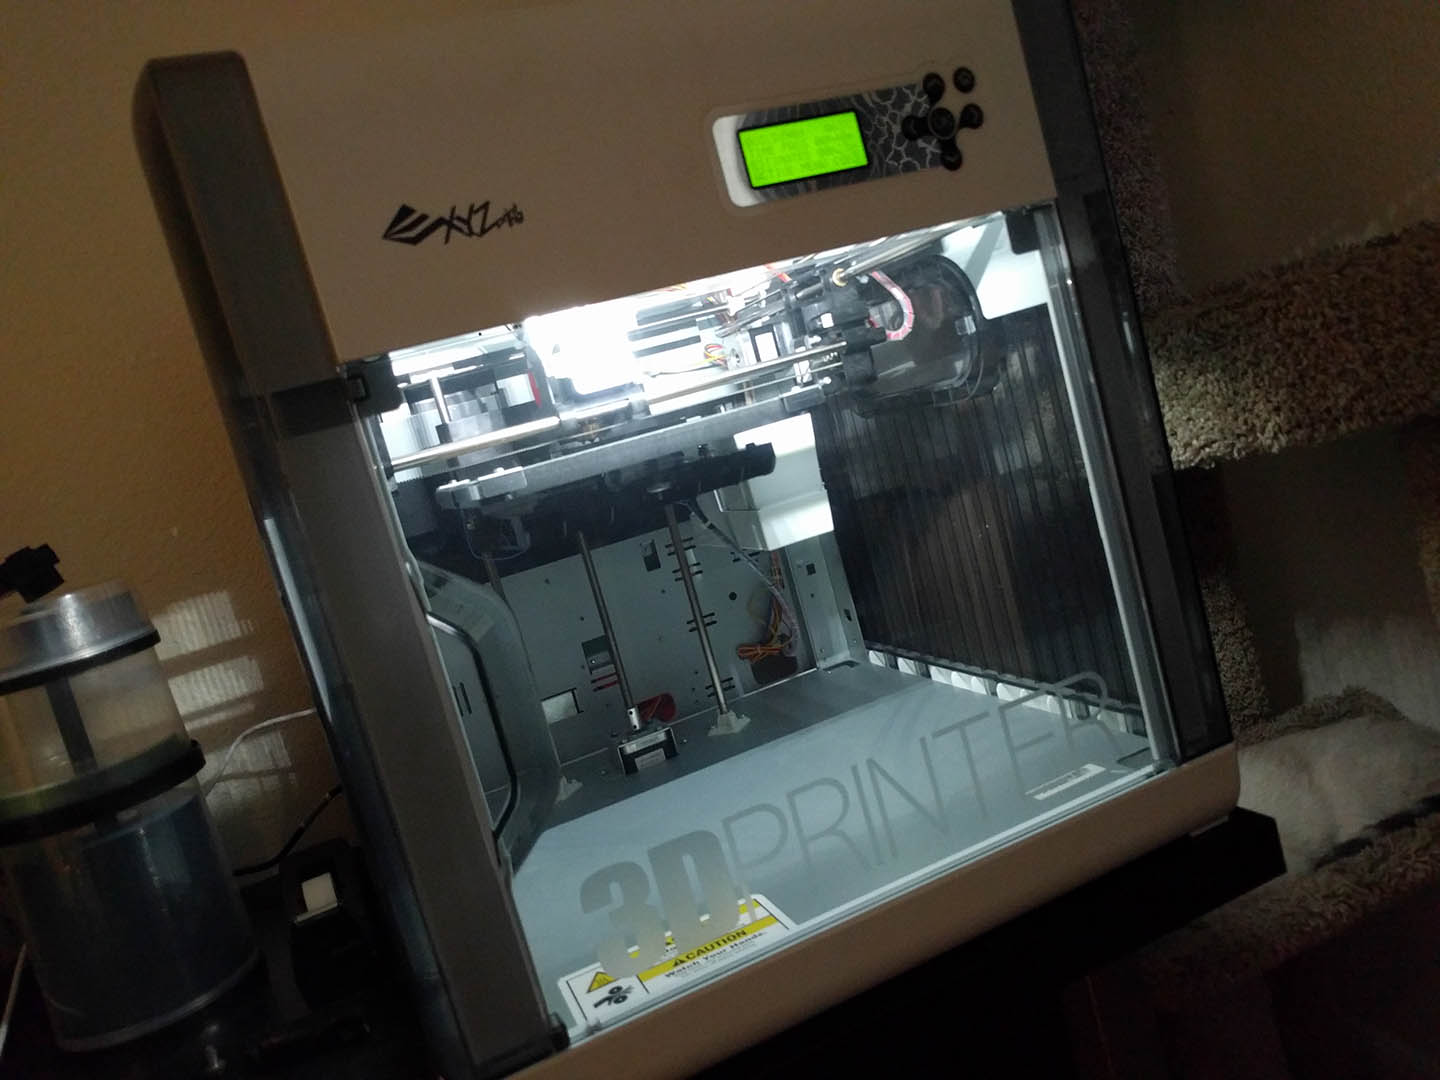
Anyway, how many people on here are 3D printing? I recently got a DaVinci 1.0A which has a fairly large bed (7.8" square) and it can print ABS. I got this one for free from someone who thought it was broken. After cleaning and calibration I had it working good as new.
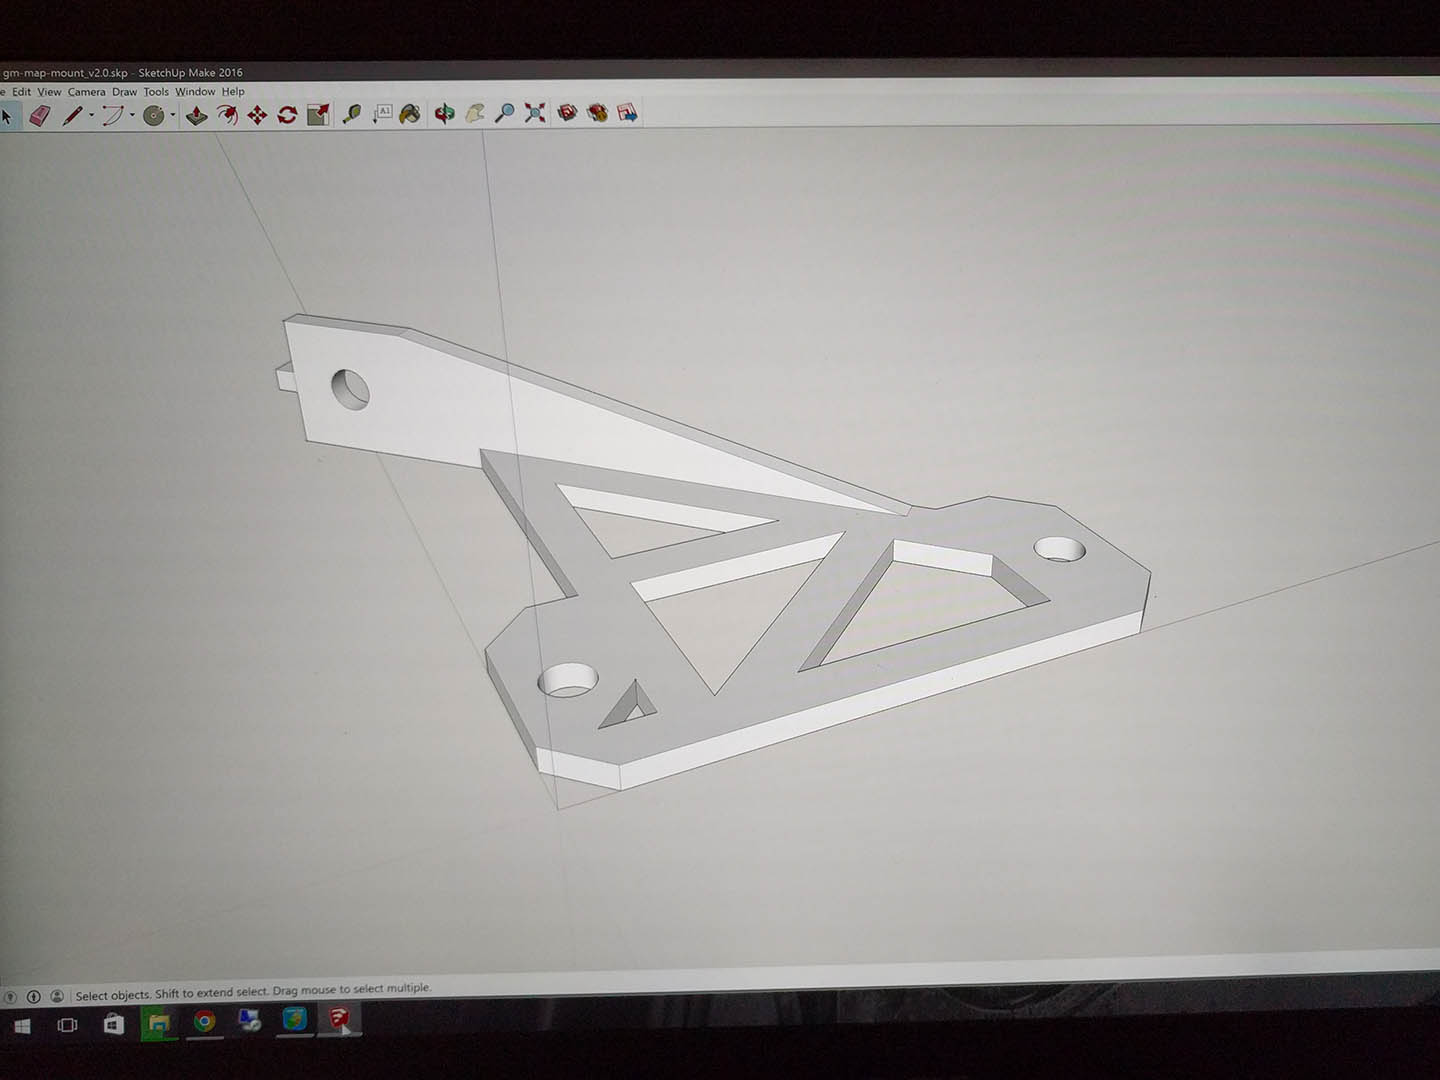
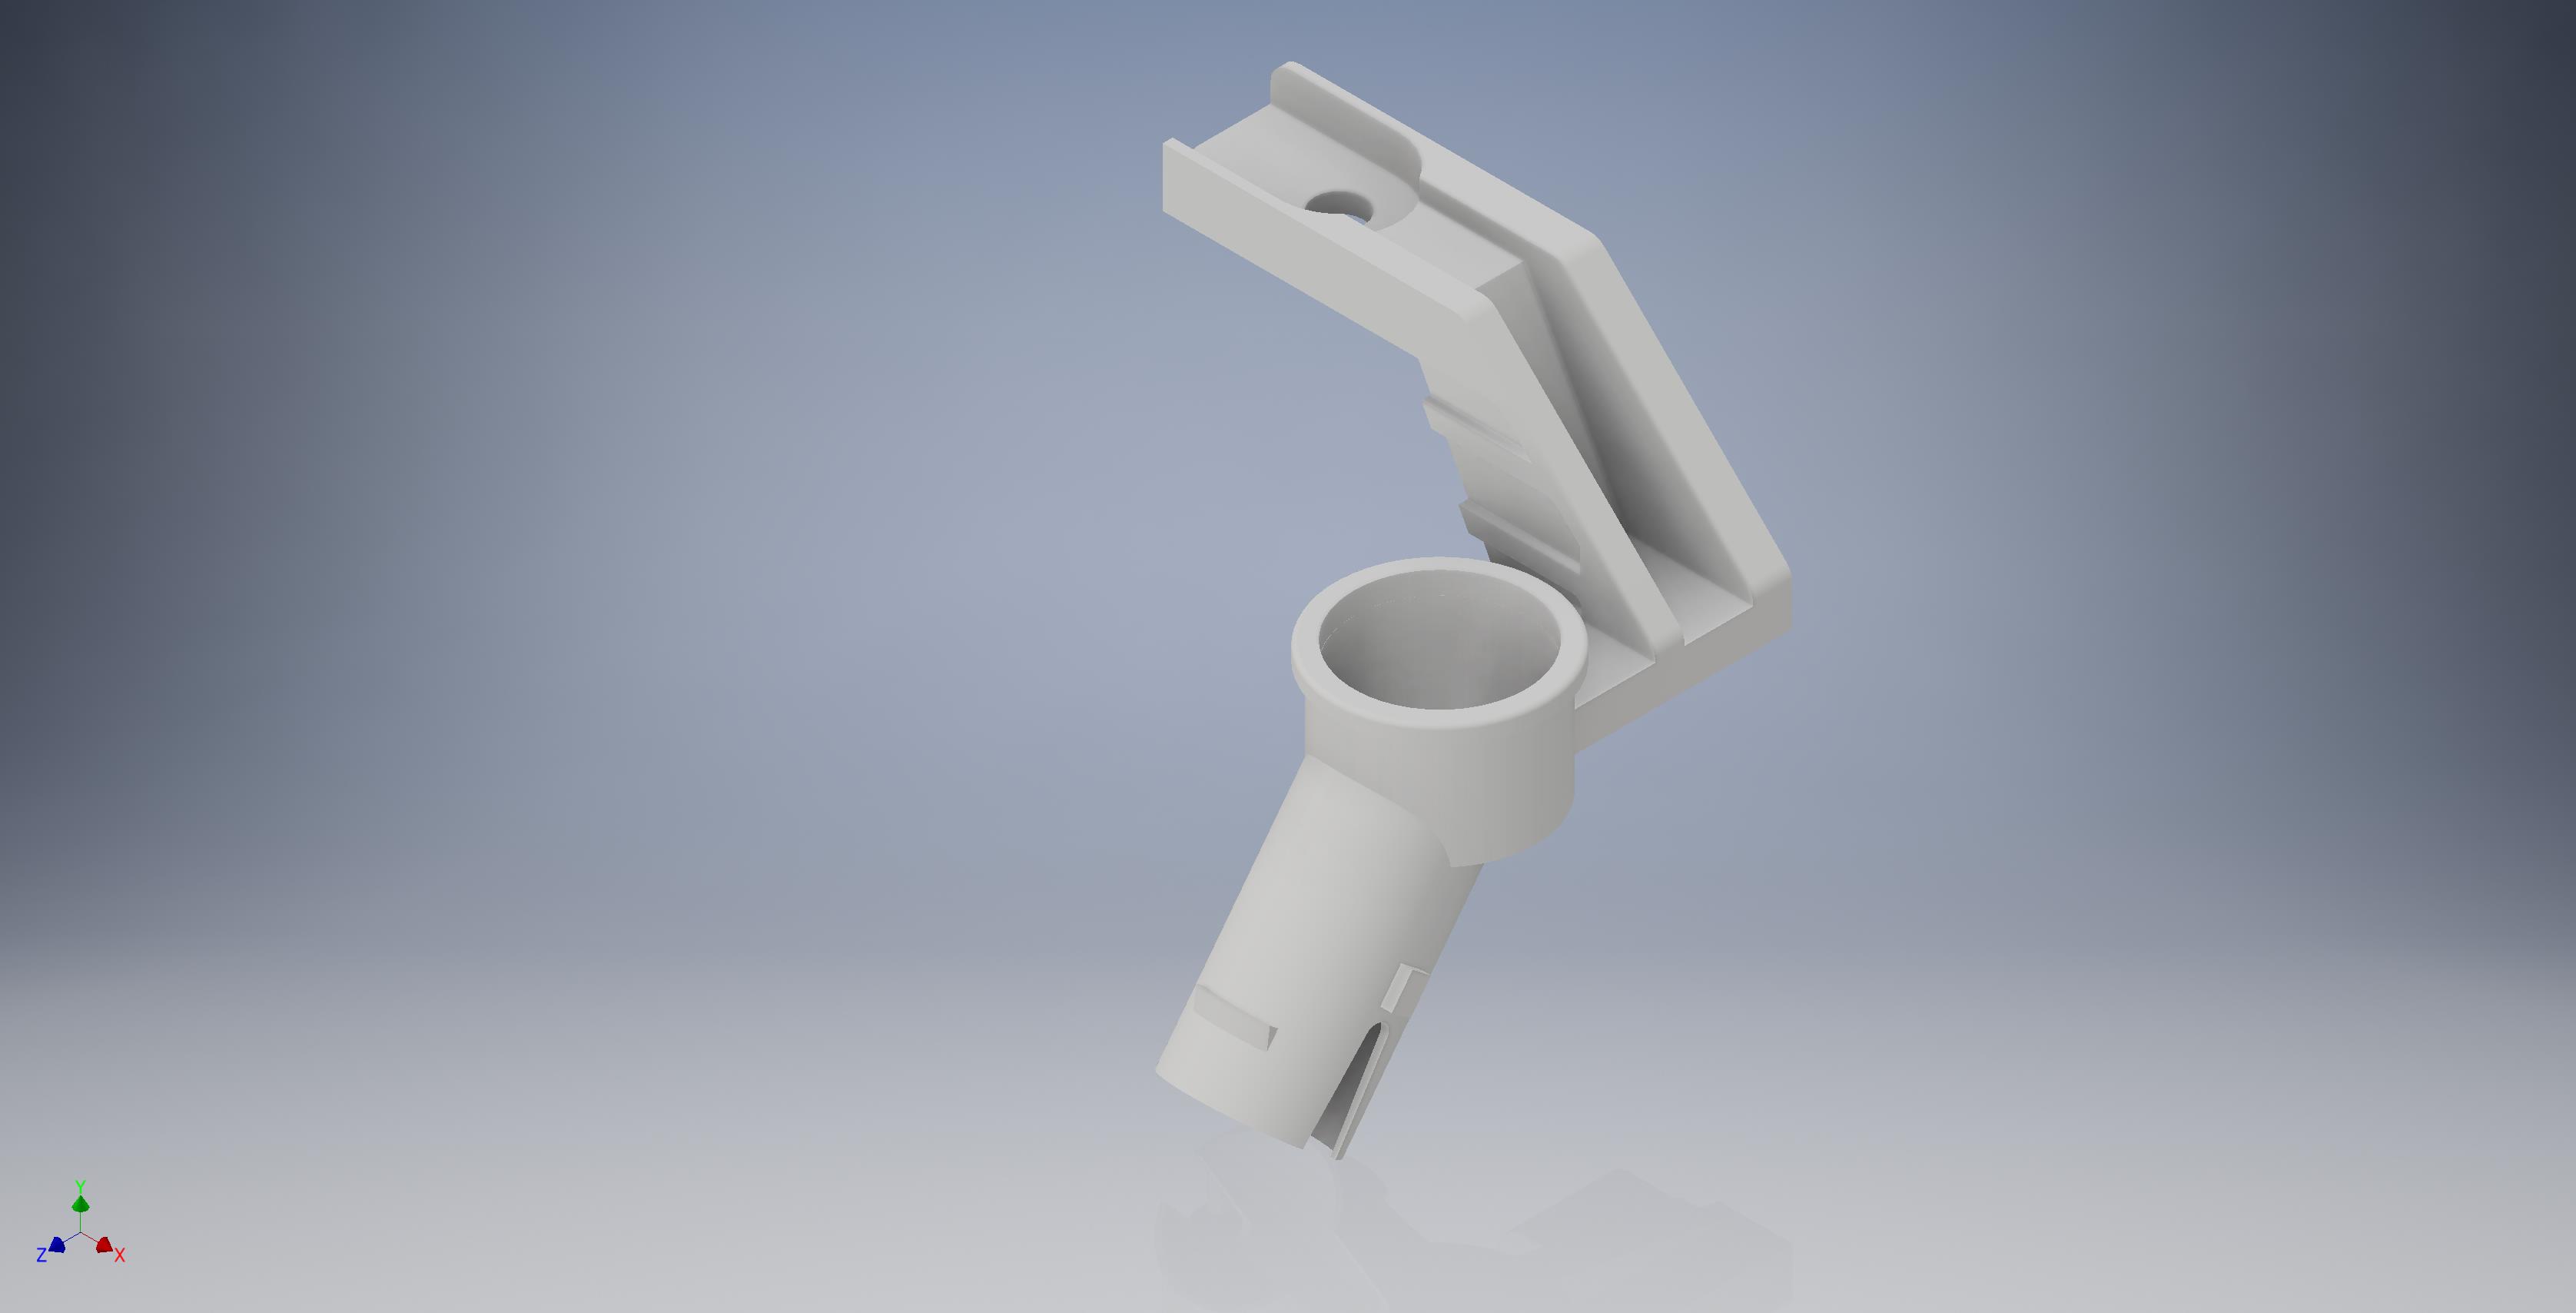
I didn't want to waste filament printing random trinkets so started designing parts using Google Sketchup and/or Autodesk Inventor. The first part I made was a MAP sensor bracket that allows you to mount a GM (or aftermarket) sensor in the factory location. Here's a pic of the model I made in SketchUp -- took about 30 minutes of measuring and modeling:
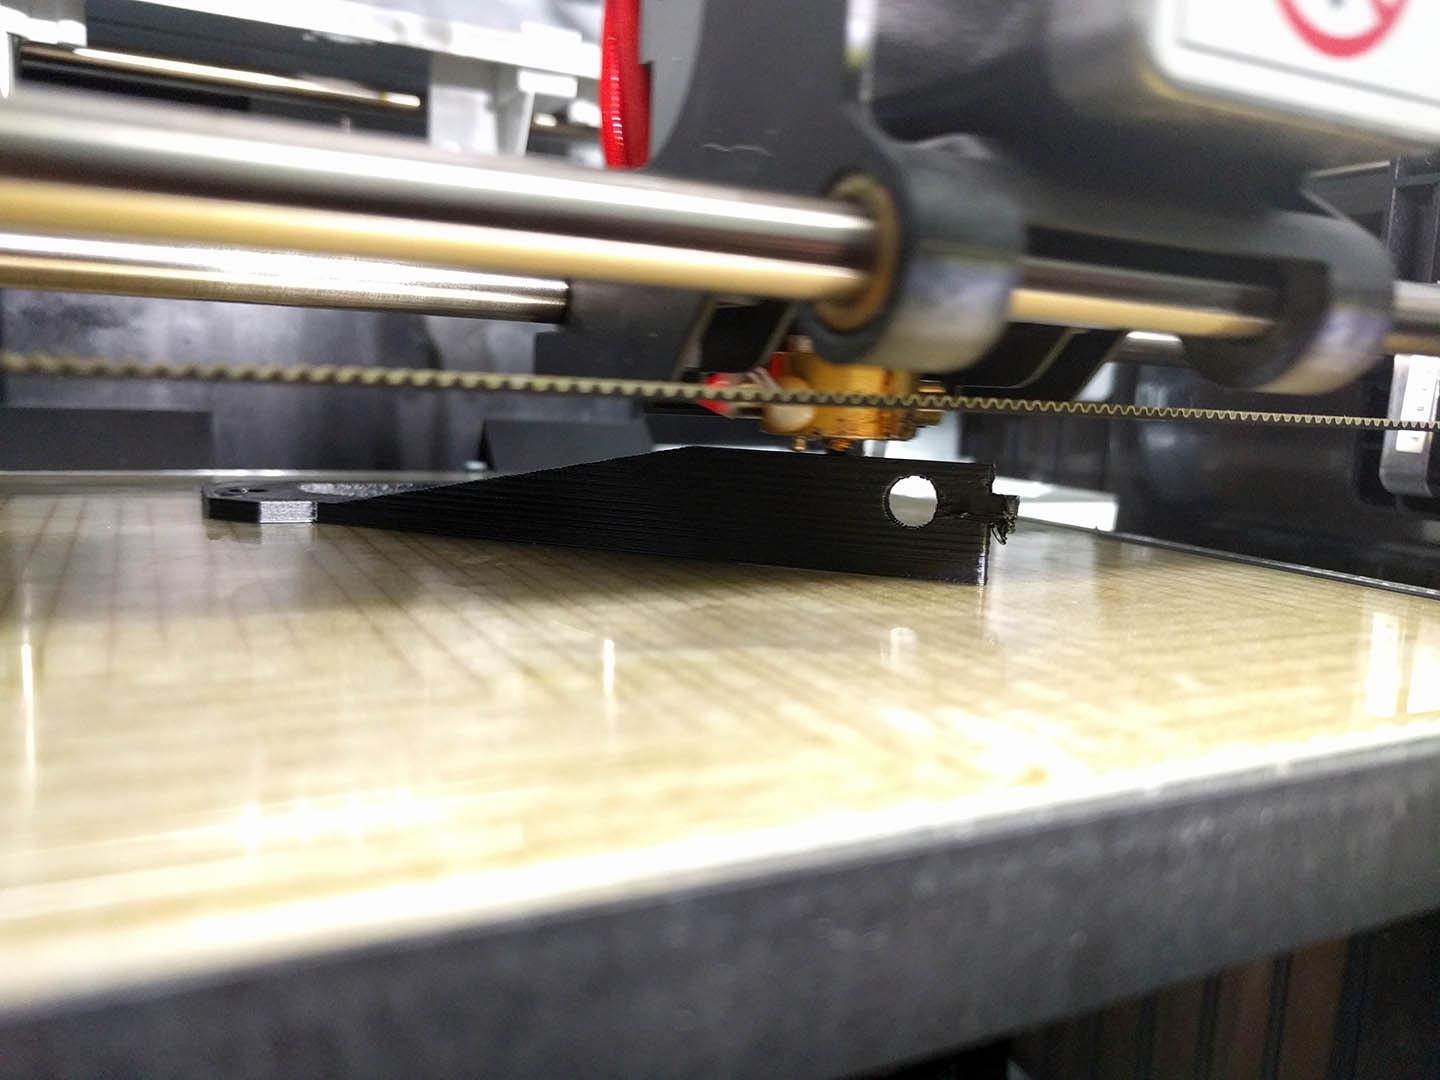
I wasn't sure about the print settings (fill %, etc.) so I just kind of guessed, but it actually turned our really well for my very first-ever printed 3d part:
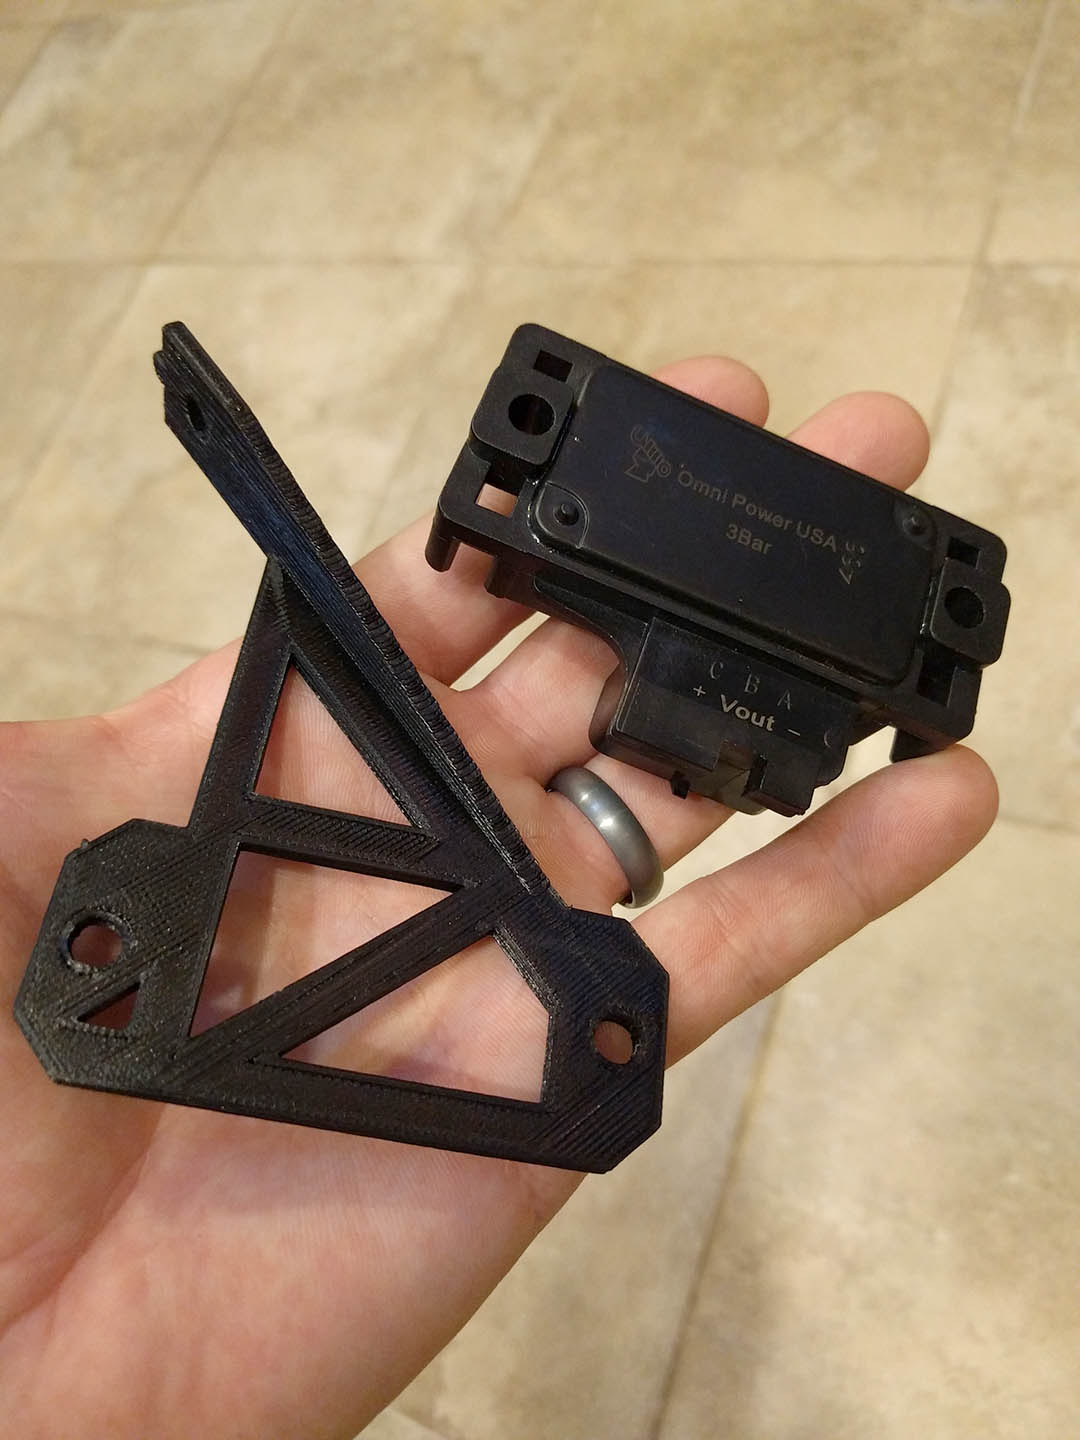
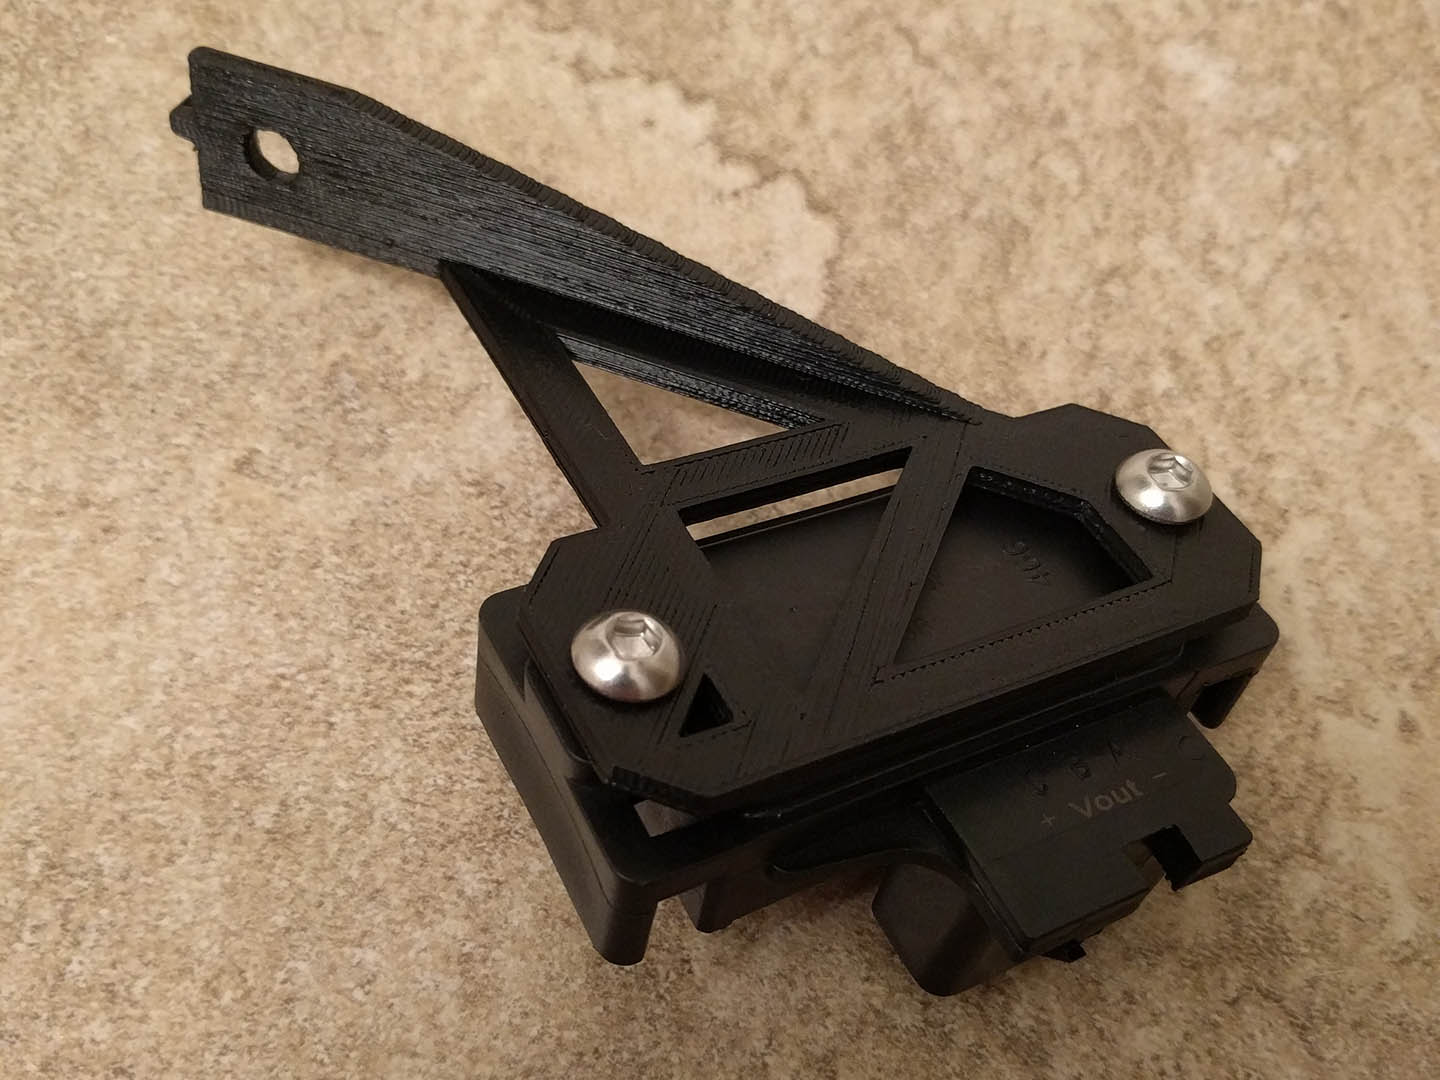
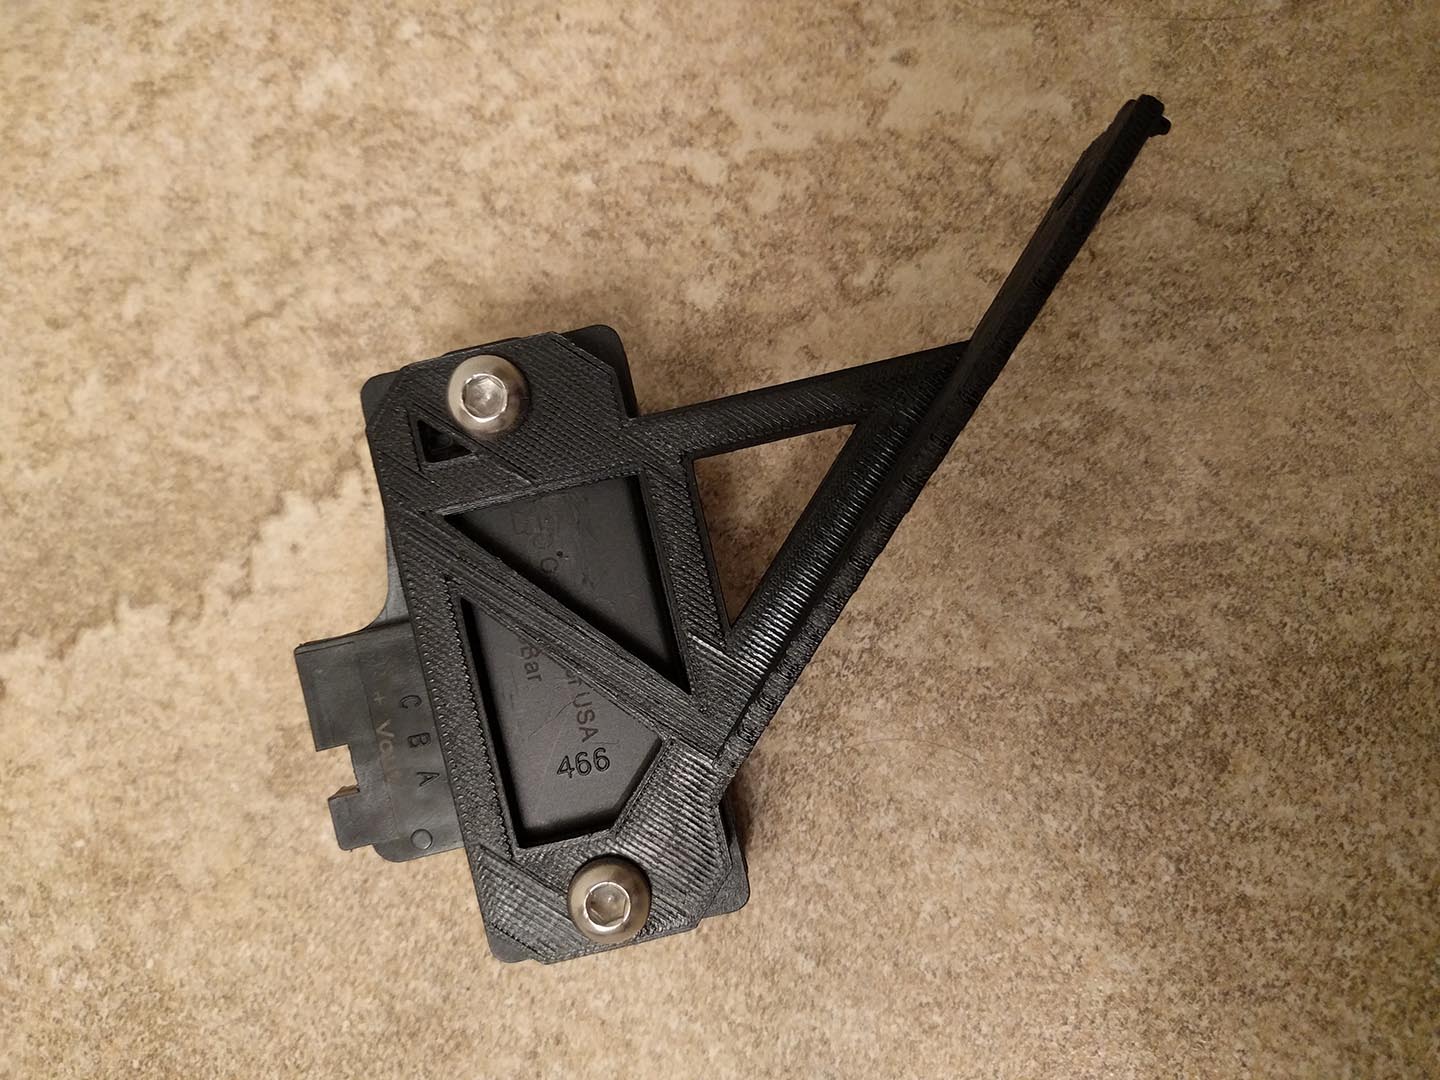
The part came out really strong even at only 40% fill. I probably could have run it slower and with thinner layers to make a cleaner looking part, but this works just fine for simply holding a sensor. Also, the melting point for this ABS is 220c so I'm sure under hood temps won't be an issue.
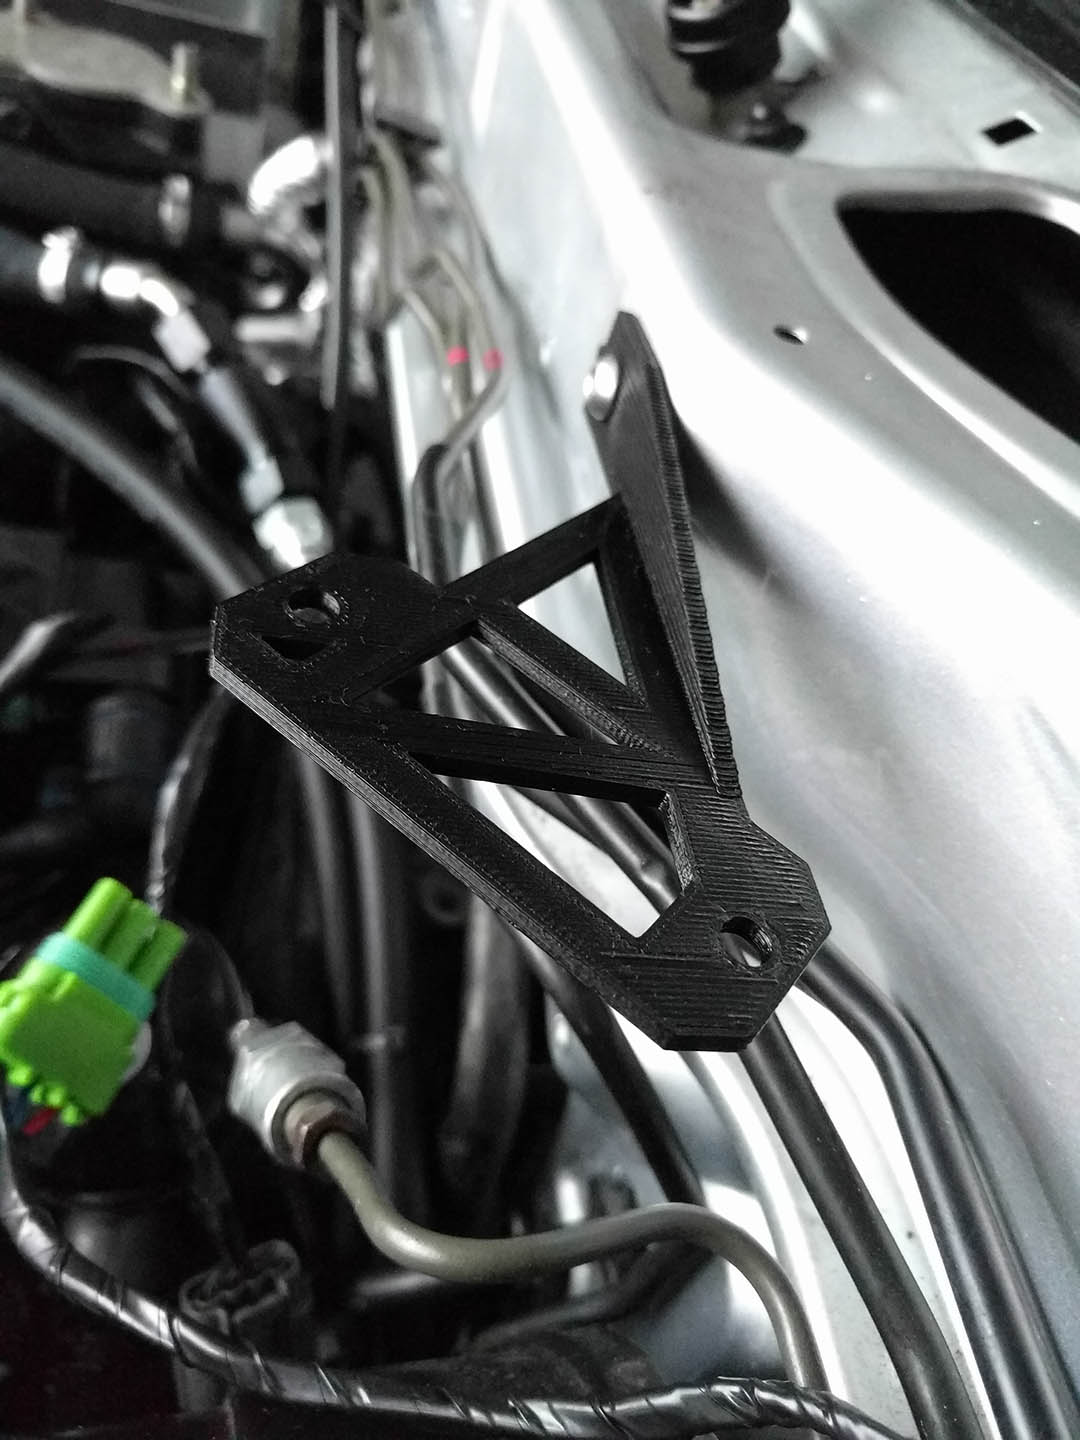
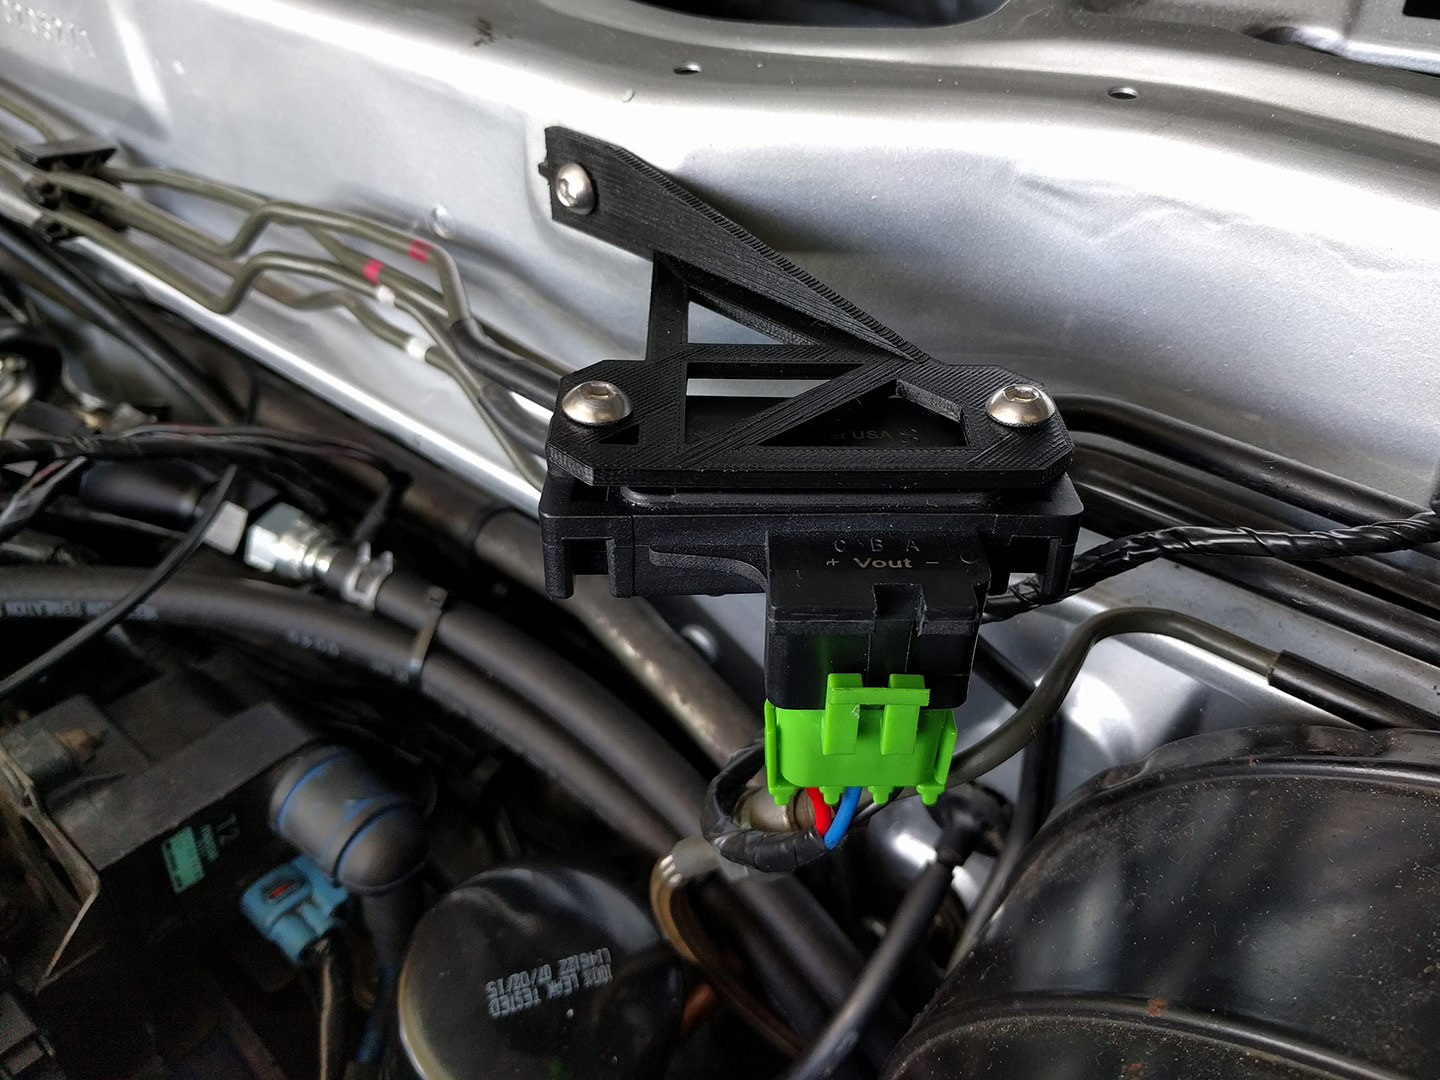
And here's it bolted to the firewall in the stock location:
I really like the idea of Open Source, so I've decided to start posting the printable files for free on this website called Thingiverse. You can view / download any of my 3D-printable parts for free from here:
BLACK LABEL ENGINEERING on Thingiverse
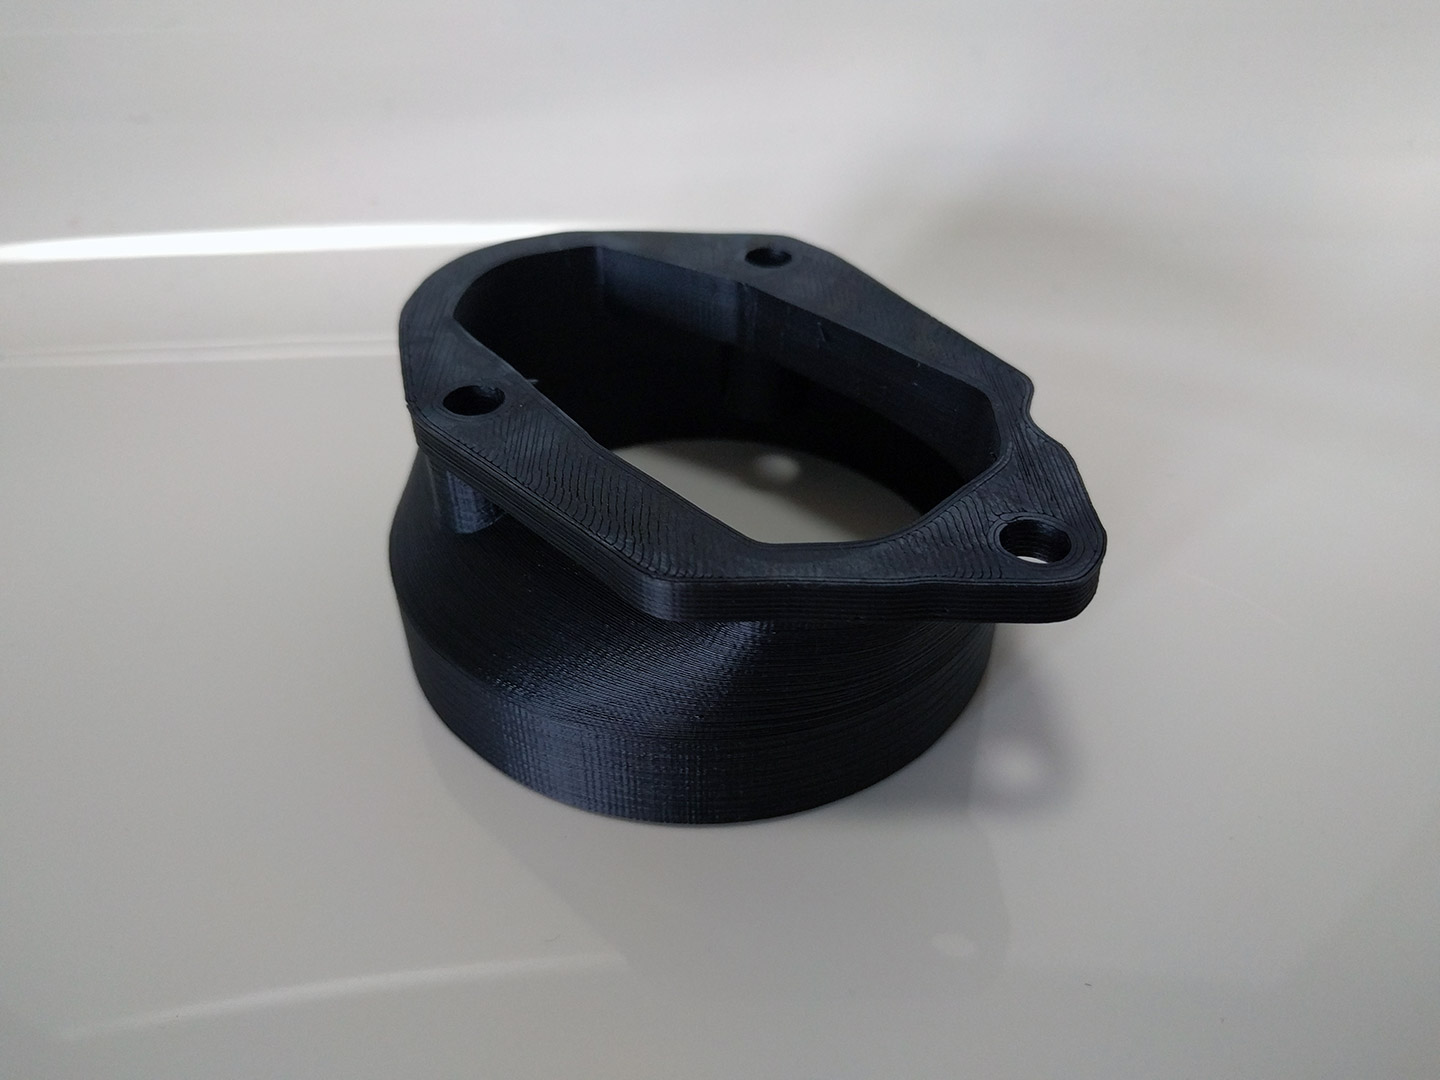
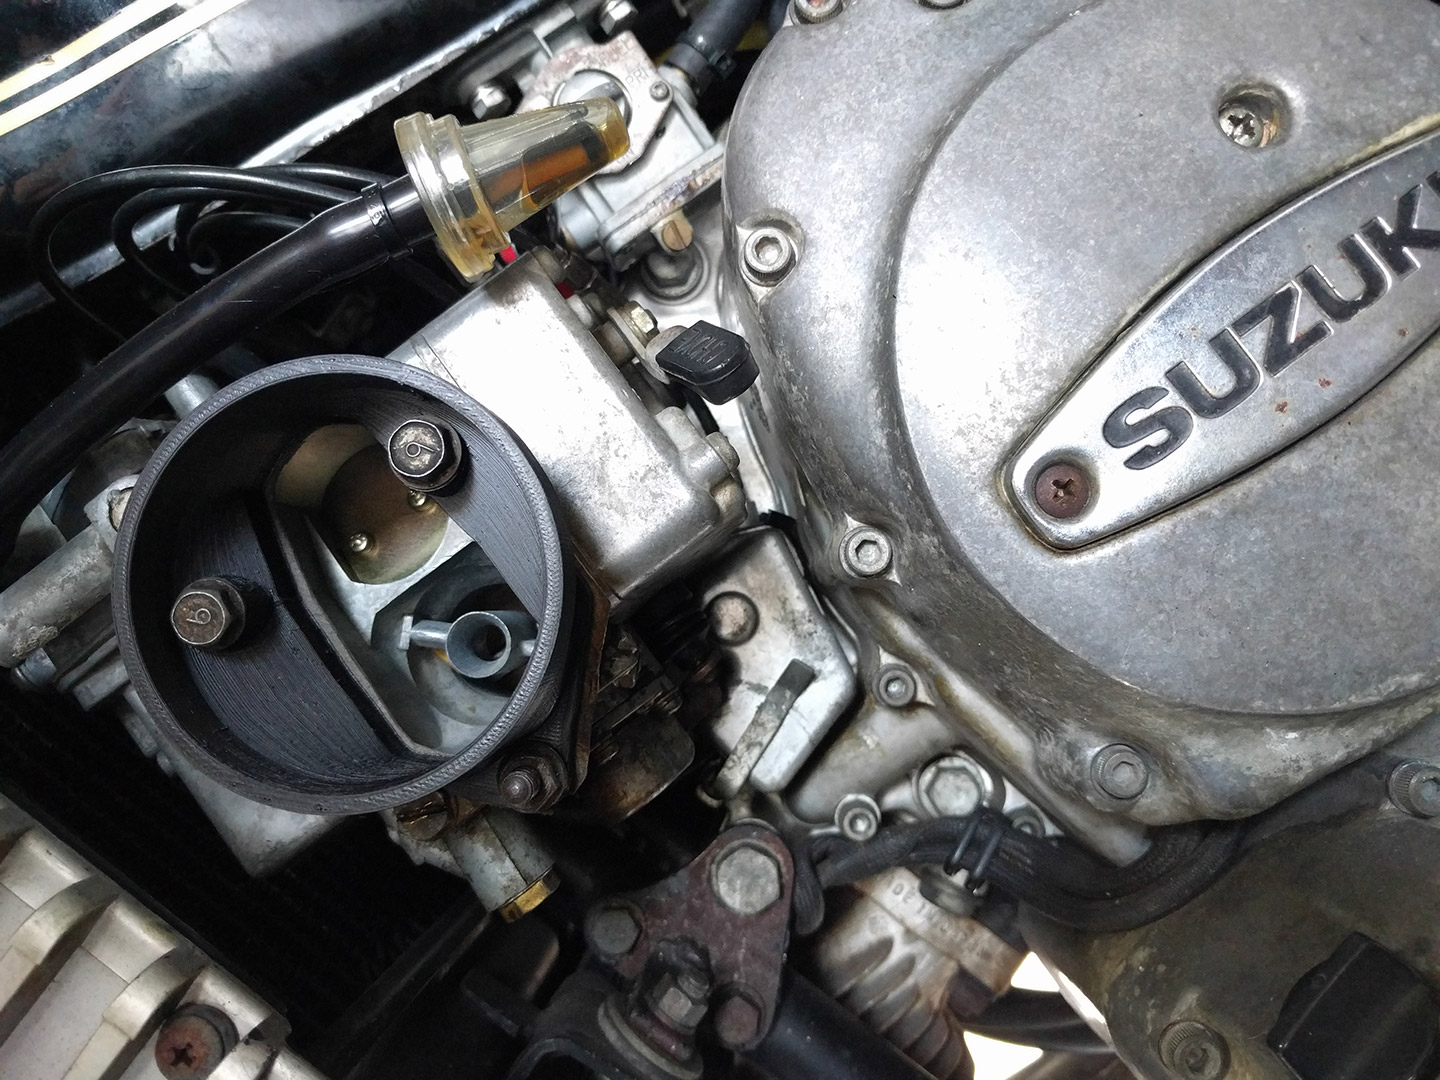
I also made an intake filter adapter for my '76 Suzuki RE5 (for those who don't know it's a 500cc single-rotor motorcycle). Here's a pic of that part which is a little bit more of a complex shape:
Is anyone else 3D printing parts for RX-7s? What have you made?
Anyway, how many people on here are 3D printing? I recently got a DaVinci 1.0A which has a fairly large bed (7.8" square) and it can print ABS. I got this one for free from someone who thought it was broken. After cleaning and calibration I had it working good as new.
I didn't want to waste filament printing random trinkets so started designing parts using Google Sketchup and/or Autodesk Inventor. The first part I made was a MAP sensor bracket that allows you to mount a GM (or aftermarket) sensor in the factory location. Here's a pic of the model I made in SketchUp -- took about 30 minutes of measuring and modeling:
I wasn't sure about the print settings (fill %, etc.) so I just kind of guessed, but it actually turned our really well for my very first-ever printed 3d part:
The part came out really strong even at only 40% fill. I probably could have run it slower and with thinner layers to make a cleaner looking part, but this works just fine for simply holding a sensor. Also, the melting point for this ABS is 220c so I'm sure under hood temps won't be an issue.
And here's it bolted to the firewall in the stock location:
I really like the idea of Open Source, so I've decided to start posting the printable files for free on this website called Thingiverse. You can view / download any of my 3D-printable parts for free from here:
BLACK LABEL ENGINEERING on Thingiverse
I also made an intake filter adapter for my '76 Suzuki RE5 (for those who don't know it's a 500cc single-rotor motorcycle). Here's a pic of that part which is a little bit more of a complex shape:
Is anyone else 3D printing parts for RX-7s? What have you made?

 08-21-16, 05:04 PM
#6

I had this idea over a year ago. It's good for recreation for plastics that are NLA. Only problem is that this process is only good for mold-making. You'll never get good enough resolution with off-the-shelf 3-D printers. I wanted to laser scan interior plastics, convert them to CAD files, and print them for the purpose of mold making. I even contacted Benny, at Bubbletech, to see if he'd be interested in joining with me on the idea. He is very committed to doing things strictly his own way, so he graciously declined my offer. I believe he's working on a gauge hood these days.
The laser scan is generated as a "cloud point" file. The trick (see: cost) also involves converting that cloud point file into a usable 3-D CAD file. If one were to rent a laser scanner (at a considerable cost), one also needs to pay for the cost of file conversion. I addressed this on a GB/Interest thread where the OP was doing just this, but he disappeared. I know the process, I just don't have the dough to rent the hardware right now. Besides, folks like CarbonMiata and the like are making carbon fiber replacements at reasonable prices (albeit questionable quality)
So, while this is certainly the future of NLA part replacement, we are still a ways for small batch ROI projects.
08-21-16, 07:53 PM
#7
I had this idea over a year ago. It's good for recreation for plastics that are NLA. Only problem is that this process is only good for mold-making. You'll never get good enough resolution with off-the-shelf 3-D printers. I wanted to laser scan interior plastics, convert them to CAD files, and print them for the purpose of mold making. I even contacted Benny, at Bubbletech, to see if he'd be interested in joining with me on the idea. He is very committed to doing things strictly his own way, so he graciously declined my offer. I believe he's working on a gauge hood these days.
The laser scan is generated as a "cloud point" file. The trick (see: cost) also involves converting that cloud point file into a usable 3-D CAD file. If one were to rent a laser scanner (at a considerable cost), one also needs to pay for the cost of file conversion. I addressed this on a GB/Interest thread where the OP was doing just this, but he disappeared. I know the process, I just don't have the dough to rent the hardware right now. Besides, folks like CarbonMiata and the like are making carbon fiber replacements at reasonable prices (albeit questionable quality)
So, while this is certainly the future of NLA part replacement, we are still a ways for small batch ROI projects.
The laser scan is generated as a "cloud point" file. The trick (see: cost) also involves converting that cloud point file into a usable 3-D CAD file. If one were to rent a laser scanner (at a considerable cost), one also needs to pay for the cost of file conversion. I addressed this on a GB/Interest thread where the OP was doing just this, but he disappeared. I know the process, I just don't have the dough to rent the hardware right now. Besides, folks like CarbonMiata and the like are making carbon fiber replacements at reasonable prices (albeit questionable quality)
So, while this is certainly the future of NLA part replacement, we are still a ways for small batch ROI projects.
Also, I disagree: 3D printing isn't "only good for mold making." I've got a number of parts in the works that I plan to print-and-use on my car. The MAP sensor bracket is just the first thing (literally the first thing I printed) off my printer, and it's currently installed in my engine bay.
About 2-3 years ago when I was reading up on 3D printers, I made a list of parts I wanted to make and 3D print, but at the time I wasn't decided I didn't want to make the investment in the hardware. I figured I would wait until quality got better before I spend any money on a good printer.
3D scanning is actually pretty easy these days. I've scanned a few factory parts as meshes. Converting them into usable files isn't difficult either -- the hard part is dealing with parts that are larger than your printing bed. Anyway, I'm not really trying to 1:1 replicate existing parts -- I want to design new and original parts.
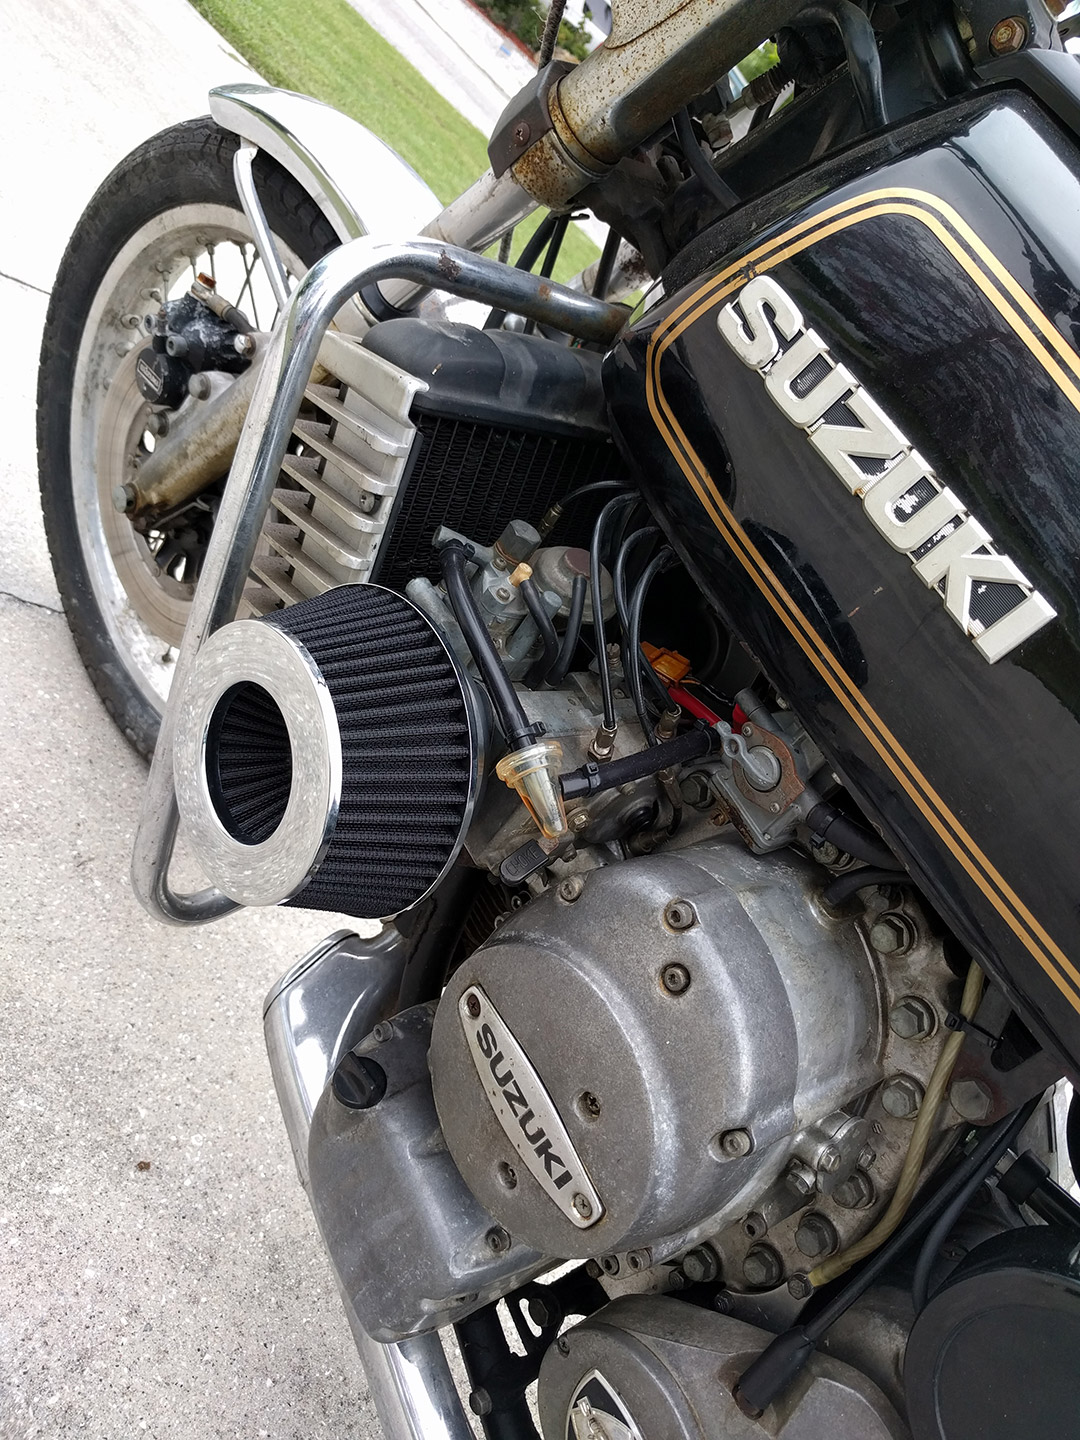
Here's a few pics of the intake filter adapter I'm running on my RE5. My 3D printer is almost 2 years old so it's fairly-early tech, and it still produces a very nice printed part without any after finishing. I literally designed this part in 45 mins, printed it out (5.5 hours), bolted it up to my bike (5 minutes) and rode off. It's strong enough that I can put it on the floor and stand on it (175lbs) without it so much as even cracking.

Last edited by theorie; 08-21-16 at 08:03 PM.
Trending Topics
 08-22-16, 09:51 AM
#9
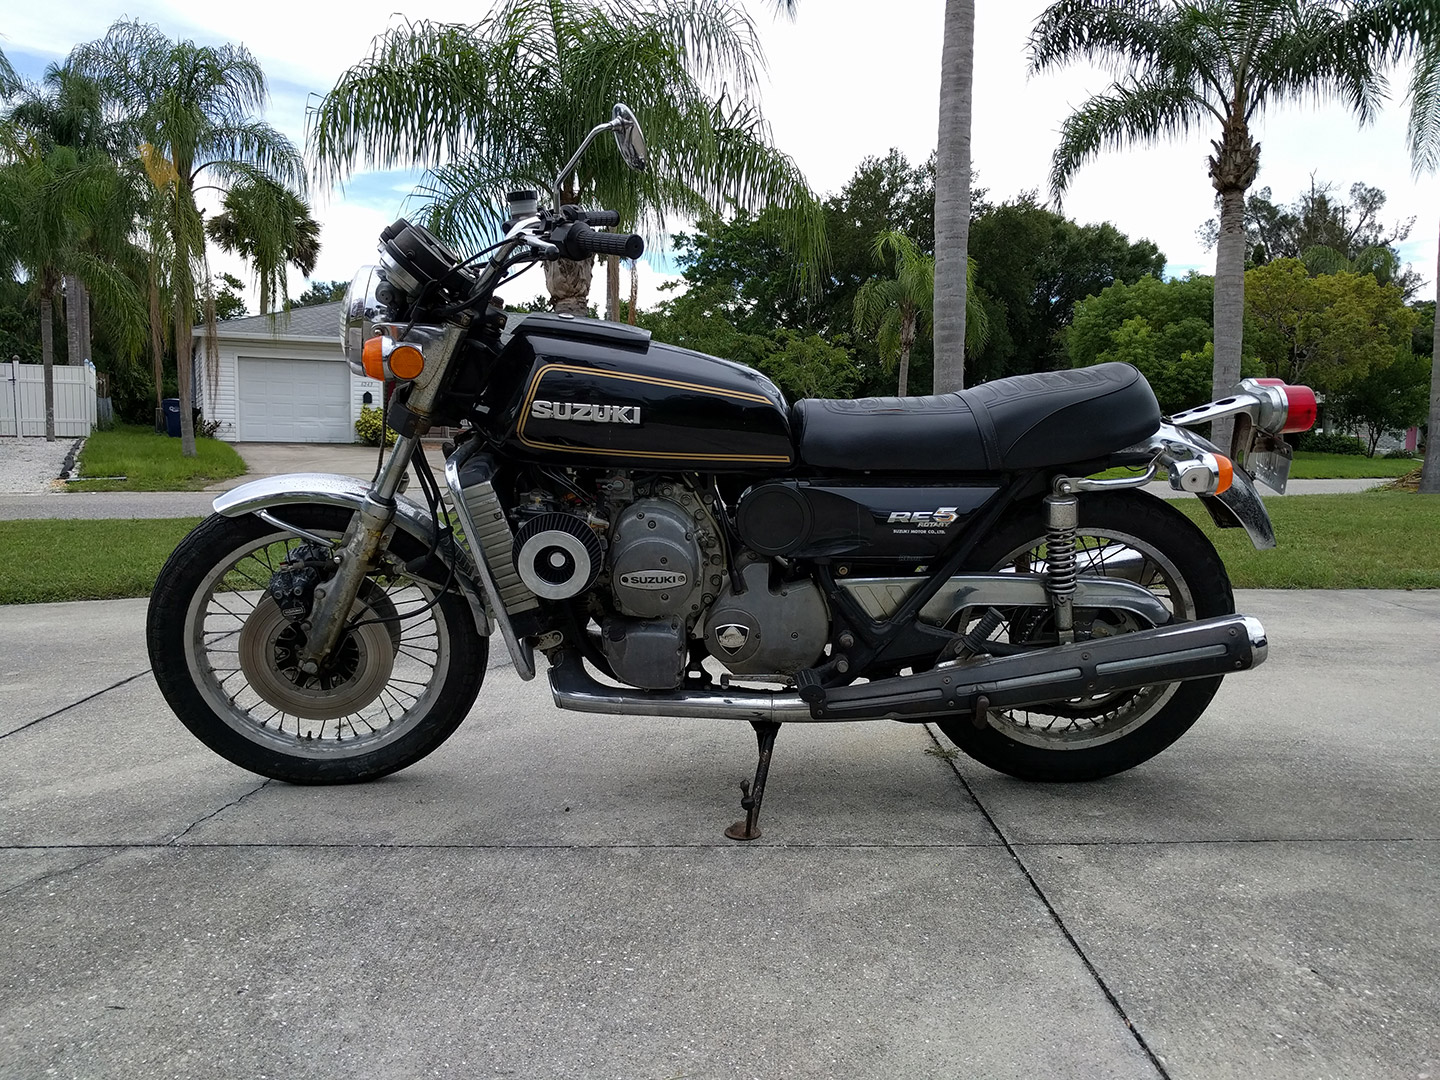
Other than replacing the ignition and adding the air filter, this bike is pretty much original -- I haven't even given it a good cleaning yet. It sat collecting dust in the back of a shop for at least several years before I found it and convinced the owner to let me buy it.
08-22-16, 10:46 AM
#10
08-22-16, 04:01 PM
#11
...
Also, I disagree: 3D printing isn't "only good for mold making." I've got a number of parts in the works that I plan to print-and-use on my car. The MAP sensor bracket is just the first thing (literally the first thing I printed) off my printer, and it's currently installed in my engine bay.
3D scanning is actually pretty easy these days. I've scanned a few factory parts as meshes. Converting them into usable files isn't difficult either -- the hard part is dealing with parts that are larger than your printing bed. Anyway, I'm not really trying to 1:1 replicate existing parts -- I want to design new and original parts.
...
Also, I'd like to know what laser scanner you used, and how you acquired it. I am interested in renting one, but the only ones I've seen online rent for too much money. I'd like to know how you're converting your cloud points as well. Thanks!
08-23-16, 08:03 AM
#12
Awesome, nice work, and subscribed. You might want to put a fillet or chamfer at the inside of that long 90 on the bracket to reduce potential stress concentration.
Sweet bike too.
I use AD Inventor daily and have also considered reccreating interior plastics. Don't have a printer yet, but I have given some thought to overcoming the resolution issue. One solution could be to make the parts slightly oversized on the visible surfaces, then manually finish each part by sanding and painting. All my 93 interior plastics are painted matte black anyways.
08-25-16, 07:47 AM
#13
Ultimate Guide to Finishing 3D Printed Parts
Regarding more affordable options: you can now 3d scan and create meshes using photos. There are various software options you can use -- personally I'm using AutoDesk ReMake: https://remake.autodesk.com/about
Here's another new consumer-priced hardware/software option that is a hybrid of laser and photo...using a smartphone: https://www.kickstarter.com/projects...n-your-smartph
I use AD Inventor daily and have also considered reccreating interior plastics. Don't have a printer yet, but I have given some thought to overcoming the resolution issue. One solution could be to make the parts slightly oversized on the visible surfaces, then manually finish each part by sanding and painting. All my 93 interior plastics are painted matte black anyways.
I just downloaded Inventor less than two weeks ago and I'm just teaching myself as I go. I agree with you that interior parts could be produced with post-treatment. All my interior plastics are sanded and resprayed as well.
Anyway here's another part I designed last night. near identical replacement for the coolant overflow tank neck. I'm sure you guys know these things yellow with age. I wanted to make something a little more complex (compared to the simple parts I've already made) so this was a good test. The plan is to 3d print it in black ABS. I'll also be doing the windshield washer fluid neck from the other side.
The following users liked this post:
Neo (01-03-22)
08-26-16, 08:57 PM
#15
Junior Member

I work for a 3D scanning and surveying firm and we have 3 big printers in the back, (we have printed out refinery units that we 3D scanned) and I've thought about trying to scan some things to print them out. But the printers don't run much and I don't think my boss would let me. . .


 10-02-17, 10:24 PM
#24
Senior Member
retired parts and 3D printing
Mazda lists some parts as "retired" so new replacements are not available from them. Junk yards with FDs are far apart. As my 93 has aged, a few little parts have gone missing and it seems some 3D printing of them should be fairly easy. Once converted to design code, anybody could use the code to print up that part or order a part to be made and shipped. I would buy in if it was anywhere near reasonable $$$.
Example little parts that have gone AWOL:
the plastic cover for the main fuse block right next to the battery
the little strip that covers the gap between the OEM Bose radio and the left dash
the little wheel center buttons for the stock wheels
and then some bigger options might be considered:
1. the almost always broken driver door plastic around the handles and controls, including the silly bucket cover lid
2. Possibly printed in metal (to be tough enough) the almost always broken right door pull handle
3. And getting bigger, the front stock plastic air dam that always drags on the pavement at driveways or parking lot barriers.
And if the RX7 stays on the road for another 10 years, the 3D printing technology should be good enough and automatic enough to make any of the parts that give up by then....
cheers
06-12-20, 12:03 AM
#25
Make an assessment...

iTrader: (3)
Is anyone making the larger fuse/relay box in the engine bay yet? I just broke my mounting tab tonight and figured a brand new one would be pretty nice.
I like the idea about the coolant overflow and washer fluid necks too. I'm in for those.
I like the idea about the coolant overflow and washer fluid necks too. I'm in for those.