She Followed Me Home, Honest
 09-05-12, 08:26 AM
#101
It's not really sad, it's almost as if the '91 will go to sleep and wake up as an idealized version of her old self.
Before I used her as my lab and frankensteined all sorts of things onto her.
The '91 was in fairly stock form when I got it but both the bay and the interior had been fiddled with, sometimes roughly, and only now has the GTU shown me the myriad little fiddlybits I've been missing all along.
I can look back and see the path that lead from original to what she is now.
I regret none of it and will be incorporating complete most of the mods.
The two main things I won't be changing are the switchgear and the seats.
I've struggled mightily with both and have not been entirely satisfied with either.
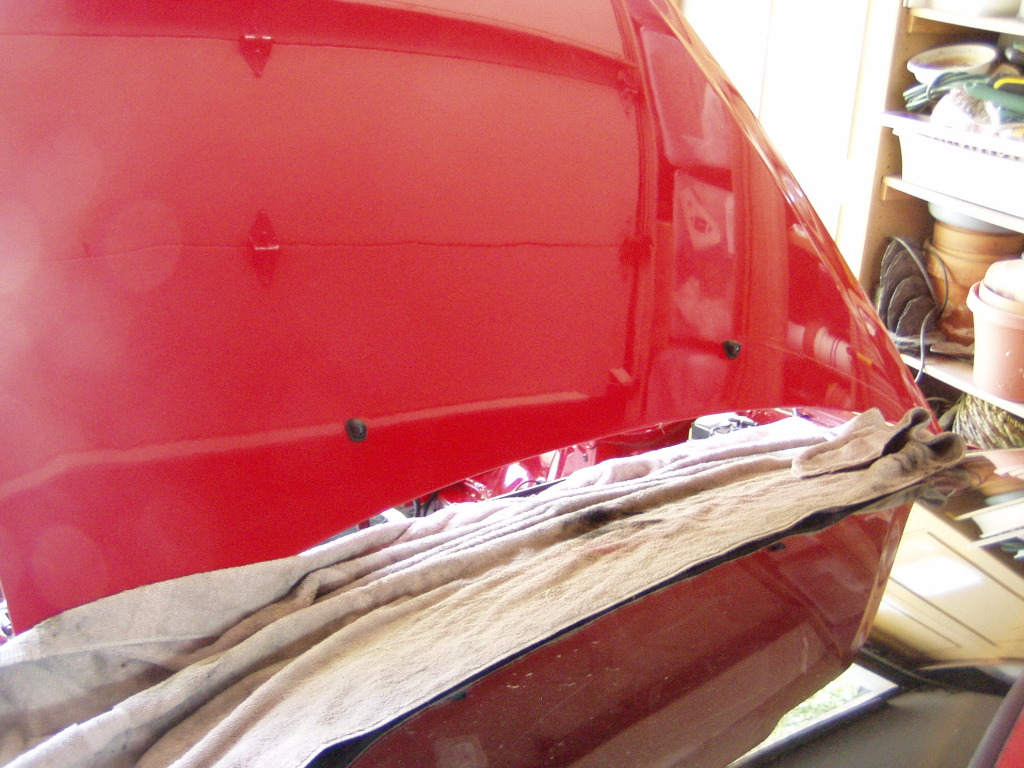
On the exterior I'd like to try a wipered hatch.
Attention Lurkers! I'd like some feedback about how well the rear hatch wiper/washer system works. Particularly how it does in snow.
I'd also really like a sport (duckbill) rear spoiler.
The OEM "turbo" spoiler ruins the lines of the car's rear for me, the duckbill is a much better look.
Today I finish up the wiring (decided overnight to incorporate some of the fan wiring into the main harness- for routing sake) and begin looming.
With the harness in place- specifically, the relocated run across the radiator, I can begin to conceptualize the shrouding from the nose to the coolers. I'd like to keep it completely independent of the stock undertray (which is more of a splash guard than anything else) and I can already tell it's going to be a multipiece affair to clear all the structure in there.
I don't need a hyper efficient "sealed" system and will initially concentrate on the radiator end where the air can go all over the place. Then I'll build it out as seems feasible.
Probably redo it several times if past becomes prologue, but I can't tell how I've failed till the first attempt is made.
Failure is not only an option in my world, it's expected.
The trick is to figure out how much of the fault was due to conceptual errors and how much was poor/inappropriate implementation.
Practice makes perfect.
Now, back to the salt mines.
Oh, one more thing...
There's a lot I plan on stripping from the '91 but it'll still have some goodies to sell, taillights, for one.
Any oddball bits you might need, LMK via PM, please.
Before I used her as my lab and frankensteined all sorts of things onto her.
The '91 was in fairly stock form when I got it but both the bay and the interior had been fiddled with, sometimes roughly, and only now has the GTU shown me the myriad little fiddlybits I've been missing all along.
I can look back and see the path that lead from original to what she is now.
I regret none of it and will be incorporating complete most of the mods.
The two main things I won't be changing are the switchgear and the seats.
I've struggled mightily with both and have not been entirely satisfied with either.
On the exterior I'd like to try a wipered hatch.
Attention Lurkers! I'd like some feedback about how well the rear hatch wiper/washer system works. Particularly how it does in snow.
I'd also really like a sport (duckbill) rear spoiler.
The OEM "turbo" spoiler ruins the lines of the car's rear for me, the duckbill is a much better look.
Today I finish up the wiring (decided overnight to incorporate some of the fan wiring into the main harness- for routing sake) and begin looming.
With the harness in place- specifically, the relocated run across the radiator, I can begin to conceptualize the shrouding from the nose to the coolers. I'd like to keep it completely independent of the stock undertray (which is more of a splash guard than anything else) and I can already tell it's going to be a multipiece affair to clear all the structure in there.
I don't need a hyper efficient "sealed" system and will initially concentrate on the radiator end where the air can go all over the place. Then I'll build it out as seems feasible.
Probably redo it several times if past becomes prologue, but I can't tell how I've failed till the first attempt is made.
Failure is not only an option in my world, it's expected.
The trick is to figure out how much of the fault was due to conceptual errors and how much was poor/inappropriate implementation.
Practice makes perfect.
Now, back to the salt mines.
Oh, one more thing...
There's a lot I plan on stripping from the '91 but it'll still have some goodies to sell, taillights, for one.
Any oddball bits you might need, LMK via PM, please.
 09-05-12, 03:46 PM
#103
On the exterior I'd like to try a wipered hatch.
Attention Lurkers! I'd like some feedback about how well the rear hatch wiper/washer system works. Particularly how it does in snow.
I'd also really like a sport (duckbill) rear spoiler.
The OEM "turbo" spoiler ruins the lines of the car's rear for me, the duckbill is a much better look.
Attention Lurkers! I'd like some feedback about how well the rear hatch wiper/washer system works. Particularly how it does in snow.
I'd also really like a sport (duckbill) rear spoiler.
The OEM "turbo" spoiler ruins the lines of the car's rear for me, the duckbill is a much better look.
Duckbill's nice, I just picked up a CF one, too bad I have no ETA on when I can actually drive the ****** again.
09-05-12, 08:15 PM
#104
We occasionally get very fast, high volumn snow storms and I've been stuck in traffic with the hatch totally obscured in the space of seconds.
Heat isn't the big issue, physically pushing off the snow is.
Then again, this is a once in a blue moon situation, so it's just under consideration now.
The harness is about 85% finalized/loomed.
So far it's hitting all the hard mount points, laying in nicely.
The part that's undone has been giving me some pause (that's why I left it for last).
It's the part where the harness first hits the framerail and the branch for the starter/alternator splits off.
I have no problem with the starter section but think the excessive length of the alternator wires is absurd.
I'm going to do something but don't know what as yet.
While I cogitate, the final install of the completed front harness can commence.
The lights, horns and retractors will be appropriately cleaned/greased and once plugged in, will be considered "good" and final installed.
This includes anti-seizing the hardware and dialectric grease on the new bulbs, so it's a bit tedious but necessary.
The final piece of the harness project will be running the new battery cable through the firewall to the tie in stud.
With that cable in place, the bin structure can go back in.
Might look like something's really happening.
Maybe even something picture worthy.
09-06-12, 12:28 PM
#105
We occasionally get very fast, high volumn snow storms and I've been stuck in traffic with the hatch totally obscured in the space of seconds.
Heat isn't the big issue, physically pushing off the snow is.
Then again, this is a once in a blue moon situation, so it's just under consideration now.
The harness is about 85% finalized/loomed.
So far it's hitting all the hard mount points, laying in nicely.
The part that's undone has been giving me some pause (that's why I left it for last).
It's the part where the harness first hits the framerail and the branch for the starter/alternator splits off.
I have no problem with the starter section but think the excessive length of the alternator wires is absurd.
I'm going to do something but don't know what as yet.
While I cogitate, the final install of the completed front harness can commence.
The lights, horns and retractors will be appropriately cleaned/greased and once plugged in, will be considered "good" and final installed.
This includes anti-seizing the hardware and dialectric grease on the new bulbs, so it's a bit tedious but necessary.
The final piece of the harness project will be running the new battery cable through the firewall to the tie in stud.
With that cable in place, the bin structure can go back in.
Might look like something's really happening.
Maybe even something picture worthy.
Heat isn't the big issue, physically pushing off the snow is.
Then again, this is a once in a blue moon situation, so it's just under consideration now.
The harness is about 85% finalized/loomed.
So far it's hitting all the hard mount points, laying in nicely.
The part that's undone has been giving me some pause (that's why I left it for last).
It's the part where the harness first hits the framerail and the branch for the starter/alternator splits off.
I have no problem with the starter section but think the excessive length of the alternator wires is absurd.
I'm going to do something but don't know what as yet.
While I cogitate, the final install of the completed front harness can commence.
The lights, horns and retractors will be appropriately cleaned/greased and once plugged in, will be considered "good" and final installed.
This includes anti-seizing the hardware and dialectric grease on the new bulbs, so it's a bit tedious but necessary.
The final piece of the harness project will be running the new battery cable through the firewall to the tie in stud.
With that cable in place, the bin structure can go back in.
Might look like something's really happening.
Maybe even something picture worthy.
 lol. This build just makes my stomach tingly. Just about everything you're doing interior wise is exactly what I'm doing soon. Love it! >.<
09-06-12, 04:34 PM
lol. This build just makes my stomach tingly. Just about everything you're doing interior wise is exactly what I'm doing soon. Love it! >.<
09-06-12, 04:34 PM
#106
It started here, passenger side of the radiator support:
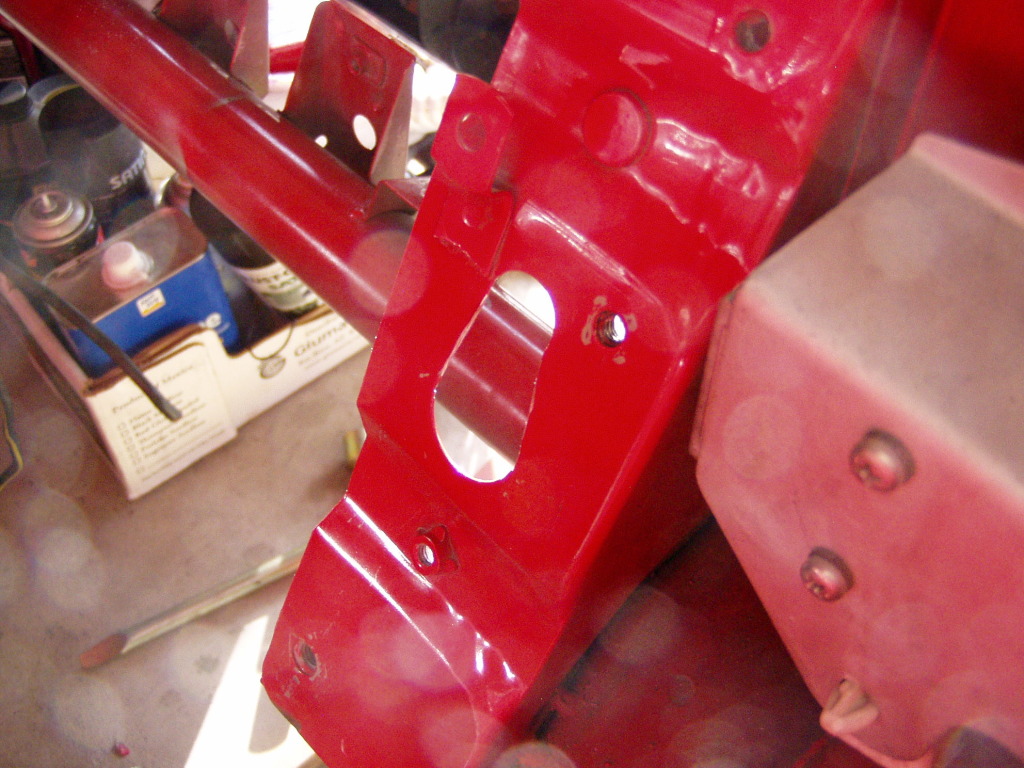
Originally there were two discrete holes, I've cut out the bridge between them and filed the edges straight/smooth.
For more perspective:
The hole(s) needed to be enbiggered for the connectors to pass through...this was the choke point for my whole concept, so here's where I began.
A little extra filing and the worst connector (hint: it's the round retractor connector, if it passes through, so will everything else) made the transition.
There were several goals overall, they were mixed/matched as applicable for the various sections of the harness.
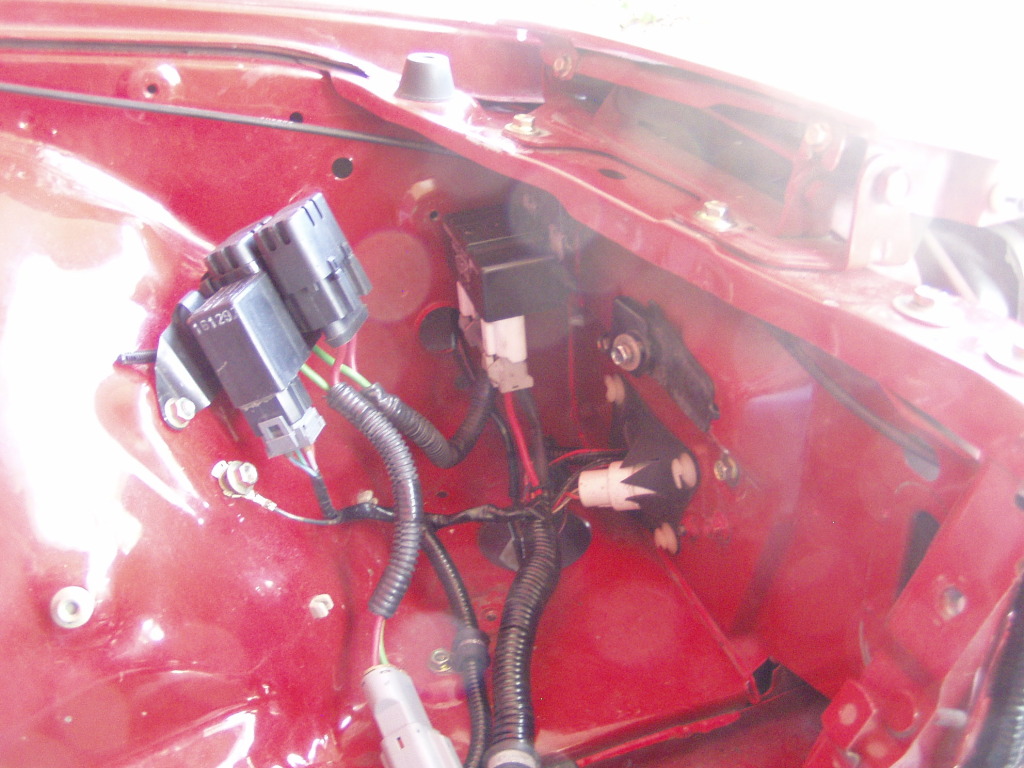
Behind the two headlights needed to be tightly controlled because of the multiple connections made at one point...potentially very messy.
The harness should be, near as possible, invisible as it crosses the front of the car.
Mazda seemed to have gone out of their way to dangle the harness as near to harm's way as they could, like they were daring fate.
The run from the firewall to the headlight, up the driver side frame rail, was a particular concern.I have a lot going on down this run and need to keep the various things apart.
The big dog is the main power cable from the rear mounted battery.
It comes through the firewall with the the main cable run and then runs down the rail till nearly the headlight.
The reason for the extra length is that for some reason there's an unused set of capture nuts that perfectly match the isolated stud I use, the fact that they're further down the rail than necessary is overshadowed by the painless install.
So, that section can get crowded.
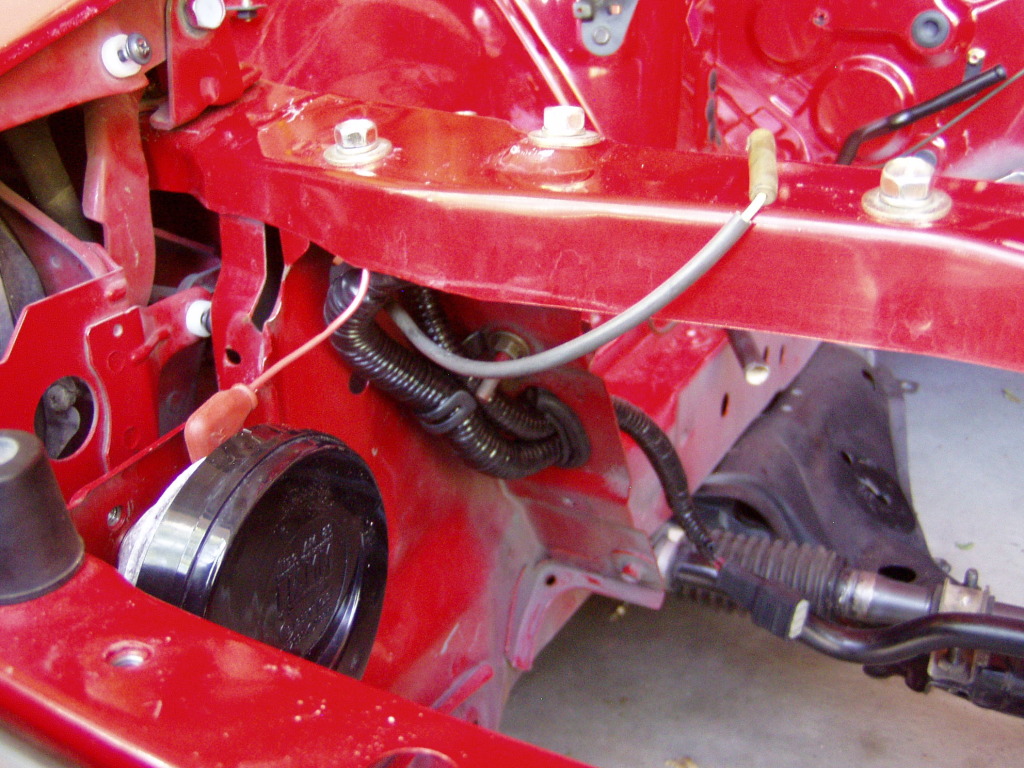
I reinstalled the stock bracket way back on the rail that guides the starter/alt harness towards the engine and had a minor eureka! moment.
That little bracket not only guides the harness but it also elevates it off the rail by about an inch.
Why not elevate it all the way down?
If the harness touches nothing, it can't chafe and short out.
It can't lay in water, oil, mud, etc., so barrier penetration is minimized.
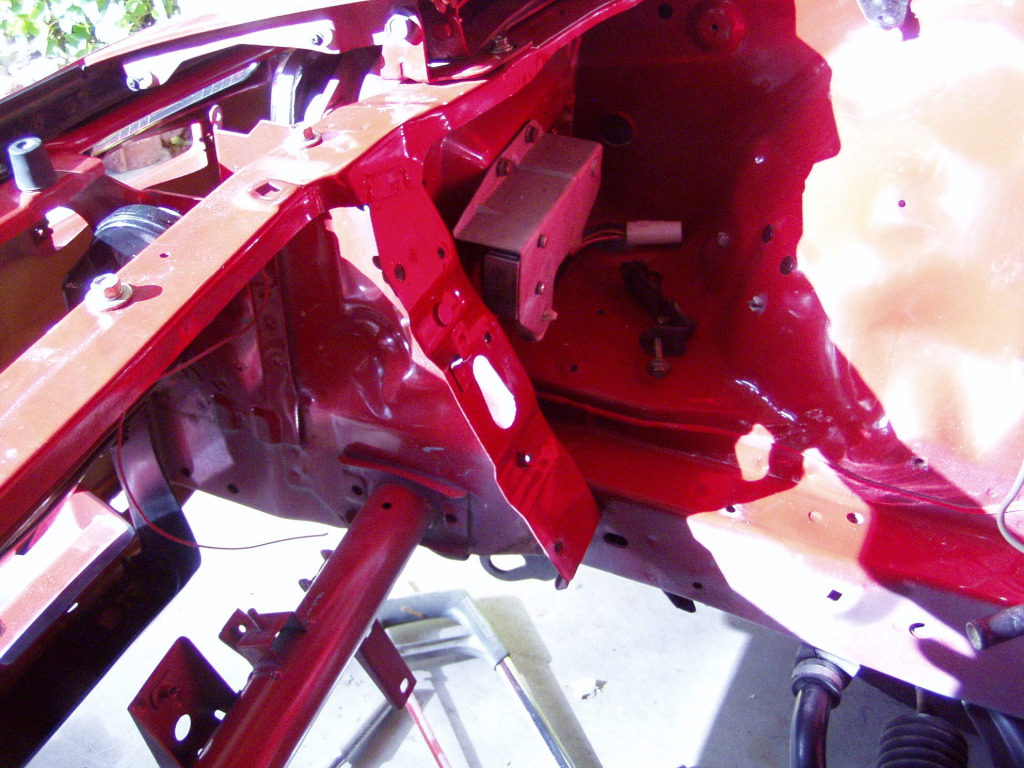
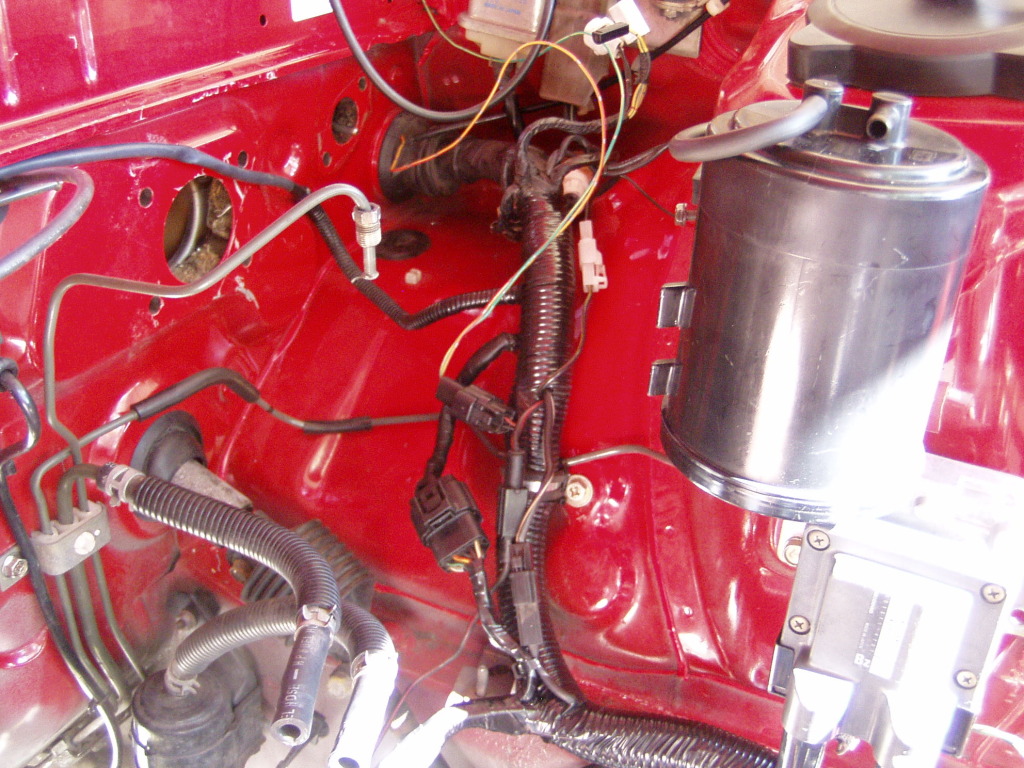
From various angles, it looks like so:
The passenger headlight area ends up like this:
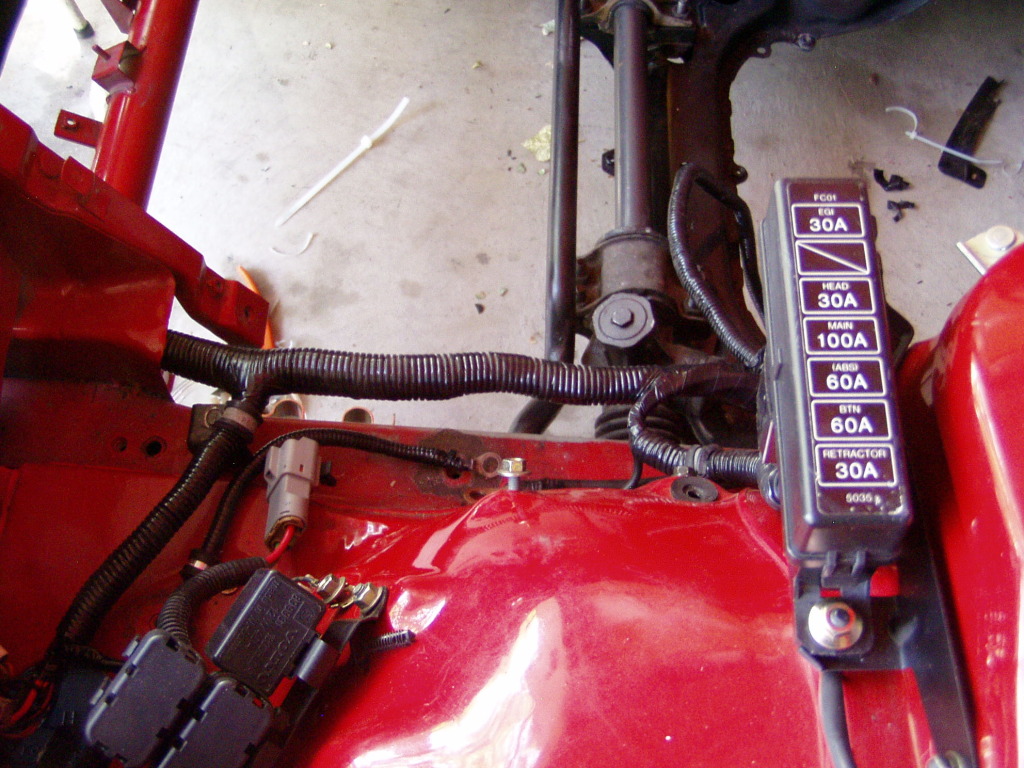
The last pic shows the harness as it descends from it's run across the underside of the top rad/hood latch support. Also visible is the r/h horn and the connection for the LOW COOLANT warning.
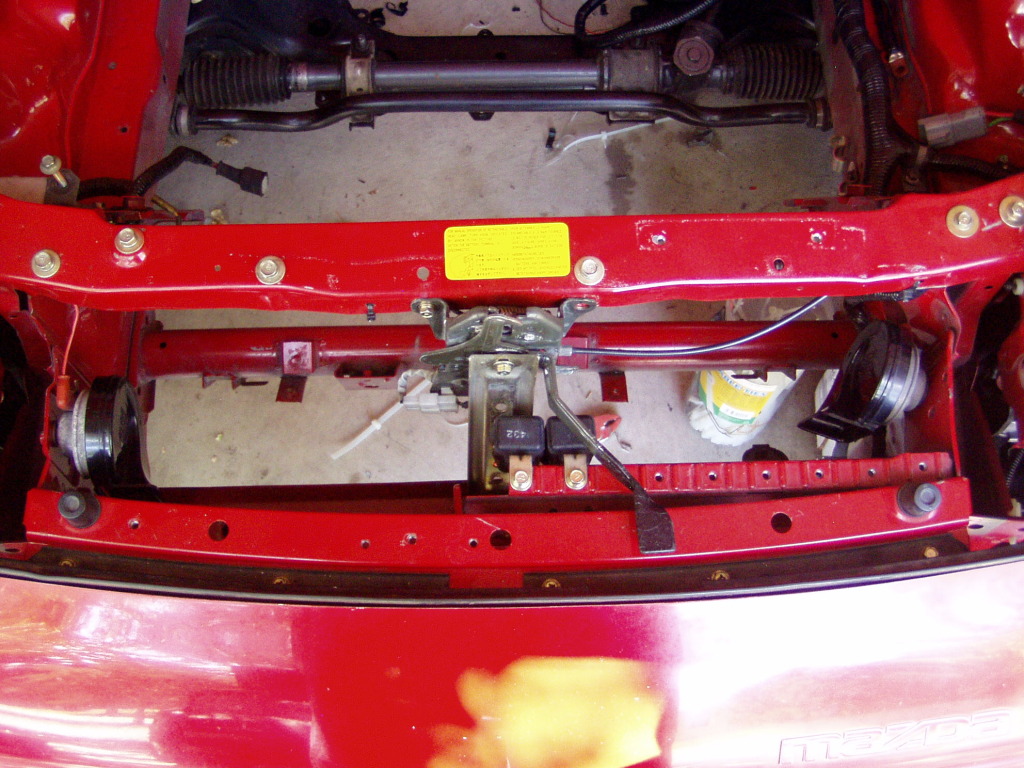
From the top, looking into the nose cavity:
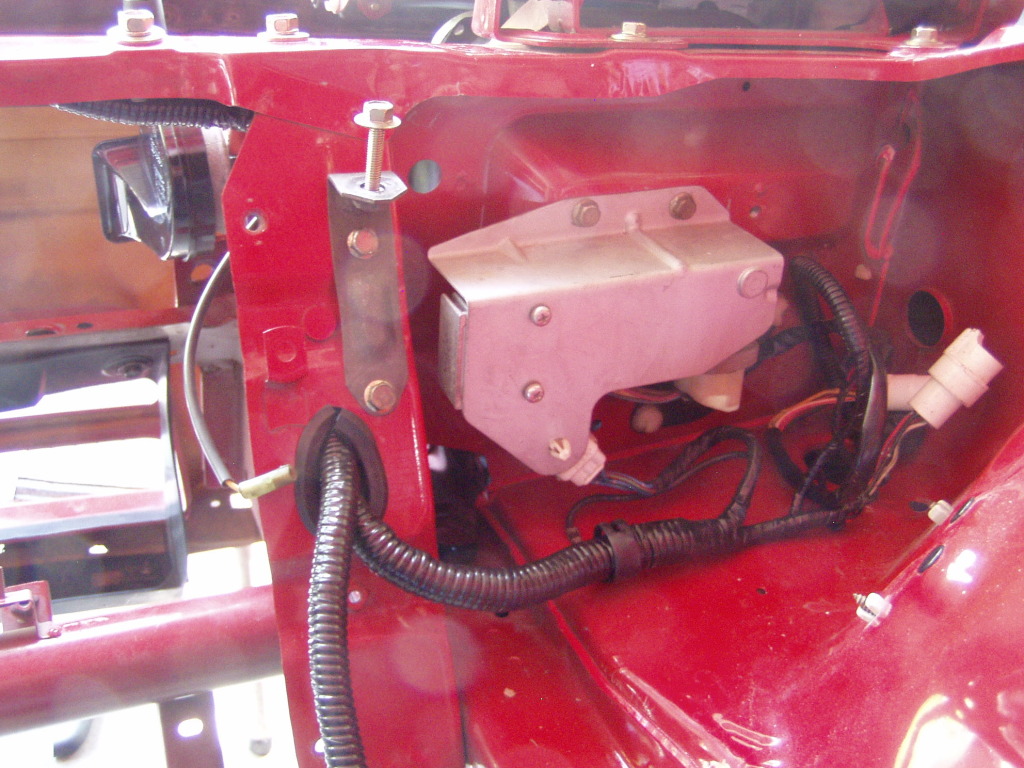
The driver side headlight area also houses the efan wiring now:
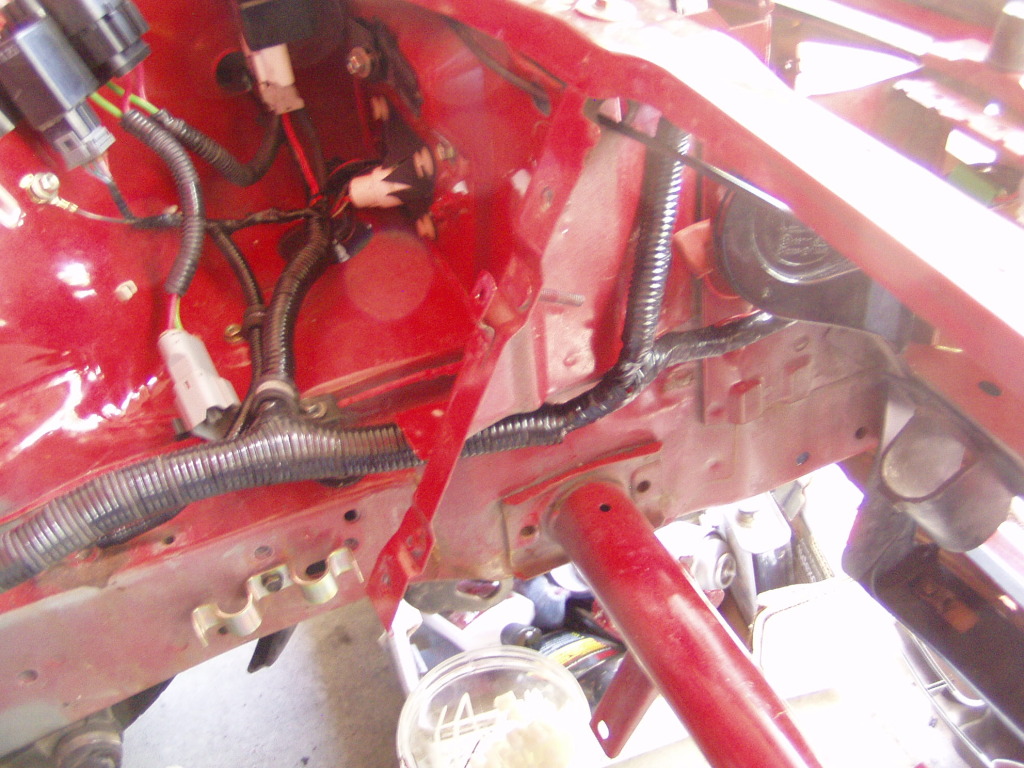
The alternator wiring has been separated from the starter harness and exits the harness directly across from the alternator as it sits on the engine. It will just run over then up.
The starter harness -basically just the +12v battery, ground (to the strut tower) and the solenoid trigger- is separate from the little stuff (sensors on the engine and trans).
Those last two can't be loomed till the engine is in place but should be easy.
And here's what's left:
Too bad I'm nearly out of tape.
Originally there were two discrete holes, I've cut out the bridge between them and filed the edges straight/smooth.
For more perspective:
The hole(s) needed to be enbiggered for the connectors to pass through...this was the choke point for my whole concept, so here's where I began.
A little extra filing and the worst connector (hint: it's the round retractor connector, if it passes through, so will everything else) made the transition.
There were several goals overall, they were mixed/matched as applicable for the various sections of the harness.
Behind the two headlights needed to be tightly controlled because of the multiple connections made at one point...potentially very messy.
The harness should be, near as possible, invisible as it crosses the front of the car.
Mazda seemed to have gone out of their way to dangle the harness as near to harm's way as they could, like they were daring fate.
The run from the firewall to the headlight, up the driver side frame rail, was a particular concern.I have a lot going on down this run and need to keep the various things apart.
The big dog is the main power cable from the rear mounted battery.
It comes through the firewall with the the main cable run and then runs down the rail till nearly the headlight.
The reason for the extra length is that for some reason there's an unused set of capture nuts that perfectly match the isolated stud I use, the fact that they're further down the rail than necessary is overshadowed by the painless install.
So, that section can get crowded.
I reinstalled the stock bracket way back on the rail that guides the starter/alt harness towards the engine and had a minor eureka! moment.
That little bracket not only guides the harness but it also elevates it off the rail by about an inch.
Why not elevate it all the way down?
If the harness touches nothing, it can't chafe and short out.
It can't lay in water, oil, mud, etc., so barrier penetration is minimized.
From various angles, it looks like so:
The passenger headlight area ends up like this:
The last pic shows the harness as it descends from it's run across the underside of the top rad/hood latch support. Also visible is the r/h horn and the connection for the LOW COOLANT warning.
From the top, looking into the nose cavity:
The driver side headlight area also houses the efan wiring now:
The alternator wiring has been separated from the starter harness and exits the harness directly across from the alternator as it sits on the engine. It will just run over then up.
The starter harness -basically just the +12v battery, ground (to the strut tower) and the solenoid trigger- is separate from the little stuff (sensors on the engine and trans).
Those last two can't be loomed till the engine is in place but should be easy.
And here's what's left:
Too bad I'm nearly out of tape.
09-06-12, 10:35 PM
#108
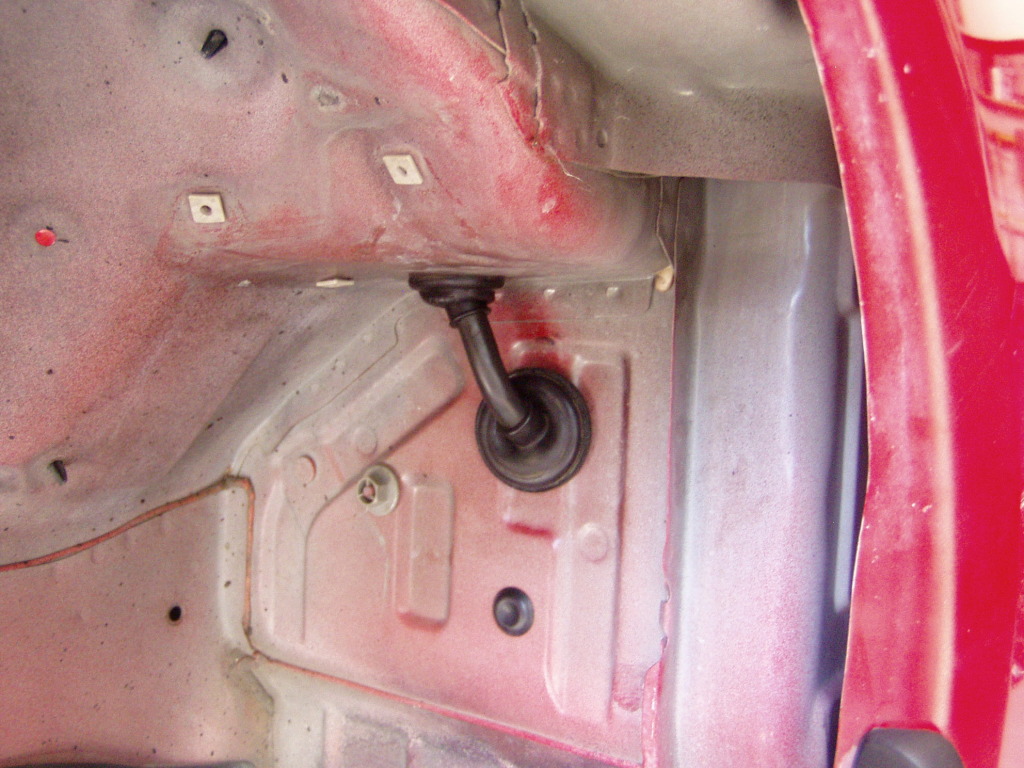
I only recall one grommeted hole.
The grommet had to be cut because it wasn't possible to get all the connectors through while it was intact.
The "gap/seam" in the grommet was placed at the top because the harness is pushing down at that transition, possible chafing would happen at the lower edge.
I'm always on the lookout for that sort of finish trim at the junkyard, so a better part may turn up eventually.
09-06-12, 10:51 PM
#109
Red Pill Dealer
iTrader: (10)

I have a hatch glass and wiper assembly from a '91 TII if you're interested. The hatch itself was rather rusty so I just removed the glass. The defrost wires are perfect. Wiper needs paint.
09-07-12, 09:27 AM
#110
Thanks for the offer but a hatch is something I'll source locally or do without.
I don't want to fully commit without a chance to look at it for a while and anyways, shipping would be absurd.
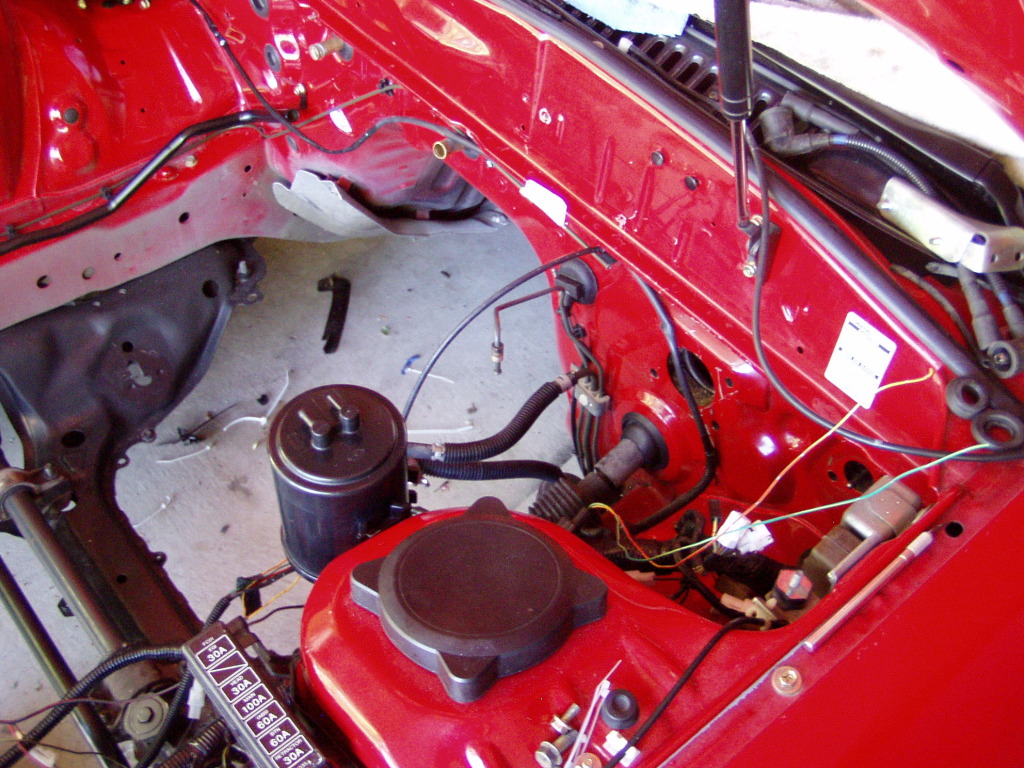
Today I want to finish the engine bay harness work.
There are two side projects (one exploratory) that need to happen first.
The "real" project is to finalize and install the washer reservoir/pump so it's wiring can be wrapped.
Remember, this stupid little item was the primary reason the whole harness was deloomed, so you can be damn sure it's the one thing I'm going to complete (although, on a side note, I did finally match the LOW BRAKE fluid warning connector and it will be functional for the first time ever).
The "exploratory" project is to take a final look at the firewall grommet area and see if there isn't a better, easier way to bring the main power cable through the firewall.
On the '91, I weaseled it through the grommet with everything else (without shredding the grommet!) but that seems a less than ideal solution.
Since the dash is out, access will never be better and I'm hoping to find a spot that a nice 3/4" hole might fit nicely.
And I still need to get some tape.
About the tape...
I've been using 3M Super 33+ which a lot of stores sell as their premium brand (probably hoping it's high price will drive folks to the much cheaper "house" brand tape nearby).
It runs about $7 a roll and is well worth the money.
Real electrical nerds probably have even better materials to work with, but the 33+ is an excellent "shadetree" techs choice. It's stretchy with good adhesion and not as stiff as the cheaper alternatives.
I had to go back and redo a small section of the efan wiring (so far, the only adjustment I've had to make) and removing the 3M tape was reminiscent of stripping the original harness, it didn't particularly want to come off.
While stripping the original looming, I paid attention to the process the OEM maker used and tried to mimic it during my work.
I also used small zip ties to reinforce the spot where branches join the main trunk, so it's not just tape reinforcing the juncture.
Although it's basically just a stock harness somewhat cleaned up, this is my most successful looming job so far. It would be nice to have stealthed it but that's for phase two, so this was only an inspection and optimization project.
Besides, once the rest of the bay gets assembled, most of the ugly spots are hidden anyway.
I don't want to fully commit without a chance to look at it for a while and anyways, shipping would be absurd.
Today I want to finish the engine bay harness work.
There are two side projects (one exploratory) that need to happen first.
The "real" project is to finalize and install the washer reservoir/pump so it's wiring can be wrapped.
Remember, this stupid little item was the primary reason the whole harness was deloomed, so you can be damn sure it's the one thing I'm going to complete (although, on a side note, I did finally match the LOW BRAKE fluid warning connector and it will be functional for the first time ever).
The "exploratory" project is to take a final look at the firewall grommet area and see if there isn't a better, easier way to bring the main power cable through the firewall.
On the '91, I weaseled it through the grommet with everything else (without shredding the grommet!) but that seems a less than ideal solution.
Since the dash is out, access will never be better and I'm hoping to find a spot that a nice 3/4" hole might fit nicely.
And I still need to get some tape.
About the tape...
I've been using 3M Super 33+ which a lot of stores sell as their premium brand (probably hoping it's high price will drive folks to the much cheaper "house" brand tape nearby).
It runs about $7 a roll and is well worth the money.
Real electrical nerds probably have even better materials to work with, but the 33+ is an excellent "shadetree" techs choice. It's stretchy with good adhesion and not as stiff as the cheaper alternatives.
I had to go back and redo a small section of the efan wiring (so far, the only adjustment I've had to make) and removing the 3M tape was reminiscent of stripping the original harness, it didn't particularly want to come off.
While stripping the original looming, I paid attention to the process the OEM maker used and tried to mimic it during my work.
I also used small zip ties to reinforce the spot where branches join the main trunk, so it's not just tape reinforcing the juncture.
Although it's basically just a stock harness somewhat cleaned up, this is my most successful looming job so far. It would be nice to have stealthed it but that's for phase two, so this was only an inspection and optimization project.
Besides, once the rest of the bay gets assembled, most of the ugly spots are hidden anyway.
09-07-12, 07:24 PM
#112
It's good you have no winter problems, yet I have.
Still just thinking about the wipered hatch though, it's not a priority.
What was the main goal was harness completion and for the most part, it is.
Finally.
Only the starter and sensor branch is left and that's better done with the engine in place, so for now, it sits.
Two (hopefully) small projects had to be completed first...the washer reservoir had to be in place and if the main power cable wasn't coming through the big firewall grommet, the alternative had to be found.
I'd been secretly dreading this but it was much easier than I'd feared.
The perfect confluence of the right tools, the right access and the right grommets- and a well placed stock hole- made the job easy.
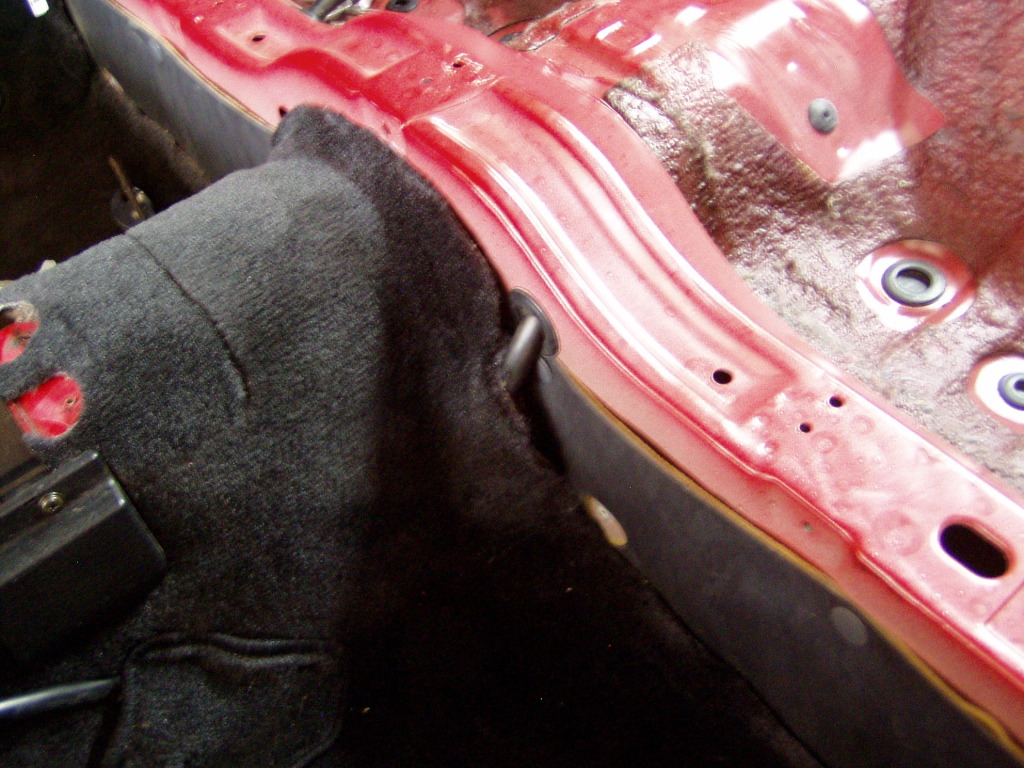
Looking directly below the clutch MC, there is an ovoid hole stamped in the "floor" of the wheelwell.
Just a few inches below this hole is a relatively easily accessible spot to place a 1" hole, into the driver footwell, just next to the fusebox.
I made sure I had good grommets for the holes and here we go:

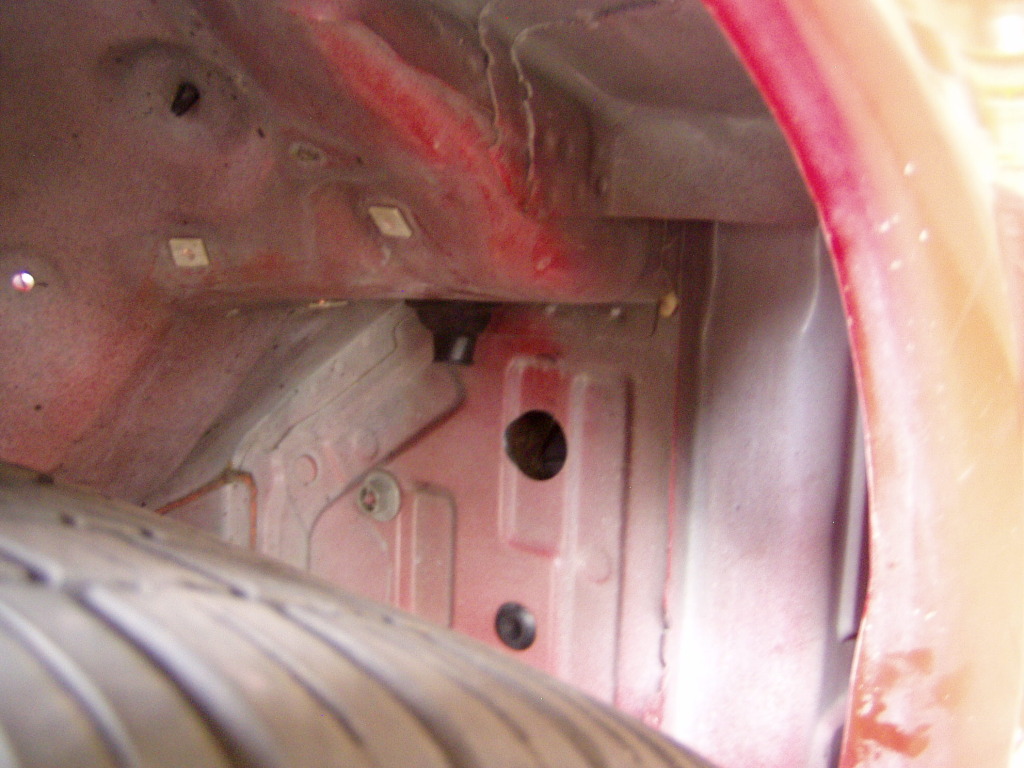
Should work well and completely separates the power cable from the rest of the harness.
Next was the reservoir:
I knew this was going to be the favorite and only required drilling two holes, one of which fell "behind" the fender liner, just installed a few days ago. Had to jack up the car, pull the wheel and undo the whole rear half of the liner...just to get to one bolt.
Today was mostly cloudy and cool(er), I figured that it was a perfect time to clean the inside of the wheels, long as it was off (and the driver side could be).
So I diverted for an hour and did this (but only to the fronts, so far):
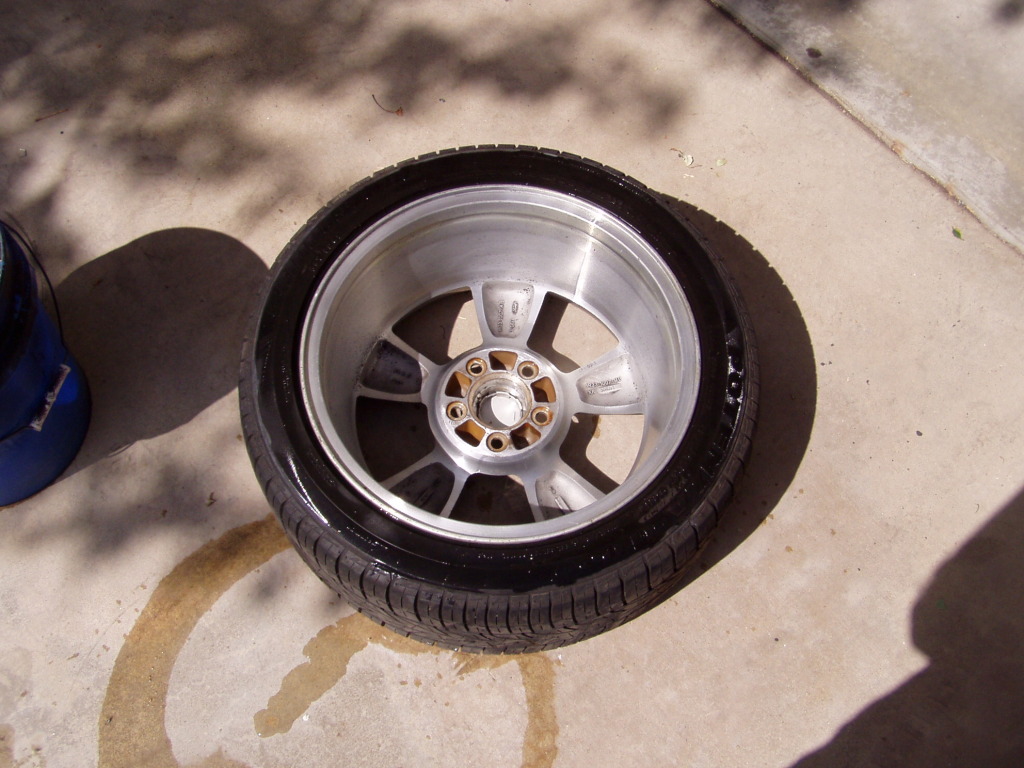
If nothing else, this car will be pretty clean.
Just in time for some winter driving.
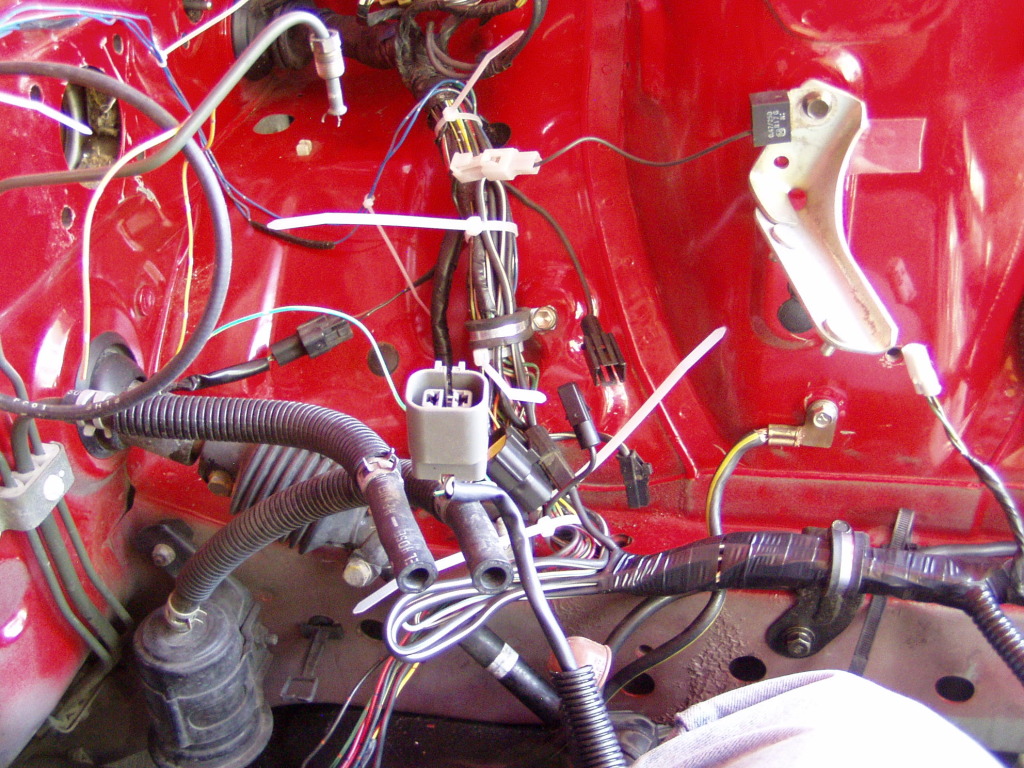
That sidetrack complete, the final push on the harness began.
I went and got more tape because I knew it was gonna be close and I still have a bit more wiring/looming to do in the interior.
As it happened, the old roll finished the job with about 2" to spare.
Close, indeed.
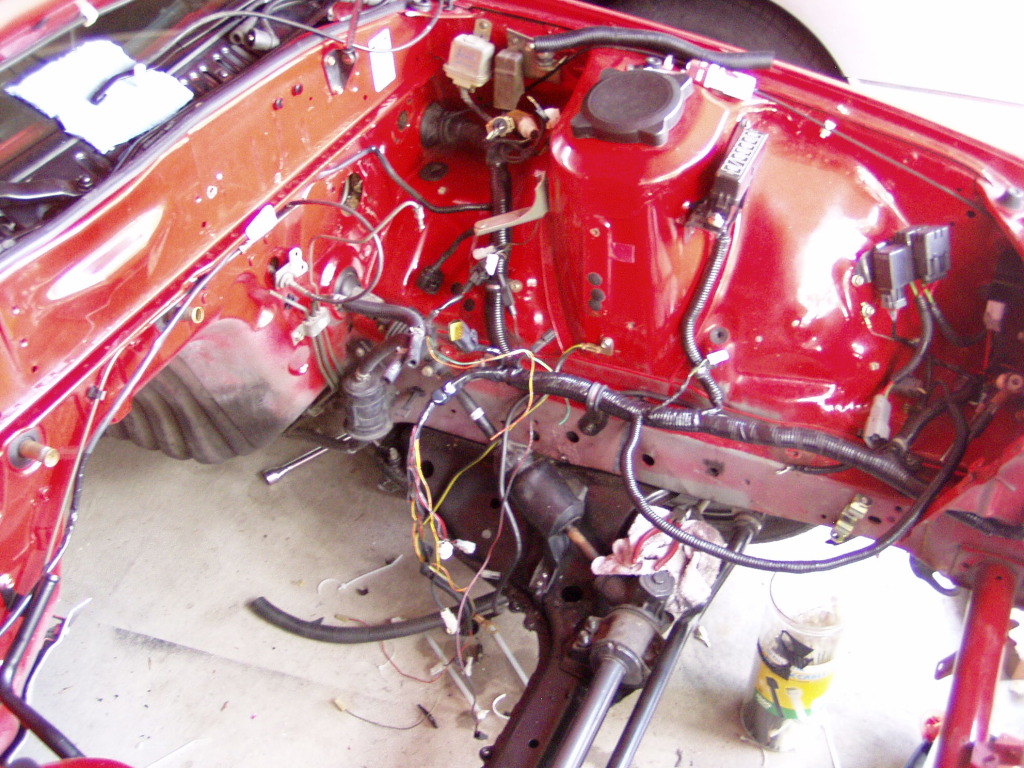
Although it still looks kind of chaotic, the harness is substantially finished and final hookups are possible as sequence permits.
That corner of the driver side firewall is quite crowded, the electrical is only the first layer.
I'm considering relocating the brake proportioning valve and a few other things need to be tweaked before more assembly in that area can continue.
Still just thinking about the wipered hatch though, it's not a priority.
What was the main goal was harness completion and for the most part, it is.
Finally.
Only the starter and sensor branch is left and that's better done with the engine in place, so for now, it sits.
Two (hopefully) small projects had to be completed first...the washer reservoir had to be in place and if the main power cable wasn't coming through the big firewall grommet, the alternative had to be found.
I'd been secretly dreading this but it was much easier than I'd feared.
The perfect confluence of the right tools, the right access and the right grommets- and a well placed stock hole- made the job easy.
Looking directly below the clutch MC, there is an ovoid hole stamped in the "floor" of the wheelwell.
Just a few inches below this hole is a relatively easily accessible spot to place a 1" hole, into the driver footwell, just next to the fusebox.
I made sure I had good grommets for the holes and here we go:
Should work well and completely separates the power cable from the rest of the harness.
Next was the reservoir:
I knew this was going to be the favorite and only required drilling two holes, one of which fell "behind" the fender liner, just installed a few days ago. Had to jack up the car, pull the wheel and undo the whole rear half of the liner...just to get to one bolt.
Today was mostly cloudy and cool(er), I figured that it was a perfect time to clean the inside of the wheels, long as it was off (and the driver side could be).
So I diverted for an hour and did this (but only to the fronts, so far):
If nothing else, this car will be pretty clean.
Just in time for some winter driving.
That sidetrack complete, the final push on the harness began.
I went and got more tape because I knew it was gonna be close and I still have a bit more wiring/looming to do in the interior.
As it happened, the old roll finished the job with about 2" to spare.
Close, indeed.
Although it still looks kind of chaotic, the harness is substantially finished and final hookups are possible as sequence permits.
That corner of the driver side firewall is quite crowded, the electrical is only the first layer.
I'm considering relocating the brake proportioning valve and a few other things need to be tweaked before more assembly in that area can continue.
09-08-12, 07:26 PM
#113
Today I kinda lost focus and chased unicorns all over the place.
Sometimes this leads to unexpected solutions, today it wasted several hours.
Practically nothing I tried made the cut.
Did knock off several little jobs off the list while I frittered away the day, the washer pump is installed on the reservoir and the hood nozzles are installed.
The sprayers may seem like a little thing- and I guess they really are- but I had a problem that the stock sprayers didn't fix, so I went junkyarding a few days ago and these were among the haul.
Whoever painted my aluminum hood messed up around the nozzle holes and there was a 1/2" round depression in the paint, looked like a washer should be there but wasn't.
I needed bigger than stock sprayers to cover this flaw and found a pair of headlight nozzles on a 280ZX that looked promising. Had to open up the holes in the hood a bit but install was painless and they completely cover the weirdness in the paint.
So that's good.
The VSS signal harness (think of it as an electronic speedo cable) was harvested from the old car and fit to the GTU.
That's good, too.
The bulk of my wasted day went into a bracket that I thought would solve a problem that turned out to be irrelevant.
I had somehow started with the preconception that a bracket would be necessary and only realized much later that simpler was more elegant and I could do entirely without.
I sometimes lose sight of the things yet to be installed (a lot!) and how they affect the finished look of the bay.
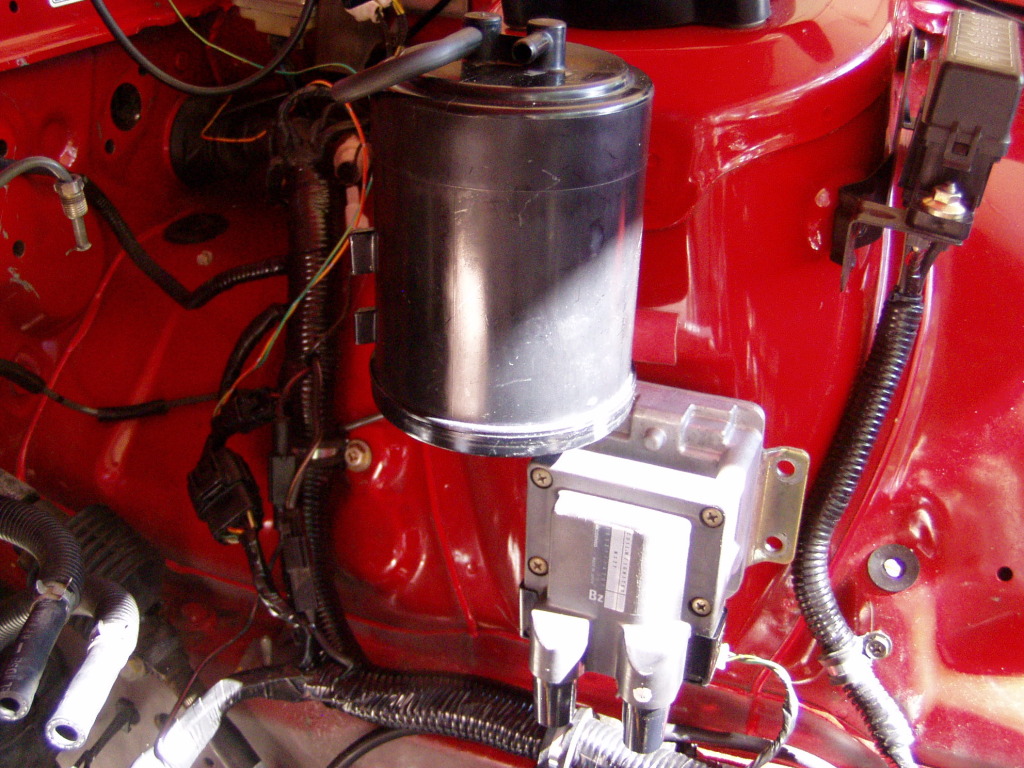
So here's where I think the evap cannister might go now:
I was not aware that the cannister has two sets of mount "wedges" but the can will rotate 90� if that puts the hose connections in a more favorable position (using the second mount wedge also raises the can about an inch or so in the bracket, I like the lower position better so far).
Also visible is the VSS harness but it's not very exciting.
Sorry, but most of this **** is pretty boring, I hope it gets better soon.
Sometimes this leads to unexpected solutions, today it wasted several hours.
Practically nothing I tried made the cut.
Did knock off several little jobs off the list while I frittered away the day, the washer pump is installed on the reservoir and the hood nozzles are installed.
The sprayers may seem like a little thing- and I guess they really are- but I had a problem that the stock sprayers didn't fix, so I went junkyarding a few days ago and these were among the haul.
Whoever painted my aluminum hood messed up around the nozzle holes and there was a 1/2" round depression in the paint, looked like a washer should be there but wasn't.
I needed bigger than stock sprayers to cover this flaw and found a pair of headlight nozzles on a 280ZX that looked promising. Had to open up the holes in the hood a bit but install was painless and they completely cover the weirdness in the paint.
So that's good.
The VSS signal harness (think of it as an electronic speedo cable) was harvested from the old car and fit to the GTU.
That's good, too.
The bulk of my wasted day went into a bracket that I thought would solve a problem that turned out to be irrelevant.
I had somehow started with the preconception that a bracket would be necessary and only realized much later that simpler was more elegant and I could do entirely without.
I sometimes lose sight of the things yet to be installed (a lot!) and how they affect the finished look of the bay.
So here's where I think the evap cannister might go now:
I was not aware that the cannister has two sets of mount "wedges" but the can will rotate 90� if that puts the hose connections in a more favorable position (using the second mount wedge also raises the can about an inch or so in the bracket, I like the lower position better so far).
Also visible is the VSS harness but it's not very exciting.
Sorry, but most of this **** is pretty boring, I hope it gets better soon.
09-09-12, 06:07 PM
#114
Today started with an error but correcting that mistake lead to a superior outcome.
I discovered that the pigtail for the leading coil was about an inch too short.
I was even thinking about it as I decided on the length several days ago and made it too short anyway. One day I may learn from these fuckups.
If I undid the connector on the coil- which is pinned to the bracket- the connection was fine, but the dangling connector really irked me.
I may have cried.
I realized though that moving the coil mount to the other side of the bracket not only solved that problem but also freed up a lot of space and made life much simpler all around.
The only reason it was where it was is because that's how I did it the first time I tried the mod and I'd never changed it since.
Mindset/preconceptions...they can be terrible things.
Overwhelmed by the new possibilities, I decided to make the executive decision and consider the new evap can location as final and really begin it's install.
Not much I can do about the input from the engine yet but the outflow back to the fuel tank is complete.
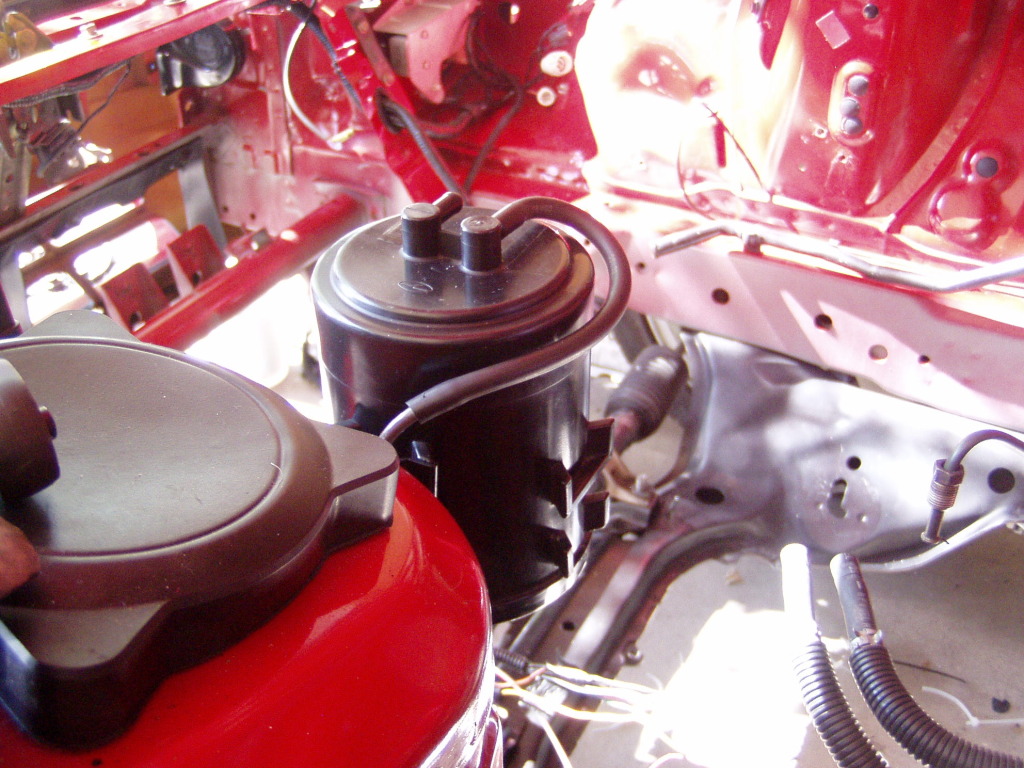
I used the stock metal tube, extensively tweaked and shortened to make the run from the can to the firewall (where it meets the newly bent tube that runs under the car).
It seemed logical and was easy to do.
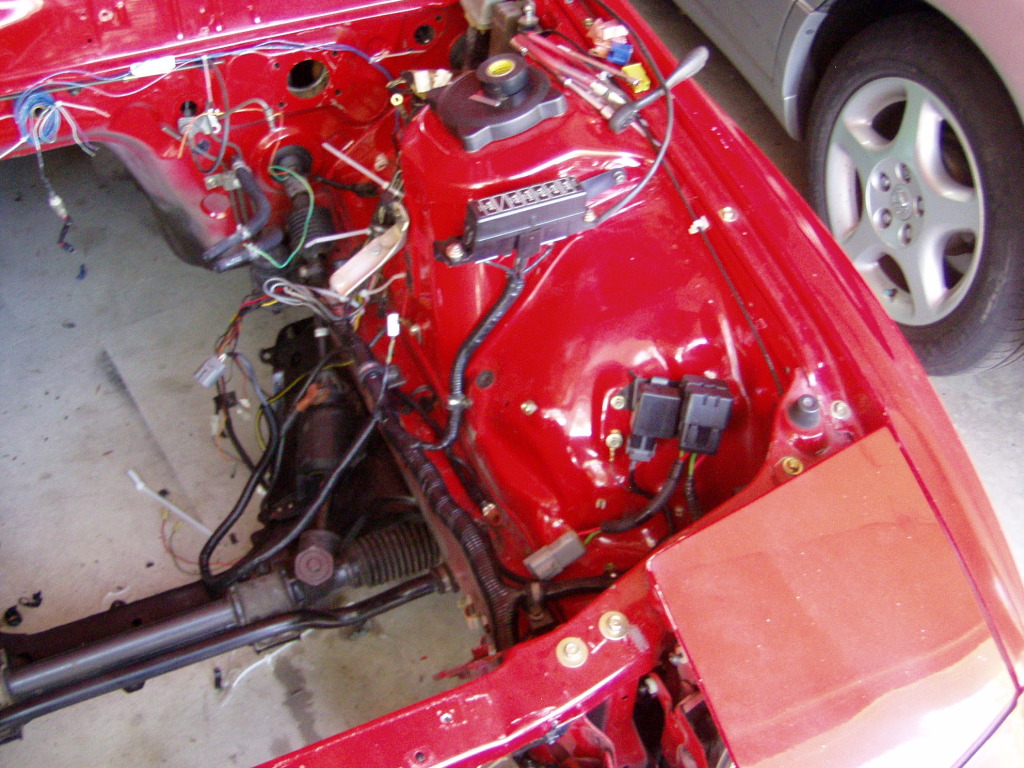
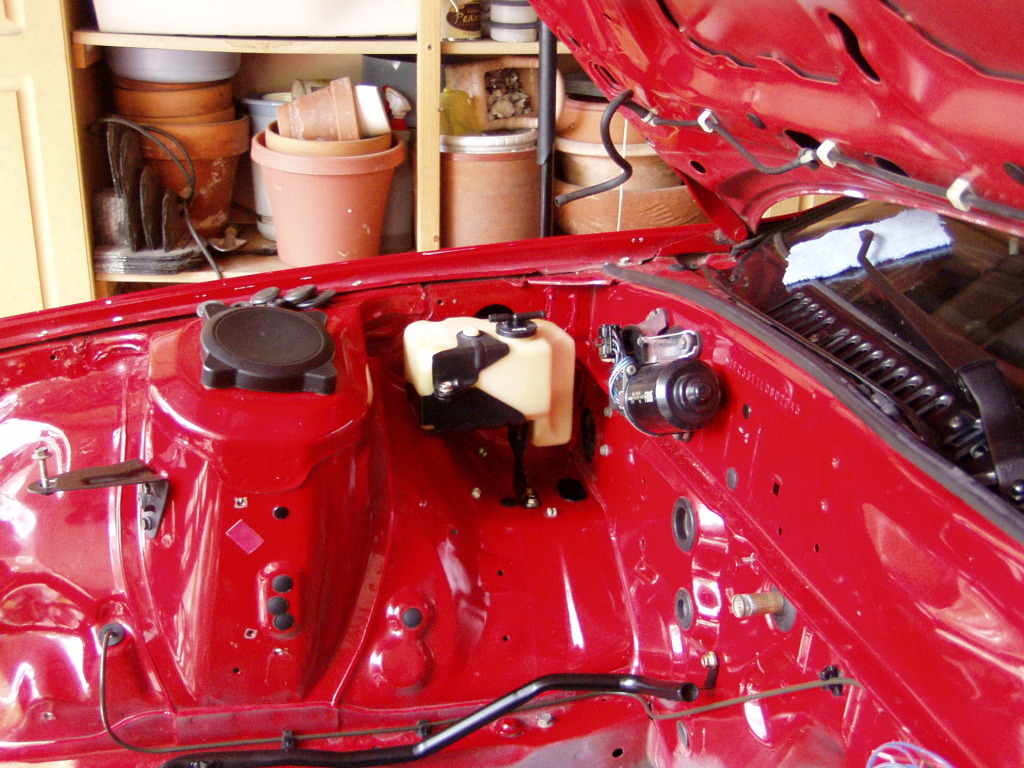
This shot shows a significant milestone:
The fact that the headlight cover trim is on means that all the front end is connected and installed. Lights, horns, fuel pump relay and efan...finished, bolted down, greased, etc.
I am really pleased, everything fit like I'd planned and is easily serviced/removed.
The radiator and airbox are only temporarily mounted but I needed to measure for the efan connection and wanted to make sure the fan trigger harness was a good length.
It was.
I removed 24" from the harness that connects the fan to the relays, the new relay(s) location made everything shorter and simpler compared to my old arrangement.
There are four more wires to solder in the bay (2 each for the LOW brake fluid warning and the connector to the washer pump) and the chassis harness is finished.
Next up, I begin the brakes.
I discovered that the pigtail for the leading coil was about an inch too short.
I was even thinking about it as I decided on the length several days ago and made it too short anyway. One day I may learn from these fuckups.
If I undid the connector on the coil- which is pinned to the bracket- the connection was fine, but the dangling connector really irked me.
I may have cried.
I realized though that moving the coil mount to the other side of the bracket not only solved that problem but also freed up a lot of space and made life much simpler all around.
The only reason it was where it was is because that's how I did it the first time I tried the mod and I'd never changed it since.
Mindset/preconceptions...they can be terrible things.
Overwhelmed by the new possibilities, I decided to make the executive decision and consider the new evap can location as final and really begin it's install.
Not much I can do about the input from the engine yet but the outflow back to the fuel tank is complete.
I used the stock metal tube, extensively tweaked and shortened to make the run from the can to the firewall (where it meets the newly bent tube that runs under the car).
It seemed logical and was easy to do.
This shot shows a significant milestone:
The fact that the headlight cover trim is on means that all the front end is connected and installed. Lights, horns, fuel pump relay and efan...finished, bolted down, greased, etc.
I am really pleased, everything fit like I'd planned and is easily serviced/removed.
The radiator and airbox are only temporarily mounted but I needed to measure for the efan connection and wanted to make sure the fan trigger harness was a good length.
It was.
I removed 24" from the harness that connects the fan to the relays, the new relay(s) location made everything shorter and simpler compared to my old arrangement.
There are four more wires to solder in the bay (2 each for the LOW brake fluid warning and the connector to the washer pump) and the chassis harness is finished.
Next up, I begin the brakes.
09-09-12, 06:50 PM
#115
Rotary Enthusiast

Great work, but are you concerned about the orientation of the coil pack? Being upside down, is there a chance of the plug wires coming loose from vibration?
09-09-12, 08:29 PM
#117
Junior Member
Join Date: May 2012
Location: Atlanta, GA
Posts: 36
Likes: 0
Received 0 Likes
on
0 Posts
That looks really good, keep up the good work lol Can I ask you what radiator you got, the shroud on it and what efan you plan to pick up? I'm interested in doing the efan on my car as well. Thanks!
09-10-12, 04:03 PM
#119
Today's missions were simple and easy (because I felt like taking a break).
Finished soldering the four wires left, so the washer pump and LOW brake fluid warning are done and the bay harness is fully complete.
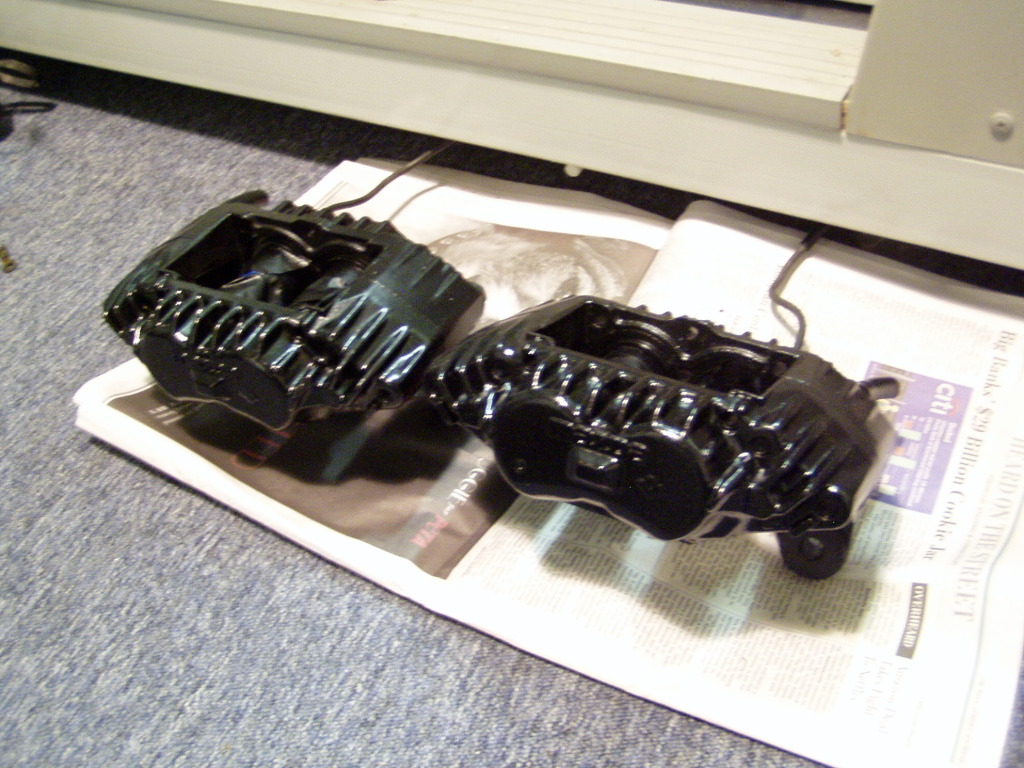
Today's weather is beautiful but by Wednesday we'll be rainy and in the 60's, so I decided that the brake calipers had to be done today.
Pulled the pads from the calipers on the '91, pumped the pedal a few times and all eight pistons fully extended, nearly ready to pop out.
Removed the calipers, cleaned them up and painted them satin black.
With the weather dependent work out of the way, I took a nap.
No pics of the calipers or the nap, sorry.
Finished soldering the four wires left, so the washer pump and LOW brake fluid warning are done and the bay harness is fully complete.
Today's weather is beautiful but by Wednesday we'll be rainy and in the 60's, so I decided that the brake calipers had to be done today.
Pulled the pads from the calipers on the '91, pumped the pedal a few times and all eight pistons fully extended, nearly ready to pop out.
Removed the calipers, cleaned them up and painted them satin black.
With the weather dependent work out of the way, I took a nap.
No pics of the calipers or the nap, sorry.
09-11-12, 04:55 PM
#120
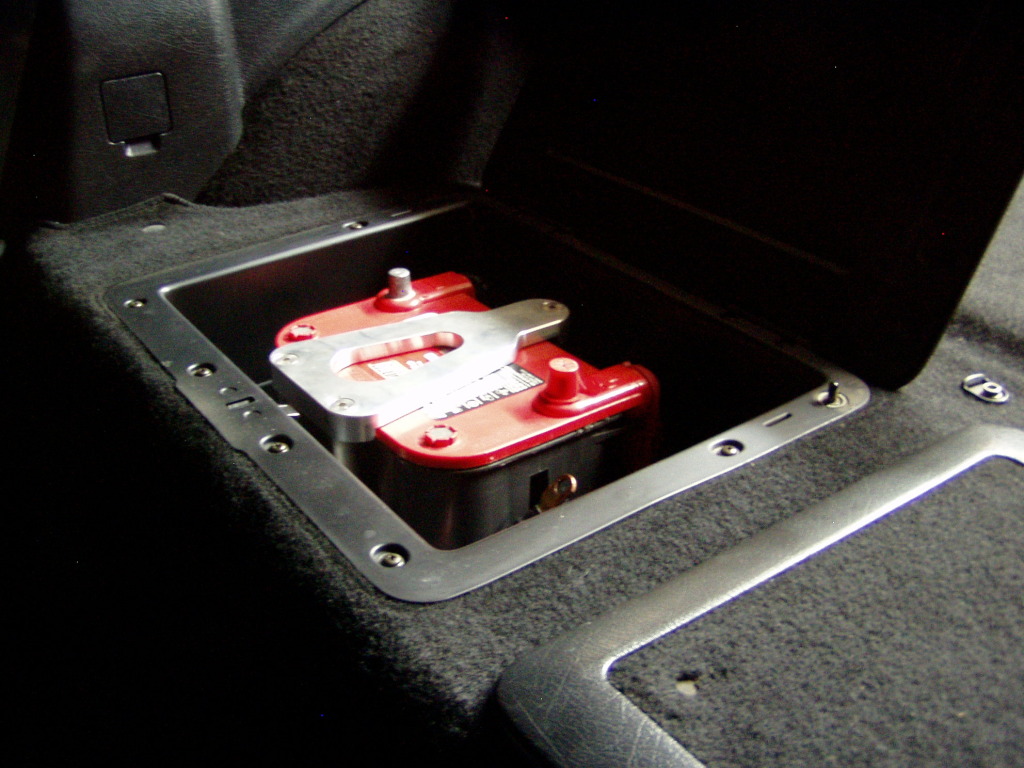
I finally did something pic-worthy (at least IMO) and installed the relocated battery setup.
It was holding up a lot of interior install and I was tired of putting it off.
Parts of the job would have really benefited from a second set of hands, so of course it took much longer than anticipated, but it's (almost) done and I'm glad.
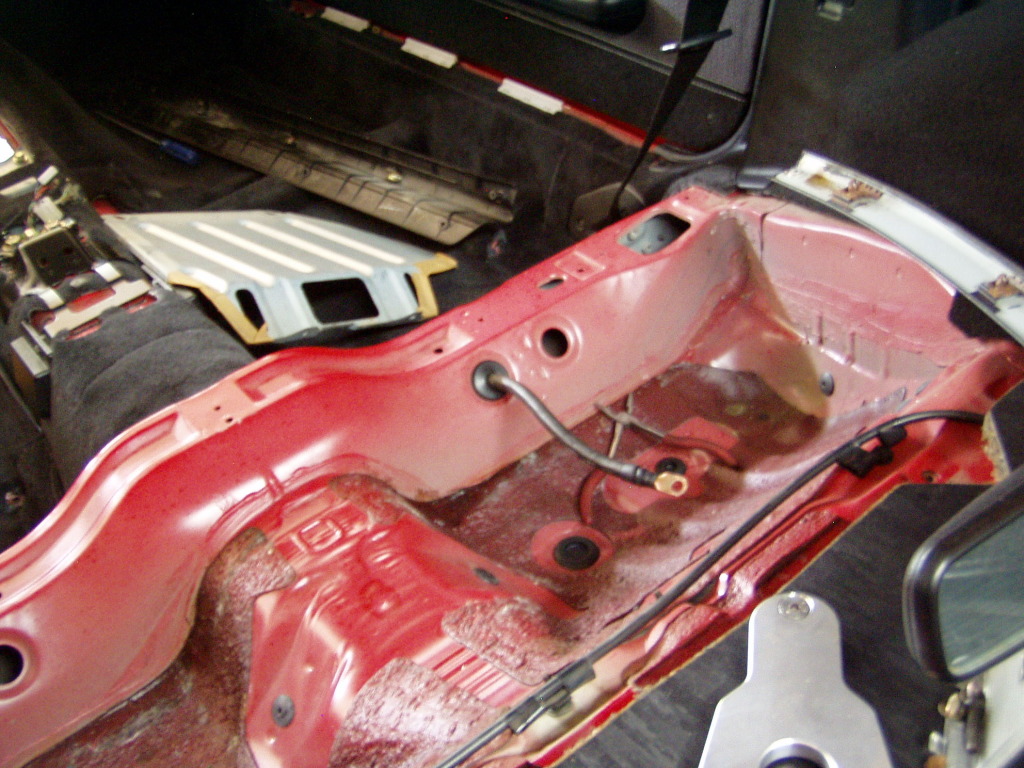
Started with the isolated terminal way up on the front framerail where the battery joins the rest of the chassis harness:
The cable then dives below the clutch master and into the driver's footwell:
No mods were required for the plastic fender liner, it fits perfectly.
The cable then follows the main interior harness down the side of the rocker behind the masonite divider and curls behind the seat to the trans tunnel where it goes into a preexisting hole (this may necessitate some minor trimmage of the bin structure, time will tell):
Through the support beam and out into the passenger bin area:
The battery sits in my custom battery holder (it's only "custom" because I machined it, it's a direct copy of a piece I saw in a hot rod catalog):
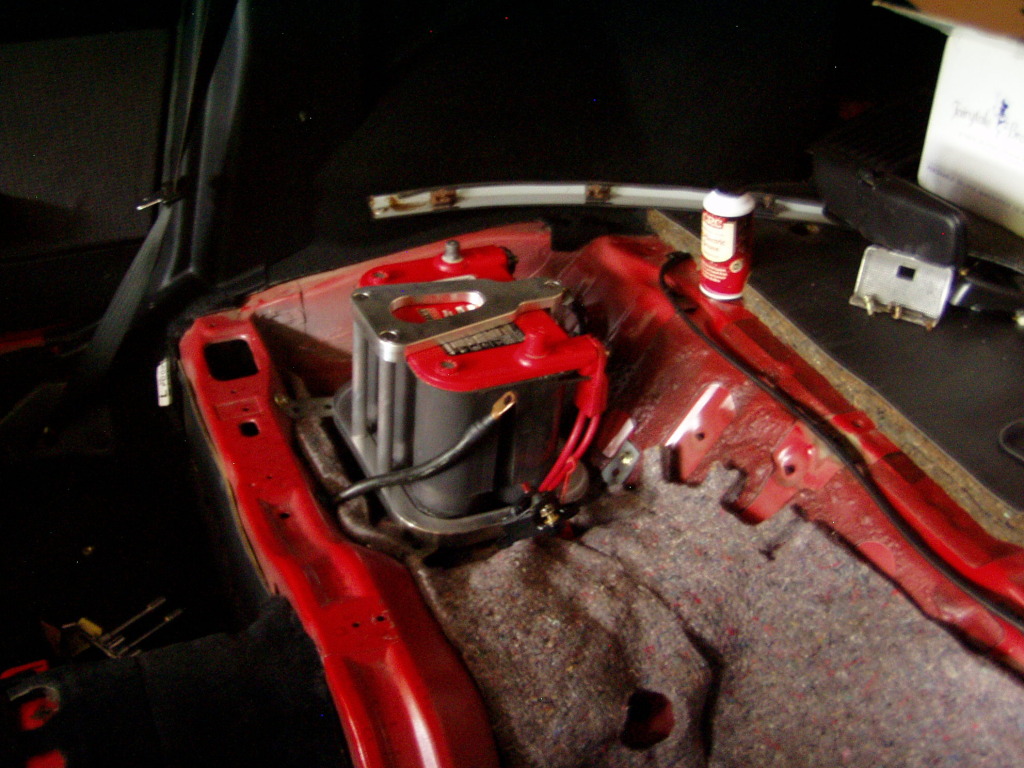
The cable is #1 ga. Anaconda welding cable, and hasn't had any problems for the several years I've already run it, so I don't anticipate any problems now.
This install, although similar to the original in the '91, is much nicer in detail and execution...practice does make perfect.
As with the rest of the wiring, the power cable does not touch metal anywhere on it's journey, it would take something extraordinary for it to short out.
Now I can install the bin support and mount the cut off switch/breaker and another milestone will be achieved.
YAY!
It was holding up a lot of interior install and I was tired of putting it off.
Parts of the job would have really benefited from a second set of hands, so of course it took much longer than anticipated, but it's (almost) done and I'm glad.
Started with the isolated terminal way up on the front framerail where the battery joins the rest of the chassis harness:
The cable then dives below the clutch master and into the driver's footwell:
No mods were required for the plastic fender liner, it fits perfectly.
The cable then follows the main interior harness down the side of the rocker behind the masonite divider and curls behind the seat to the trans tunnel where it goes into a preexisting hole (this may necessitate some minor trimmage of the bin structure, time will tell):
Through the support beam and out into the passenger bin area:
The battery sits in my custom battery holder (it's only "custom" because I machined it, it's a direct copy of a piece I saw in a hot rod catalog):
The cable is #1 ga. Anaconda welding cable, and hasn't had any problems for the several years I've already run it, so I don't anticipate any problems now.
This install, although similar to the original in the '91, is much nicer in detail and execution...practice does make perfect.
As with the rest of the wiring, the power cable does not touch metal anywhere on it's journey, it would take something extraordinary for it to short out.
Now I can install the bin support and mount the cut off switch/breaker and another milestone will be achieved.
YAY!
09-13-12, 05:38 PM
#121
Despite the dogpoop weather yesterday, more stuff happened.
The bins/rear carpet were installed:
The power cable routing necessitated no trim of the bin support and removing the bin cover "lock" (I don't consider the bins to be very high security storage sites and see no point in locking them) allows the cover to sit flush over the newly sited battery.
The front calipers are curing nicely, I get to the rebuild as the weather turns sour again.
The rear calipers are almost through the cleaning stage (they're much more complicated than the fronts), one will be getting rebuilt, they both get paint.
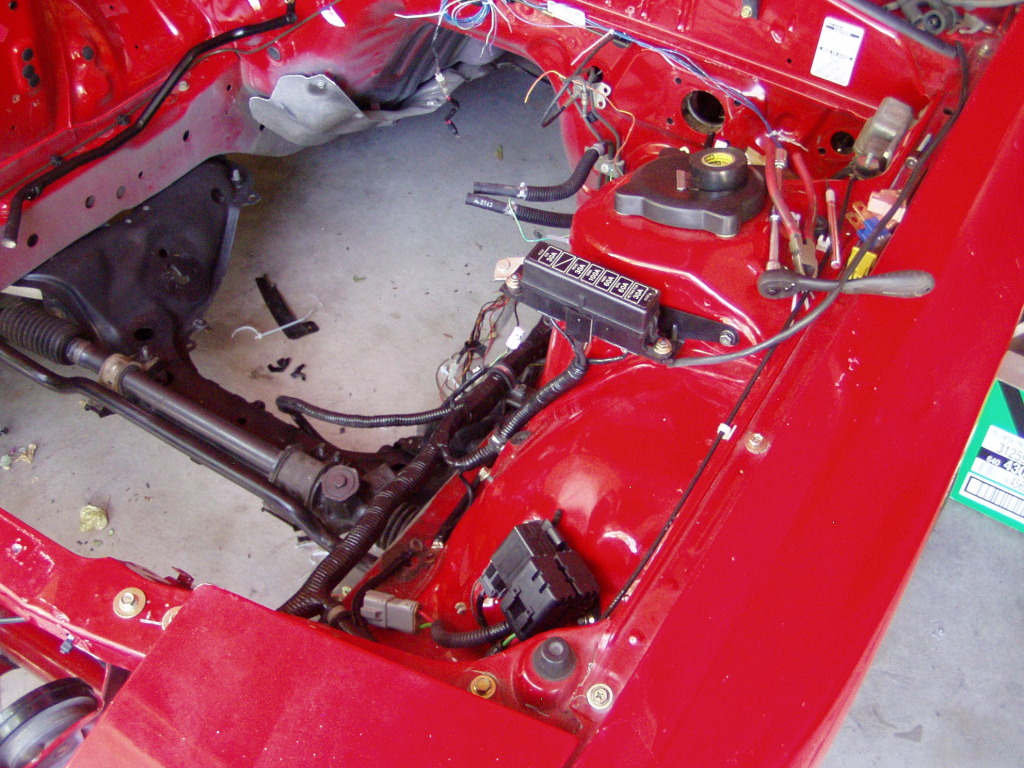
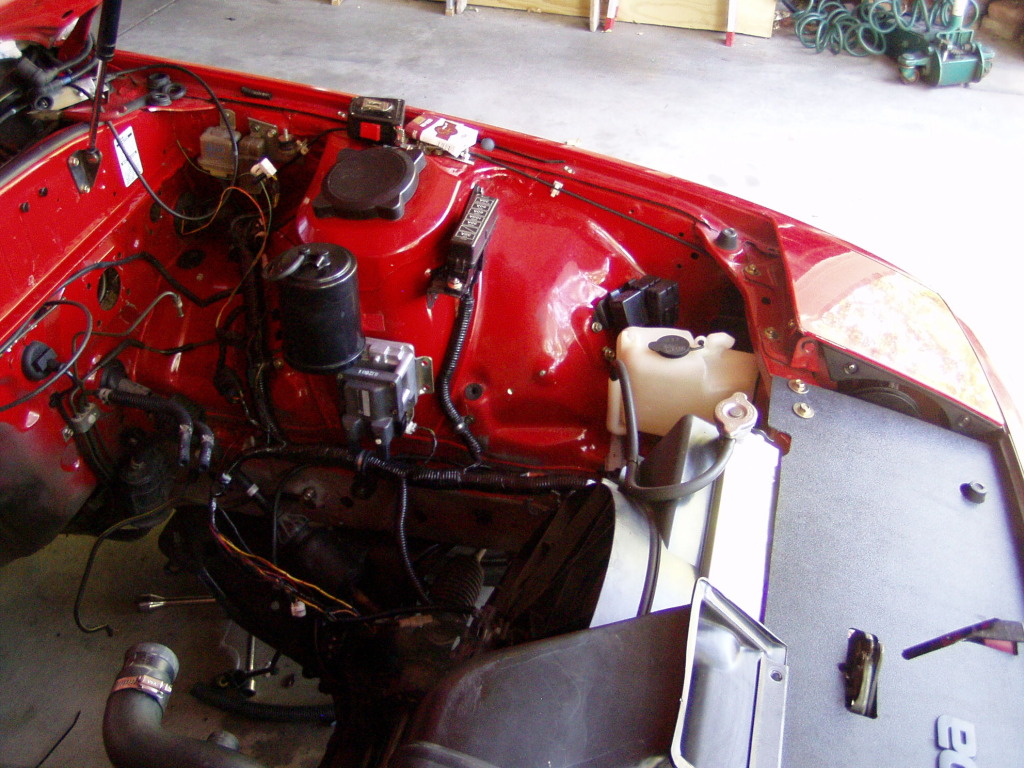
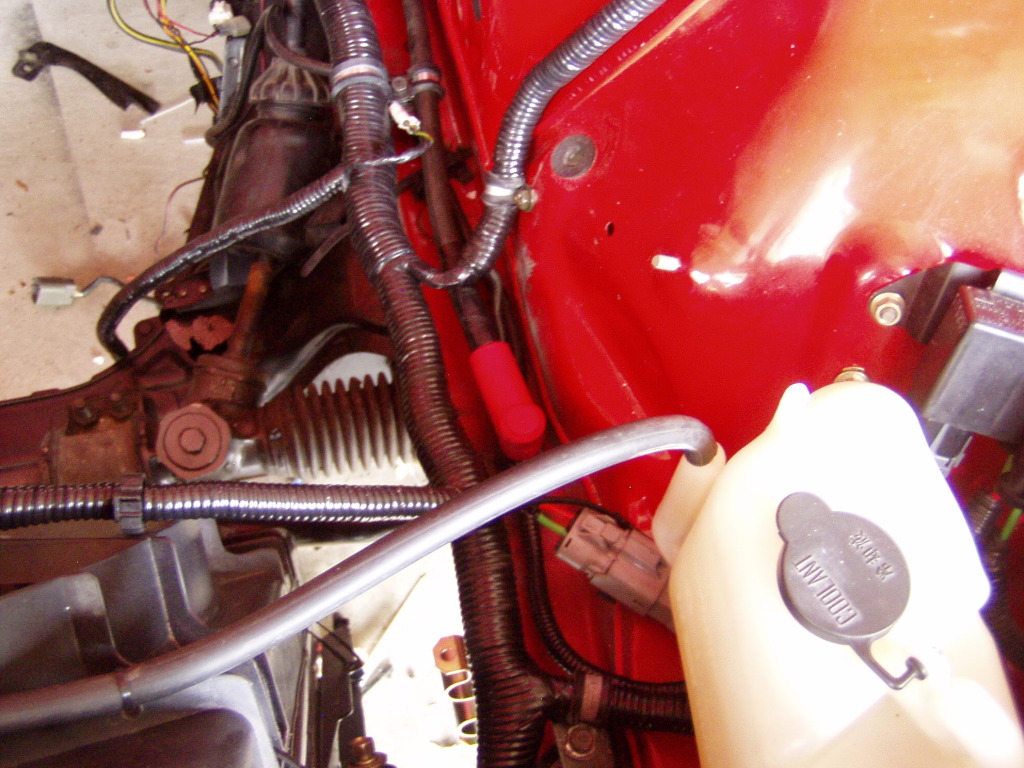
With the battery cable in place, the rest of the corner crowding stuff could be put back:
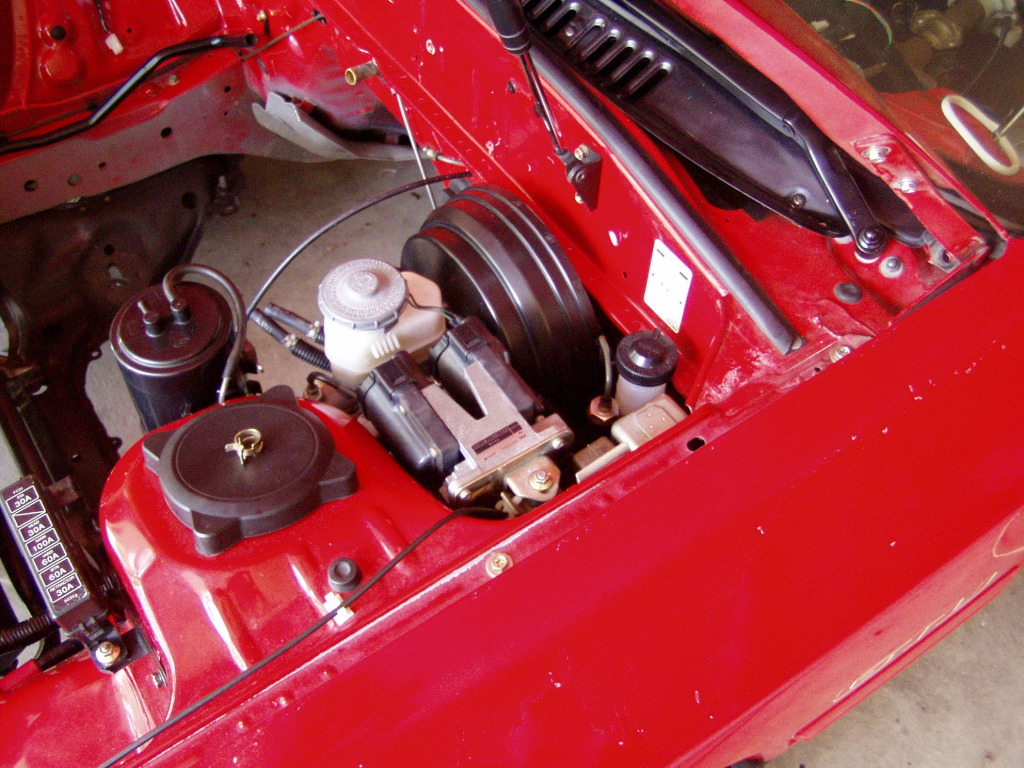
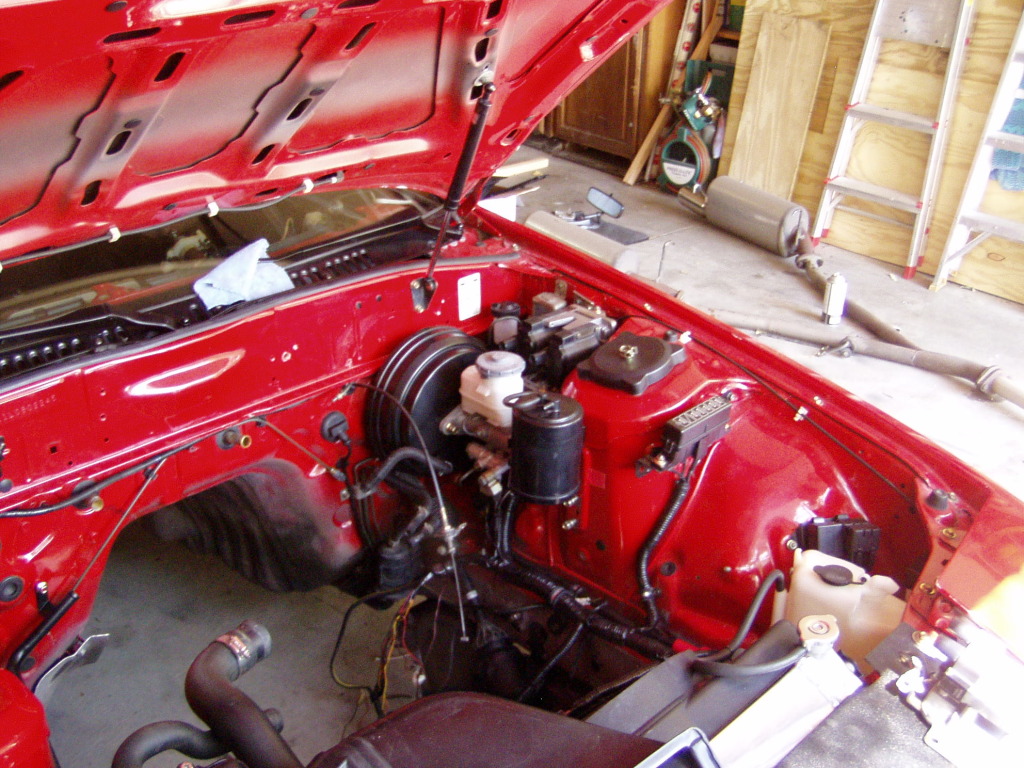
My "clean firewall" goal has been achieved although I still need to figure out the run for booster vacuum...something will occur to me (I flipped the booster 180� during install to place the vacuum port on the lower inside rather than the upper outside of the booster face This should facilitate a "stealth" vacuum supply route).
Instead of parting out the '91, I was fortunate to sell her as a rolling chassis.
This saves me a lots of time marketing, packaging and shipping but accelerated the time frame as I now have a deadline for pickup.
Most of my efforts will now have to focus on stripping the old car rather than obsessing over the new one.
This AM I dropped the RB exhaust (which I'm keeping) and pulled the rear calipers/rotors.
The rotors are been skimmed today although I have no immediate use for them.
Next I'll start stripping the engine bay, preparing for engine removal.
The bins/rear carpet were installed:
The power cable routing necessitated no trim of the bin support and removing the bin cover "lock" (I don't consider the bins to be very high security storage sites and see no point in locking them) allows the cover to sit flush over the newly sited battery.
The front calipers are curing nicely, I get to the rebuild as the weather turns sour again.
The rear calipers are almost through the cleaning stage (they're much more complicated than the fronts), one will be getting rebuilt, they both get paint.
With the battery cable in place, the rest of the corner crowding stuff could be put back:
My "clean firewall" goal has been achieved although I still need to figure out the run for booster vacuum...something will occur to me (I flipped the booster 180� during install to place the vacuum port on the lower inside rather than the upper outside of the booster face This should facilitate a "stealth" vacuum supply route).
Instead of parting out the '91, I was fortunate to sell her as a rolling chassis.
This saves me a lots of time marketing, packaging and shipping but accelerated the time frame as I now have a deadline for pickup.
Most of my efforts will now have to focus on stripping the old car rather than obsessing over the new one.
This AM I dropped the RB exhaust (which I'm keeping) and pulled the rear calipers/rotors.
The rotors are been skimmed today although I have no immediate use for them.
Next I'll start stripping the engine bay, preparing for engine removal.
09-14-12, 10:33 AM
#122
Moderator
iTrader: (3)
Join Date: Mar 2001
Location: https://www2.mazda.com/en/100th/
Posts: 30,796
Received 2,574 Likes
on
1,830 Posts
i missed the memo, what are the brake booster and master from? looks like a honda master?
09-14-12, 10:58 AM
#123
The booster/MC are from an Integra (good eye, BTW)- the booster is a large double diaphragm unit and the MC has a 1" bore.
My ideal setup is the 1 1/16" MC/booster from a Subaru Legacy but I donated that to the FD project and haven't found another in good enough condition to warrant changing.
This is fine, it's what I've been running for the past year or so and I'm very comfortable with the feel and performance.
You might check your spam settings...my memos may be getting diverted.
09-14-12, 11:52 AM
#124
Moderator
iTrader: (3)
Join Date: Mar 2001
Location: https://www2.mazda.com/en/100th/
Posts: 30,796
Received 2,574 Likes
on
1,830 Posts
The booster/MC are from an Integra (good eye, BTW)- the booster is a large double diaphragm unit and the MC has a 1" bore.
My ideal setup is the 1 1/16" MC/booster from a Subaru Legacy but I donated that to the FD project and haven't found another in good enough condition to warrant changing.
This is fine, it's what I've been running for the past year or so and I'm very comfortable with the feel and performance.
You might check your spam settings...my memos may be getting diverted.
My ideal setup is the 1 1/16" MC/booster from a Subaru Legacy but I donated that to the FD project and haven't found another in good enough condition to warrant changing.
This is fine, it's what I've been running for the past year or so and I'm very comfortable with the feel and performance.
You might check your spam settings...my memos may be getting diverted.
does the booster actually bolt in? we did an Rx8 booster/929 master in my friends FC, and since the FC boosters studs are so long we had to make special nuts, that have a long non threaded shank so they can bolt to the booster, and have the length needed
09-14-12, 12:35 PM
#125
Yup, like it was made for the FC.
IIRC (it's been a while) the Honda booster has an 8mm pushrod and the FC has a 10mm, so the FC clevis needs some modding. I just threaded a 8mm Helicoil right into the clevis's 10mm threads...worked like a charm, took about 30 seconds.
IIRC (it's been a while) the Honda booster has an 8mm pushrod and the FC has a 10mm, so the FC clevis needs some modding. I just threaded a 8mm Helicoil right into the clevis's 10mm threads...worked like a charm, took about 30 seconds.