She Followed Me Home, Honest
 08-17-12, 12:09 PM
#51
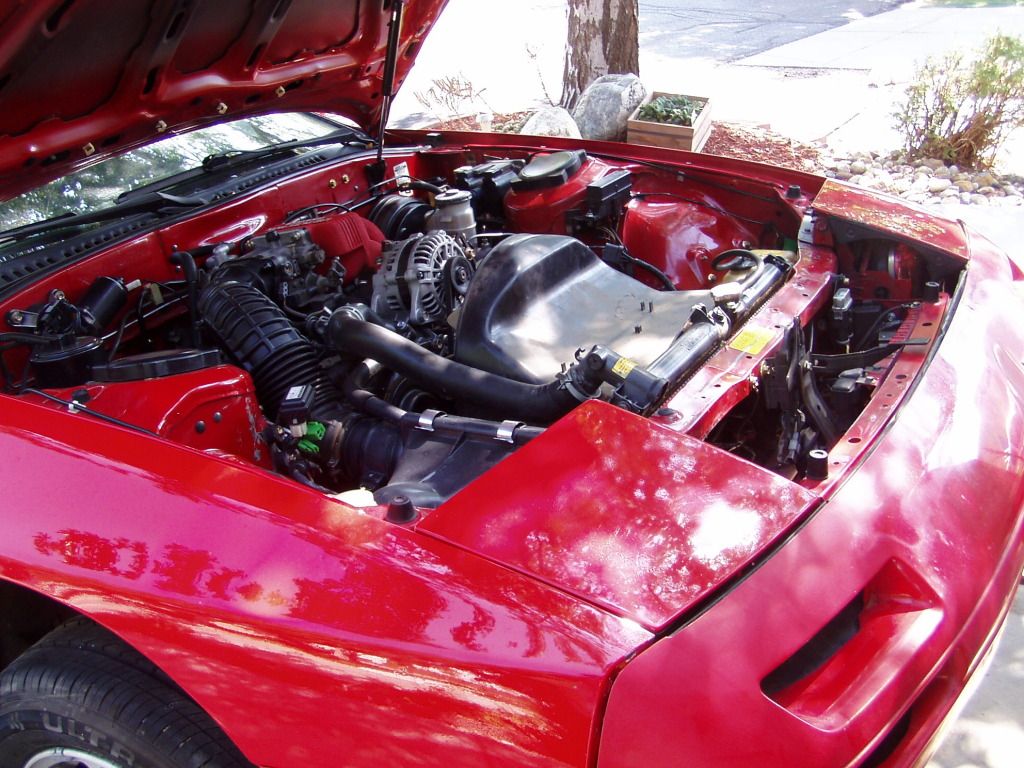
The $30 Harbor Freight HVLP gun works very well and you can easily paint fenders and a nose in your garage. And in those amounts the paint is cheap. And you can get good results. Here is what the kid did in the garage with that setup and PPG Shopline base/clear on the wing, bumper caps and bumper.

If the clear is peeling it is likely they didn't spray in the clear on top of the base within the recoat window or more likely they sprayed clear on top of unkeyed base coat. You'll have to sand all of the clear off.
If the clear is peeling it is likely they didn't spray in the clear on top of the base within the recoat window or more likely they sprayed clear on top of unkeyed base coat. You'll have to sand all of the clear off.
 08-17-12, 03:30 PM
#52
That looks very good, I'll look into it, thanks.
Today I intentionally went looking for trouble but didn't find it, which kinda surprised me.
I realize that subframe removal wouldn't be considered terribly complicated but keep in mind I'm working alone using a limited supply of 3/8" drive hand tools.
I expected the four big nuts would be a problem but with the floorjack handle as a cheater bar, they weren't bad at all.
Even the tie rods were relatively painless, a few taps on the spindle and they dropped right out.
I figured it would never be easier than now to remove the rotor dust shields, so I did that also.
Unless/until I drop the diff, I think the really physical part is done.
I repaced the engine/trans mounts on the other chassis a year or so ago, so I'm not expecting any frozen bolts when the drive train gets swapped.
The decision to use my other chassis' front nose was the reason for this seeming sidetrack.
I figured as long as I was going to disassemble the running car to swap noses, I may as well harvest the front struts and steering rack at the same time. I'll also swap the hoods (the other one is aluminum).
That way, with all the bodywork in place, I can finish the paint restoration and that part will be done.
The brakes will have to wait as I need to fab new front lines (and possibly the rear as well).
I've kind of accelerated the schedule a bit but the process tree was more logical this way and the weather is nice, so why not?
The other car will still be driveable, albeit in a somewhat degraded fashion...I'll just deal.
Tomorrow I'll pull the other car into the driveway and begin tearing it apart,
08-18-12, 05:14 PM
#53
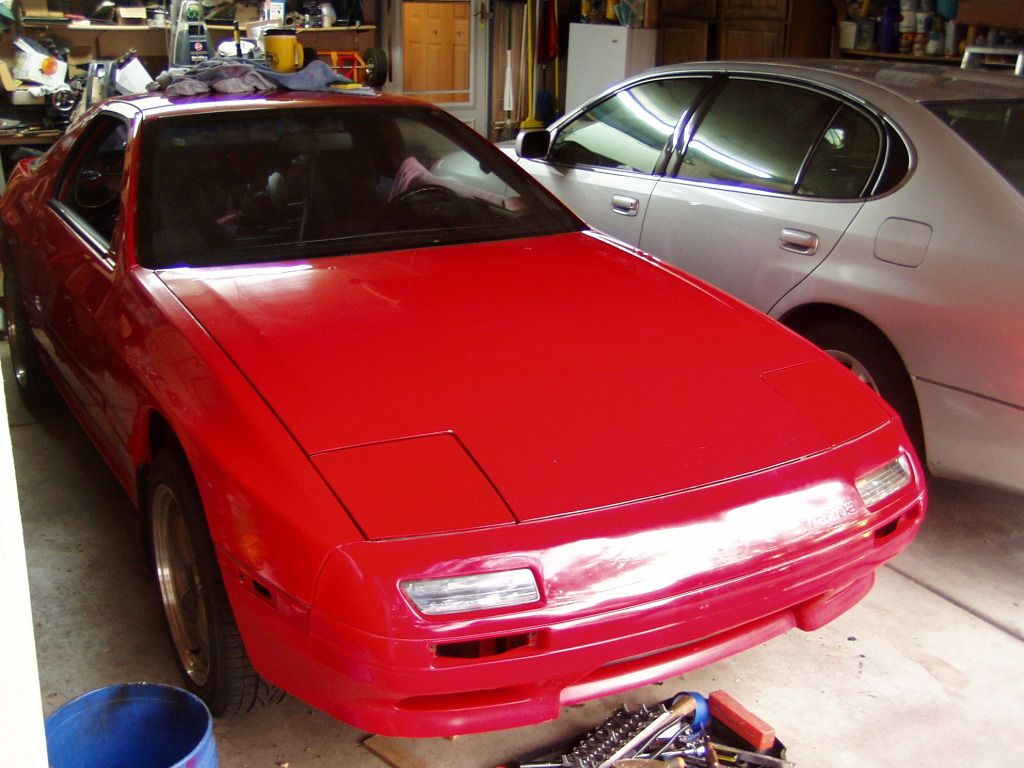
Well, if I was going to succumb to mission creep, today was the perfect day, only 77� and a little breezy. It's amazing what a difference 20� makes to my stamina and drive.
The girls had their first face to face meeting:
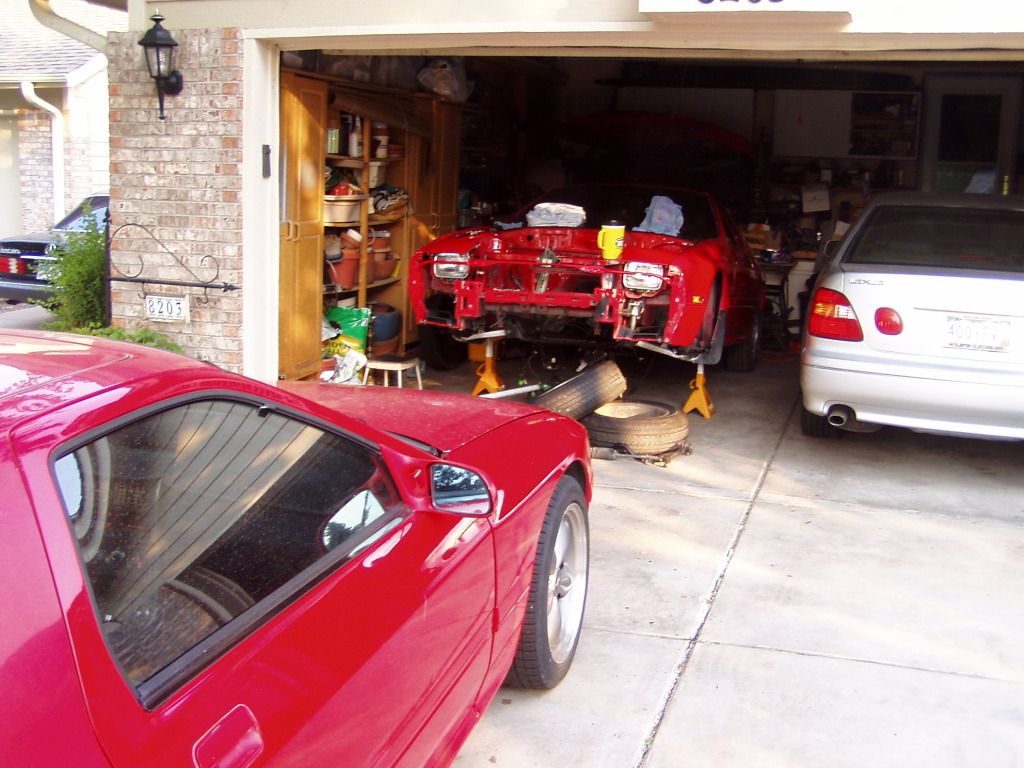
At that point the '91 had no idea what was coming, so she was very docile.
That changed in a hurry.
I thought I'd start with something easy, so the first job was removing the good struts from the "91 and putting the old OEM units on (remember, I'm trying to keep the "91 driveable as long as possible, so all the major stuff I remove has to be replaced).
On either side one of the lower strut bolts was frozen in place and they fought like bastards before popping free.
Not the way I thought it would go.
I usually anti-seize everything as I go but clearly dropped the ball when I installed the struts several years ago. Live and learn.
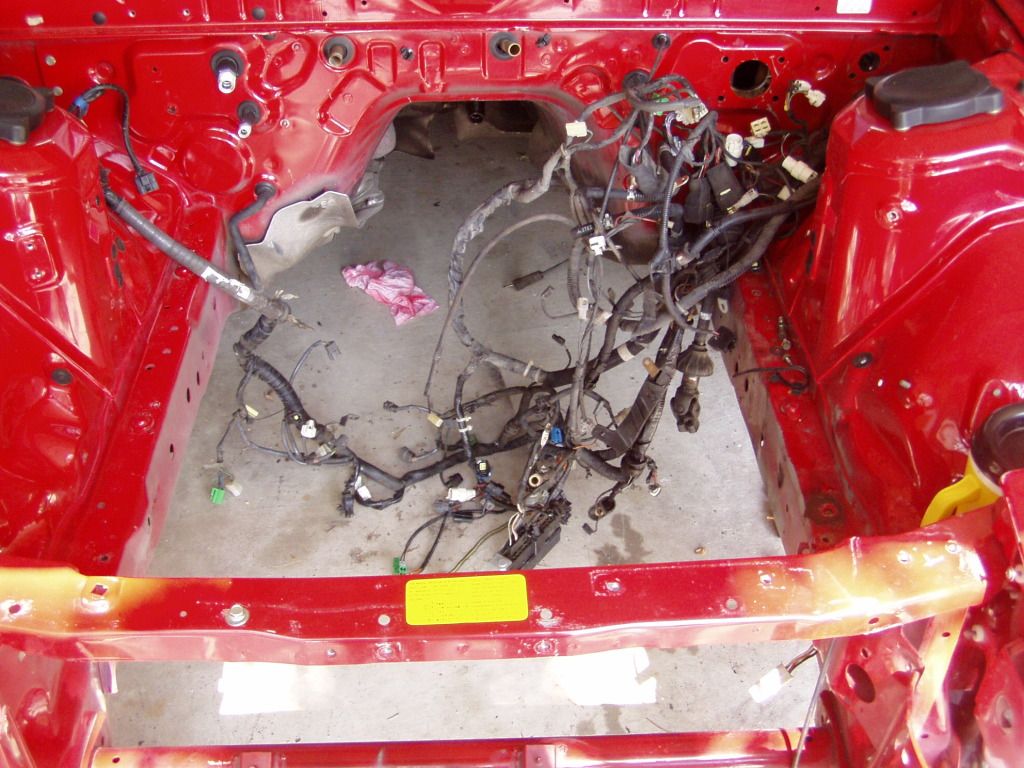
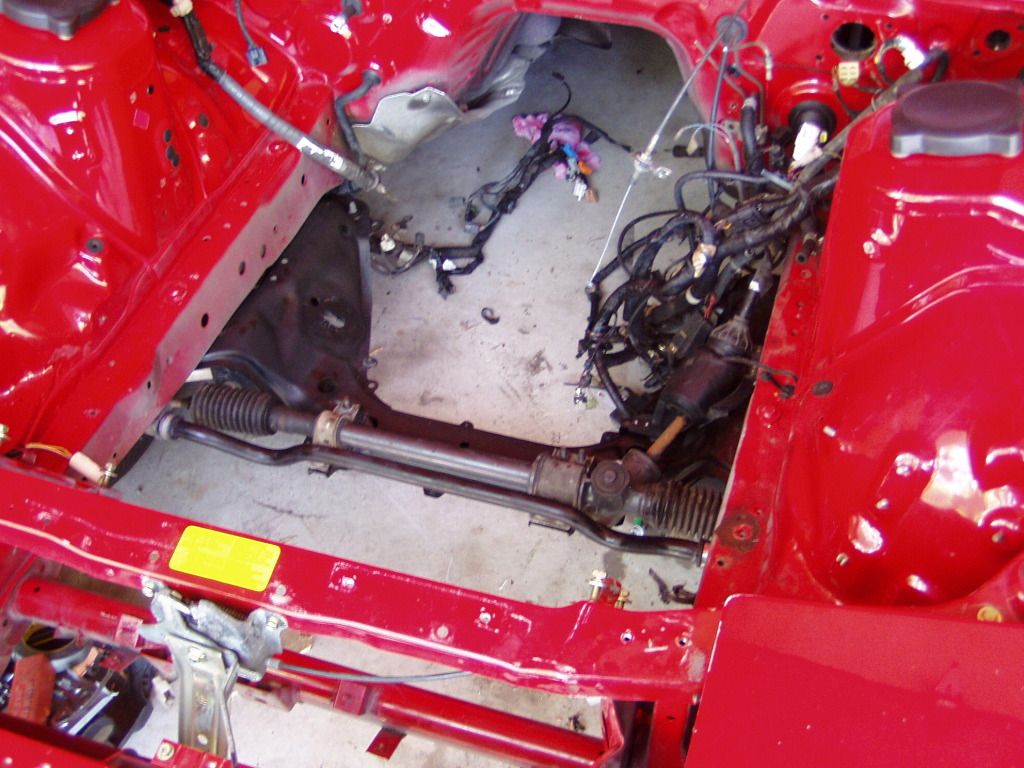
With the struts finally done, I freed up the manual steering rack but realized it's a lot easier to remove if the rad and sway bar are gone, so out they came.
Then the bumper cap.
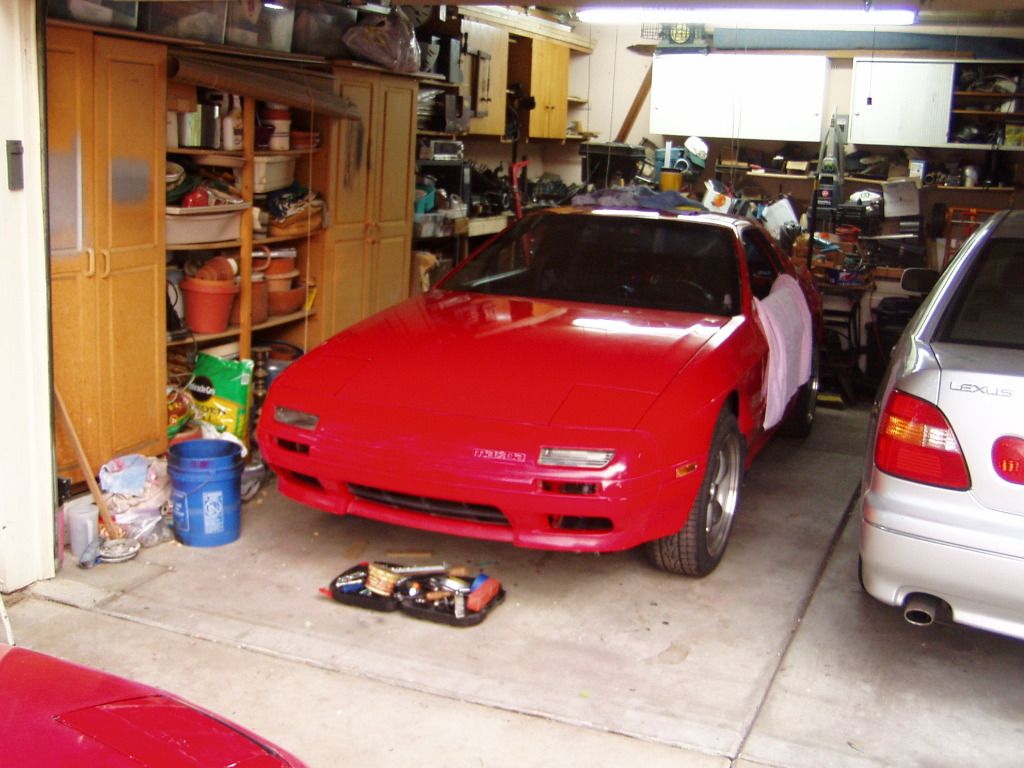
Here's a shot from about midway through the clusterfuck:
Finally, about eight hours later, the '91 was more or less back in one piece.
I spent as little time as possible mounting the semi-deformed GTU nose to the '91, two bolts on each side flange and two on top, no attempt to make it fit nicely. I'll go through the agonies of panel fitting on the "new" car, the old one has lost it's appeal to me.
Tonight (assuming I don't just pass out) I'll start harvesting some of the little exterior goodies (window trim, etc.)...all easy stuff.
Tomorrow I want to swap the rear shocks and I'll be done with the "91 for a while and can start putting the goodies on the GTU.
Fun times.
The girls had their first face to face meeting:
At that point the '91 had no idea what was coming, so she was very docile.
That changed in a hurry.
I thought I'd start with something easy, so the first job was removing the good struts from the "91 and putting the old OEM units on (remember, I'm trying to keep the "91 driveable as long as possible, so all the major stuff I remove has to be replaced).
On either side one of the lower strut bolts was frozen in place and they fought like bastards before popping free.
Not the way I thought it would go.
I usually anti-seize everything as I go but clearly dropped the ball when I installed the struts several years ago. Live and learn.
With the struts finally done, I freed up the manual steering rack but realized it's a lot easier to remove if the rad and sway bar are gone, so out they came.
Then the bumper cap.
Here's a shot from about midway through the clusterfuck:
Finally, about eight hours later, the '91 was more or less back in one piece.
I spent as little time as possible mounting the semi-deformed GTU nose to the '91, two bolts on each side flange and two on top, no attempt to make it fit nicely. I'll go through the agonies of panel fitting on the "new" car, the old one has lost it's appeal to me.
Tonight (assuming I don't just pass out) I'll start harvesting some of the little exterior goodies (window trim, etc.)...all easy stuff.
Tomorrow I want to swap the rear shocks and I'll be done with the "91 for a while and can start putting the goodies on the GTU.
Fun times.
08-19-12, 04:14 PM
#54
Well, another beautiful, productive day although I'm now facing the side effects of the accident the car had suffered.
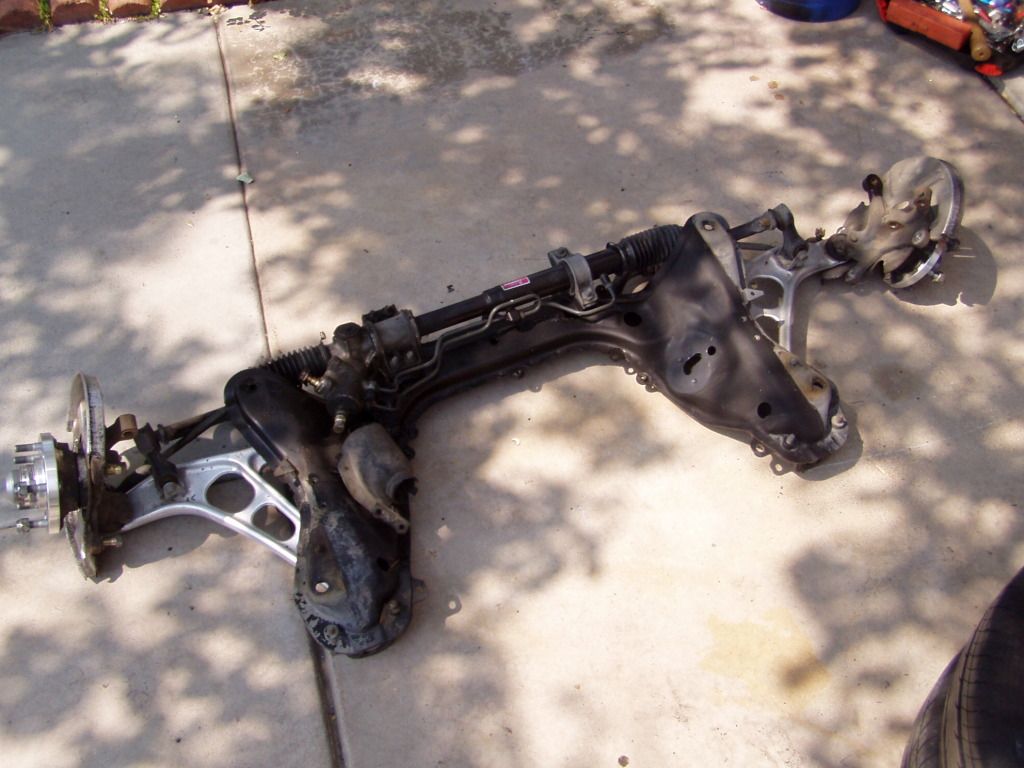
Began by installing the subframe, struts, manual steering rack, swaybar and front Bullit wheels.
All that went smoothly, no problems except that the subframe is a heavy, awkward **** and took a while to get positioned properly.
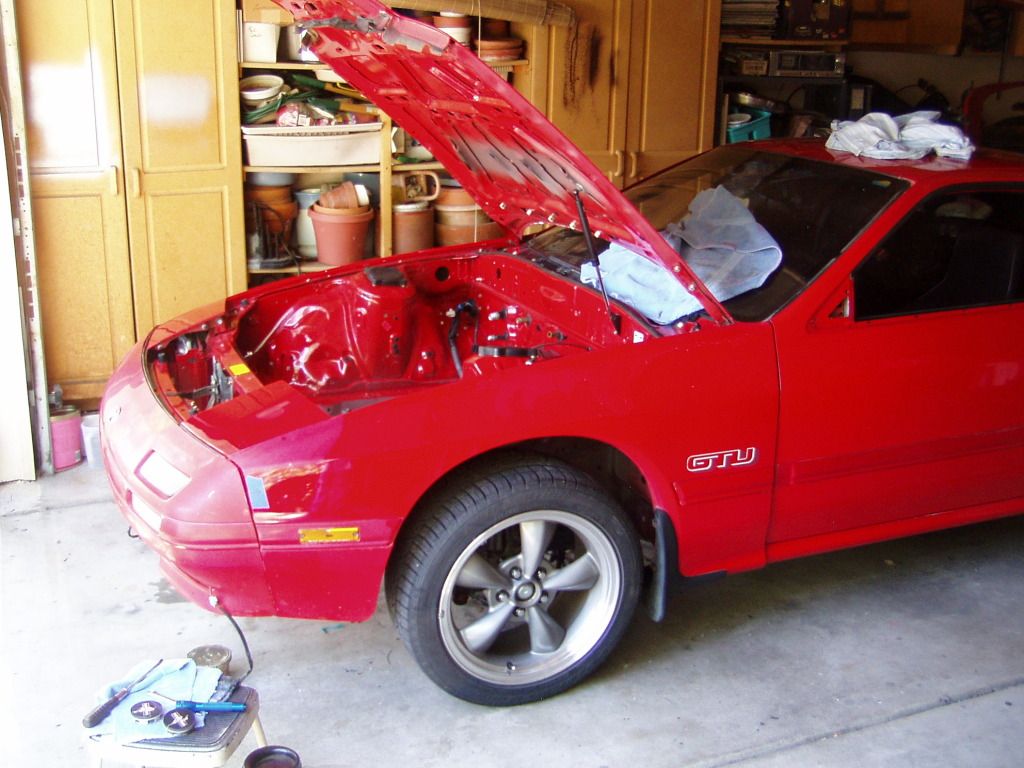
I then pulled the alloy hood from the '91 and put it and the strut into the GTU:
Then loosely hung the fenders and fit the front bumpercap which is where the difficulties began:
The front support structure of the RX is surprisingly flimsy and the accident tweaked it all more than I first suspected. Most of the misalignment was relatively easy to bend back close to correct but the bar across the front that holds the five bolts for the top of the nose is way off.
I can get the far passenger side bolt to go in with some effort but it gets increasingly crooked till the last bolt on the driver side is about 3/8" away from the hole.
I need to move this somehow and was stumped.
It finally occurred to me that the OEM scissors jack would be the ideal tool for this job...I think.
I haven't tried it yet but it's the best option I can come up with.
Fingers are crossed.
This is not to mention the panel gaps, which are generally atrocious but I expected that...you can't remove the fenders, hood, headlights and bumper without spending a lot of time realigning everything.
I've seen some pro bodyshop guys at work and they are amazingly physical, basically wailing away on the car to get the gaps right but there's an art to it as well and it's experience I lack.
I'll do the best I can and see how it goes.
At least the body is back in one piece, with it's final panels, and that means I can finish the paint work and put all the little bits and bobs back on before they start disappearing.
It will be a major milestone when the exterior is complete.
Began by installing the subframe, struts, manual steering rack, swaybar and front Bullit wheels.
All that went smoothly, no problems except that the subframe is a heavy, awkward **** and took a while to get positioned properly.
I then pulled the alloy hood from the '91 and put it and the strut into the GTU:
Then loosely hung the fenders and fit the front bumpercap which is where the difficulties began:
The front support structure of the RX is surprisingly flimsy and the accident tweaked it all more than I first suspected. Most of the misalignment was relatively easy to bend back close to correct but the bar across the front that holds the five bolts for the top of the nose is way off.
I can get the far passenger side bolt to go in with some effort but it gets increasingly crooked till the last bolt on the driver side is about 3/8" away from the hole.
I need to move this somehow and was stumped.
It finally occurred to me that the OEM scissors jack would be the ideal tool for this job...I think.
I haven't tried it yet but it's the best option I can come up with.
Fingers are crossed.
This is not to mention the panel gaps, which are generally atrocious but I expected that...you can't remove the fenders, hood, headlights and bumper without spending a lot of time realigning everything.
I've seen some pro bodyshop guys at work and they are amazingly physical, basically wailing away on the car to get the gaps right but there's an art to it as well and it's experience I lack.
I'll do the best I can and see how it goes.
At least the body is back in one piece, with it's final panels, and that means I can finish the paint work and put all the little bits and bobs back on before they start disappearing.
It will be a major milestone when the exterior is complete.
08-20-12, 11:19 AM
#58
Moderator
iTrader: (3)
Join Date: Mar 2001
Location: https://www2.mazda.com/en/100th/
Posts: 30,796
Received 2,574 Likes
on
1,830 Posts
so you put fender on, put sockets in the holes, tighten it down, and you're almost good to go. then you can line up the headlights (they sit 2-5mm behind the fenders, if you look at the bumper its not straight, there is a molding) and hood. i find the hood is the PITA on the FC.
since these cars have been bounced off things for 23 years, there might be a little bending required, but you shouldn't need to do more than that
08-20-12, 12:33 PM
#59
Sweet, j9, I'll give that a try this afternoon.
I was simultaneously pleased and irritated when I put the GTU steel hood on the '91 this morning...I just haphazardly bolted it on and dropped it down, the bloody gaps were all nearly perfect. I hope I can get the GTU to fit as nicely.
Spent the morning compounding/polishing the front bumper cap.
Poor thing has suffered some abuse over the years and all the damn trim lines are a real pain to work with (as is that damn embossed Mazda logo). It's "shiny" but hardly perfect (or even all that good) but I'm working with what I've got and it'll do for now.
I have to keep telling myself that how it looks from 6" away is not indicative of how she'll look from 10' because from a distance she looks pretty damn good.
Certainly a lot better than when I started.
I need to spend some time fitting the fenders and nose now...there's something odd going on with the gap between the sides of the nose and the front of the fenders.
It's nice and tight at the bottom but develops an increasing gap as it goes up (almost 1/4").
The top stud of the nose seems to be at a completely different angle than the flange at the front of the fender and it won't seat nicely. I hope it's something simple.
If I can get that straightened out, I'll be able to put the wheelwell liners back in and be done with all that.
With the fenders and bumper final installed I can spend some effort getting the lights and hood adjusted and the body will be done.
Which is good because my enthusiasm for this type of work is definitely waning...
08-22-12, 09:55 AM
#60
And my enthusiasm for the bodywork is officially all gone.
I fiddlefucked with the front clip off and on for several hours and finally got to the "Looks OK for now" stage and have decided to move on.
At least everything is bolted in/on properly and I can revisit the fitting later.
Frankly, I long for the simplicity of plain ole mechanical work where things either go on or they don't and there's little finessing involved.
Even electrical work sounds enticing...
I swapped the rear shocks/wheels over also, so the suspension is done.
This pic shows it to best advantage so I'll leave off with it for now:
08-22-12, 05:13 PM
#61
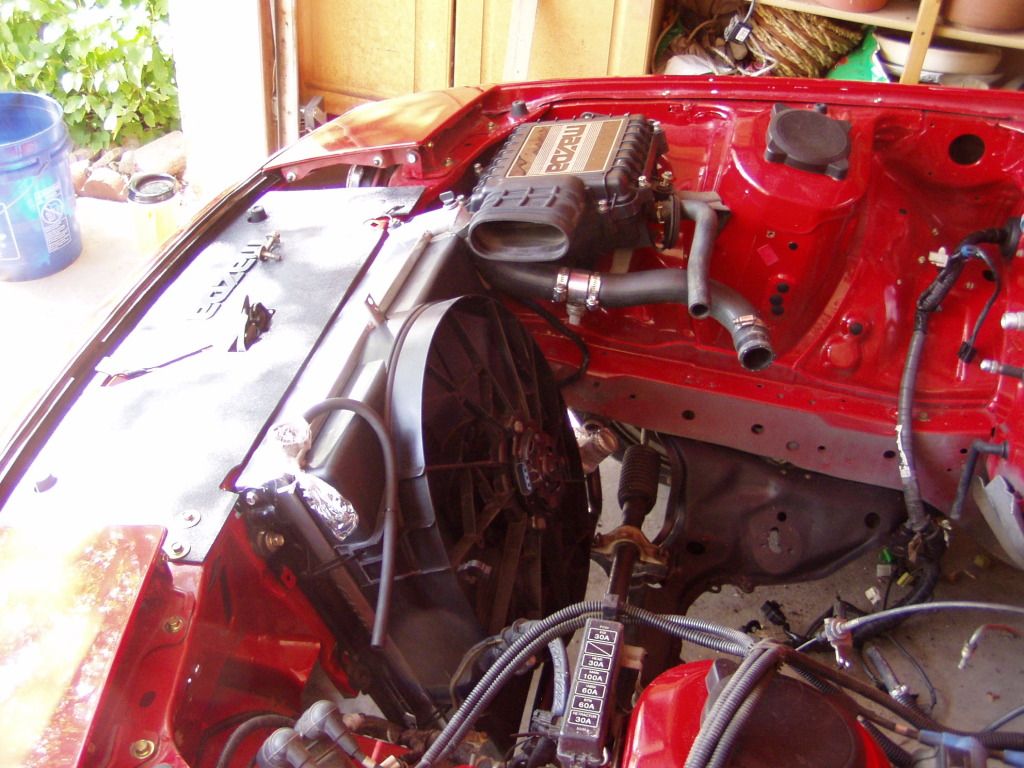
We got our first rain in weeks here in Denver so I couldn't roll her out of the garage to start stripping the interior.
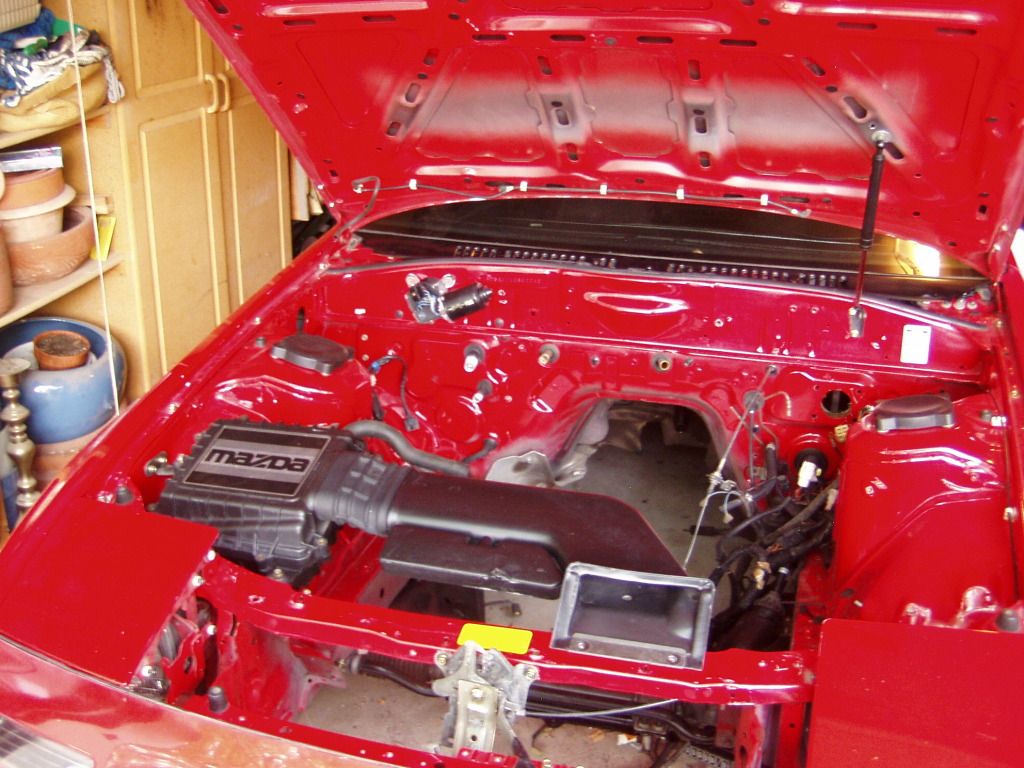
So, instead I started going through the boxes of stuff removed from the bay during the initial teardown. Obvious stuff to install, like the wiper motor, I began to clean up.
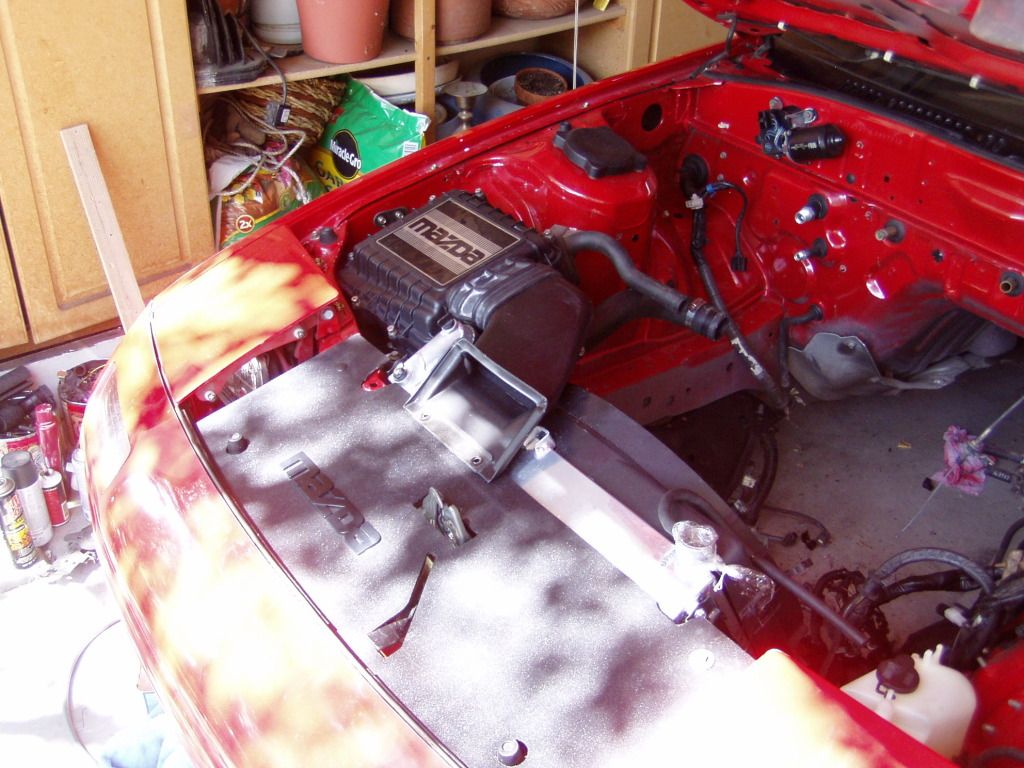
More or less on a whim, I opened the airbox and was pleasantly surprised to discover a very fresh looking K&N drop in filter.
Over the years, I've modified the '91's engine bay a lot and now this stock airbox actually looks exotic to me.
Bolted it in, just to look at:
Lead to a bit of an epiphany and I've decided to semi-change the course of this initial work on the new chassis.
Basically, I'm going to try and reinstall as close to stock as I can (with a few subtle exceptions).
Leave the electrical untouched for now because once the '91 is stripped, I'll have two complete harnesses to work with, thus increasing my options exponentially and allowing for complete color matching no matter what I decide to do.
I will be doing mods/tucks, just not right now.
I've decided to totally focus on just getting her running before going crazy.
About the only major thing I have to do in the interior is swap to manual belts because both the mousetracks are dead (cables hanging).
This will accelerate the completion date to weeks instead of months and allow me to begin selling the excess parts sooner, funding I could really use.
Of course, who knows what I'll think tomorrow.
So, instead I started going through the boxes of stuff removed from the bay during the initial teardown. Obvious stuff to install, like the wiper motor, I began to clean up.
More or less on a whim, I opened the airbox and was pleasantly surprised to discover a very fresh looking K&N drop in filter.
Over the years, I've modified the '91's engine bay a lot and now this stock airbox actually looks exotic to me.
Bolted it in, just to look at:
Lead to a bit of an epiphany and I've decided to semi-change the course of this initial work on the new chassis.
Basically, I'm going to try and reinstall as close to stock as I can (with a few subtle exceptions).
Leave the electrical untouched for now because once the '91 is stripped, I'll have two complete harnesses to work with, thus increasing my options exponentially and allowing for complete color matching no matter what I decide to do.
I will be doing mods/tucks, just not right now.
I've decided to totally focus on just getting her running before going crazy.
About the only major thing I have to do in the interior is swap to manual belts because both the mousetracks are dead (cables hanging).
This will accelerate the completion date to weeks instead of months and allow me to begin selling the excess parts sooner, funding I could really use.
Of course, who knows what I'll think tomorrow.
08-23-12, 01:19 PM
#63
Started rehanging components and running the body harness this morning.
No real problems except the car must have had a PS leak at some point because the section of wiring by the pump is kinda nasty.
Have to do something about that.
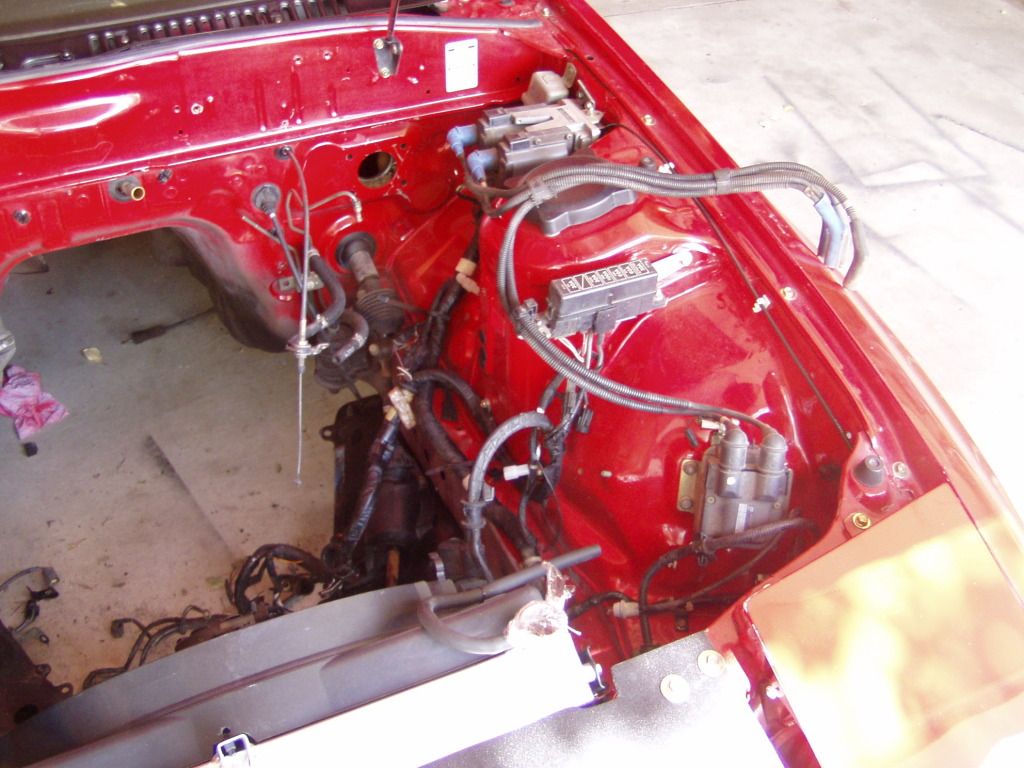
After stringing the harness across the front to the passenger side, I discovered some rabbit damage, nothing major but definitely requires attention. Oh well.
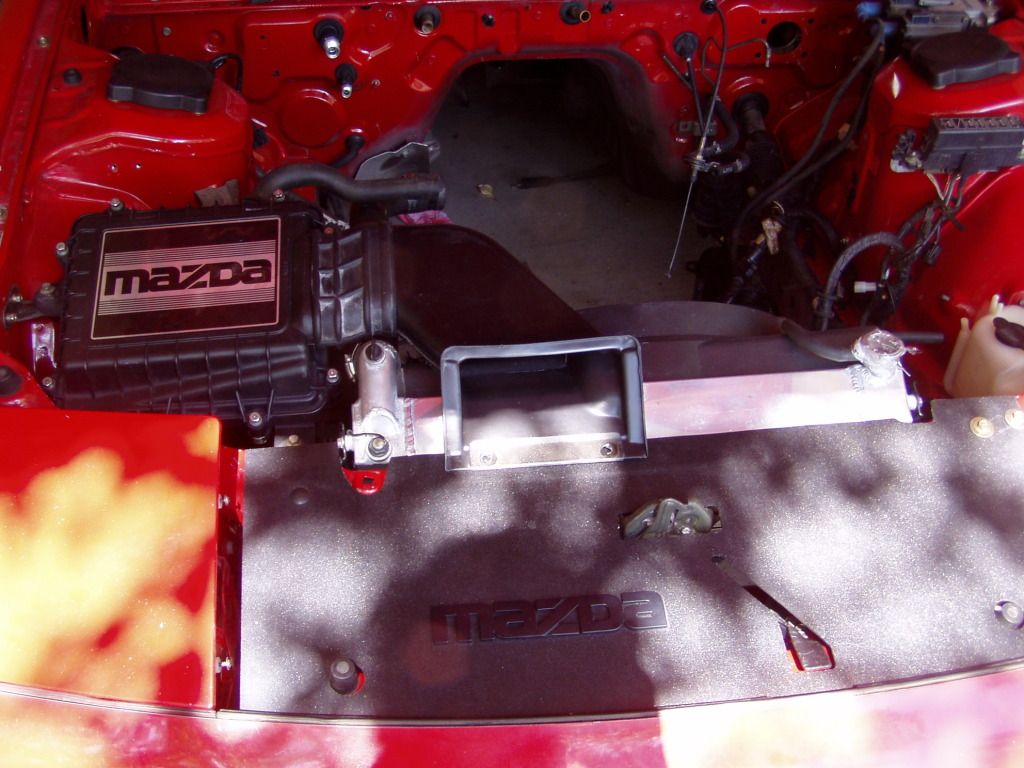
After adding that to the "to do" list and not really being in the mood for electrical repair, it struck me that I may have a problem with the airbox snorkel and the Godspeed rad/Lincoln fan.
So I quickly hung the rad:
And indeed, I do:
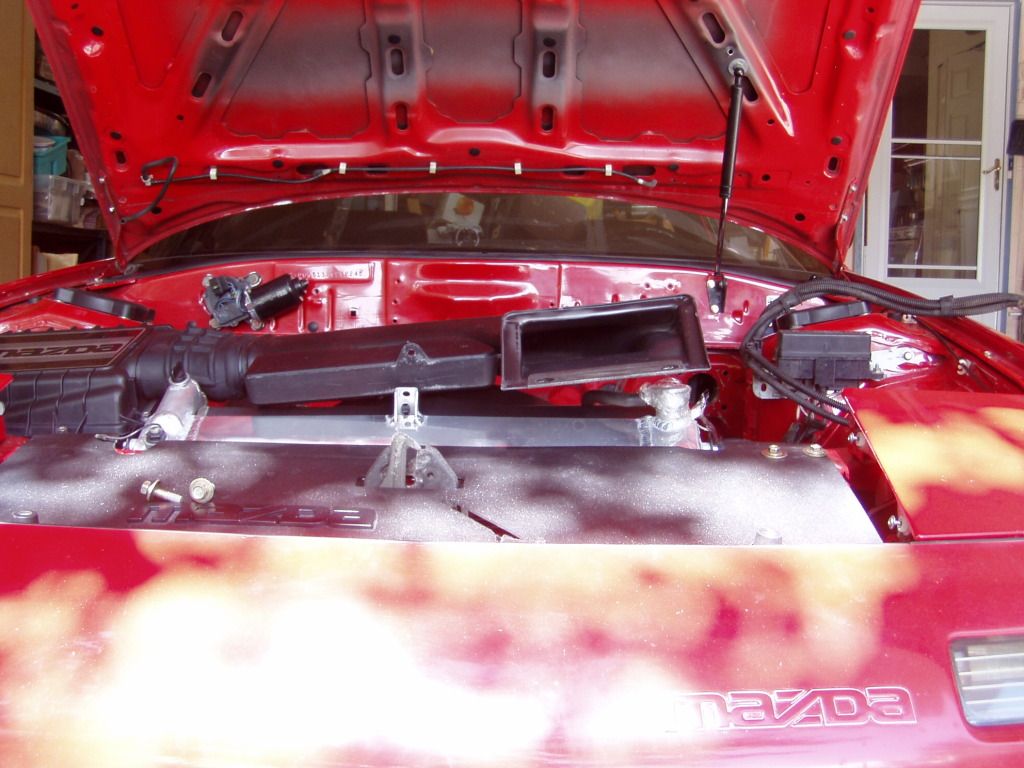
Clearly, the snorkel ain't gonna work.
This is not immediately catastrophic, I can run sans snorkel over the cold winter months without taking a huge performance hit but it will need addressing if I'm to keep the stock airbox long term.
I've really needed to get to the junkyard (my hardware supply is running very low) and maybe something suitable will jump at me there.
Stranger things have happened...
No real problems except the car must have had a PS leak at some point because the section of wiring by the pump is kinda nasty.
Have to do something about that.
After stringing the harness across the front to the passenger side, I discovered some rabbit damage, nothing major but definitely requires attention. Oh well.
After adding that to the "to do" list and not really being in the mood for electrical repair, it struck me that I may have a problem with the airbox snorkel and the Godspeed rad/Lincoln fan.
So I quickly hung the rad:
And indeed, I do:
Clearly, the snorkel ain't gonna work.
This is not immediately catastrophic, I can run sans snorkel over the cold winter months without taking a huge performance hit but it will need addressing if I'm to keep the stock airbox long term.
I've really needed to get to the junkyard (my hardware supply is running very low) and maybe something suitable will jump at me there.
Stranger things have happened...
08-26-12, 08:16 AM
#64
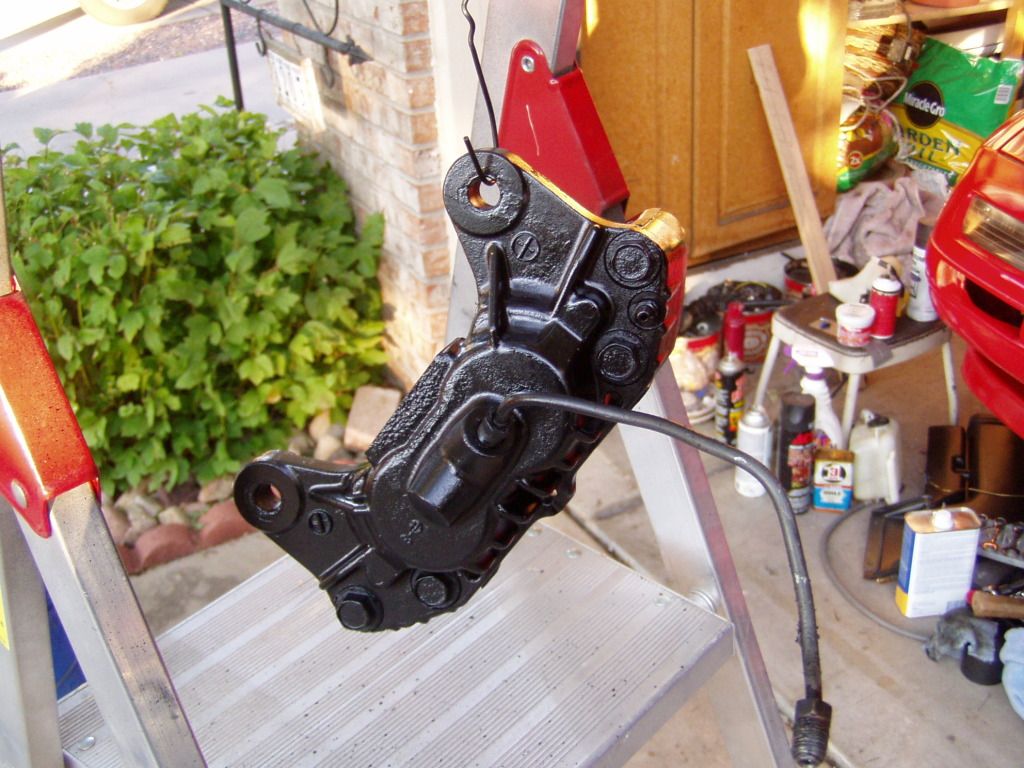
I've been vacillating on my decision about the electrical and as I pondered, I figured I'd do some brake work.
I've had a spare set of 4-pistons and a rebuild kit up in the attic for a few years, figured I may as well clean 'em up/rebuild them and cross that off the list.
Well, everything started off swimmingly, then I drowned.
Pulled the spare calipers down from the attic, stripped the paint and wirebrushed them clean.
Then I tried removing the pistons.
This is normally pretty easy if they're hooked to the hydraulics, just pull the pads and a few pumps of the brake pedal will push the pistons nearly out.
With the calipers just sitting on the floor though I had to lever the pistons out, which ain't no fun.
Caliper one went OK but number two fought like a **** and the two inboard pistons were simply frozen solid, I couldn't get them to move at all. In desperation I even tried vice grips to try and spin them in the bore but no luck.
That caliper has been reduced to "core" status, let some minimum wage drone have a go at them.
I went ahead and finished cleaned, then painted the good caliper.
Instead of the currently popular "ricer red" finish, I opted for a satin black which is much easier to keep clean (or at least, looking clean) and am just waiting for the paint to fully cure.
My quandary now is that the brake project is only half finished and I'd really like to get the calipers crossed off the list. I need to fab new front brake hardlines as Precision was none too gentle with them when they removed the booster/MC, and that would be simpler with the calipers in place.
What I'm thinking is to pull the good calipers from the old car and replace them with the crumby single piston units from the GTU. To keep the old car roadworthy, I'll have to bleed that system, which is a real time suck but seems like my best option right now.
Long as I'm at it, may as well do the rears as well since the "old" car has the upgraded (vented rotor) brakes. Normally, I wouldn't bother but for some reason the solid rear disks are twice the price of the vented parts. Seems odd but you'll have that from time to time, I guess. I'll have the rear rotors resurfaced (they're only two years old) but will just get new fronts as they're cheap. Plus, I can harvest and install the braided brake hoses and speedbleeders.
Oh well.
08-26-12, 01:33 PM
#65
"The best laid plans of mice and men..."
The brake pads on the GTU single piston brakes were down to the backing plates, so my plan for the day went down in flames fast and early.
Besides, after checking Autozone online I discovered I can get reman calipers for $45, which makes all this effort seem kinda pointless.
So, what to do?
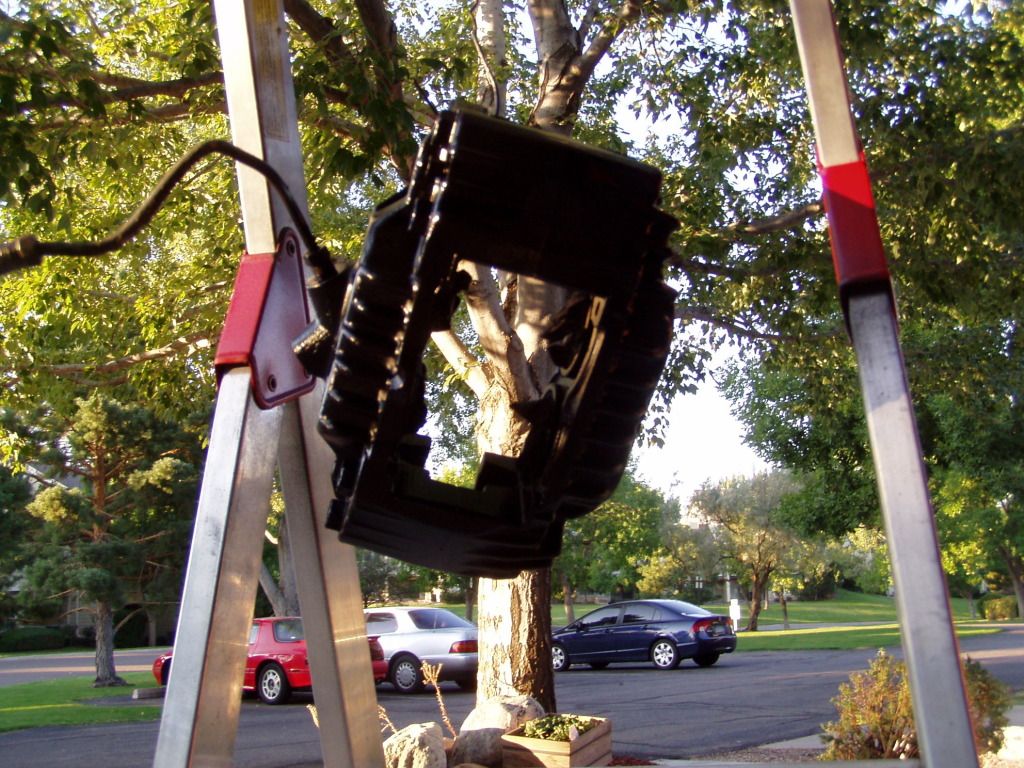
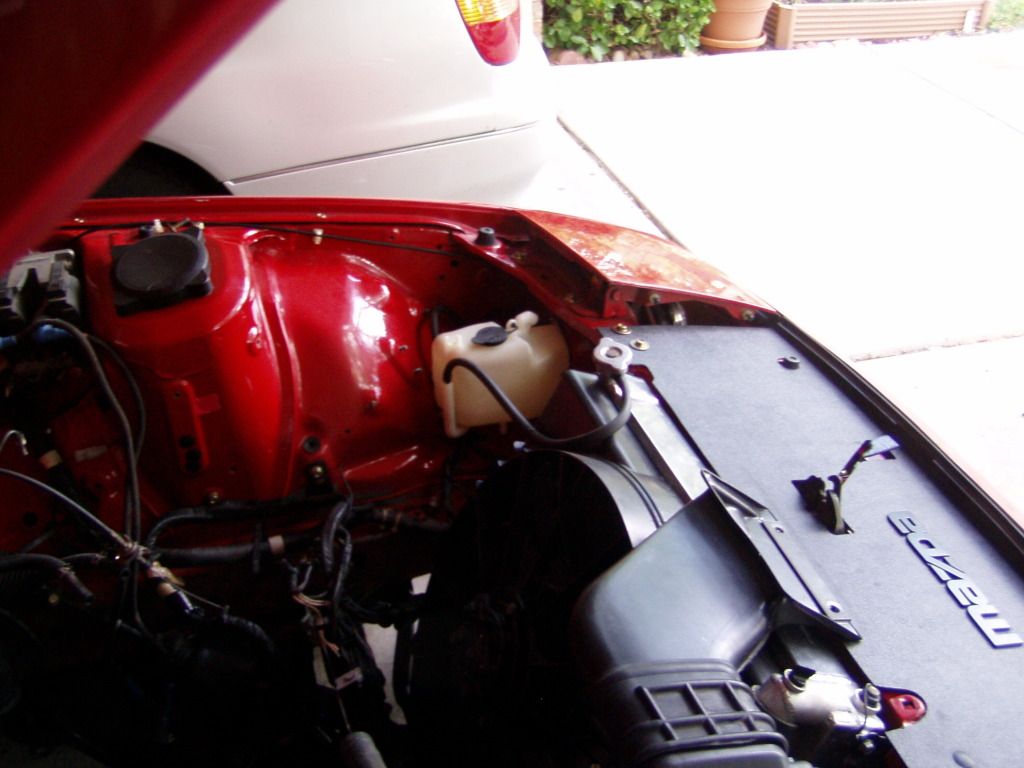
Looking at a previous pic of the ill fitting intake snorkel, I got an idea.
A few hours later, I had this:
It wasn't as easy at it appears, for instance, the rubber coupler was shortened and flipped upside down and a carefully shaped relief was cut into the bottom of the snorkel to sit down over the edge of the efan shroud, but the end result looks almost OEM to me.
Of course, whether it actually works or not remains to be seen, there is an issue.
Study the underside of your hood and you'll see how the support structure was shaped to accommodate the snorkel intake in it's stock location.
This relief does not exist in my new location.
I crawled into the bay (sure is handy not having an engine sometimes) and with the hood closed the new location is somewhat obstructed by the underhood structure but nothing really terrible.
If it doesn't work, well, c'est la vie, I haven't really lost anything and nothing has been altered on the chassis.
I really hope it does though...this is exactly the sort of sneaky mod I enjoy.
The brake pads on the GTU single piston brakes were down to the backing plates, so my plan for the day went down in flames fast and early.
Besides, after checking Autozone online I discovered I can get reman calipers for $45, which makes all this effort seem kinda pointless.
So, what to do?
Looking at a previous pic of the ill fitting intake snorkel, I got an idea.
A few hours later, I had this:
It wasn't as easy at it appears, for instance, the rubber coupler was shortened and flipped upside down and a carefully shaped relief was cut into the bottom of the snorkel to sit down over the edge of the efan shroud, but the end result looks almost OEM to me.
Of course, whether it actually works or not remains to be seen, there is an issue.
Study the underside of your hood and you'll see how the support structure was shaped to accommodate the snorkel intake in it's stock location.
This relief does not exist in my new location.
I crawled into the bay (sure is handy not having an engine sometimes) and with the hood closed the new location is somewhat obstructed by the underhood structure but nothing really terrible.
If it doesn't work, well, c'est la vie, I haven't really lost anything and nothing has been altered on the chassis.
I really hope it does though...this is exactly the sort of sneaky mod I enjoy.
08-26-12, 02:00 PM
#66
When I have had problems getting caliper pistons out I've started with compressed air. The key with multi-piston calipers is to fab up a jig so that the pistons can't come all the way out. Otherwise one pops out leaving behind the really stuck piston. The jig also makes it a lot safer. Pneumatics are obviously dangerous so heavy leather gloves, a leather welding jacket and face shield are good ideas.
If that doesnt work the other trick I've used is to fill the caliper with penetrating oil. I've had one instance where I had to heat the caliper in the oven to 200 degrees, then I put an ice cube in the piston cup and put it in the jig before finally putting air to it.
Good luck. As always... enjoying the show!
08-26-12, 07:56 PM
#67
Encouraged by the (potential) success of the intake mod, I decided to address some other issues that have long bothered me.
Mazda seems overly fond of putting components that are connected as far from each other as possible.
The windshield washer reservoir is about as far from the windshield as possible, the radiator recovery tank requires a hose that travels all the way across the rad and then in front of it, the evap cannister is located on the opposite side of the bay from it's connections...the list goes on.
Look at a stock engine compartment and there are hoses and tubes running everywhere.
I think it's unsightly and have long wished to do something about it, so today I began.
I've already prototyped a bracket to move the evap cannister over to the side of the engine formerly filled by the AC and PS components (but since the car is currently engineless, I can't show it).
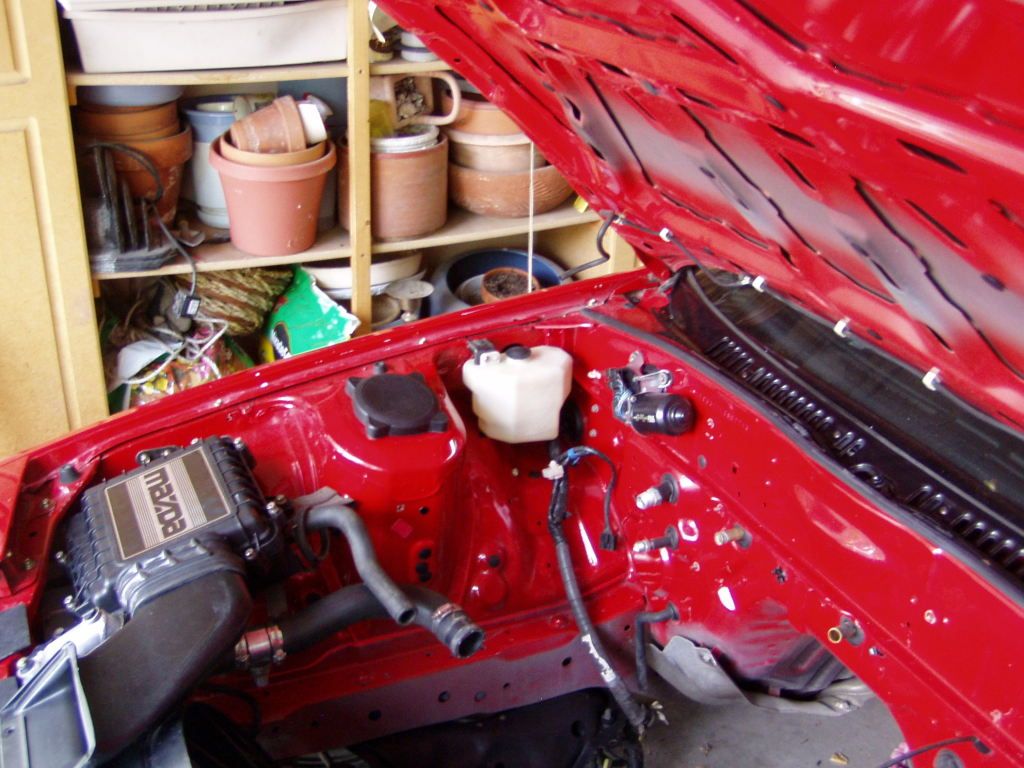
Since I'll not be running cruise control, there is now a big empty space right next to the firewall and it seemed perfect for the washer reservoir.
This is the first candidate for that duty:
I have another unit that might work even better but it's currently in use on the old chassis.
Next was the radiator recovery tank and it looks like this now:
The goal is to have nothing visible crossing the firewall and to minimize the length of every hose/wire/tube that must remain.
These are baby steps but you've got to start somewhere.
Mazda seems overly fond of putting components that are connected as far from each other as possible.
The windshield washer reservoir is about as far from the windshield as possible, the radiator recovery tank requires a hose that travels all the way across the rad and then in front of it, the evap cannister is located on the opposite side of the bay from it's connections...the list goes on.
Look at a stock engine compartment and there are hoses and tubes running everywhere.
I think it's unsightly and have long wished to do something about it, so today I began.
I've already prototyped a bracket to move the evap cannister over to the side of the engine formerly filled by the AC and PS components (but since the car is currently engineless, I can't show it).
Since I'll not be running cruise control, there is now a big empty space right next to the firewall and it seemed perfect for the washer reservoir.
This is the first candidate for that duty:
I have another unit that might work even better but it's currently in use on the old chassis.
Next was the radiator recovery tank and it looks like this now:
The goal is to have nothing visible crossing the firewall and to minimize the length of every hose/wire/tube that must remain.
These are baby steps but you've got to start somewhere.
08-26-12, 09:16 PM
#68
Moderator
iTrader: (3)
Join Date: Mar 2001
Location: https://www2.mazda.com/en/100th/
Posts: 30,796
Received 2,574 Likes
on
1,830 Posts
lmao! you're right, AND i never really noticed that before.... maybe i SHOULD move the charcoal canister
08-27-12, 07:45 AM
#69
Of course, I have an advantage that Mazda did not in that I don't have to leave room for options that will not be present, so space for say, the cruise control, can be utilized for something else.
Manual steering and no AC frees up a bunch of room on the left side of the engine...etc, etc, etc.
There are secondary consequences to such moves as well.
For instance, if the washer reservoir is fully visible, do you really need a LOW FLUID warning light?
IMO, no.
Since I tend to keep my cars for a long time and perform most of the maintenance myself, I'm keenly interested in keeping the car as simple as possible.
I've also heard from several full time techs that what kills modern cars is the increasingly integrated and very complex electrical systems...bad things start to happen and the repairs quickly exceed the value of the car.
The RX7 came just at the dawn of this era, probably the most egregious example is the body CPU which computerizes the horn relay, TS and other minor, less important functions.
I'd like to 86 that POS altogether as I can see no advantage to it over the old school $5 blinker unit from PepBoys. I can live without a key reminder or lighted door locks, which just seem like frippery to me.
My inner Luddite seems to be raging this morning.
08-27-12, 08:45 AM
#70
Rotary Enthusiast

The RX7 came just at the dawn of this era, probably the most egregious example is the body CPU which computerizes the horn relay, TS and other minor, less important functions.
I'd like to 86 that POS altogether as I can see no advantage to it over the old school $5 blinker unit from PepBoys. I can live without a key reminder or lighted door locks, which just seem like frippery to me.
My inner Luddite seems to be raging this morning.
I'd like to 86 that POS altogether as I can see no advantage to it over the old school $5 blinker unit from PepBoys. I can live without a key reminder or lighted door locks, which just seem like frippery to me.
My inner Luddite seems to be raging this morning.
It may be possible to identify the circuits you want to keep on the large circuit board and cut out the sections you don't want. Or, using the schematic and pin-outs, build a new circuit or find suitable replacements.
08-27-12, 10:03 AM
#71
True, but I have a S5 and see no reason not to use a simple flasher unit and eliminate circuit boards altogether.
Several months ago I scored a Honda part that integrates the TS and hazard into one simple unit and that's what I plan on using.
My other objection to the stock electrical layout is that by integrating all sorts of functions into one box, you end up with giant clumps of wiring, all crammed into one spot.
I plan on completely decentralizing all the components so everything doesn't homerun to a single location.
Particularly galling to me is the location of the main cabin fusebox which (at my advanced age) requires more contortions (not to mention a flashlight) to access.
My plan is to run power to the areas of the car where it's needed (the battery will be relocated to the passenger bin) and put the relays and fuses as close to their controlled components as possible.
For instance, in the rear will be the relays for the brake lights and fuel pump (I'd like to use the relay style with integrated blade fuses)- that way, I only need one wire each to run through the cabin to it's control source (brake light switch/ECU) and those wires can be light gauge because they carry no real load.
This approach not only minimizes the size of the chassis harness (because it's not really transferring any heavy current) but also reduces the possibility of one failure point taking out whole sections of the harness.
I used this approach (in it's V.1.0 form) on the swapped FD to excellent effect and plan on going even further implementing it this time.
08-27-12, 10:10 AM
#72
Moderator
iTrader: (3)
Join Date: Mar 2001
Location: https://www2.mazda.com/en/100th/
Posts: 30,796
Received 2,574 Likes
on
1,830 Posts
Of course, I have an advantage that Mazda did not in that I don't have to leave room for options that will not be present, so space for say, the cruise control, can be utilized for something else.
Manual steering and no AC frees up a bunch of room on the left side of the engine...etc, etc, etc.
There are secondary consequences to such moves as well.
For instance, if the washer reservoir is fully visible, do you really need a LOW FLUID warning light?
IMO, no.
Since I tend to keep my cars for a long time and perform most of the maintenance myself, I'm keenly interested in keeping the car as simple as possible.
I've also heard from several full time techs that what kills modern cars is the increasingly integrated and very complex electrical systems...bad things start to happen and the repairs quickly exceed the value of the car.
The RX7 came just at the dawn of this era, probably the most egregious example is the body CPU which computerizes the horn relay, TS and other minor, less important functions.
I'd like to 86 that POS altogether as I can see no advantage to it over the old school $5 blinker unit from PepBoys. I can live without a key reminder or lighted door locks, which just seem like frippery to me.
My inner Luddite seems to be raging this morning.
Manual steering and no AC frees up a bunch of room on the left side of the engine...etc, etc, etc.
There are secondary consequences to such moves as well.
For instance, if the washer reservoir is fully visible, do you really need a LOW FLUID warning light?
IMO, no.
Since I tend to keep my cars for a long time and perform most of the maintenance myself, I'm keenly interested in keeping the car as simple as possible.
I've also heard from several full time techs that what kills modern cars is the increasingly integrated and very complex electrical systems...bad things start to happen and the repairs quickly exceed the value of the car.
The RX7 came just at the dawn of this era, probably the most egregious example is the body CPU which computerizes the horn relay, TS and other minor, less important functions.
I'd like to 86 that POS altogether as I can see no advantage to it over the old school $5 blinker unit from PepBoys. I can live without a key reminder or lighted door locks, which just seem like frippery to me.
My inner Luddite seems to be raging this morning.
08-27-12, 10:19 AM
#73
And that was always part of it's appeal to me (although the sidecurtains were a bit crude, even for me).
Now, on a completely unrelated subject...
Today is trash day here and I was going through all the crap I've pulled to discard the stuff I'm absolutely certain will not be reused.
I came upon the "dump" system for the ACV- that large rubber tube abomination with the muffler that runs to a chamber in the nose of the car.
It's ugly as **** and I'd like to delete it but I have no clue what the thing sounds like without it.
Any input appreciated.
08-27-12, 10:39 AM
#74
Ban Peak
iTrader: (49)

And that was always part of it's appeal to me (although the sidecurtains were a bit crude, even for me).
Now, on a completely unrelated subject...
Today is trash day here and I was going through all the crap I've pulled to discard the stuff I'm absolutely certain will not be reused.
I came upon the "dump" system for the ACV- that large rubber tube abomination with the muffler that runs to a chamber in the nose of the car.
It's ugly as **** and I'd like to delete it but I have no clue what the thing sounds like without it.
Any input appreciated.
Now, on a completely unrelated subject...
Today is trash day here and I was going through all the crap I've pulled to discard the stuff I'm absolutely certain will not be reused.
I came upon the "dump" system for the ACV- that large rubber tube abomination with the muffler that runs to a chamber in the nose of the car.
It's ugly as **** and I'd like to delete it but I have no clue what the thing sounds like without it.
Any input appreciated.