Time for Re-Wiring the Entire Harness (84GS, Naomi)
 12-23-10, 03:37 PM
#1
Time for Re-Wiring the Entire Harness (84GS, Naomi)
Hey Guys,
Well I've been procrastinating on this for a long time but I really have to get this part of the project done. While Joe at ClassicAuto is giving my Naomi the Royal Treatment (see my other threads) I've got the wiring harness on the floor in my basement, just calling out to be re-wired.
For the most part, the parts of the harness inside the car don't need any work. They're all in good condition. The Engine-side harness will be getting brand new connectors and a few replaced wires to keep things fresh. The main changes are going to be all the deletes I've done with relation to the Emissions and the FD Alt wiring changes.
I've taken the Wiring Diagram for the 84 12a models, printed it out and started refreshing my old kindergarten colouring skills.
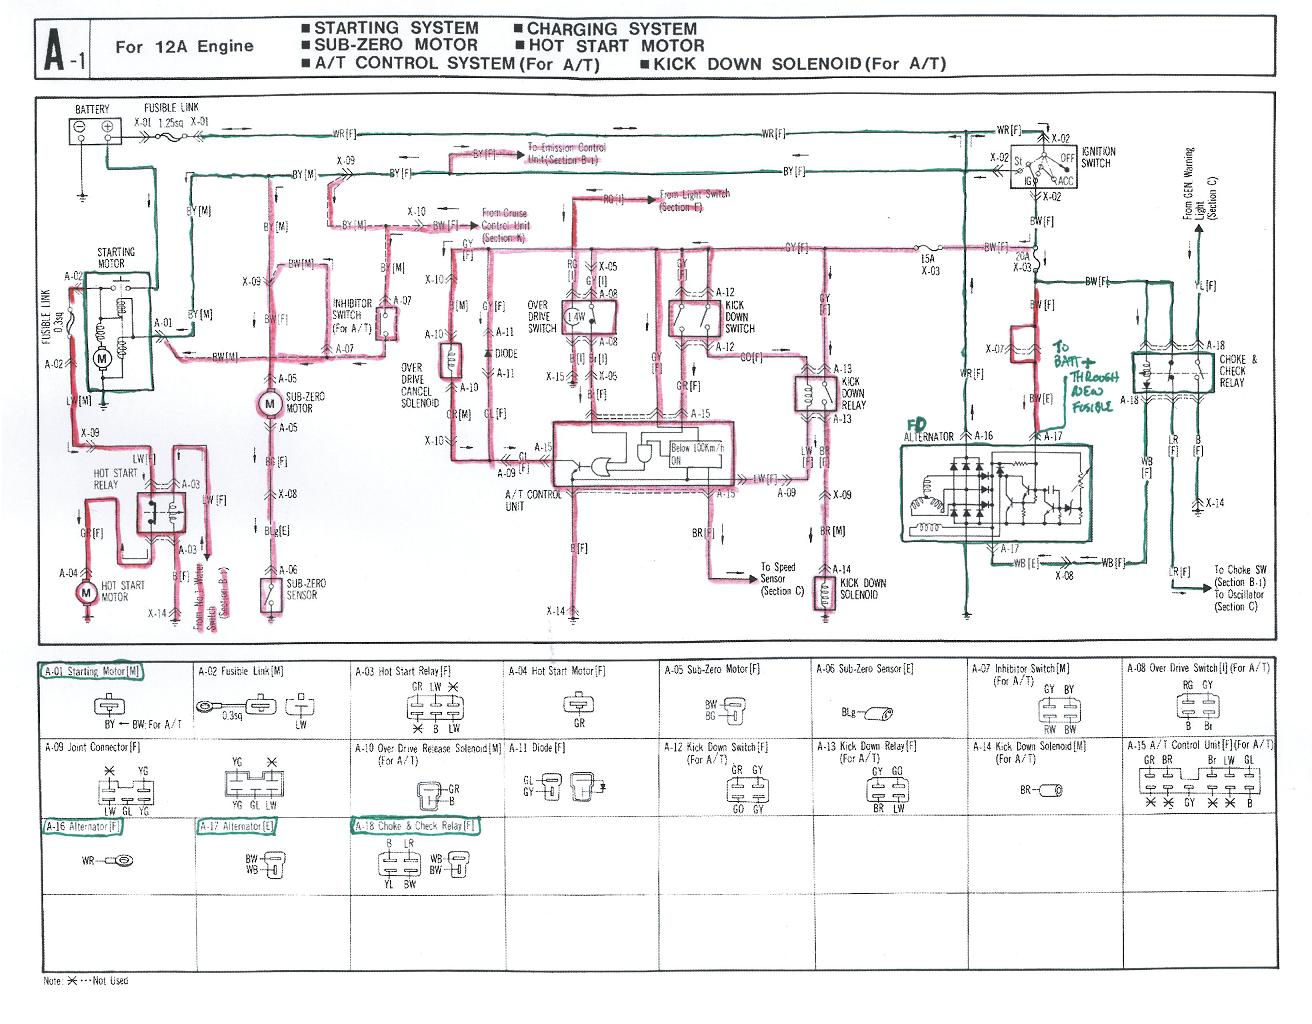
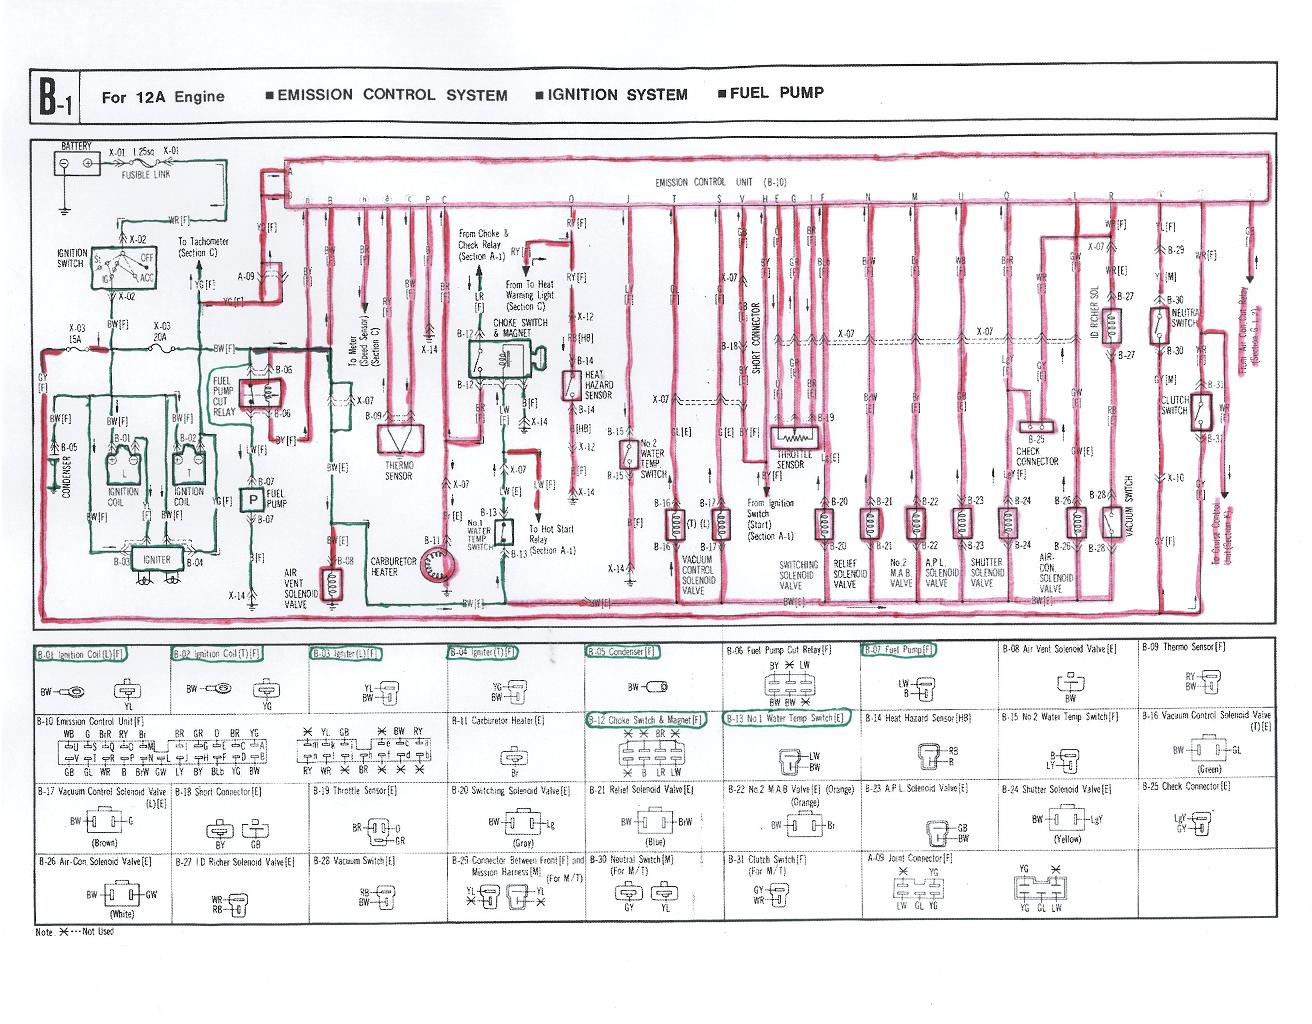
I've scanned in the results for sections A-1 and B-1, which cover the majority of the engine bay and Emissions Control Unit equipment. Any feedback would be appreciated. Stuff in green stays, stuff in red either gets removed, or never came on my car anyway.
Notes:
- My car's a Manual, so any A/T stuff is also marked to delete
- An FD Alt has been added, so changes around the alt wiring have been made
- My car never had Cruise, Power Steering, or Air Conditioning so I don't care about those (marked for deletion if I find any provisions in the harness for them)
- I've done a full Rat's Nest removal and run a Sterling carb and RB Street Port Exhaust system, so all of that's gonzo. I do however want to keep the choke **** and magnet working for the fast-idle rod on the Sterling.
- I bypassed the Fuel Pump Cut Relay (the pre-84 models never had it, and mine blew so I bypassed it). I've decided to make this a permanent mod, because I like the way it functions this way better.
- Yes the Washer Fluid Reservoir has been removed. It cracked and the motor was broken so I took it out. I originally intended to replace it but after 5+ summers I haven't had a single "damn I wish I had washer fluid" moment, so I'm making the removal permanent and having the sprayer holes filled in.
- It's not listed in the diagrams but the original Ignition +12v that went to the Alt will be re-routed to run a 12v Relay for my E-fan. That should stop it from draining my battery when the car's off on extra-hot days. It doesn't serve any purpose when the water pump isn't running anyway so having it run with the car off isn't that useful. The E-fan doesn't currently show up on these for obvious reasons. I'll make a diagram for that separately.
I'm aiming to simplify things as much as possible, but I'm sticking with stock wire colours and routing wherever possible to make future troubleshooting easy. I'll make new diagrams anyway but those will just be these diagrams with the removed items whited-out in MSPaint or something.
Check it out, toss questions at me, and let me know what you think so far. I'm by far not an expert at this kind of thing, but I've spent enough time in and around the car and wiring that I think I have a pretty good grasp of what stays and what goes.
I'll tell you one thing, I definitely have more respect for the electrical engineers who had to add all this emissions crap to the car. It complicated the wiring harness like crazy!
Jon
Well I've been procrastinating on this for a long time but I really have to get this part of the project done. While Joe at ClassicAuto is giving my Naomi the Royal Treatment (see my other threads) I've got the wiring harness on the floor in my basement, just calling out to be re-wired.
For the most part, the parts of the harness inside the car don't need any work. They're all in good condition. The Engine-side harness will be getting brand new connectors and a few replaced wires to keep things fresh. The main changes are going to be all the deletes I've done with relation to the Emissions and the FD Alt wiring changes.
I've taken the Wiring Diagram for the 84 12a models, printed it out and started refreshing my old kindergarten colouring skills.
I've scanned in the results for sections A-1 and B-1, which cover the majority of the engine bay and Emissions Control Unit equipment. Any feedback would be appreciated. Stuff in green stays, stuff in red either gets removed, or never came on my car anyway.
Notes:
- My car's a Manual, so any A/T stuff is also marked to delete
- An FD Alt has been added, so changes around the alt wiring have been made
- My car never had Cruise, Power Steering, or Air Conditioning so I don't care about those (marked for deletion if I find any provisions in the harness for them)
- I've done a full Rat's Nest removal and run a Sterling carb and RB Street Port Exhaust system, so all of that's gonzo. I do however want to keep the choke **** and magnet working for the fast-idle rod on the Sterling.
- I bypassed the Fuel Pump Cut Relay (the pre-84 models never had it, and mine blew so I bypassed it). I've decided to make this a permanent mod, because I like the way it functions this way better.
- Yes the Washer Fluid Reservoir has been removed. It cracked and the motor was broken so I took it out. I originally intended to replace it but after 5+ summers I haven't had a single "damn I wish I had washer fluid" moment, so I'm making the removal permanent and having the sprayer holes filled in.
- It's not listed in the diagrams but the original Ignition +12v that went to the Alt will be re-routed to run a 12v Relay for my E-fan. That should stop it from draining my battery when the car's off on extra-hot days. It doesn't serve any purpose when the water pump isn't running anyway so having it run with the car off isn't that useful. The E-fan doesn't currently show up on these for obvious reasons. I'll make a diagram for that separately.
I'm aiming to simplify things as much as possible, but I'm sticking with stock wire colours and routing wherever possible to make future troubleshooting easy. I'll make new diagrams anyway but those will just be these diagrams with the removed items whited-out in MSPaint or something.
Check it out, toss questions at me, and let me know what you think so far. I'm by far not an expert at this kind of thing, but I've spent enough time in and around the car and wiring that I think I have a pretty good grasp of what stays and what goes.
I'll tell you one thing, I definitely have more respect for the electrical engineers who had to add all this emissions crap to the car. It complicated the wiring harness like crazy!
Jon
Last edited by vipernicus42; 12-23-10 at 10:58 PM.
 12-23-10, 07:53 PM
#2

I understand putting the stuff you don't want in red, but it's a little confusing to say the stuff in red is from an automatic when all of the red stuff that you have marked is not from an automatic. I would pick another color for the automatic stuff and designate the new color and red as the stuff to delete. Someone reading this might have an auto and think they can yank all the stuff in red out.
12-23-10, 10:57 PM
#3
By "in red" I mean "is also marked to be deleted"
That problem exists for more than just Automatic Transmission. People with Cruise Control, Power Steering or Air Conditioning will run into the same problem. I'm not going to put each of those in a different colour because they come with attached wires and connectors that are shared and that I really do want to remove and these diagrams would get much more confusing if I went that route.
This thread is more of a "Let's get some feedback and some extra eyes on this from people who know this stuff better" thread than a "Here's how to gut your wiring harness" tutorial, so I guess I should put the disclaimer that this is only 100% valid SPECIFICALLY for:
- An 84GS with Manual Transmission
- With No Cruise, Power Steering, or Air Conditioning
- And aftermarket carb and exhaust system
- And no emissions equipment
- Where you've decided to delete the windshield washer sprayer system
and so if you are reading this thread instructively keep in mind that your mileage may vary.
I'll also change that line to say "My car is a Manual, so stuff for A/T is also marked to delete"
Jon
Last edited by vipernicus42; 12-23-10 at 11:05 PM.
12-24-10, 12:59 AM
#4
its not hard to do at all as I done it many times and currently, cleaning up a complete 83 harness so I can upgrade one of my RX-3s; however, it is very time consuming and be sure to run to harbor freight or any electronic shop and buy several packages of heat shrink along with soldering iron if you dont have one yet.
Now, if you want to start with the engine bay, start by labeling the alternator wires, oil pressure, and water temp. then unhooking the 2 plugs on the passenger side of engine bay. After that, start with the identifying the headlight and parking light wires and so on and so forth. Start slow and dont rush and bring plenty of heine (or bud light if you're a light weight ).
).
also, its best if you have a place to hang the harness such as garage door. don;t worry about the starting/ignition wiring as it is the easiest one to do. And lastly, be sure to enlarge that electrical diagram (in sections and taped them together) for an easy view.
Now, if you want to start with the engine bay, start by labeling the alternator wires, oil pressure, and water temp. then unhooking the 2 plugs on the passenger side of engine bay. After that, start with the identifying the headlight and parking light wires and so on and so forth. Start slow and dont rush and bring plenty of heine (or bud light if you're a light weight
). also, its best if you have a place to hang the harness such as garage door. don;t worry about the starting/ignition wiring as it is the easiest one to do. And lastly, be sure to enlarge that electrical diagram (in sections and taped them together) for an easy view.
12-24-10, 01:34 AM
#5
Jolly Green Giant
iTrader: (1)
Join Date: Feb 2008
Location: San Antonio, TX
Posts: 509
Likes: 0
Received 0 Likes
on
0 Posts
its not hard to do at all as I done it many times and currently, cleaning up a complete 83 harness so I can upgrade one of my RX-3s; however, it is very time consuming and be sure to run to harbor freight or any electronic shop and buy several packages of heat shrink along with soldering iron if you dont have one yet.
Now, if you want to start with the engine bay, start by labeling the alternator wires, oil pressure, and water temp. then unhooking the 2 plugs on the passenger side of engine bay. After that, start with the identifying the headlight and parking light wires and so on and so forth. Start slow and dont rush and bring plenty of heine (or bud light if you're a light weight).
also, its best if you have a place to hang the harness such as garage door. don;t worry about the starting/ignition wiring as it is the easiest one to do. And lastly, be sure to enlarge that electrical diagram (in sections and taped them together) for an easy view.
Now, if you want to start with the engine bay, start by labeling the alternator wires, oil pressure, and water temp. then unhooking the 2 plugs on the passenger side of engine bay. After that, start with the identifying the headlight and parking light wires and so on and so forth. Start slow and dont rush and bring plenty of heine (or bud light if you're a light weight
). also, its best if you have a place to hang the harness such as garage door. don;t worry about the starting/ignition wiring as it is the easiest one to do. And lastly, be sure to enlarge that electrical diagram (in sections and taped them together) for an easy view.
I plan on doing much the same you are but to a bit more of an extreme as I'm taking out my dash, all my interior [already gone] so everything that isn't purely essential to the car functioning is being stripped.
Please do update when you start pulling and de-looming for any stumps you really run into. I just finally started doing tech work at my job so all my tools are now locked away during the weekends which means I can't work on my RX-7 anymore until I buy another toolset so I'm kinda left staring at the car thinking about how I want to go about it.
Good Luck!
12-24-10, 10:41 AM
#6
Thankfully I've been soldering and playing with the wiring of things since I was 12, so I've got a good soldering iron, soldering paste and I know where to pick up some good heatshrink. We've also got a thread in the archive that shows where to get replacement "blue wire with a yellow stripe" type wire to keep that stock look, along with new connectors and spades.
Joe did a great job of labeling all the connectors with masking tape and a sharpie when he took the harness out, so I'll be putting fresh labels on there for him when he goes to reassemble it.
I'm still looking for a good place to get some high quality wrap or loom material for it. I don't just want to wrap it in cheap electrical tape if I can help it.
I had to shrink the diagram so that I could attach it to the post, but yeah I've got some big copies around.
Oh yeah, I'll have beer. Nothing American for sure (my golden rule of beer is ABC - Anything But Coors) so I'll likely be getting some Sapporo (since the car's Japanese) or Heinekin (since Felix Wankel was German).
I'll be doing updates at many steps along the way. My other diagrams should be up sometime after Christmas (I may work on them on Boxing Day) and then when I dig into the harness there'll be lots of pictures.
The only thing I had a question about was the Choke Switch/Magnet on the diagram. Am I correct in my assumption that the only thing the choke "switch" part is for is telling the ECU whether I have the choke pulled out or not? Is it okay if that BR wire coming off B-12 just gets removed and not connected to anything?
That was the only thing I wasn't 100% sure of.
Jon


Trending Topics
12-24-10, 03:56 PM
#9
Moderator
iTrader: (3)
Join Date: Mar 2001
Location: https://www2.mazda.com/en/100th/
Posts: 30,780
Received 2,565 Likes
on
1,824 Posts
because electrical tape is just a huge mess
12-27-10, 12:25 PM
#11
Hmm... thanks for the suggestion Wacky.
I'm going to stick with re-wiring the stock harness though, partly because there's something about me that's really **** about the details, and partly because I'm not the one doing the install. I'm doing the modifications to the harness, then shipping it to the shop 600km away that's working on the car and they're doing the install. So I want to make sure that all the runs are the correct length and I think I've got the best chance of that using the stock harness.
I figured it'd be good to re-post what I've found in terms of wiring/connector supplies. There's a great thread in the archive about it, but basically I'll be getting my stuff from these places:
Connectors:
http://www.easternbeaver.com/Main/El...onnectors.html
Crimping Tool (I'm going for the Xcelite ECP-112):
http://www.easternbeaver.com/Main/El...ols/tools.html
Terminal Removal Tool:
http://www.princessauto.com/workshop...-removal-tools
Replacement Wire (Click on Supplies, Wire Colours and Wire by the Foot):
http://www.riwire.com/
With that I should be able to do high quality re-wiring of the harness, stick to the stock colour code, and be sure that the harness will fit when Joe goes to install it. At least, that's the plan!
Jon
01-16-13, 11:43 AM
#14
If you have the funds, this is way easier to use Wiring Harness. Most hot rod guys are using ezwiring over painless kit.

Thread
Thread Starter
Forum
Replies
Last Post
trickster
2nd Generation Specific (1986-1992)
25
07-01-23 04:40 PM