SA Waffle wheel refurb
 07-15-08, 08:18 PM
#1
Waffles - hmmm good
Thread Starter
iTrader: (1)
SA Waffle wheel refurb
I bought these waffle wheels several years ago from a forum member (31rx7) for 70 bucks or so with the intent of restoring them to like new condition.
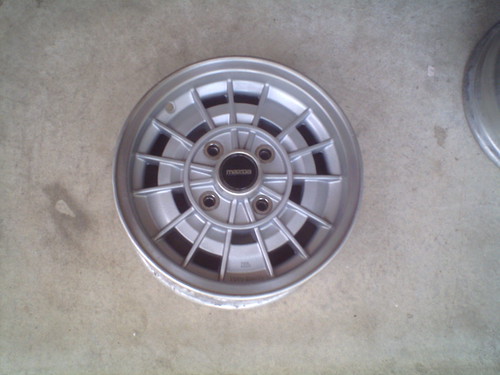
You can see here I have a brand, new never seen the road, waffle wheel as my spare because way back in the 80s someone broke one of my wheels mounting tires on it. Its was purchased brand new from a Mazda stealership back in 86 or so. This wheel is all shiny and new looking and painted a light grey in the waffle area.

So I have this set of wheels I'm restoring and I thought it would make a good projet to write up. There will be lots of picture although my cheap Walmart camera doesn't take close ups real well. Most importantly I'll try to describe the best way to go about this based on what I've done here. This is not the exact way I did it but rather lessons learned as I was working on it.
I'll continue in the next few posts with the details.
You can see here I have a brand, new never seen the road, waffle wheel as my spare because way back in the 80s someone broke one of my wheels mounting tires on it. Its was purchased brand new from a Mazda stealership back in 86 or so. This wheel is all shiny and new looking and painted a light grey in the waffle area.
So I have this set of wheels I'm restoring and I thought it would make a good projet to write up. There will be lots of picture although my cheap Walmart camera doesn't take close ups real well. Most importantly I'll try to describe the best way to go about this based on what I've done here. This is not the exact way I did it but rather lessons learned as I was working on it.
I'll continue in the next few posts with the details.
 07-15-08, 08:30 PM
#2
Waffles - hmmm good
Thread Starter
iTrader: (1)
Getting started
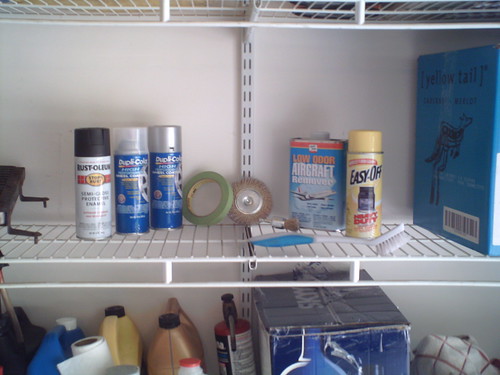
First thing is to list supplies you need:
2 or 3 cans of EasyOff Oven cleaner
1 stiff plastic scrub brush
1 (or 2) brass wire brushes
1 wire brush (not shown)
1 piece of 0000 steel wool (not shown)
1 roll of green masking tape
2 bottles of Aluminum Mag Wheel Etching cleaner (not shown)
2 or 3 cans of aircracft stripper (aerosal) or one quart of the paste
1 can of clear coat (Duplicolor) (not the wheel clear coat just regular clearcoat)
1 can of light grey wheel paint (Duplicolor)
1 hose connected to a good water source (not shown)
1 spray nozzle that you can adjust from stream to spray (not shown)
Heres a pictures of some of the supplies:
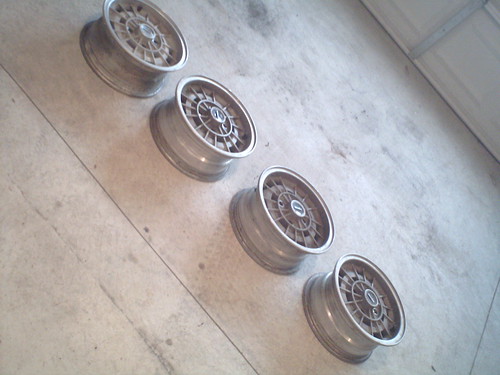
Here some more pictures of the wheels before the resto work started. These are what most of the wheels looked like before I started.
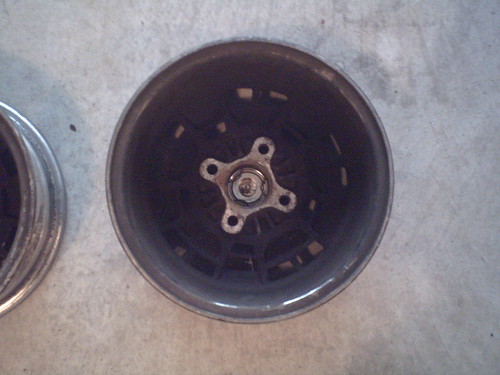
And some had the residue from using that flat tire in a can crap. Please don't let your loved ones use this stuff. Its almost impossible to get off.
Next up stripping them down.
2 or 3 cans of EasyOff Oven cleaner
1 stiff plastic scrub brush
1 (or 2) brass wire brushes
1 wire brush (not shown)
1 piece of 0000 steel wool (not shown)
1 roll of green masking tape
2 bottles of Aluminum Mag Wheel Etching cleaner (not shown)
2 or 3 cans of aircracft stripper (aerosal) or one quart of the paste
1 can of clear coat (Duplicolor) (not the wheel clear coat just regular clearcoat)
1 can of light grey wheel paint (Duplicolor)
1 hose connected to a good water source (not shown)
1 spray nozzle that you can adjust from stream to spray (not shown)
Heres a pictures of some of the supplies:
Here some more pictures of the wheels before the resto work started. These are what most of the wheels looked like before I started.
And some had the residue from using that flat tire in a can crap. Please don't let your loved ones use this stuff. Its almost impossible to get off.
Next up stripping them down.
07-15-08, 08:42 PM
#3
Waffles - hmmm good
Thread Starter
iTrader: (1)
Stripping the wheels
1. Use the oven cleaner on the backs of the wheels first to get most of the really heavy grease off. Do the backs first so that the streaking that will happen to the front side is dealt with when you turn the wheel over to work the front side. Only leave the cleaner on for a few minutes at a time, if its starts to evaporate, spray some more cleaner on it to keep it wet. Did I say wear gloves and a respirator? I didn't but you know its probably a good idea. Use the hose to first gently rinse the cleaner off then turn it to a spray and make sure its all cleaned off. You may have to do this multiple times until you don't see any improvement, thats when you switch to the next step.
2. Once the backs stop getting any cleaner from the EasyOff switch to the Mag Wheel etching cleaner. This stuff is strong but it will get down to the metal pretty good. Again, don't let it dry on the wheel, add some or make sure you spray it off the same way as before. Spray gentle first and then use a strong stream once the bulk of the cleaner has been knocked off. This keeps little flecks of acid from hitting you on the legs and stinging like crazy when you have shorts on. Ask me how I know It may take 2 or 3 rounds to get them this clean.
3. While the wheels are still face down. Look at the back of the front of the wheel rim and the front bead. Nows is the time to hit those areas with easy off and the etching cleaner as well. Through out this process keep the plastic brush handy and use on the cleaners as they work to help loosen all the crap thats on there. You will eventually want to take a wire brush to the bead to make sure its smooth and clean.
4. The backs are all clean and so is the front bead. Now turn them over and it will look ugly because the cleaners have streak dirt and stuff on the front side. Thats ok, don't panic because once you get done with the fronts it won't matter. Repeat steps 1, 2, and 3 (this time doing the rear rim and bead).
5. Now you need to strip the clearcoat and paint from the front of the wheel. Let the wheels dry real good first. Take the aircraft stripper in the spray can and spray on the front of the wheels. Make sure you get it from all angles. Sometimes it helps to prop the wheels up on each other so the spray can is held horizontally. Aerosol spray cans work better in the vertical position. Leave this on for a few minutes. Again don't let it evaporate away. Spray it down, gentle first then with a strong stream. For those that don't think these wheels were painted from the factory, this will make a believer out of you. You'll see the paint lift right off as you watch including the metallic flakes that were in it.
Your wheels are now stripped and ready to prep for paint. You can see some minor streaks on the wheel fronts in this picture but the paint will cover it fine.
And the back side
Next step is prepping for paint.
2. Once the backs stop getting any cleaner from the EasyOff switch to the Mag Wheel etching cleaner. This stuff is strong but it will get down to the metal pretty good. Again, don't let it dry on the wheel, add some or make sure you spray it off the same way as before. Spray gentle first and then use a strong stream once the bulk of the cleaner has been knocked off. This keeps little flecks of acid from hitting you on the legs and stinging like crazy when you have shorts on. Ask me how I know
It may take 2 or 3 rounds to get them this clean.3. While the wheels are still face down. Look at the back of the front of the wheel rim and the front bead. Nows is the time to hit those areas with easy off and the etching cleaner as well. Through out this process keep the plastic brush handy and use on the cleaners as they work to help loosen all the crap thats on there. You will eventually want to take a wire brush to the bead to make sure its smooth and clean.
4. The backs are all clean and so is the front bead. Now turn them over and it will look ugly because the cleaners have streak dirt and stuff on the front side. Thats ok, don't panic because once you get done with the fronts it won't matter. Repeat steps 1, 2, and 3 (this time doing the rear rim and bead).
5. Now you need to strip the clearcoat and paint from the front of the wheel. Let the wheels dry real good first. Take the aircraft stripper in the spray can and spray on the front of the wheels. Make sure you get it from all angles. Sometimes it helps to prop the wheels up on each other so the spray can is held horizontally. Aerosol spray cans work better in the vertical position. Leave this on for a few minutes. Again don't let it evaporate away. Spray it down, gentle first then with a strong stream. For those that don't think these wheels were painted from the factory, this will make a believer out of you. You'll see the paint lift right off as you watch including the metallic flakes that were in it.
Your wheels are now stripped and ready to prep for paint. You can see some minor streaks on the wheel fronts in this picture but the paint will cover it fine.
And the back side
Next step is prepping for paint.
07-15-08, 08:55 PM
#4
Waffles - hmmm good
Thread Starter
iTrader: (1)
Prepping for paint I
Now is the time to break out the steel wool, brass brushes and wire brush.
1. I used the 0000 steel wool all around the rim lip to get it all to a uniform finish and to slightly polish it up. You could go further and use polishing compounds or a wheel to buff up the lip to chrome like shine but I really didn't want that. I didn't want the lips to standout and distract from the overall look of the wheel.
I like waffle wheels, can you tell? Did I mention they are only 12.5 lbs each. Pretty good for a stock wheel. Anyway back to the process.
2 Next I used the small brass brush on a drill and ran it straight down on top of the lug holes to clean out the chromed lug holes and remove any crust from them. It didn't seem to hurt the chrome at all and really shined them up good.
3 Then took the larger brass brush and hit both inside beads all the way around to make sure I have a nice smooth finish for the tires to seat on.
4. Last, for the wheels that still have the flat tire can crap on them, I used the heavy wire brush around the inside of the wheel to get all the largest chunks off.
5. Now you can spray the off again and let them dry good.
BTW I had also stripped the center caps and had them ready to paint as well.
07-15-08, 09:10 PM
#5
Waffles - hmmm good
Thread Starter
iTrader: (1)
Preping for paint II
The wheels are ready to be painted, but wait you need to mask off the wheels or everything will get covered in paint. Masking is a pain but its really worth doing.
1. Mask the lip by applying short strips around the lip so that the inside edge has always got some tape overlap on it. It will look something like this:
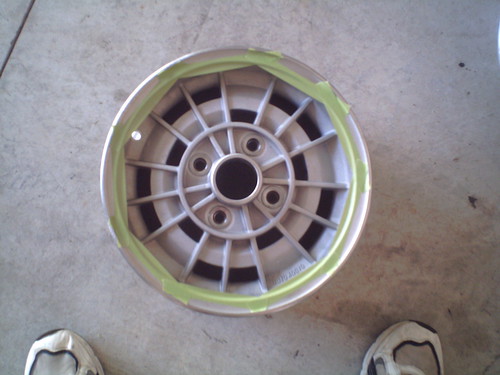
2. Now take a razor and with gentle sawing motions up and down go around the inside of the lip edge and cut the tape off to make a perfect circular mask on the inside of the lips. At first this is kind of difficult but after the first wheel you will get a rhythm established.
3. Next mask each of the chrome lug holes. Just tape over them and then run a razor around the outside edge to trim the mask a bit. Also mask off the center top edge as this should be left unpainted as well. You will end up with something like this:
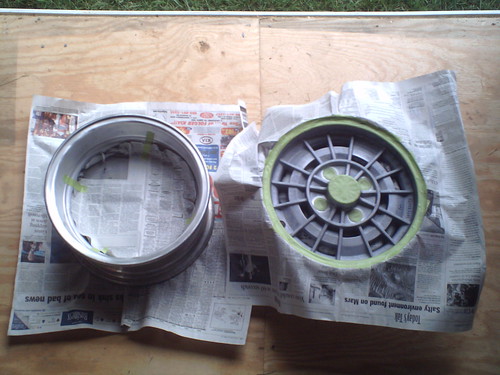
4. Now get some newspaper and trace the outline of a wheel on it. Cut out the circle from the paper but inside the drawn circle by about 1/2 inch. This will then be the outer mask to go over the rest of the lip and drape over the rim to keep overspray off of the inner part of the beads. Take the circle that was cut out and press it up against the back side of the front of the wheel so that it can stop the spray coming through from the from side.
Your wheels are now ready to paint
1. Mask the lip by applying short strips around the lip so that the inside edge has always got some tape overlap on it. It will look something like this:
2. Now take a razor and with gentle sawing motions up and down go around the inside of the lip edge and cut the tape off to make a perfect circular mask on the inside of the lips. At first this is kind of difficult but after the first wheel you will get a rhythm established.
3. Next mask each of the chrome lug holes. Just tape over them and then run a razor around the outside edge to trim the mask a bit. Also mask off the center top edge as this should be left unpainted as well. You will end up with something like this:
4. Now get some newspaper and trace the outline of a wheel on it. Cut out the circle from the paper but inside the drawn circle by about 1/2 inch. This will then be the outer mask to go over the rest of the lip and drape over the rim to keep overspray off of the inner part of the beads. Take the circle that was cut out and press it up against the back side of the front of the wheel so that it can stop the spray coming through from the from side.
Your wheels are now ready to paint
07-15-08, 09:33 PM
#6
Waffles - hmmm good
Thread Starter
iTrader: (1)
Painting the wheels
Note that before you start the painting make sure you have at least an hour of uninterrupted time to do it. The reason being that the color coat and the clear coat need to be applied within an hour or so or you will have to wait a day and then rough up the color coat to get the clear to stick.
Start by painting the front side with the grey wheel paint. Apply several lights coats 10 minutes apart. It helps to have the wheel up on a platform or something so that you can hold the can almost vertical as you spray and turn the wheel with the other hand. That helps get the paint into all the crannys and holes. Also spraying from the top down while rotating the wheel is another way to make sure you get the coverage you need. I was amazed how close the Dplicolor light gray was to the original paint mazda used for the wheels.
Once the color coat has been completely done, pull all the masking off. Now we need to do the clear coat. I started to paint the clear coat on the front side of my first wheel using the Duplicolor wheel clearcoat. That was a mistake, I should have tested it on the back of the wheel first as I noticed that the wheel clearcoat paint wasn't drying clear and was developing odd patterns. One thing I noticed was that the wheel clearcoat I had didn't have a mixing ball in it and I thought maybe it wasn't mixed up good.
So back to the Zone I went. I picked up some more wheel clearcoat and just in case I picked up the regular finish clearcoat. Both cans had mixing ***** in them when they were shook around. One other can at the store didn't have a ball either. Anyway, I brought that home and tried the wheel clear coat again, same problem, it wasn't drying clear. It kept having a cloudy look to it.
I then tested the regular finish clearcoat and it worked fine and dried quickly to a clear finish. The one wheel I started on I had to quickly respray with the gray and steel wool the lips, lug holes and center cap edge to get rid of the cloudy clearcoat. Time was running out as my 1 hour window was closing. What drama, painting wheels, who would have known?
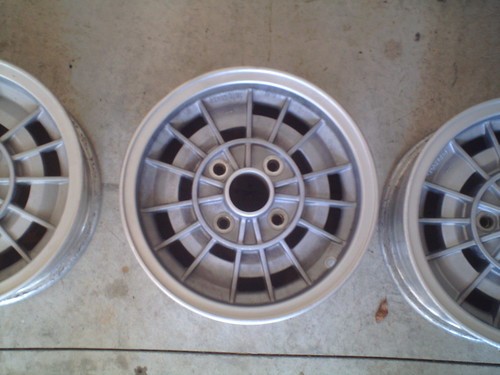
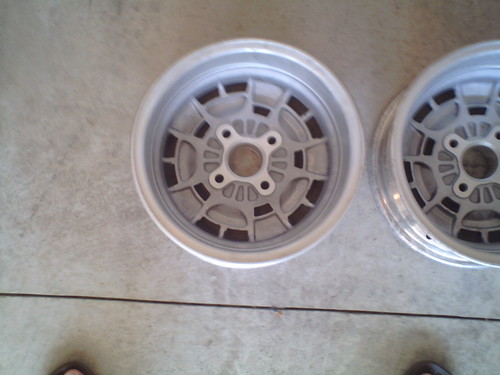
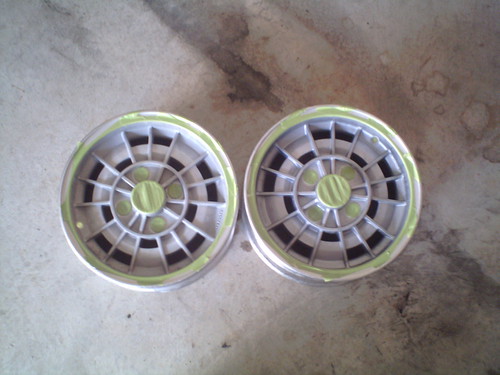
I then proceeded to clearcoat the crap out of the front and backs of all the wheels. I put down several light coats until the can ran dry. Heres the results:
The center caps were easy I just painted them with some rustoleum satin black. Then while they were wet I took a clothe dipped in mineral spirits and used it to wipe the piant off the mazda log and the outer accent lines around the edges. I then clearcoated the crap out of those as well.
I'm sure this isn't the only way to get this done, but I hope it helps anyone else that wants to tackle their waffle wheels. I spent the equivalent of about 8 hours doing this over a two weekends as I got time. Enjoy.
Tim
Start by painting the front side with the grey wheel paint. Apply several lights coats 10 minutes apart. It helps to have the wheel up on a platform or something so that you can hold the can almost vertical as you spray and turn the wheel with the other hand. That helps get the paint into all the crannys and holes. Also spraying from the top down while rotating the wheel is another way to make sure you get the coverage you need. I was amazed how close the Dplicolor light gray was to the original paint mazda used for the wheels.
Once the color coat has been completely done, pull all the masking off. Now we need to do the clear coat. I started to paint the clear coat on the front side of my first wheel using the Duplicolor wheel clearcoat. That was a mistake, I should have tested it on the back of the wheel first as I noticed that the wheel clearcoat paint wasn't drying clear and was developing odd patterns. One thing I noticed was that the wheel clearcoat I had didn't have a mixing ball in it and I thought maybe it wasn't mixed up good.
So back to the Zone I went. I picked up some more wheel clearcoat and just in case I picked up the regular finish clearcoat. Both cans had mixing ***** in them when they were shook around. One other can at the store didn't have a ball either. Anyway, I brought that home and tried the wheel clear coat again, same problem, it wasn't drying clear. It kept having a cloudy look to it.
I then tested the regular finish clearcoat and it worked fine and dried quickly to a clear finish. The one wheel I started on I had to quickly respray with the gray and steel wool the lips, lug holes and center cap edge to get rid of the cloudy clearcoat. Time was running out as my 1 hour window was closing. What drama, painting wheels, who would have known?
I then proceeded to clearcoat the crap out of the front and backs of all the wheels. I put down several light coats until the can ran dry. Heres the results:
The center caps were easy I just painted them with some rustoleum satin black. Then while they were wet I took a clothe dipped in mineral spirits and used it to wipe the piant off the mazda log and the outer accent lines around the edges. I then clearcoated the crap out of those as well.
I'm sure this isn't the only way to get this done, but I hope it helps anyone else that wants to tackle their waffle wheels. I spent the equivalent of about 8 hours doing this over a two weekends as I got time. Enjoy.
Tim
07-15-08, 09:50 PM
#7
My 7 is my girlfriend.
iTrader: (5)
Join Date: Feb 2006
Location: London, Ontario, Canada
Posts: 3,162
Likes: 0
Received 1 Like
on
1 Post
Looking good. You certainly put a little more effort into your wheels than I did with mine. Here's my thread: https://www.rx7club.com/1st-generation-specific-1979-1985-18/blah-bling-766238/
Trending Topics
07-15-08, 10:02 PM
#8
Waffles - hmmm good
Thread Starter
iTrader: (1)
Hey thanks. I had this write up planned and started before yours but I just got around to getting it all written and pics loaded.
Next I want to get some RWL old school tires on them. So far the only ones I've found are 205/60R13 Cooper radials. I'd love to find some NOS BFGs that aren't dry rotted in a 185/70R13 size. They still make them but not for 13 inch rims.
Next I want to get some RWL old school tires on them. So far the only ones I've found are 205/60R13 Cooper radials. I'd love to find some NOS BFGs that aren't dry rotted in a 185/70R13 size. They still make them but not for 13 inch rims.
07-15-08, 10:38 PM
#9
Too old to act my age
Join Date: Feb 2005
Location: Tulsa, Ok.
Posts: 3,164
Likes: 0
Received 0 Likes
on
0 Posts
TG, I see you're in NC. Any chance there's a track near your area that runs the "Legends" series? They use a spec BFG Comp T/A 205/60-13. Perhaps you could get your hands on a set of them.
I know it's not quite the size you want, but they have that classic BFG look.
BTW, those waffles sure look tasty.....
I know it's not quite the size you want, but they have that classic BFG look.
BTW, those waffles sure look tasty.....
07-16-08, 04:55 AM
#11
Nice work TG! Think I would have media-blasted then powdercoated for the most durable finish (maybe one day), but for rattle-can this is first rate.
Waffles Rool!
I used the Summi HTR 205s and they look great! I "think" they make a 185 too?
Show us the RX with "new" wheels mounted....
Stu Aull
80SG
Golden Waffles (we ain't talkin' breakfast!)
Alaska
Waffles Rool!
I used the Summi HTR 205s and they look great! I "think" they make a 185 too?
Show us the RX with "new" wheels mounted....
Stu Aull
80SG
Golden Waffles (we ain't talkin' breakfast!)
Alaska
07-16-08, 06:19 AM
#12
Waffles - hmmm good
Thread Starter
iTrader: (1)
Thanks guys. I can't wait to get new shoes on them and mount them up on the SA.
I know about the legends tires but you can only get them used from folks that buy them new for the races directly from BFG.
The sumis are fine and I may mount them up on my other set of waffles for day to day but I'm looking for a RWL on the sidewall to give these wheels and my ride the old school look.
7aull, the media blasting would have worked just as well I guess but this way was just as easy. Also the media blasting wouldn't have remove all the caked on grease on the inside of the wheels. I would have still used the over cleaner there. I am thinking about powder coating my other set as a project. I have a kiln that I can fit all the wheels in at once and bake them at whatever temp I need for the powder. Never done powder so it will be something new. Then we can compare them.
One thing that doesn't come thru in the pics because of my walmart camera is just how nice they look. I'll grab my wifes camera and take a shot of one the refurb wheels and the new spare one for comparison when I get a chance and post that up here.

 07-17-08, 01:39 AM
#17
Full Member
Join Date: Mar 2008
Location: Roseburg, Oregon
Posts: 142
Likes: 0
Received 0 Likes
on
0 Posts
Thanks guys. I can't wait to get new shoes on them and mount them up on the SA.
I know about the legends tires but you can only get them used from folks that buy them new for the races directly from BFG.
The sumis are fine and I may mount them up on my other set of waffles for day to day but I'm looking for a RWL on the sidewall to give these wheels and my ride the old school look.
7aull, the media blasting would have worked just as well I guess but this way was just as easy. Also the media blasting wouldn't have remove all the caked on grease on the inside of the wheels. I would have still used the over cleaner there. I am thinking about powder coating my other set as a project. I have a kiln that I can fit all the wheels in at once and bake them at whatever temp I need for the powder. Never done powder so it will be something new. Then we can compare them.
One thing that doesn't come thru in the pics because of my walmart camera is just how nice they look. I'll grab my wifes camera and take a shot of one the refurb wheels and the new spare one for comparison when I get a chance and post that up here.
I know about the legends tires but you can only get them used from folks that buy them new for the races directly from BFG.
The sumis are fine and I may mount them up on my other set of waffles for day to day but I'm looking for a RWL on the sidewall to give these wheels and my ride the old school look.
7aull, the media blasting would have worked just as well I guess but this way was just as easy. Also the media blasting wouldn't have remove all the caked on grease on the inside of the wheels. I would have still used the over cleaner there. I am thinking about powder coating my other set as a project. I have a kiln that I can fit all the wheels in at once and bake them at whatever temp I need for the powder. Never done powder so it will be something new. Then we can compare them.
One thing that doesn't come thru in the pics because of my walmart camera is just how nice they look. I'll grab my wifes camera and take a shot of one the refurb wheels and the new spare one for comparison when I get a chance and post that up here.
I've been a little reluctant to do this on my rims because I didn't know how well it would end up looking, but now that I've seen this thread I'm defiantly planing to do it. I can get an extra set off of a parts car that someone I know has, so next time I'm out there I'll probably pull them, so I can take my time and strip and paint them. Then once they're done and on my car I'll probably do the same to the ones currently on my car and put them up for sale.
07-17-08, 05:29 AM
#18

Nice work TG! Think I would have media-blasted then powdercoated for the most durable finish (maybe one day), but for rattle-can this is first rate.
Waffles Rool!
I used the Summi HTR 205s and they look great! I "think" they make a 185 too?
Show us the RX with "new" wheels mounted....
Stu Aull
80SG
Golden Waffles (we ain't talkin' breakfast!)
Alaska
Waffles Rool!
I used the Summi HTR 205s and they look great! I "think" they make a 185 too?
Show us the RX with "new" wheels mounted....
Stu Aull
80SG
Golden Waffles (we ain't talkin' breakfast!)
Alaska
07-17-08, 10:15 AM
#19
Too old to act my age
Join Date: Feb 2005
Location: Tulsa, Ok.
Posts: 3,164
Likes: 0
Received 0 Likes
on
0 Posts
I'll bet that if you found someone that uses those tires for racing that you could get them to buy you a set the next time they are buying tires. They may charge you a little more than they're cost, but if it's what you're looking to get then it would definitely be worth it. And it couldn't hurt to ask.
I have a set mounted on stock wheels, for those times I am going to the road course for a play day. I used to use them for autox, but I like the 15's better. The shorter sidewall, and wider tread seem to work better in the really tight sections.
I still use the 13's for track days, as the smaller OD gives better acceleration. Besides, I don't mind killing off tires that cost me $40 for the set. The smaller OD means I have to shift in and out of 3rd way too often at most autox's. You wouldn't think the minor difference in OD between a 205/60-13 and 205/50-15 could be detected, but when you are peaking out 2nd with the taller tire, you'd need 3rd with a shorter tire.
One thing I like about the BFG legend tires, they have stiffer sidewalls than most 13's. The old school white letters also look bitchin'.
07-18-08, 04:39 AM
#20
Full Member
Join Date: Mar 2008
Location: Roseburg, Oregon
Posts: 142
Likes: 0
Received 0 Likes
on
0 Posts
Yea, I just mentioned it because it sounds like he didn't want to get used tires, but it couldn't hurt to ask someone to purchase an extra set the next time they are buying tires and like I said they may charge you a little bit more than what it costs them, but if you want a new set of tires and that is the only way to get them it's worth it. About the worst that would happen is they say no.
A lot of people think very poorly of used tires, but I have to say I've bought a lot of used tires over the years, and you can usually get a really good deal on some tires that still have a lot of life left in them. I imagine that would be even more true if you were getting used tires from someone that was using them for racing since they're going to be changing them out a lot sooner than someone that was just using them on they're street car.
A lot of people think very poorly of used tires, but I have to say I've bought a lot of used tires over the years, and you can usually get a really good deal on some tires that still have a lot of life left in them. I imagine that would be even more true if you were getting used tires from someone that was using them for racing since they're going to be changing them out a lot sooner than someone that was just using them on they're street car.
08-05-08, 03:30 PM
#21
Waffles - hmmm good
Thread Starter
iTrader: (1)
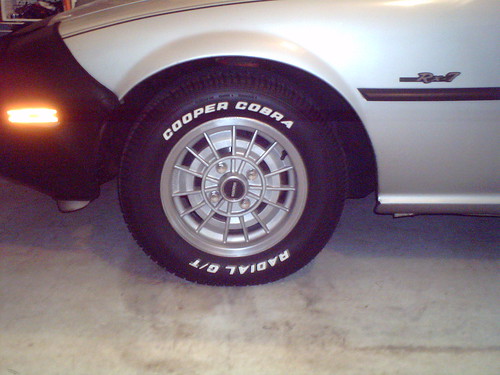
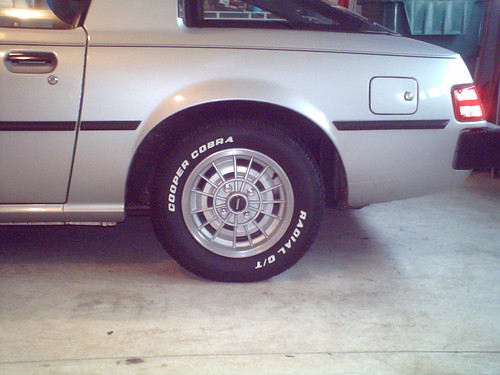
Pics!
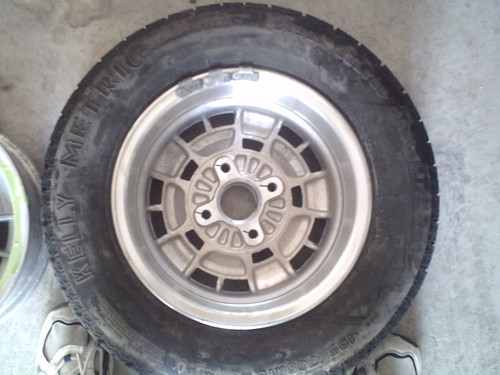
Heres the new Cooper Cobra Radial GT tires on my refurb rims mounted on the car. Not the best pictures but gives you an idea of how they look. Maybe I'll grab a better camera for some more pics later of the whole car.
 08-05-08, 04:03 PM
#24
Waffles - hmmm good
Thread Starter
iTrader: (1)
Thanks guys. I love the look. I wasn't sure I would but it really takes me back to see the RWL and the redone rims. Almost like the first time when I bought it.
If anyones wondering those are size 205/60 R13 tires.
If anyones wondering those are size 205/60 R13 tires.