How to: Make you're own muffler.
 08-22-08, 10:15 AM
#1

How to: Make you're own muffler.
Thought I'd post a how too in its own thread as the other one is kinda misleading a bit. The original thread is right here though:
https://www.rx7club.com/1st-generation-specific-1979-1985-18/borla-vs-backfire-backfire-wins-borla-shreaded-up-my-surprise-fg-778499/page2/
In a nutshell I since i blew up the other one I used the perfortrated pipe of the borla and did the rest my self. But you can buy the Perfortrated pipe on ebay or you can have it made locally at most sheet metal places (they basically grab a perfortraded sheet and roll it to make a tube. I don't know the exact spacing and hole size needed so maybe buying premade stuff is easier). Other things that you'll beed will be Coarse stainless steel wool (Number 3), and medium Stainless steel wool (Number One), Ceramic furnace insulation (rated to about 2500*f), and a welder.
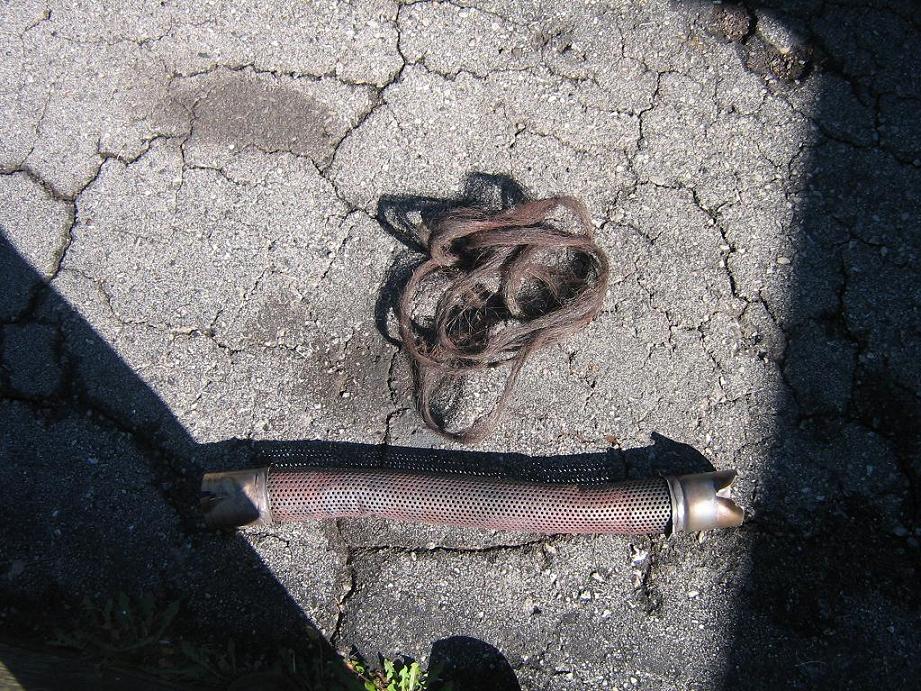
One thing to do if you're just buying or have a straight muffler is to add a few angles in there to reduce the sound abit more. Mine since it was an offset mufffler already had about 7 degree angle on the pipe so i stuck with that. Here's what mine looked like when all taken out of the casing and everything unwrapped of it:
Next thing to do is start wrapping the coarse wool, on the Pipe. The reason that I wrapped it with the coarse stuff first is because it has more material and the heat can't detroyit as easily. In my case I used up 10 pads of the coarse to get 2 layers on it. Then from there you want to grab some tape (I used the paper type tape so its not as overly tight wrapped as apperently it could make thing matters worse). This is how things look like then:
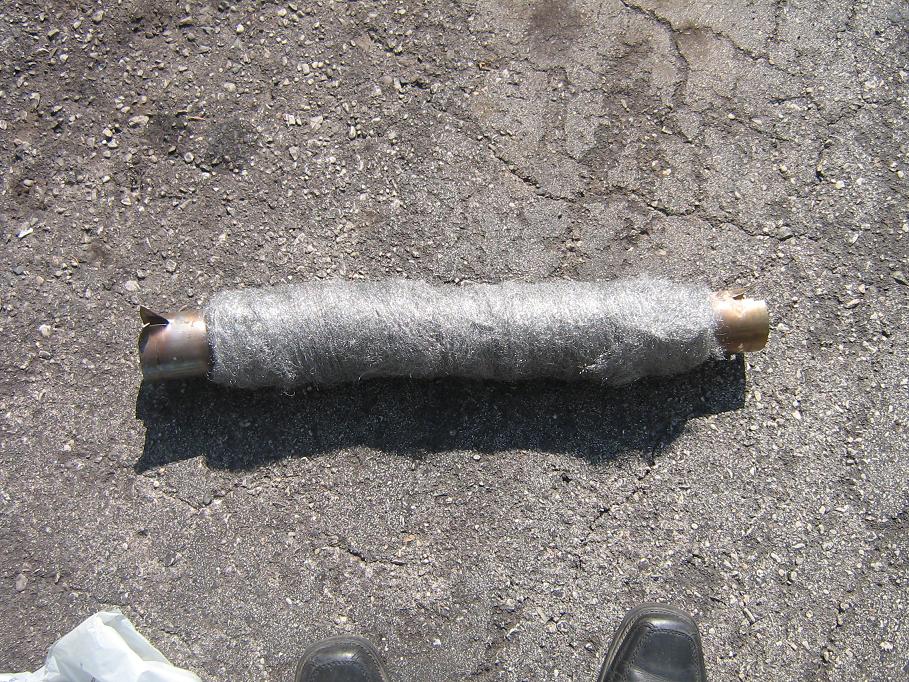
You do the same thing now with the Medium wool and wrap it up. It should also look like the above. Basically you're adding SS wool to fill up the size of your muffler tubing that you'll be using. I used 4" SS with about 1/8" side wall and used 1/16" Side plates.
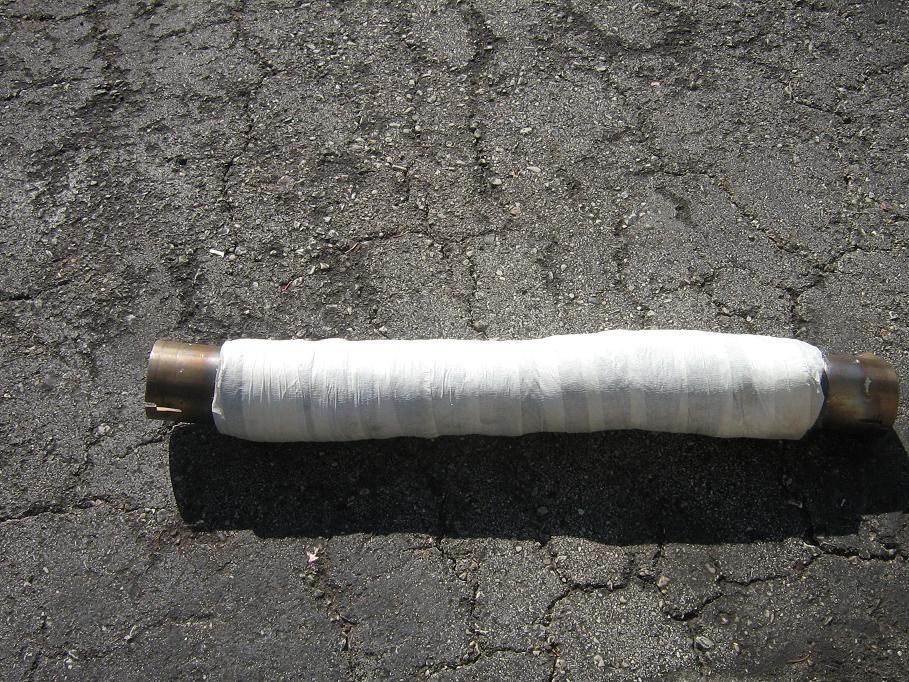
Now when you're doing the medium grade leave about 1/2"-3/4" from inside walls of the tubing to fit the insulation wool. So once its all filler up you want to cut a size that is going wrap around the tubing properly and still be somewhat easy to fit in. I made sure mine was nice and tight when stuck inside the tube. That stuff will shrink a bit and once the tape is burnt up the SS wool should expand a bit.
So now grab your tube, slide it over it and it should look something like this now:
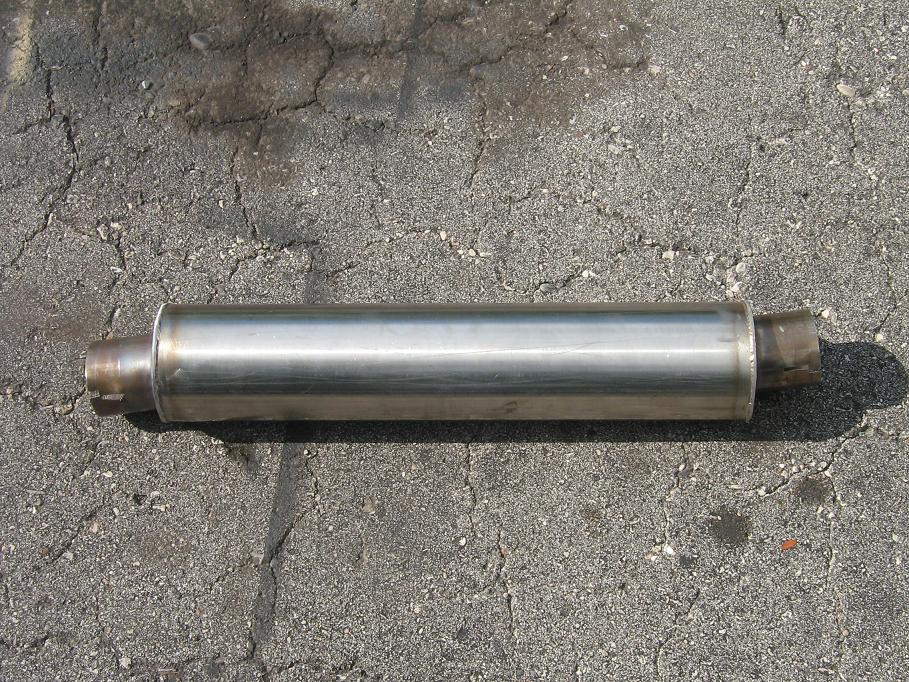
Mine was 19.5" Long in total for that center section. Have some plates welded on there and the ends should look something like this:
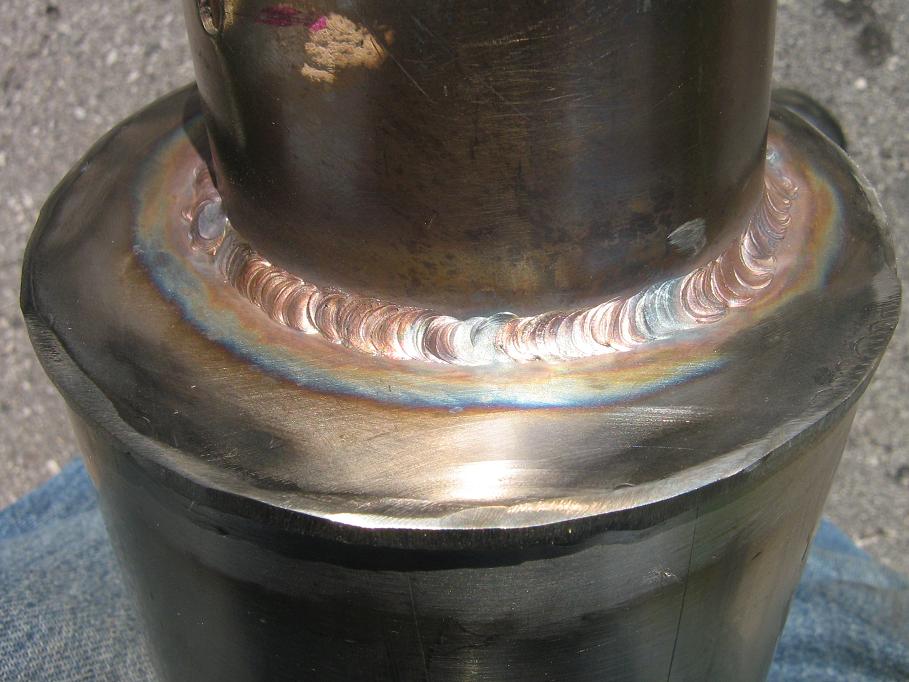
You'll notice that the tube isn't sitting right in the centre. I figures since my diameter is already small enough for the ouside tubing, where ever there's a bend in the pipe there's more room behind it for the air to travel through and cut down on sound a but more. Thats my theory. If you have a big enough piece I'm sure it wouldn't matter as much. And there you have it.
I have some videos of it uploaded on youtube. The first one is of ouside the car with the new muffler on, the second one is of back when I just had a magnaflow, and the last one is of inside the car in the passeger side to show you how quiet it is inside. I did have my windows open and I was in a parking lot so you are hearing abit of echo from the muffler in that one.
http://www.youtube.com/watch?v=Wpc8aLu23Mo
http://www.youtube.com/watch?v=ROdbcjjA_Cc
http://www.youtube.com/watch?v=3t4R_id9wgA
Also both videos were taken with the same camera. You can really tell the difference in noise below 4k rpm. Alot more muffled down. Sorry i don't have any with the old borla on but it wasn't much quieter than with the magnaflow alone. Inside the car the noise is about 1/3 of what it was with the borla and about 1/2 the noise on low rpms outside the car.
https://www.rx7club.com/1st-generation-specific-1979-1985-18/borla-vs-backfire-backfire-wins-borla-shreaded-up-my-surprise-fg-778499/page2/
In a nutshell I since i blew up the other one I used the perfortrated pipe of the borla and did the rest my self. But you can buy the Perfortrated pipe on ebay or you can have it made locally at most sheet metal places (they basically grab a perfortraded sheet and roll it to make a tube. I don't know the exact spacing and hole size needed so maybe buying premade stuff is easier). Other things that you'll beed will be Coarse stainless steel wool (Number 3), and medium Stainless steel wool (Number One), Ceramic furnace insulation (rated to about 2500*f), and a welder.
One thing to do if you're just buying or have a straight muffler is to add a few angles in there to reduce the sound abit more. Mine since it was an offset mufffler already had about 7 degree angle on the pipe so i stuck with that. Here's what mine looked like when all taken out of the casing and everything unwrapped of it:
Next thing to do is start wrapping the coarse wool, on the Pipe. The reason that I wrapped it with the coarse stuff first is because it has more material and the heat can't detroyit as easily. In my case I used up 10 pads of the coarse to get 2 layers on it. Then from there you want to grab some tape (I used the paper type tape so its not as overly tight wrapped as apperently it could make thing matters worse). This is how things look like then:
You do the same thing now with the Medium wool and wrap it up. It should also look like the above. Basically you're adding SS wool to fill up the size of your muffler tubing that you'll be using. I used 4" SS with about 1/8" side wall and used 1/16" Side plates.
Now when you're doing the medium grade leave about 1/2"-3/4" from inside walls of the tubing to fit the insulation wool. So once its all filler up you want to cut a size that is going wrap around the tubing properly and still be somewhat easy to fit in. I made sure mine was nice and tight when stuck inside the tube. That stuff will shrink a bit and once the tape is burnt up the SS wool should expand a bit.
So now grab your tube, slide it over it and it should look something like this now:
Mine was 19.5" Long in total for that center section. Have some plates welded on there and the ends should look something like this:
You'll notice that the tube isn't sitting right in the centre. I figures since my diameter is already small enough for the ouside tubing, where ever there's a bend in the pipe there's more room behind it for the air to travel through and cut down on sound a but more. Thats my theory. If you have a big enough piece I'm sure it wouldn't matter as much. And there you have it.
I have some videos of it uploaded on youtube. The first one is of ouside the car with the new muffler on, the second one is of back when I just had a magnaflow, and the last one is of inside the car in the passeger side to show you how quiet it is inside. I did have my windows open and I was in a parking lot so you are hearing abit of echo from the muffler in that one.
http://www.youtube.com/watch?v=Wpc8aLu23Mo
http://www.youtube.com/watch?v=ROdbcjjA_Cc
http://www.youtube.com/watch?v=3t4R_id9wgA
Also both videos were taken with the same camera. You can really tell the difference in noise below 4k rpm. Alot more muffled down. Sorry i don't have any with the old borla on but it wasn't much quieter than with the magnaflow alone. Inside the car the noise is about 1/3 of what it was with the borla and about 1/2 the noise on low rpms outside the car.
 11-24-09, 03:58 PM
#3
Agreed. RB's presilencers use 3/8" end plates. They last forever.
So, what are your plans for your muffler now? Gonna redo the end plates?
A few months ago I rebpacked an RB presilencer with three layers. 1st layer was stainless scouring pads held in place with dict tape (figured it'd withstand the heat of welding together better than masking tape). 2nd layer coarse steel wool (again with the duct tape because steel wool easily ignites from welding spatter). 3rd layer was fine 0000 steel wool with a final wrap of duct tape. The presilencer shell slid pretty well over the wrap. Tried to keep the heating to a minimum during welding and only smoked the duct tape a couple of times. Test ran it on the back of the GLC which really helped a great deal. It made a noticeable difference in noise coming out the back.
The plan is to rebuild the other presilencer (from an old dead rusty RB 'street port' center section) in the same way and use them both in the REPU in a long primary system for better low end torque.
11-25-09, 12:40 PM
#4
Well the plan was to make 2 new mufflers and also redo the whole exhaust system actually. That was before i had an accident earlier on this morning ... car understeered doing 30km/h (~19 mph) and hit a curb hard bending the driver side lower control arm, tension rob braket, probably tension rob, breaking sway bar end link, and who knows what else. And this is all with the new rack and pinion stuff, so mostly Re-speed parts. Every thing should be gather up by the end of the day and should be seeing it hopefully early next week.
But this is what I was planning on doing:
Reduce the outlet of the collector from 2-1/2" to 2-1/4" with a transition at a 30 degree taper
From there install a megaphone of a 6.5 degree taper going from 2-1/4" to 3"
Make a new muffler with 3" inlet/oulet packed with Bull Dog SS wool and Superwool 607 HT (Rated at 2372*F)
Reverse cone again with a 30 degree transition from 3" to 2-1/2"
Mandrel bent over the axle
New rear muffler of 2-1/2" inlet to dual 2" oultet with the same packing as above.
In the rear currently i have that magnaflow with a 3" inlet and dual 2-1/4" oulets i believe they are. Inside the muffler though of the rear, I'm going to make the Y right at the beginning of the inlet to give the air a better chance to be absorbed into the muffler and get muffled.
Also now that you've mentiond that RB uses 3/8" end plates I might even bump them up to 1/4" plates then. I will be using 6 x 3/8" 3 bolt flanges to hold the mufflers in place and make installation and removal easier. I hope this setup will net me a few ponis and also quiet down the exhaust abit. Well either way it will be quieter just because i won't have any leaks down there.
12-16-09, 09:02 PM
#5
Just to keep things updated, I've bought some of the parts and should hopefully start welding the 2 muffler near the end of this month. I will no longer be using the same cores (perforated tubing) so everything is going to be new.
The new perforated tubes I bought from "Perforated Tubes Inc." (http://www.perforatedtubes.com/). These are the sizes that I bought:
304SS - 13GA - 50% Perforation - 3"x18"
304SS - 18GA - 40% Perforation - 2.5"x36"
Each one of those pieces cost me 30$. Now i opted out for a higher perforation in the mid section to be a bit more effective at reducing noise level, and since that one will be seeing more heat I opted to go for a slightly thicker material for better durability. The rear muffler should still be a bit more effective since there will be more tubing area open in the muffler, hence more sound can be absorbed into the packing.
The outside casing will be as follow (These were bought locally):
4" x 20" (12GA) Round in the center section
6"x9"x18" (16GA) oval in the rear.
This has set me back 60$ for both pieces and reasoning for the thicker one in the center is the same as above. End plates will probably be done with 1/4" 304SS also need to measure a few things up first before i can CAD it up and get them sent out to be laser cut.
I also bought the long strand ceramic fiber blanket (50sq/ft for 60$). So far the cost has been pretty good compared to the cost of a single muffler. I'll try to post up some pictures later on this week when I get more time.

Trending Topics
12-18-09, 12:25 AM
#8
Now the collector only really has one pulse from each chamber going through it each time. (so 1st rotor gases, then 2nd rotor gases ... and repeat) And it doesn't matter how fast the engine is running, its not going to overlap them there. Now going by a smaller diameter pipe at the end of the collector will cause the air to travel at a higher velocity and keeping the flow out faster.
Now if you keep that same diameter (the reduced size) all throughout to the end of the car, since both pulse are travelling in there, at higher rpm when more air needs to be pushed out the engine is losing power because now it using energy to keep on pushing the gases out as oppose to them pretty much free flowing. Now this is where people who just do regular exhaust systems just keep say a 2.5" exhaust or so for a decent optomize in power and streetability. Or if you're just a full out race car go to say 3" or on the other end of the spectrum go to 2" for daily driven car without any or barely any tracking days.
This is where the megaphone comes in though. With the higher velocity right at the end of the collertor to keep the gases being sucked out of the collector quicker, it gradually increase to a larger area which in that alone creates a vacuum (the collector being the high pressure area, and the area after that say where the 3" is going to be in my case and the muffler, are going to be the low pressure area). If you watch the weather enough, you'll know that the high pressure always moves towards the lower pressure to pretty much try to normalize the pressure. This is why putting a megaphone right after the collector normally makes more power. Getting the angles and length just right for optimal settings though thats the tricky part and nobody seems to want to spill out the beans on those.
Now the reason that I go up to 3" and go back down to 2.5" is because I'm trying to create a bigger pressure difference, since the bigger the difference the stronger the vaccum and the more it helps the engine pull the exhaust gases out as oppose to just push them out. I still maintain 2.5" after that to make sure that the engine doesn't have to "push out" any gases at really high rpms.
I could be wrong on the whole things, but this is my understanding on it.
12-18-09, 12:18 PM
#9
I need a new user title

Join Date: Oct 2005
Location: Yaizu, Japan
Posts: 2,646
Likes: 0
Received 0 Likes
on
0 Posts
The venturi effect with an expansion chamber. Hmm. Only thing I'm concerned about is that on a rotary with peripheral exhaust ports, the ports never fully close so the pulses aren't really discreet.
12-18-09, 06:15 PM
#10
I'm not sure exactly how this would work with things like this, but I would imagine that the second pulse coming from the second rotor still isn't all that strong to fully diminish the effect. If anything I would imagine all you have to do is just make the collector bigger and so instead of 2 1/4" go to 2 1/2" and then maybe just expand to 3 1/2" or maybe even 4" if space permits.
12-18-09, 11:57 PM
#14
I'm defintaly going to try to opt out for a longer megaphone then what you have though. I don't think i'm going to see as much gain as you probably did but thats because my exhaust is already pretty open right now unlike that RB system you had. I'm currently close to 160whp already (12a Streetported), so if I hit 180ish with it, it would definatly be fantastic for a 12a, although breaking that 200whp mark would be lovely ... but highly doubt its going to happen.
12-19-09, 01:15 AM
#17

Also just as a note, the outside tubing are now 14 and 15GA for the 4" and 6" respectively. The place didn't have my original sizes that I wanted. I'm currently CAD'ing up the plates that need to be laser cut so hopefully I can have them before Christmas hits.
12-19-09, 07:42 AM
#20
Senior Member
Join Date: Nov 2008
Location: Czech republic
Posts: 357
Likes: 0
Received 0 Likes
on
0 Posts
https://www.rx7club.com/showthread.p...eed+12a&page=3
By Crispeed
"I also got a road race buddy with a 1st gen(series I) Rx-7 that we had the motor dynoed on an engine dyno and it made 260 hp at the flywheel and we later dynoed on the dynojet and it made 220 hp. Conditions on both dynoes were pretty close since they are located only a couple of bays away from each other. Also when we dynoed on the engine dyno it was with all the same accessories on the motor as it would be on the car even the exhaust and ignition system.
BTW. it was a street ported 12A with dual 45mm weber carbs!"
12-19-09, 11:34 AM
#21
What about 220 rwhp streetport 12A
https://www.rx7club.com/showthread.p...eed+12a&page=3
By Crispeed
"I also got a road race buddy with a 1st gen(series I) Rx-7 that we had the motor dynoed on an engine dyno and it made 260 hp at the flywheel and we later dynoed on the dynojet and it made 220 hp. Conditions on both dynoes were pretty close since they are located only a couple of bays away from each other. Also when we dynoed on the engine dyno it was with all the same accessories on the motor as it would be on the car even the exhaust and ignition system.
BTW. it was a street ported 12A with dual 45mm weber carbs!"
I would be happy at 180whp and i'm sure i could do a bit more damage on the track with it. Another thing that's going to help me get that bit more power is the cold/ram air intake. Right now i'm just sucking the air above my engine, So cooling it down should be alot better especially at the track at higher speeds. Lastly to help me out a bit more, I did play around with my timing on my Megasquirt and seemed to have found abit more power also. Slamming on the throttle at about 3krpm, spins up the wheel all through first and can hold second
.I would like to be under 14's at the drag strip also just to say I did it lol. Personal best is 14.67ET @ 94.50mph. I also have semi slicks to try this with, so that should help me further more.
01-09-10, 12:55 AM
#23
Kinda late, but better late then never. Here's the pictures of the laser cut muffler pieces. I cut everything at first in 1/4" and then did another run with 1/8". I think doing the back muffler in 1/4" plates is just over kill and damn heavy hence the need for the second run. I should hopefully get started welding it together next week.

