Hogging a Nikki
 12-18-16, 04:24 PM
#1
Full Member
Thread Starter
iTrader: (1)
Join Date: Mar 2014
Location: New Mexico
Posts: 66
Likes: 0
Received 0 Likes
on
0 Posts
Hogging a Nikki
A few weeks back I replaced the stock exhaust system with a RB header and RB complete exhaust - huge difference in power and feel!
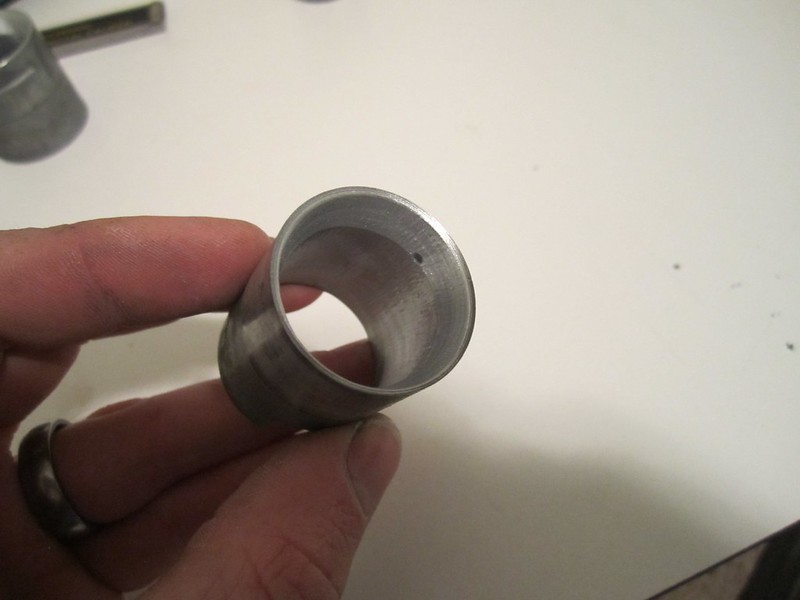
With a higher flowing exhaust and reading the many posts here about opening up the Nikki, I decided to take the plunge into hogging a Nikki.
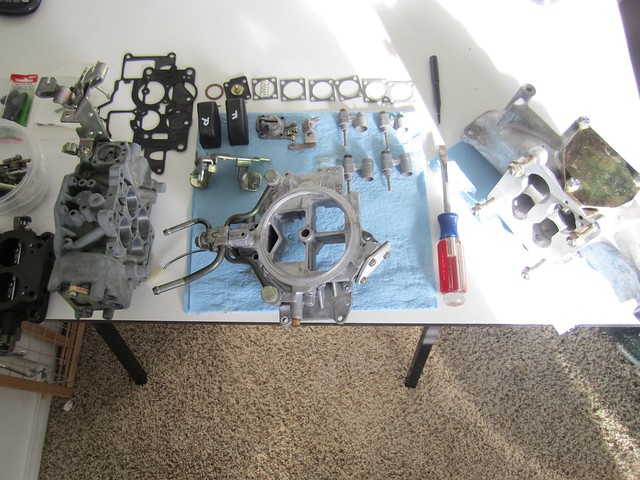
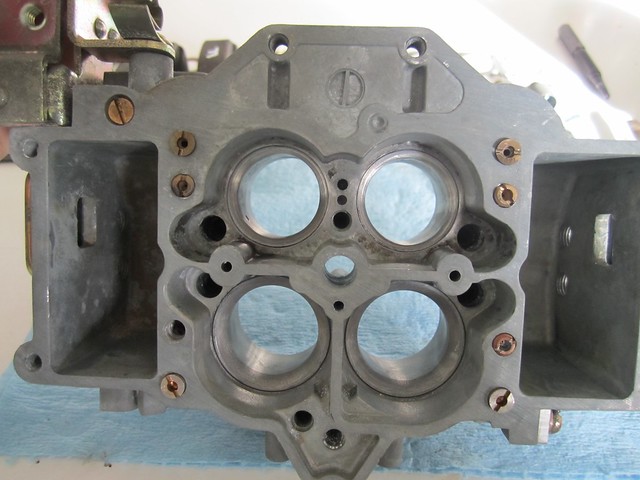
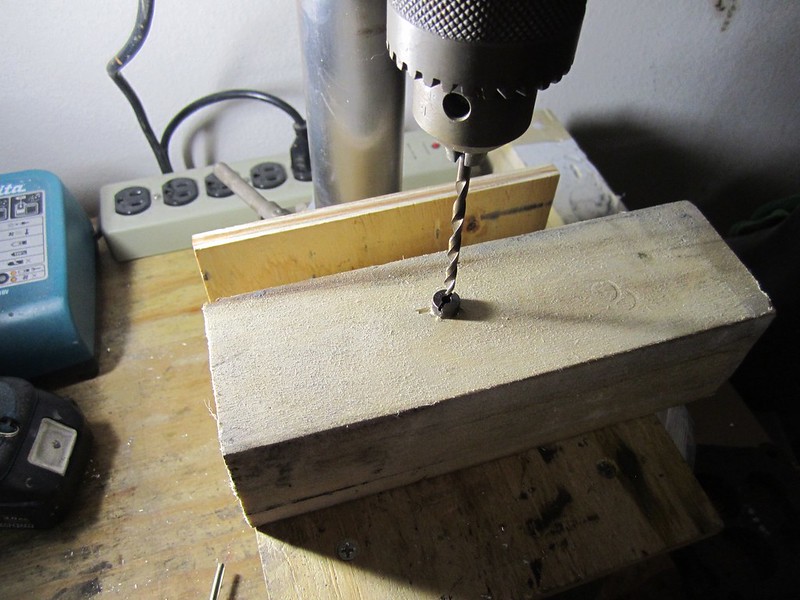
I have a spare '83 Nikki torn down with most of the 'hardware' modifications complete. The first step was an ultrasonic cleaning. Attached are a few photos while I wait for the various jets and drill bits that Jeff20B recommends to arrive over the next weeks.
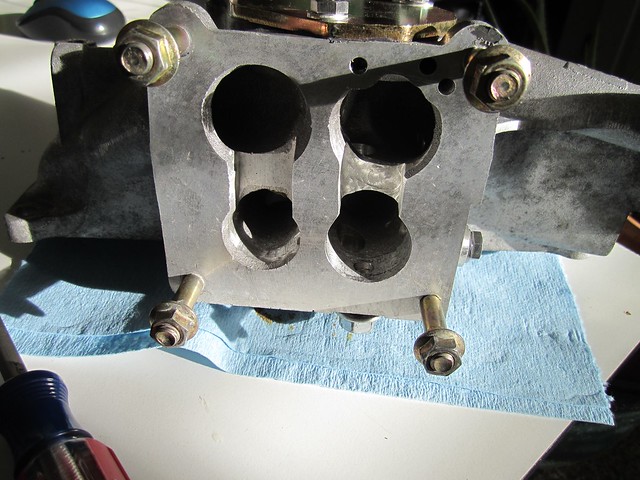
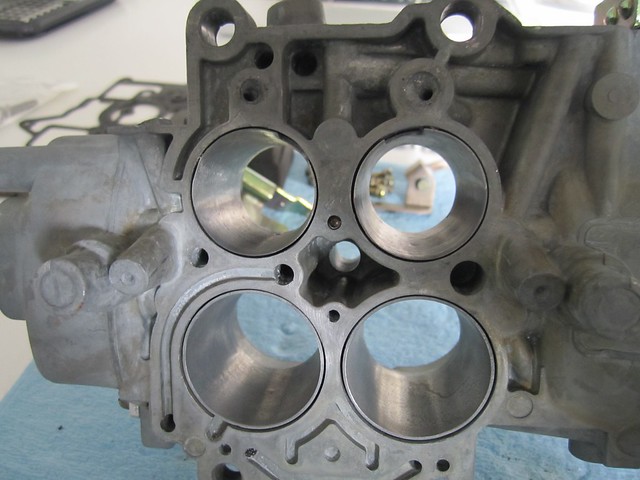
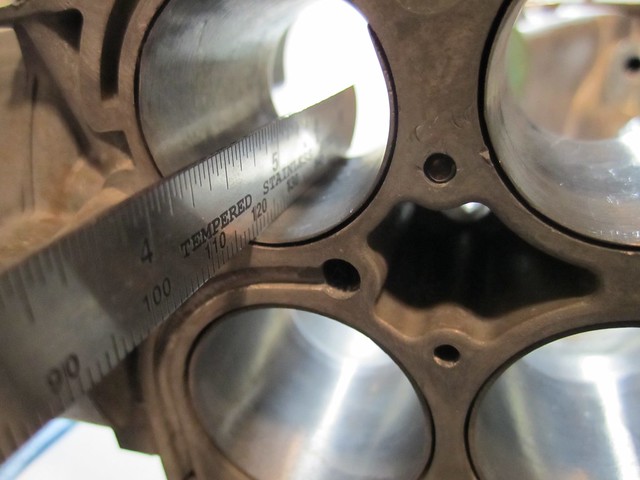
A 24.2mm washer fits through the primaries and I am guessing they are both pretty close to 24.5mm. I tried to get the narrowest diameter at the hole and then make a constant flare from this small diameter out to the largest diameter, using a Dremel with a milling-style bit and then sets of sanding drums and scotchbrite bits. Secondaries will stay at 28mm. I also took the Dremel a bit to the intake.
The open sharing of Nikki hogging directions on this forum is really cool, thanks to all of those who who pioneered this work!
The plans
Messy tack weld but it should hold
With a higher flowing exhaust and reading the many posts here about opening up the Nikki, I decided to take the plunge into hogging a Nikki.
I have a spare '83 Nikki torn down with most of the 'hardware' modifications complete. The first step was an ultrasonic cleaning. Attached are a few photos while I wait for the various jets and drill bits that Jeff20B recommends to arrive over the next weeks.
A 24.2mm washer fits through the primaries and I am guessing they are both pretty close to 24.5mm. I tried to get the narrowest diameter at the hole and then make a constant flare from this small diameter out to the largest diameter, using a Dremel with a milling-style bit and then sets of sanding drums and scotchbrite bits. Secondaries will stay at 28mm. I also took the Dremel a bit to the intake.
The open sharing of Nikki hogging directions on this forum is really cool, thanks to all of those who who pioneered this work!
The plans
Messy tack weld but it should hold
 12-18-16, 07:04 PM
#2
YES!!!!!!!!!!!
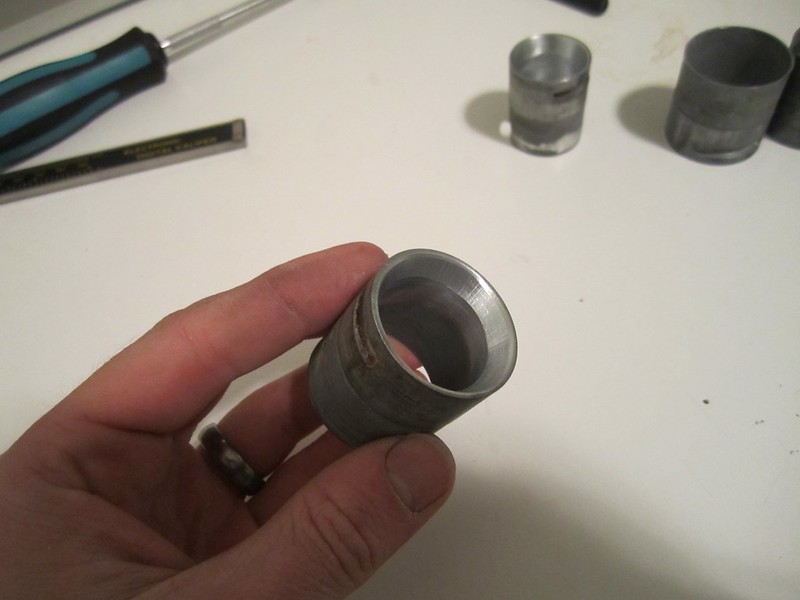
Very cool. You sir have inspired me to share pics of a carb I'm working on right now. It is currently fully dissembled and just had its venturis hogged yesterday. See here. https://www.rx7club.com/1st-generati.../#post12133861
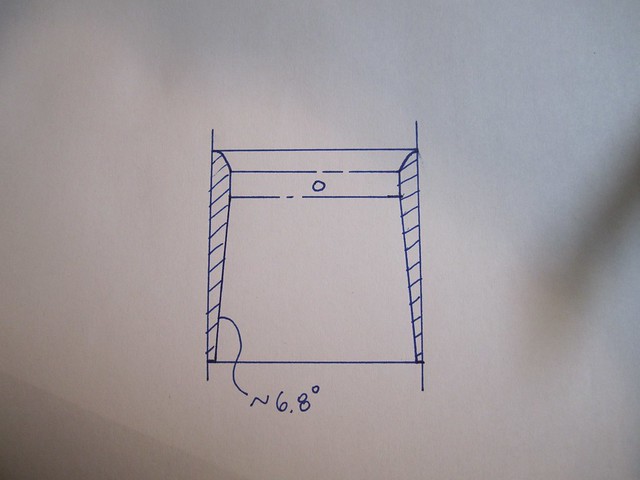
As for your carb, maybe I missed it, but did you remove your venturis before you enlarged them? And did you do your level-best to keep the narrowest point right at the little hole? How straight is your taper? Mine are done by hand so the upper angle ends up with a very nice subtle curve like the factory venturis have, not a hard straight angle that you get from a lathe. The outlet angle is just a straight expanding taper to the bottom.
By the way, the bottom edges of your primary venturis look very thin. So thin that I must recommend for you to hog out the top of your cast iron baseplate so you don't get a nasty lip where they meet. Set the main body on the baseplate with no gaskets and run your finger in and out of her... mmmm. You know what she wants.
Ahem. I like your intake manifold channel work.
Very cool. You sir have inspired me to share pics of a carb I'm working on right now. It is currently fully dissembled and just had its venturis hogged yesterday. See here. https://www.rx7club.com/1st-generati.../#post12133861
As for your carb, maybe I missed it, but did you remove your venturis before you enlarged them? And did you do your level-best to keep the narrowest point right at the little hole? How straight is your taper? Mine are done by hand so the upper angle ends up with a very nice subtle curve like the factory venturis have, not a hard straight angle that you get from a lathe. The outlet angle is just a straight expanding taper to the bottom.
By the way, the bottom edges of your primary venturis look very thin. So thin that I must recommend for you to hog out the top of your cast iron baseplate so you don't get a nasty lip where they meet. Set the main body on the baseplate with no gaskets and run your finger in and out of her... mmmm. You know what she wants.
Ahem. I like your intake manifold channel work.
12-18-16, 09:10 PM
#3
Full Member
Thread Starter
iTrader: (1)
Join Date: Mar 2014
Location: New Mexico
Posts: 66
Likes: 0
Received 0 Likes
on
0 Posts
I also did mine by hand. For better or for worse my final shape looks like this, just based on the angles and reach of the dremel bit. I did not remove the Venturi to work on it, I left it in during grinding.
I tried my best to keep a straight line/angle between the smallest diameter and the larger diameter, I think they came out pretty linear.
Good note on the lip that is now present from removing so much material from the bottom end of the Venturi, I will have to work on the cast iron plate a bit now.
I tried my best to keep a straight line/angle between the smallest diameter and the larger diameter, I think they came out pretty linear.
Good note on the lip that is now present from removing so much material from the bottom end of the Venturi, I will have to work on the cast iron plate a bit now.
Last edited by Andrew-s; 12-18-16 at 10:00 PM.
12-19-16, 10:34 AM
#4
Ok, looking your diagram you drew up, I'd say those venturis can work relatively well, but I must say it would have been better to have made a defined point right at the hole instead of the flat vertical section you did. I understand it can be hard to do that while the venturis are in the carb. But you also gain so much more control if you remove them. Pretty good for your first time out though.  I bet they will be pretty satisfying to drive.
Heck for my first time, I tried hogging them while installed. They had a tendency to rotate in the main body. I had to find a solution to get them out. I found a washer of 28mm OD and put it on a grade 8 suspension bolt and got them out with some gentle tapping with a 28oz mini sledge. I let the weight of the hammer do the work. Same idea for the secondaries, by finding a 34mm washer. I only started doing secondaries recently.
The reason I started doing secondaries is due to how weak they started feeling compared to my ever increasing primaries. Back when my 13B was happy with 25.35mm pri, the stock shaped 28mm secs were just fine. But as I went up to 26.55mm pri, the stock secs suddenly didn't feel like a second turbo was kicking in anymore. They felt weak. It was no longer a "transcendent experience" like what t_g_pharrel is currently feeling in his fat Nikki (which tells me his primaries are too small for his engine, but he didn't measure his so who knows how big they really are). They felt more like a boring stock carb, to be honest. So I spent about four hours exploring what I can do on a set of 100% stock secondaries one Saturday afternoon back in late October. Well, first I took a .90mm drill bit and drilled out the landmark hole so I would know where to concentrate my efforts. When I was done, I had a set of 30.8mm, fully polished and ready to be installed and tested.
All I had done up to that point was merely correcting some damaged secondaries caused by a previous owner such as deep gouges caused by his pliers in an attempt to pull the sec boosters, or he improperly cut the venturis on a lathe so the narrowest point was well below the landmark hole.
I had never cut secondaries from totally stock before. I went slow and constantly checked my progress, as should anybody. Since then I did the set pictured yesterday, in only 1 hour and 45 minutes, but I didn't remove as much metal either.
If you do plan to pull your venturis to correct your short angles and create a more accurate steep funnel shape with the narrowest point right at the landmark hole, you will notice a definite improvement in power and drivability. If you were suffering from any kind of secondary delay in boost due to the current short angle shape of the primaries, I can tell you from personal experience that a modern steep angle eliminates it. Just some things to think about.
One more thing. Boost or NA? I see you are wanting to go with 145 secondary jets. 145 will get you to a rich AFR of between 10.0 and 11.5 meant for boost. If you are doing NA, you will want leaner at around 12.5 AFR. JetsRus sells 138 as their largest size but the actual metric is 136 which may or may not be right. Of course when your drill bits arrive, you can drill it out to 140, but better to try 136 first and just step it up in size until your desired AFR is reached.
I bet they will be pretty satisfying to drive.Heck for my first time, I tried hogging them while installed. They had a tendency to rotate in the main body. I had to find a solution to get them out. I found a washer of 28mm OD and put it on a grade 8 suspension bolt and got them out with some gentle tapping with a 28oz mini sledge. I let the weight of the hammer do the work. Same idea for the secondaries, by finding a 34mm washer. I only started doing secondaries recently.
The reason I started doing secondaries is due to how weak they started feeling compared to my ever increasing primaries. Back when my 13B was happy with 25.35mm pri, the stock shaped 28mm secs were just fine. But as I went up to 26.55mm pri, the stock secs suddenly didn't feel like a second turbo was kicking in anymore. They felt weak. It was no longer a "transcendent experience" like what t_g_pharrel is currently feeling in his fat Nikki (which tells me his primaries are too small for his engine, but he didn't measure his so who knows how big they really are). They felt more like a boring stock carb, to be honest. So I spent about four hours exploring what I can do on a set of 100% stock secondaries one Saturday afternoon back in late October. Well, first I took a .90mm drill bit and drilled out the landmark hole so I would know where to concentrate my efforts.
When I was done, I had a set of 30.8mm, fully polished and ready to be installed and tested.All I had done up to that point was merely correcting some damaged secondaries caused by a previous owner such as deep gouges caused by his pliers in an attempt to pull the sec boosters, or he improperly cut the venturis on a lathe so the narrowest point was well below the landmark hole.
I had never cut secondaries from totally stock before. I went slow and constantly checked my progress, as should anybody. Since then I did the set pictured yesterday, in only 1 hour and 45 minutes, but I didn't remove as much metal either.
If you do plan to pull your venturis to correct your short angles and create a more accurate steep funnel shape with the narrowest point right at the landmark hole, you will notice a definite improvement in power and drivability. If you were suffering from any kind of secondary delay in boost due to the current short angle shape of the primaries, I can tell you from personal experience that a modern steep angle eliminates it. Just some things to think about.
One more thing. Boost or NA? I see you are wanting to go with 145 secondary jets. 145 will get you to a rich AFR of between 10.0 and 11.5 meant for boost. If you are doing NA, you will want leaner at around 12.5 AFR. JetsRus sells 138 as their largest size but the actual metric is 136 which may or may not be right. Of course when your drill bits arrive, you can drill it out to 140, but better to try 136 first and just step it up in size until your desired AFR is reached.
12-19-16, 01:34 PM
#5
Full Member
Thread Starter
iTrader: (1)
Join Date: Mar 2014
Location: New Mexico
Posts: 66
Likes: 0
Received 0 Likes
on
0 Posts
It will be going onto a stock port NA '84 12a being ran at an elevation of 3,500ft.
Ok, thanks for the tip on 136 to 140. My 145 secondary jetting was from reading through some of the other posts on this topic but I missed that size was for boost.
Next time around I will go the route of removing the venturis. There are definitely limitations on getting the right angles if they are left in.
I am excited for all the bits and parts to arrive so that I can keep going.
12-19-16, 02:31 PM
#6
ok, at such a high altitude I will advise you to not be surprised if you need to go slightly smaller on your primary jet sizes as well. Less air = less fuel required.
And yes definitely try the 138s (136 metric) secondaries and see how they run.
I'm about maybe 200 feet above sea level or less. There is a lot of air around here, so I do need to jet rich to accommodate it.
And yes definitely try the 138s (136 metric) secondaries and see how they run.
I'm about maybe 200 feet above sea level or less. There is a lot of air around here, so I do need to jet rich to accommodate it.
01-01-17, 05:27 PM
#7
Full Member
Thread Starter
iTrader: (1)
Join Date: Mar 2014
Location: New Mexico
Posts: 66
Likes: 0
Received 0 Likes
on
0 Posts
WELL, over Christmas all the essentials arrived and I had a minute to finish it up and get it back together.
All the bits.

Drilling the secondary main air bleeds.
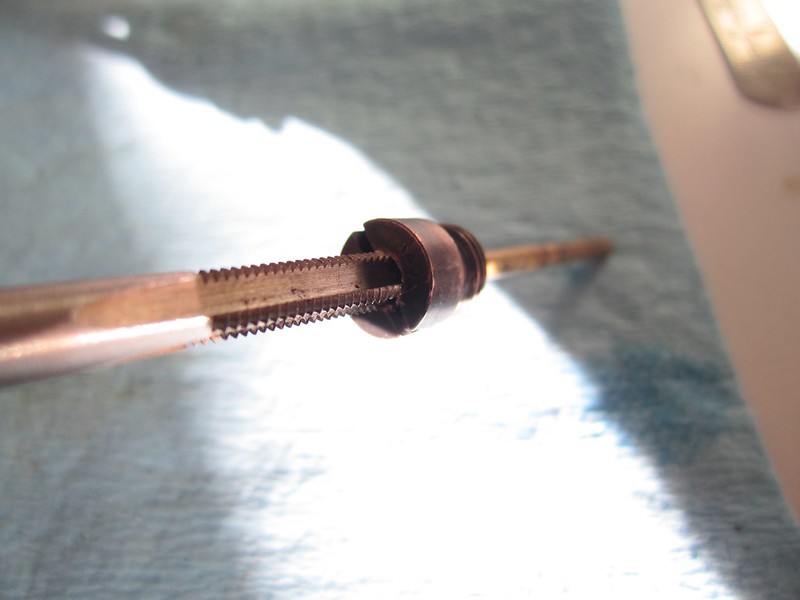
Tapping (10-32UNF, bottoming style tip)
Together with the Holley air bleeds, (per Jeff20B, Holley PN126-31-10)
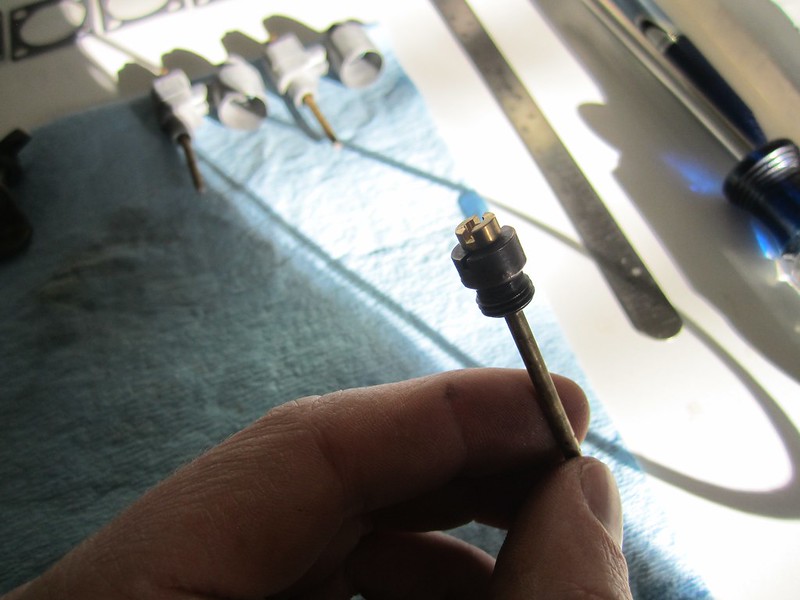
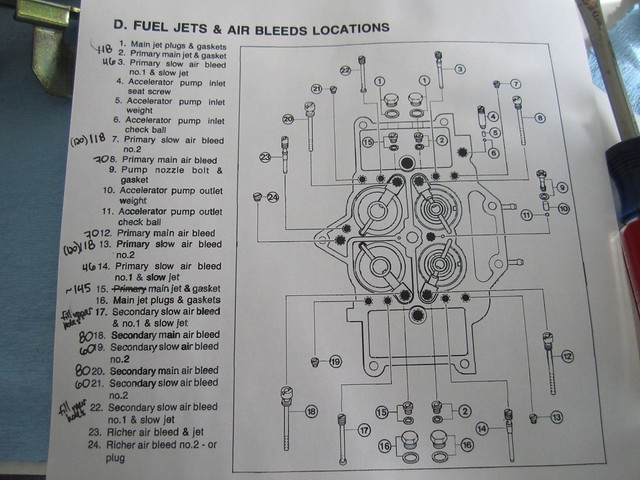
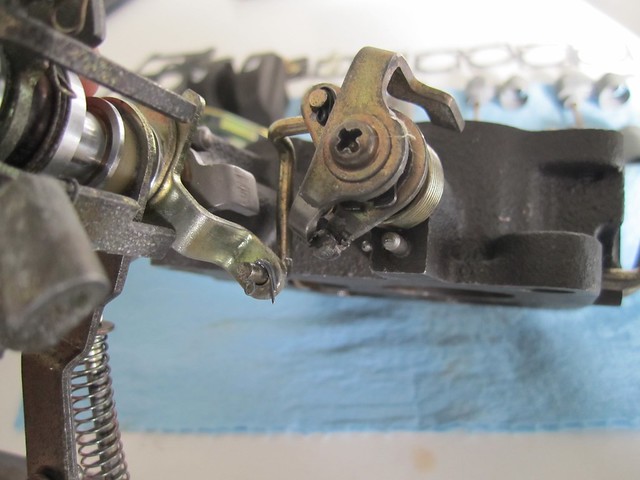
All together, including the secondary slow air bleeds (upper holes filled with solder after heating the whole thing on a gas stove) and the primary slow air bleed #2s replaced with Mikuni OEM CV Size 120 Air Jets (Again, per Jeff20B, Mukuni PN B42/55/120). The accelerator pump banjo holes were drilled to 118 using a #56 and I drilled the AP nozzles to 106 using a #58. Not shown are some Grose, glass-ball-style needles I had from an old Pro7 carb, just for kicks.
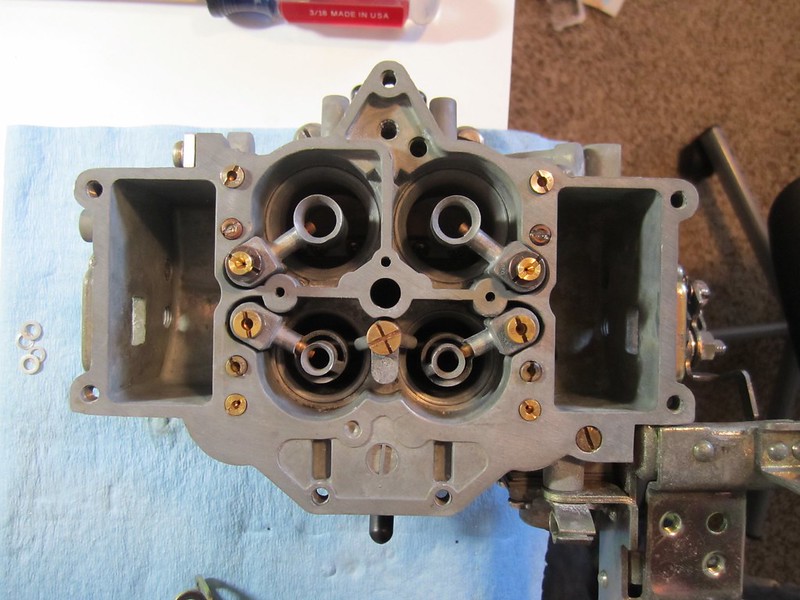
Ready to be installed.

All the bits.
Drilling the secondary main air bleeds.
Tapping (10-32UNF, bottoming style tip)
Together with the Holley air bleeds, (per Jeff20B, Holley PN126-31-10)
All together, including the secondary slow air bleeds (upper holes filled with solder after heating the whole thing on a gas stove) and the primary slow air bleed #2s replaced with Mikuni OEM CV Size 120 Air Jets (Again, per Jeff20B, Mukuni PN B42/55/120). The accelerator pump banjo holes were drilled to 118 using a #56 and I drilled the AP nozzles to 106 using a #58. Not shown are some Grose, glass-ball-style needles I had from an old Pro7 carb, just for kicks.
Ready to be installed.
Last edited by Andrew-s; 01-01-17 at 06:08 PM.
Trending Topics
01-01-17, 05:30 PM
#8
Full Member
Thread Starter
iTrader: (1)
Join Date: Mar 2014
Location: New Mexico
Posts: 66
Likes: 0
Received 0 Likes
on
0 Posts
Before.
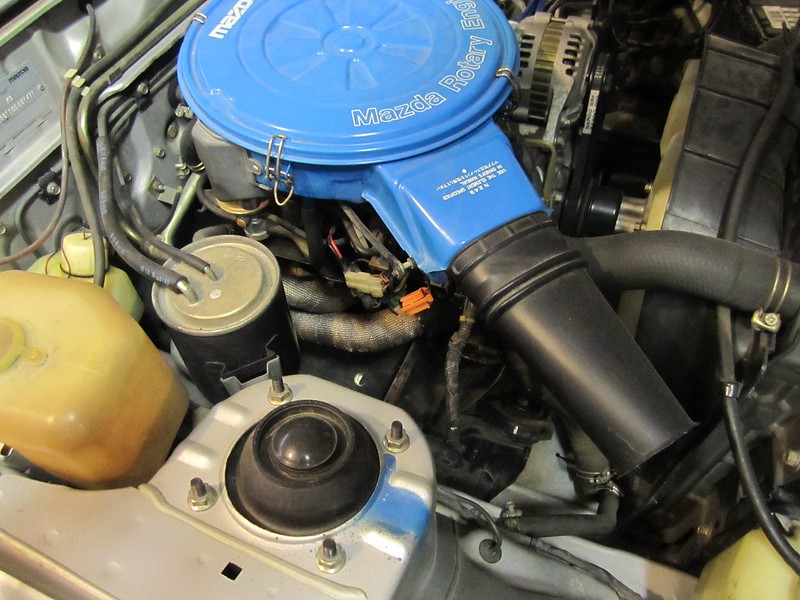
With the intake off. I split open the engine wiring loom, routed all of the unused rats nest connectors back towards the passenger fender, and then re-taped the loom to clean up the look.
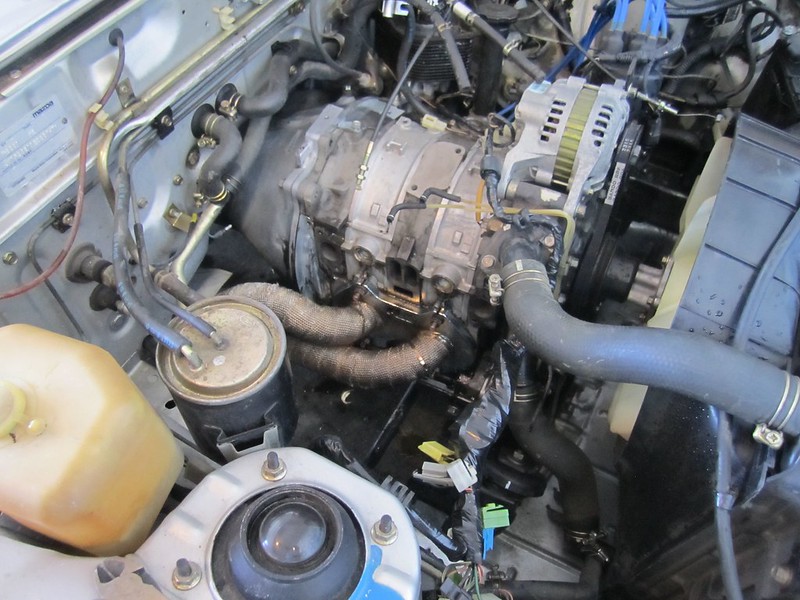
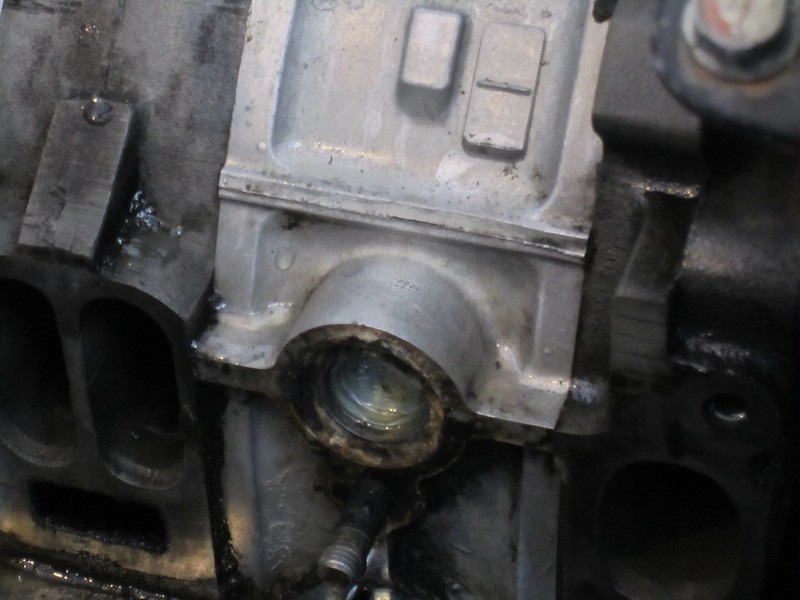
Intake coolant passages plugged with a 20mm freeze plug and RTV (Dorman PN 555-101).
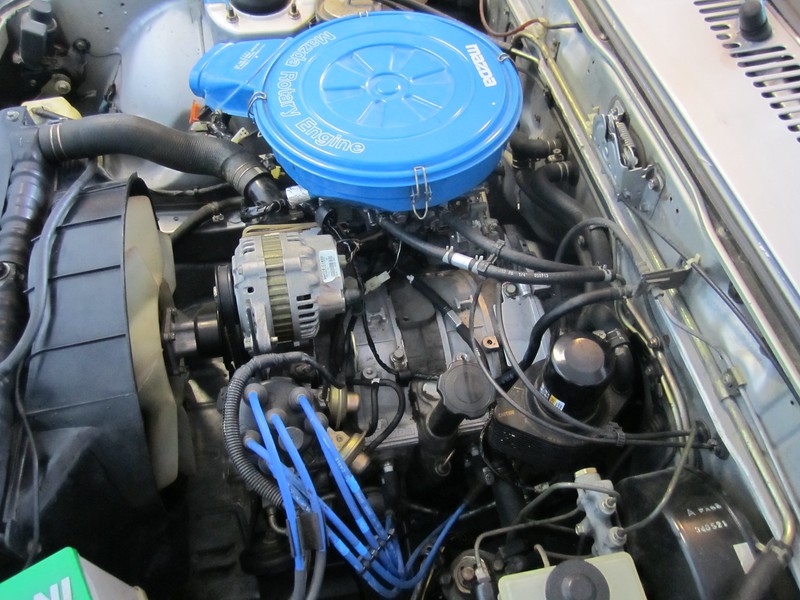
All back together (Fram FV333 on the oil breather line plumbed to the 3rd carb hat spot from the front and the distributor vacuum advances plumbed in parallel to the 2nd carb hat spot from the front, all the rest plugged).
With the intake off. I split open the engine wiring loom, routed all of the unused rats nest connectors back towards the passenger fender, and then re-taped the loom to clean up the look.
Intake coolant passages plugged with a 20mm freeze plug and RTV (Dorman PN 555-101).
All back together (Fram FV333 on the oil breather line plumbed to the 3rd carb hat spot from the front and the distributor vacuum advances plumbed in parallel to the 2nd carb hat spot from the front, all the rest plugged).
Last edited by Andrew-s; 01-01-17 at 06:12 PM.
01-01-17, 05:39 PM
#9
Full Member
Thread Starter
iTrader: (1)
Join Date: Mar 2014
Location: New Mexico
Posts: 66
Likes: 0
Received 0 Likes
on
0 Posts
Having an '84, I had to do the fuel pump relay bypass to get the carb to refill the first time. 2 batteries and 1hr later, I finally had it start. It would totally flood (soaking wet spark plugs), I think I had the idle speed adjustment much too high. Once I backed the screw all the way out it finally came back to life.
The good news is that the secondaries are close to ok. But the primaries are a mess. I do not have a wideband or EGT indication (I know, I know...) but at idle it misses a fair bit at times, smells really rich, and has fuel smoke. Driving it around, I have to pump the gas a bit to get it to take off from a standing start and then at any part throttle, primary side operation it wants to cut out and die - absolutely no power. If I baby it up to 4k and then smash the throttle it rips.
As is, I have JetsRUs "118" primary jets and secondary jets that I drilled to 1.32mm "132" using at #55 bit.
My plan is to try smaller primaries.
Last edited by Andrew-s; 01-01-17 at 05:44 PM.
01-01-17, 08:10 PM
#10
Congrats on getting further than most.
And now to critique your work. *cracks fingers*
You should not need to back your mixture screw all the way out for it to idle. Check the ID of the 120 mikuni bleeds to feel how close they are to 118.
118 is .0465 inches. I don't know how that translates to your drill bit number sizes. I know they are standardized but I've not learned the standards. I just go by what my digital caliper tells me. I hope you didn't use the wrong size drill bit here and there.
You didn't add any quicksteel or other putty to block off the ACV port in your intermediate plate. This is allowing exhaust heat to pulse up into your intake manifold and making things hot. There is no longer any coolant circulating to keep things cool.
You need to remove all hoses still connected to your phenolic carb spacer and get the carb running right first without the influence of additional air. Who knows, you could have a bad PCV valve letting a ton of air in.
I like the middle nipple on the spacer because it communicates with both primaries equally. If you have not mapped out the flow path circuits of the spacer yet, you should. I'm sure there is a ported vacuum source as well for your dizzy. As my stuff is all boost prepped, I don't run vacuum advance on anything. Either way, you do not want vacuum at idle on your dizzy. You want to idle at 0 degrees.
I tried some Grose ball jet seat things, whatever people are calling them these days, and I didn't like them. They did not work well with boost at all. Traded them for a manifold and a parts carb on it.
01-02-17, 02:36 PM
#11
Full Member
Thread Starter
iTrader: (1)
Join Date: Mar 2014
Location: New Mexico
Posts: 66
Likes: 0
Received 0 Likes
on
0 Posts
Thanks, Jeff20B. It has been a rewarding experience to tidy up the 12A and learn more about the Nikki.
I measured the Mikuni air bleeds and they are really close to 118.
Good catch on the ACV port in the intermediate housing. I read about what to do with this on a few other threads - I will work to fill it in.
Now, for some progress. This morning I started by plugging all of the spacer ports as Jeff20B suggested.
I then tried the following jetting in iterative steps:
1) 104P (1.04mm), 132S (1.32mm); it would immediately die each time the primaries were opened; too lean.
2) 115P, 132S; better but very jumpy anywhere on the primaries, no power; lean.
3) 118P, 132S; drivable but at the very end of the primaries it would lose power. Ok 1000-3000rpm but then lean ('sputtery') at 4000rpm right before the secondaries open.
4) 127P, 136S; very good through the full range. I feel 127P is a bit too rich, but it was all I had in drill sizes. I upped the secondary jetting just for fun and it seems to be pretty close. Idle mix screw now ~2 turns out.
I think I have to learn a little now on how to drive it, smashing the throttle open causes it to miss a bit for a second or two. And if I punch it before 4000rpm it 'skips a beat' and then rips. But if I use a little grace, complete and utter fun! It caught me off guard, I drove through small puddle during accelerating and the tires instantly broke all the way through 1st and 2nd.
I have the vacuum advance still unplugged but I plugged the oil breather back into the 3rd port from the front and all is ok.
I think I will order a few sizes between 118 and 127 to try on the primaries but overall, huge success!
01-02-17, 07:20 PM
#12
carb whisperer
Thanks, Jeff20B. It has been a rewarding experience to tidy up the 12A and learn more about the Nikki.
I measured the Mikuni air bleeds and they are really close to 118.
Good catch on the ACV port in the intermediate housing. I read about what to do with this on a few other threads - I will work to fill it in.
Now, for some progress. This morning I started by plugging all of the spacer ports as Jeff20B suggested.
I then tried the following jetting in iterative steps:
1) 104P (1.04mm), 132S (1.32mm); it would immediately die each time the primaries were opened; too lean.
2) 115P, 132S; better but very jumpy anywhere on the primaries, no power; lean.
3) 118P, 132S; drivable but at the very end of the primaries it would lose power. Ok 1000-3000rpm but then lean ('sputtery') at 4000rpm right before the secondaries open.
4) 127P, 136S; very good through the full range. I feel 127P is a bit too rich, but it was all I had in drill sizes. I upped the secondary jetting just for fun and it seems to be pretty close. Idle mix screw now ~2 turns out.
I think I have to learn a little now on how to drive it, smashing the throttle open causes it to miss a bit for a second or two. And if I punch it before 4000rpm it 'skips a beat' and then rips. But if I use a little grace, complete and utter fun! It caught me off guard, I drove through small puddle during accelerating and the tires instantly broke all the way through 1st and 2nd.
I have the vacuum advance still unplugged but I plugged the oil breather back into the 3rd port from the front and all is ok.
I think I will order a few sizes between 118 and 127 to try on the primaries but overall, huge success!
I measured the Mikuni air bleeds and they are really close to 118.
Good catch on the ACV port in the intermediate housing. I read about what to do with this on a few other threads - I will work to fill it in.
Now, for some progress. This morning I started by plugging all of the spacer ports as Jeff20B suggested.
I then tried the following jetting in iterative steps:
1) 104P (1.04mm), 132S (1.32mm); it would immediately die each time the primaries were opened; too lean.
2) 115P, 132S; better but very jumpy anywhere on the primaries, no power; lean.
3) 118P, 132S; drivable but at the very end of the primaries it would lose power. Ok 1000-3000rpm but then lean ('sputtery') at 4000rpm right before the secondaries open.
4) 127P, 136S; very good through the full range. I feel 127P is a bit too rich, but it was all I had in drill sizes. I upped the secondary jetting just for fun and it seems to be pretty close. Idle mix screw now ~2 turns out.
I think I have to learn a little now on how to drive it, smashing the throttle open causes it to miss a bit for a second or two. And if I punch it before 4000rpm it 'skips a beat' and then rips. But if I use a little grace, complete and utter fun! It caught me off guard, I drove through small puddle during accelerating and the tires instantly broke all the way through 1st and 2nd.
I have the vacuum advance still unplugged but I plugged the oil breather back into the 3rd port from the front and all is ok.
I think I will order a few sizes between 118 and 127 to try on the primaries but overall, huge success!
I have a wicked 12A that's lean with 118p and 170s lol, but for the stockport and factory manifold your jetting is really close to where it should end up.
Are you starting to feel the ignition getting weak at 6500 rpm? Around 130-140 hp the factory system can't keep up with the increased fuel. It's a good benchmark (if you're within 12.5:1 AFR and not much richer) thar you're starting to make power
01-07-17, 02:13 PM
#13
Full Member
Thread Starter
iTrader: (1)
Join Date: Mar 2014
Location: New Mexico
Posts: 66
Likes: 0
Received 0 Likes
on
0 Posts
After nearly continuous tinkering in the evenings while I wait for a whole slew of jet sizes to arrive, I ended up helping the primaries work better. During multiple disassembles I also learned that I'm working with an '82-style Nikki because the 'richer solenoid/circuit/jets' are simply holes (not machined with threads) nor is there a richer jet passage in the cast iron base plate.
First, I had seen in a different thread on here a member in Australia who showed that the venturies could be hogged by spinning the venturi in a drill while using the Dremel to mill away material. I tried this on a spare set of venturies I extracted from a junk carb (extracting and reinstalling the venturies is much easier than I would have guessed). They came out much better, still at 24.5mm diameter.
The same forum thread showed that there are benefits to machining a straight angle on the secondary inlets so I did that as well. The inner diameter remained the same as stock.
Even with better machined primaries, I still had a real stumble/miss/loss of power in the 1500 to 4000rpm range. Until the new jets get here for me to try, after a lot of drilling and trials with junk jets, I found that the following is really, really close - big power and easy to drive over the entire rev range.
Primary main jet - 130
Primary long air bleed - 100
Secondary main jet - 140
Secondary long air bleed - 80
AP nozzles - 100
I'm still not sure why my primaries like much bigger jets than the common 118 size usually mentioned, especially considering the thinner air at 3,500ft elevation, however, the engine seems super strong and healthy over the entire range now.
That's an interesting note about the stock ignition being a limiter with more and more fuel. Right now it seems ok, by feel it seems to pull linearly and strongly from 5000 to 7200rpm with no dead zone or flat spots.
Last edited by Andrew-s; 01-07-17 at 05:44 PM.
01-07-17, 07:34 PM
#14
Good job on the venturis but you shouldn't have followed that guy's advice about drilling your primary air bleeds to 100.  That is why you now require 130 primary jets. Your carb will never work with boost and is going to be peaky and difficult to tune unless you throw a ton of fuel at it which you've done.
My advice: go back to 70 air bleeds. Keep the 130 jets in there for now and check tail pipe and spark plug color. Get a wideband soon!
With the 70s reinstalled, you are probably going to be at around 10.1 AFR at part throttle cruise with 130 jets. Slowly step your jets down in 2 number increments until the carb just barely starts to run worse, then go back to where it ran good. The weather is cold right now so this is the best time to tune. A warm weather tune may not be necessary. My guess is you will end up between 11.9 and 13.3 AFR where it runs the best. Most of mine like it in the 12.2 to 12.5 range but I usually aim for 13.0 when possible to save MPG.
A better ignition will make it appear to run leaner to the O2 sensor as more fuel is actually being burned and more power is being made. I recommend DLIDFIS. Something else to read about for countless hours on end.
but you shouldn't have followed that guy's advice about drilling your primary air bleeds to 100. That is why you now require 130 primary jets. Your carb will never work with boost and is going to be peaky and difficult to tune unless you throw a ton of fuel at it which you've done. My advice: go back to 70 air bleeds. Keep the 130 jets in there for now and check tail pipe and spark plug color. Get a wideband soon!
With the 70s reinstalled, you are probably going to be at around 10.1 AFR at part throttle cruise with 130 jets. Slowly step your jets down in 2 number increments until the carb just barely starts to run worse, then go back to where it ran good. The weather is cold right now so this is the best time to tune. A warm weather tune may not be necessary. My guess is you will end up between 11.9 and 13.3 AFR where it runs the best. Most of mine like it in the 12.2 to 12.5 range but I usually aim for 13.0 when possible to save MPG.
A better ignition will make it appear to run leaner to the O2 sensor as more fuel is actually being burned and more power is being made. I recommend DLIDFIS. Something else to read about for countless hours on end.

