(COOLING/OIL) How to install an FC oil cooler in a 1st gen. Write-up, with pics.
 09-12-05, 07:39 PM
#1
I have been meaning to do this for months and I need a little break from the working on the widebody.
The following is my solution for the behive oil cooler. I'm sure there are other ways to do this, but this is what worked for me. I had the cooler and pedistal on hand. I spent about 40 bucks getting the hoses made up.
Side note, I have no ac. If you are keeping your ac, you will need to work around that and modify the mounting brackets and hose routing.
As a favor to keep continuity to this write-up, I would appreciate everyone holding off on replying or questions until I have completed the write-up. It is going to take a few posts for me to get all of the pics posted. I will let you know when the write-up is complete and then answer any questions.
Parts and tools needed. Tools does not include what you normally have in the tools box, just the odd ones that most people don't have.
Parts:
FC oil cooler, including both lines, banjo bolts and the oil filter pedistal off of a non-behive 12a or 13b.
7, if I've counted right, crush wahsers that fit the banjo bolts. These can be sourced from the dealer or some parts stores.
1 crush washer that fits the adapter fitting on the front cover. It is slightly smaller than the banjo washers.
2 1-7/8" muffler clamps.
2 pieces of angle, 7" long. I used 2x2x1/4" aluminum, because that's what I had laying around.
2 rubber o-rings for the filter pedistal. Take the old ones to the parts store and match the size.
21 and 23 mm combo wrenches. 23mm for the banjos, 21mm for the front cover adapter.
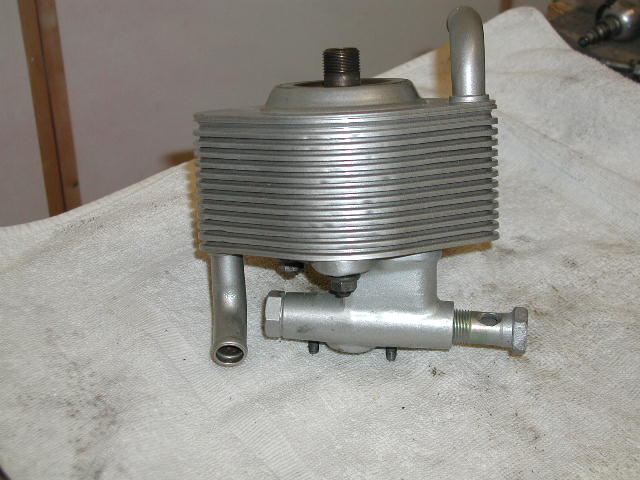
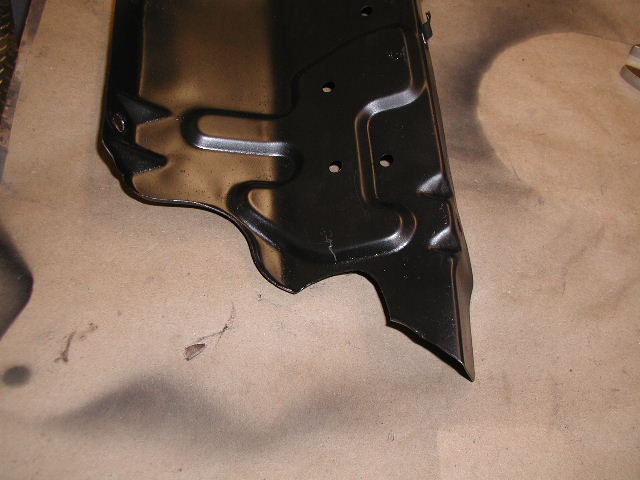
So let's get started. You need to remove this:
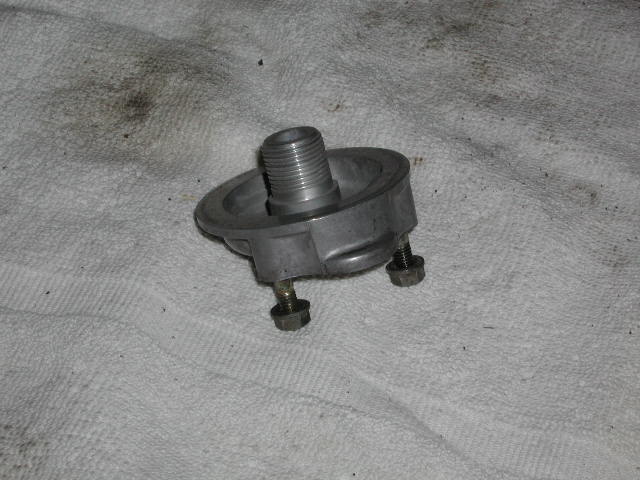
And replace it with this:
That was the easy part. Now on to mounting the cooler.
Remove the radiator and shroud. I had the car stripped down when I did this, so I had plenty of room to work. That includes the entire front end, you will need to remove the grill, at a minimum, if not the bumper also. You will also need to remove the battery and tray.
Making the brackets.
I kept this as simple as possible. The 1-78" clamps are a perfect fit around the front bar. I removed the rubber mounts and bolted the angle directly to the cooler. I know there is some disagreement about this, vibration issues, but I believe there will be less vibration and stress on the cooler with a hard mount, as opposed to a soft mount.
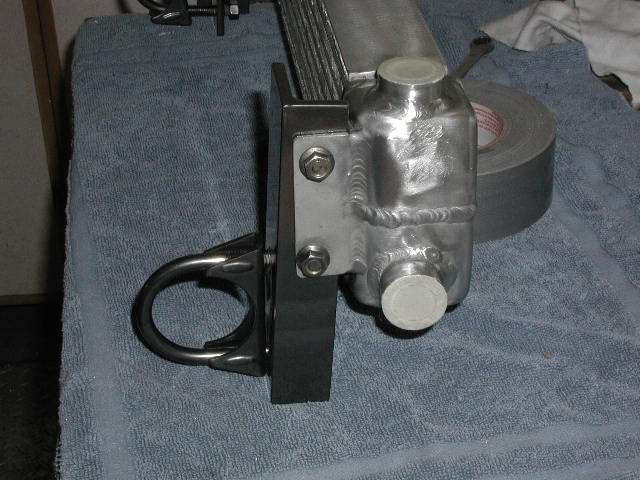
There are several ways/positions that you can mout the cooler, that choice is yours. The next pic is the angle and clamps mounted on the cooler. I chose to mount the cooler up and back in relation to the front chassis tube, (no ac condenser).
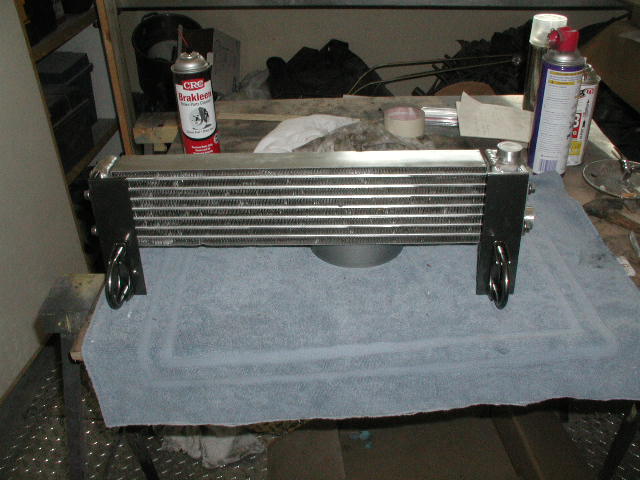
Here is a pic of the cooler mounted. Once I had the assembly positioned where I wanted it, I tack welded the clamps to the frame tube. Welding is highly reccomended. You don't want the cooler rotating around the tube. Weld both parts of the clamp to the tube. If you do this right, you can still r&r the cooler, and the clamps will remain in place.
Side note, I went up and back with the cooler mount to clear the cooling loop for the power steering, as seen in the pic.

I've reached the limits for pics. Hang on for the next post.
The following is my solution for the behive oil cooler. I'm sure there are other ways to do this, but this is what worked for me. I had the cooler and pedistal on hand. I spent about 40 bucks getting the hoses made up.
Side note, I have no ac. If you are keeping your ac, you will need to work around that and modify the mounting brackets and hose routing.
As a favor to keep continuity to this write-up, I would appreciate everyone holding off on replying or questions until I have completed the write-up. It is going to take a few posts for me to get all of the pics posted. I will let you know when the write-up is complete and then answer any questions.
Parts and tools needed. Tools does not include what you normally have in the tools box, just the odd ones that most people don't have.
Parts:
FC oil cooler, including both lines, banjo bolts and the oil filter pedistal off of a non-behive 12a or 13b.
7, if I've counted right, crush wahsers that fit the banjo bolts. These can be sourced from the dealer or some parts stores.
1 crush washer that fits the adapter fitting on the front cover. It is slightly smaller than the banjo washers.
2 1-7/8" muffler clamps.
2 pieces of angle, 7" long. I used 2x2x1/4" aluminum, because that's what I had laying around.
2 rubber o-rings for the filter pedistal. Take the old ones to the parts store and match the size.
21 and 23 mm combo wrenches. 23mm for the banjos, 21mm for the front cover adapter.
So let's get started. You need to remove this:
And replace it with this:
That was the easy part. Now on to mounting the cooler.
Remove the radiator and shroud. I had the car stripped down when I did this, so I had plenty of room to work. That includes the entire front end, you will need to remove the grill, at a minimum, if not the bumper also. You will also need to remove the battery and tray.
Making the brackets.
I kept this as simple as possible. The 1-78" clamps are a perfect fit around the front bar. I removed the rubber mounts and bolted the angle directly to the cooler. I know there is some disagreement about this, vibration issues, but I believe there will be less vibration and stress on the cooler with a hard mount, as opposed to a soft mount.
There are several ways/positions that you can mout the cooler, that choice is yours. The next pic is the angle and clamps mounted on the cooler. I chose to mount the cooler up and back in relation to the front chassis tube, (no ac condenser).
Here is a pic of the cooler mounted. Once I had the assembly positioned where I wanted it, I tack welded the clamps to the frame tube. Welding is highly reccomended. You don't want the cooler rotating around the tube. Weld both parts of the clamp to the tube. If you do this right, you can still r&r the cooler, and the clamps will remain in place.
Side note, I went up and back with the cooler mount to clear the cooling loop for the power steering, as seen in the pic.
I've reached the limits for pics. Hang on for the next post.
 09-12-05, 08:00 PM
#3
Right near Malloy
iTrader: (28)
Join Date: Dec 1999
Location: Behind a workbench, repairing FC Electronics.
Posts: 7,825
Received 498 Likes
on
338 Posts
Is this for a 1983 Model car? Because the 1984 and 1985 models have a bracket alread for the GSL-SE cooler... That should fit the FC cooler as well.
And of course the 1982 and earlier models have the short radiator with the cooler under the radiator.
And of course the 1982 and earlier models have the short radiator with the cooler under the radiator.
09-12-05, 09:05 PM
#4
Part 2: The oil lines.
If anything, I am two things: economical (cheap) and creative (tenacious). AN fittings are fine and dandy, but most of us are not building high dollar 8 sec. drag cars. I don't need to spend that kind of money when simple stock fittings can be made to work just as well.
This is why you need the oem FC oil cooler lines. We do not care about the rubber hose themselves, only the hard parts. They need to be in good condition. Another side note, save the fat foam protectors that are on the stock lines, you will need them.
Below is a pic of the stock lines as the came off of an FC and the ones I modified. This is where you need some outside help. Just down the street from me is a shop that makes hydraulic hoses, this is a good thing.
In the pic, the top 2 hoses are the lower ones on the car. The lower 2 are the upper hoses on the car.
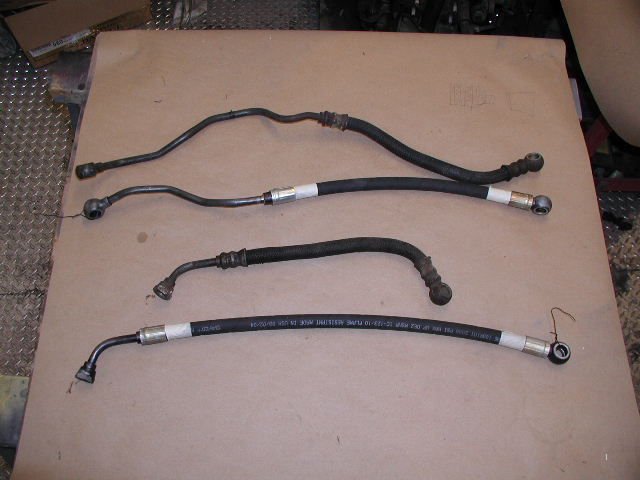
The tape on the new lines is masking, prior to painting the metal, I hate rust!
Now how do we get to this point? You have the cooler mounted, and you have removed the plug at the bottom of the rear iron, where the new hose will mount (forgot to mention that earlier will show a pic of that later).
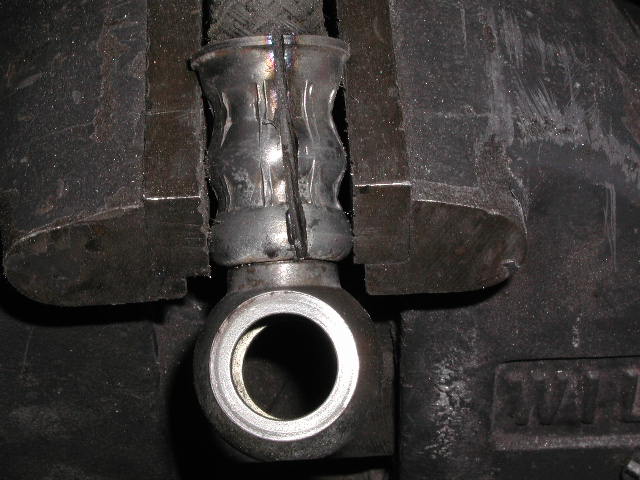
First step is to remove the old hose. To do this you will need a vise and a die grinder with a cut off wheel. You need to slot the crimped ferrel, without cutting into the bung that is brazed on the hard line. The ferrel has a lip that dips into the bung at the end of line. Do not try to cut trough this lip, you will get into the bung and the new fitting will leak. The next pic shows how far you need to cut, that last little bit of ferrel can easily be twisted off.
You only need to do this to 3 of the 4 ferrels. If you refer to the top pick, you will see that the upper hard line needs to cut and a new bung brazed onto it. Don't just go whacking with the hacksaw or tubing cutter by the pic. Test fit for position on the car. The hard line that I cut off needed to be rebent to fit where I wanted it to run, directly below the power steering line.
The shop that I went to was very good at working with me and, for them it was an unusual application. I explained what I was doing and the requirements for the hose. They came back with 1/2" 2500 psi burst strength hydraulic hose. This is some tough stuff. It is internally steel re-enforced and overkill for our application. This can be a benifit, it will not kink when you bend it like a lesser hose would.
The down side is you need to make room for those bends and a cut off wheel or good hacksaw to cut it. It is also difficult to push the hose on the bungs. I had to clamp the fitting in the vise and use liberal amounts of lube to seat the hose.
Most shops do not carry metric bungs. A 1/2" bung, along with 1/2" hose works fine. Now go to a shop and buy 3" of hose, 4 ferrels, have the one bung brazed on the hard line that comes off the lower rear end plate.
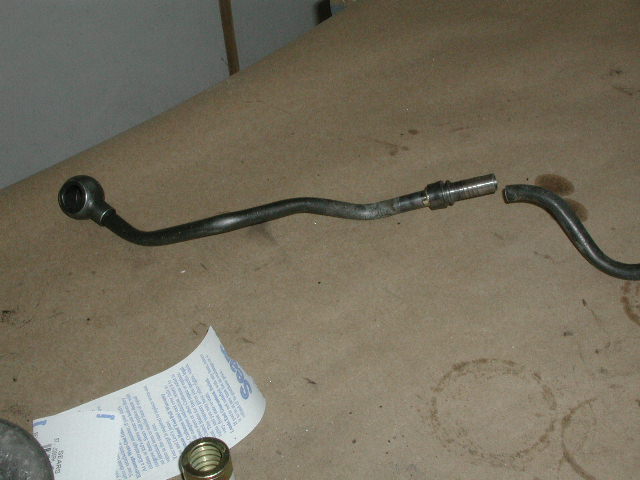
Below is a pic of thar rear line, with the new bung and the old part that was cut off.
Ok, so now you have you cooler mounted, you have removed the old hoses, you have parts in hand. Install your hard parts, the lines coming off of the rear iron and front cover and the 2 banjos and ferrels on the cooler. I have the upper ferrel on the cooler pointed forward and to the drivers side. The reason for this was it meant less cutting of metal parts and I wouldn't have to fight getting around the battery.
If you have powersteering, pay careful attention to the angle of the line coming off of the front cover. It will clear the pulley with an inch or so above and below.
Fit the lower hose first. At this point I had not welded the mounting clamps for the cooler because I was not sure how everything was going to fit into place. The radiator, shroud, battery and tray are also out at this point. These are all items that will need to be worked around and some trimming of the shroud and radiator frame was needed. This is what eats up a conciderable amount of time. If you have some cheap 1/2" hose laying around, use it for your test fitting and positioning. When you get it where you want, use the cheap hose as a template for the good hose. Just remember the curve radius of the hydraulic hose will be longer that the cheap hose.
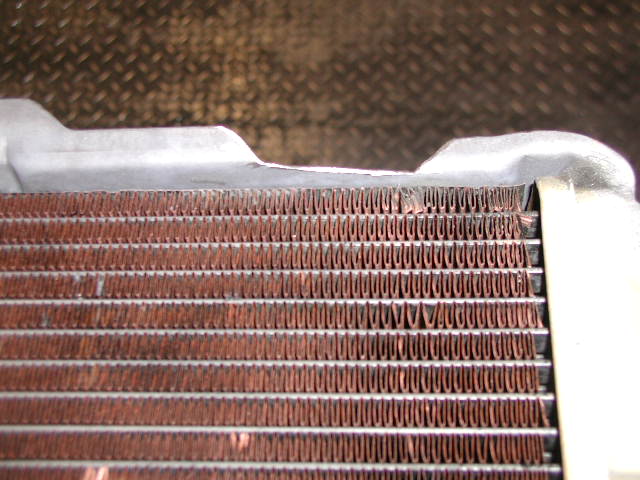
Below are pics of the trimming that I had to do for my routing choice. Yours may be different. The first one is what I timmed from the radiator frame, the second is what I trimmed from the side shroud.
And again, please refrain from replying until I am done. Just being **** today.
More to come with pics of the final install.
If anything, I am two things: economical (cheap) and creative (tenacious). AN fittings are fine and dandy, but most of us are not building high dollar 8 sec. drag cars. I don't need to spend that kind of money when simple stock fittings can be made to work just as well.
This is why you need the oem FC oil cooler lines. We do not care about the rubber hose themselves, only the hard parts. They need to be in good condition. Another side note, save the fat foam protectors that are on the stock lines, you will need them.
Below is a pic of the stock lines as the came off of an FC and the ones I modified. This is where you need some outside help. Just down the street from me is a shop that makes hydraulic hoses, this is a good thing.
In the pic, the top 2 hoses are the lower ones on the car. The lower 2 are the upper hoses on the car.
The tape on the new lines is masking, prior to painting the metal, I hate rust!
Now how do we get to this point? You have the cooler mounted, and you have removed the plug at the bottom of the rear iron, where the new hose will mount (forgot to mention that earlier will show a pic of that later).
First step is to remove the old hose. To do this you will need a vise and a die grinder with a cut off wheel. You need to slot the crimped ferrel, without cutting into the bung that is brazed on the hard line. The ferrel has a lip that dips into the bung at the end of line. Do not try to cut trough this lip, you will get into the bung and the new fitting will leak. The next pic shows how far you need to cut, that last little bit of ferrel can easily be twisted off.
You only need to do this to 3 of the 4 ferrels. If you refer to the top pick, you will see that the upper hard line needs to cut and a new bung brazed onto it. Don't just go whacking with the hacksaw or tubing cutter by the pic. Test fit for position on the car. The hard line that I cut off needed to be rebent to fit where I wanted it to run, directly below the power steering line.
The shop that I went to was very good at working with me and, for them it was an unusual application. I explained what I was doing and the requirements for the hose. They came back with 1/2" 2500 psi burst strength hydraulic hose. This is some tough stuff. It is internally steel re-enforced and overkill for our application. This can be a benifit, it will not kink when you bend it like a lesser hose would.
The down side is you need to make room for those bends and a cut off wheel or good hacksaw to cut it. It is also difficult to push the hose on the bungs. I had to clamp the fitting in the vise and use liberal amounts of lube to seat the hose.
Most shops do not carry metric bungs. A 1/2" bung, along with 1/2" hose works fine. Now go to a shop and buy 3" of hose, 4 ferrels, have the one bung brazed on the hard line that comes off the lower rear end plate.
Below is a pic of thar rear line, with the new bung and the old part that was cut off.
Ok, so now you have you cooler mounted, you have removed the old hoses, you have parts in hand. Install your hard parts, the lines coming off of the rear iron and front cover and the 2 banjos and ferrels on the cooler. I have the upper ferrel on the cooler pointed forward and to the drivers side. The reason for this was it meant less cutting of metal parts and I wouldn't have to fight getting around the battery.
If you have powersteering, pay careful attention to the angle of the line coming off of the front cover. It will clear the pulley with an inch or so above and below.
Fit the lower hose first. At this point I had not welded the mounting clamps for the cooler because I was not sure how everything was going to fit into place. The radiator, shroud, battery and tray are also out at this point. These are all items that will need to be worked around and some trimming of the shroud and radiator frame was needed. This is what eats up a conciderable amount of time. If you have some cheap 1/2" hose laying around, use it for your test fitting and positioning. When you get it where you want, use the cheap hose as a template for the good hose. Just remember the curve radius of the hydraulic hose will be longer that the cheap hose.
Below are pics of the trimming that I had to do for my routing choice. Yours may be different. The first one is what I timmed from the radiator frame, the second is what I trimmed from the side shroud.
And again, please refrain from replying until I am done. Just being **** today.
More to come with pics of the final install.
09-12-05, 10:00 PM
#5
This is the next to last chapter.
The most time consuming part of this mod is the test fitting. Installing the hoses, then the body parts and checking for interference and rubbing. I had the radiator, shroud and battery tray in and out many times.
The following pics show my final fitment. The particular routing I chose will not work if you have ac. The lines run in the same area and there is just not enough room for both.
Now for an important note. Once the rubber hose is cut to length, the ferrels installed, the hoses seated on the bungs, MAKE SURE YOU HAVE EVERYTHING CLOCKED RIGHT!. Once the ferrels are crimped, you will not be able to turn the hose on the ferrels if they are out of position. If you have everything right, that will be the last trip to the hydraulic shop.
The first pic shows how I pointed the top line forward. Doing this allowed me to do a couple of things. It reduced the amount of triming I would need to do on the radiator shroud, and it allowed me to drop the hose under the battery tray.

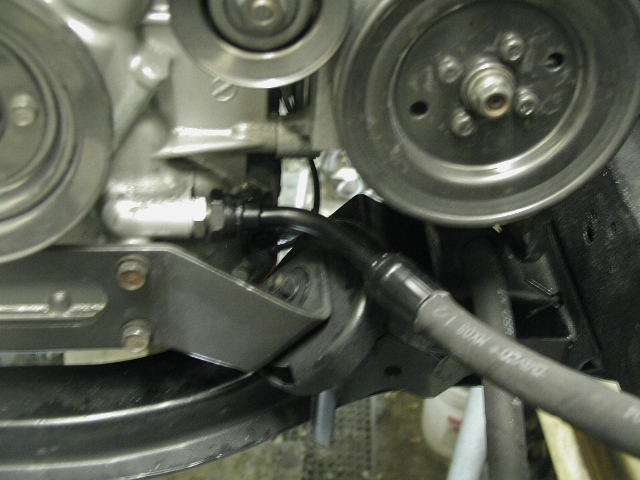
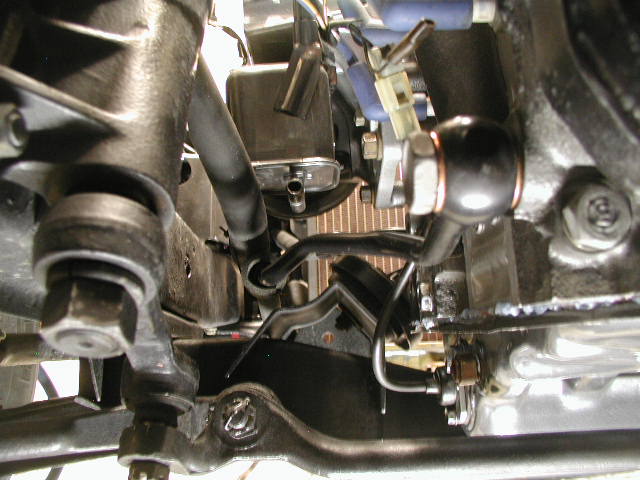
The following pic shows the line coming off of the front cover and the clearance between the hose and the ps pulley. Before tightening this fitting down, install the pulley belt to make sure it clears. I didn't the first time and had to re-clock the hose at the front cover. The adapter fitting that screws into the front cover is where you need the 21mm combo wrench. I had to thin the sides of the open end part of the wrench on the bench grinder, as the wrench, itself, was too thick to fit in between the front cover and the fitting on the end of the hose.
Next pic shows the side shroud installed. Note the banjo bolt on the lower hose. That is where I needed to trim the shroud. Also note the reuse of the padding to protect the new hose from abrasion.
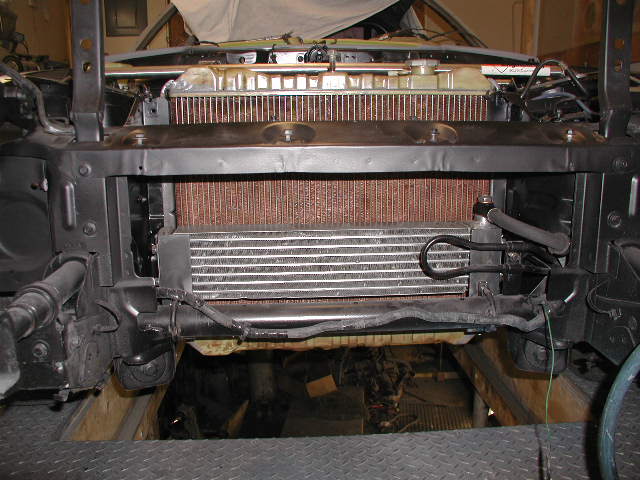
Next pic is a front view of the upper hose routing. This shows why I went forward. Had I gone to the side I would need to relocate the battery or add a 90* fitting.
The last pic in this chapter shows the battery tray installed. This is where the foam protects the hose, it is a tight fit.

Hang in there, I'm almost done.
The most time consuming part of this mod is the test fitting. Installing the hoses, then the body parts and checking for interference and rubbing. I had the radiator, shroud and battery tray in and out many times.
The following pics show my final fitment. The particular routing I chose will not work if you have ac. The lines run in the same area and there is just not enough room for both.
Now for an important note. Once the rubber hose is cut to length, the ferrels installed, the hoses seated on the bungs, MAKE SURE YOU HAVE EVERYTHING CLOCKED RIGHT!. Once the ferrels are crimped, you will not be able to turn the hose on the ferrels if they are out of position. If you have everything right, that will be the last trip to the hydraulic shop.
The first pic shows how I pointed the top line forward. Doing this allowed me to do a couple of things. It reduced the amount of triming I would need to do on the radiator shroud, and it allowed me to drop the hose under the battery tray.
The following pic shows the line coming off of the front cover and the clearance between the hose and the ps pulley. Before tightening this fitting down, install the pulley belt to make sure it clears. I didn't the first time and had to re-clock the hose at the front cover. The adapter fitting that screws into the front cover is where you need the 21mm combo wrench. I had to thin the sides of the open end part of the wrench on the bench grinder, as the wrench, itself, was too thick to fit in between the front cover and the fitting on the end of the hose.
Next pic shows the side shroud installed. Note the banjo bolt on the lower hose. That is where I needed to trim the shroud. Also note the reuse of the padding to protect the new hose from abrasion.
Next pic is a front view of the upper hose routing. This shows why I went forward. Had I gone to the side I would need to relocate the battery or add a 90* fitting.
The last pic in this chapter shows the battery tray installed. This is where the foam protects the hose, it is a tight fit.
Hang in there, I'm almost done.


Trending Topics
 09-12-05, 10:55 PM
#9
Last chapter.
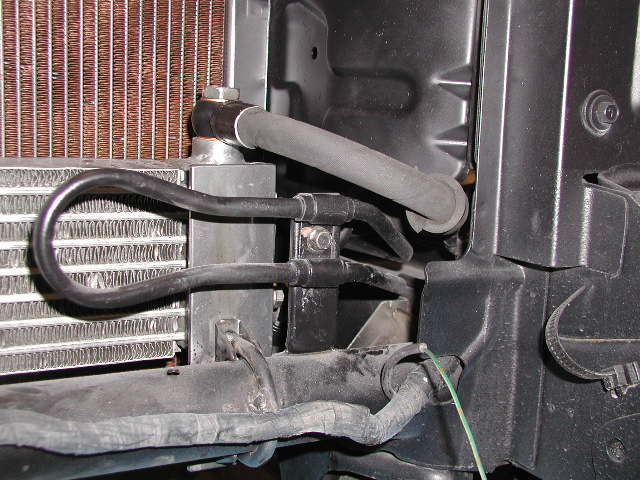
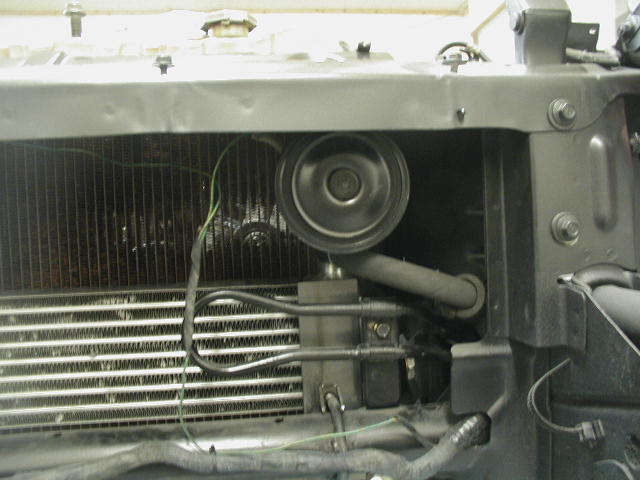
First pic is a shot from the top with the hoses and radiator installed.
Next pic is the final install from the front. Another side note: I moved the cooler as far as the mounts would allow, to the passenger side of the body. This gave me a little more room for the hose bends.
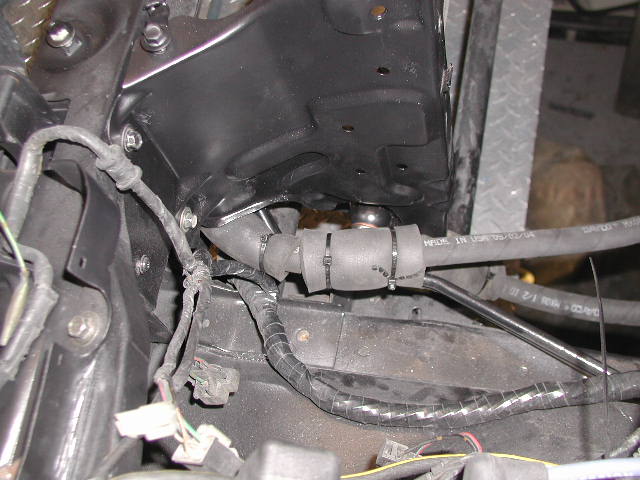
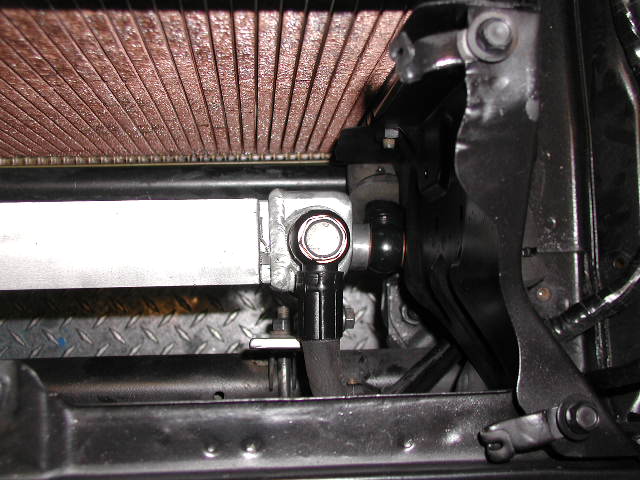
Next pic is the routing of the lower line coming off of the rear iron. I bent the hard pipe to follow under the ps hose. Note the foam protector on the hose. I also used zip ties to tie the oil and ps hoses in line.
If you have plans to install an aftermarket op gauge, tap this banjo bolt for the sender. This is the best place for a reading, as it is only a couple of inches from the oil pressure regulator.
Last pic. This shows how every thing manages to fit in place, without fighting for space.
I hope that those of you who are concidering this upgrade find this write-up helpful. It is by no means the only way to do this, but can be used as a good starting point.
For those of you who have ac, this can still be done, it will just need a little re-thinking and the cooler moved to the forward side or the frame tube.
Since the behive cooler is now gone, you will have 2 cooling lines that need to be addressed. I simply found a spare coolant hose and connected the 2 open barbs. This is fine for summer use but most of the coolant will probably bypass the heater core for cold weather use. I plan on installing a plug in the hose before winter. I would prefer the lines capped, as that would eliminate one more potential hose failure. Your choice on what you want to do.
Another side note. Since the condition of the motor that the cooler came from is probably unknown, get the cooler cleaned and flushed. You don't need somebody else's bearing flakes and gunk going through your motor.
A final word of advice concerning crush washers. Do not over tighten them when you first cinch them down. Hand tighten the banjo bolts then lightly tighten them with a wrench. Start the engine and check for leaks. You will have them. With the engine running, slowly tighten until the leak stops. Once the engine is warm and still running, re-check for leaks. A little tightening at a time is better than than trying to to seat them them all at once. An over-tightened crush washer can leak as badly as a loose one.
And as always, use new washers. Losing a motor is not worth the few bucks saved using the old ones.
Floor is now open for comments and questions.
First pic is a shot from the top with the hoses and radiator installed.
Next pic is the final install from the front. Another side note: I moved the cooler as far as the mounts would allow, to the passenger side of the body. This gave me a little more room for the hose bends.
Next pic is the routing of the lower line coming off of the rear iron. I bent the hard pipe to follow under the ps hose. Note the foam protector on the hose. I also used zip ties to tie the oil and ps hoses in line.
If you have plans to install an aftermarket op gauge, tap this banjo bolt for the sender. This is the best place for a reading, as it is only a couple of inches from the oil pressure regulator.
Last pic.
This shows how every thing manages to fit in place, without fighting for space.I hope that those of you who are concidering this upgrade find this write-up helpful. It is by no means the only way to do this, but can be used as a good starting point.
For those of you who have ac, this can still be done, it will just need a little re-thinking and the cooler moved to the forward side or the frame tube.
Since the behive cooler is now gone, you will have 2 cooling lines that need to be addressed. I simply found a spare coolant hose and connected the 2 open barbs. This is fine for summer use but most of the coolant will probably bypass the heater core for cold weather use. I plan on installing a plug in the hose before winter. I would prefer the lines capped, as that would eliminate one more potential hose failure. Your choice on what you want to do.
Another side note. Since the condition of the motor that the cooler came from is probably unknown, get the cooler cleaned and flushed. You don't need somebody else's bearing flakes and gunk going through your motor.
A final word of advice concerning crush washers. Do not over tighten them when you first cinch them down. Hand tighten the banjo bolts then lightly tighten them with a wrench. Start the engine and check for leaks. You will have them. With the engine running, slowly tighten until the leak stops. Once the engine is warm and still running, re-check for leaks. A little tightening at a time is better than than trying to to seat them them all at once. An over-tightened crush washer can leak as badly as a loose one.
And as always, use new washers. Losing a motor is not worth the few bucks saved using the old ones.
Floor is now open for comments and questions.
09-13-05, 12:10 AM
#10
Rotary Enthusiast
iTrader: (14)
Join Date: May 2004
Location: Drifting a Roundabout near you!
Posts: 1,366
Likes: 0
Received 10 Likes
on
10 Posts
Very nice job and well documented, I have one minor observation. You hard mounted the cooler instead of using a rubber insolator, this is not so much of a issue due to the soft lines you have but the cooler mounting ears are going to take a beating over time.
Once again, great job.
Best regards
Lloyd
Once again, great job.
Best regards
Lloyd
09-13-05, 12:40 AM
#11
Originally Posted by Slammed_GSL
Very nice job and well documented, I have one minor observation. You hard mounted the cooler instead of using a rubber insolator, this is not so much of a issue due to the soft lines you have but the cooler mounting ears are going to take a beating over time.
Once again, great job.
Best regards
Lloyd
Once again, great job.
Best regards
Lloyd
With the rubber isolator mounts, the cooler will actually vibrate more due to the flex in the rubber. Whether it is a hard mount or a soft mount, the stress still ends up on the ears that are tigged to the cooler. The rubber mounts will absorb some of the shock loads, at the same time they also allow for more incidents of movement.
The only way to determine which is better in the long run would require extensive, calibrated testing.
One thing I do know is the cooler should be mounted in the closest vertical position with the mounts as possible. That will reduce the radius of the moment of inertia, thereby reducing the peak shock loads.
09-13-05, 03:36 AM
#14
Originally Posted by vipernicus42
Amazingly awesome job on the writeup.
This is a stupid question but:
how did you get your old beehive to shine like that?
and
Can I buy that beehive off you? I plan to install a FMOC soon, but that beehive is pimpin' until I do!
Jon
This is a stupid question but:
how did you get your old beehive to shine like that?
and
Can I buy that beehive off you?
I plan to install a FMOC soon, but that beehive is pimpin' until I do!Jon
09-13-05, 05:32 PM
#15
Right near Malloy
iTrader: (28)
Join Date: Dec 1999
Location: Behind a workbench, repairing FC Electronics.
Posts: 7,825
Received 498 Likes
on
338 Posts
Originally Posted by Pele
Is this for a 1983 Model car? Because the 1984 and 1985 models have a bracket alread for the GSL-SE cooler... That should fit the FC cooler as well.
And of course the 1982 and earlier models have the short radiator with the cooler under the radiator.
And of course the 1982 and earlier models have the short radiator with the cooler under the radiator.
09-13-05, 05:46 PM
#16
I went back and re-read my post and found an error. In the following paragraph, the word ferrel should be replaced with bung.
"Ok, so now you have you cooler mounted, you have removed the old hoses, you have parts in hand. Install your hard parts, the lines coming off of the rear iron and front cover and the 2 banjos and ferrels on the cooler. I have the upper ferrel on the cooler pointed forward and to the drivers side. The reason for this was it meant less cutting of metal parts and I wouldn't have to fight getting around the battery."
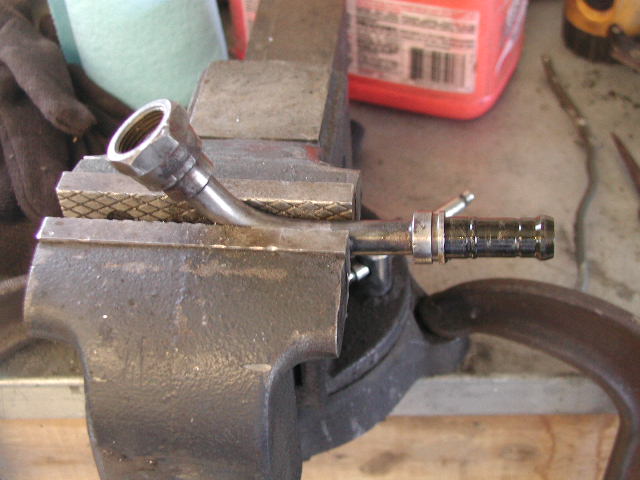
Also, below are some pics of assembling the hose and ferrels, prior to returning to the shop to have them crimped.
The first pic is the hard line, that comes off the front cover, mounted in the vise ready for the hose. The ferrel is not shown in the pic, but they need to be slipped over the hard line first.
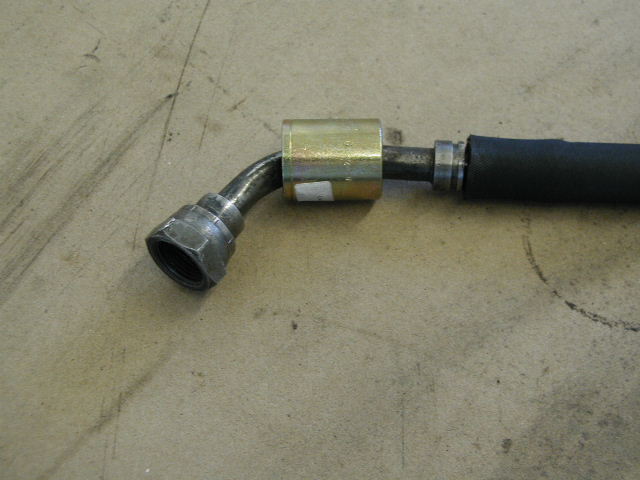
This pic shows the the hose, hard line and ferrel, almost done. Note that the hose is fully seated on the ferrel. The last groove on the bung is where the ferrel gets it's mechanical grip to the hard line. Crimping the ferrel produces a frictional and mechanical grip between the hose and bung.
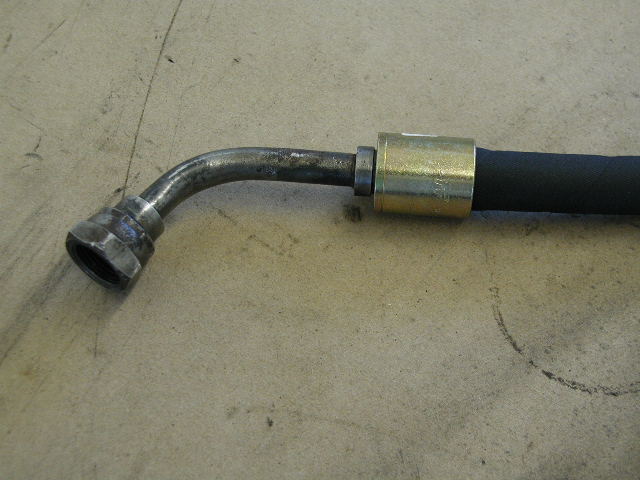
Done. Here is where you make your final check to see that your hose and fittings are properly clocked. Now it's off to the shop for crimping.
Enjoy, Scott.
"Ok, so now you have you cooler mounted, you have removed the old hoses, you have parts in hand. Install your hard parts, the lines coming off of the rear iron and front cover and the 2 banjos and ferrels on the cooler. I have the upper ferrel on the cooler pointed forward and to the drivers side. The reason for this was it meant less cutting of metal parts and I wouldn't have to fight getting around the battery."
Also, below are some pics of assembling the hose and ferrels, prior to returning to the shop to have them crimped.
The first pic is the hard line, that comes off the front cover, mounted in the vise ready for the hose. The ferrel is not shown in the pic, but they need to be slipped over the hard line first.
This pic shows the the hose, hard line and ferrel, almost done. Note that the hose is fully seated on the ferrel. The last groove on the bung is where the ferrel gets it's mechanical grip to the hard line. Crimping the ferrel produces a frictional and mechanical grip between the hose and bung.
Done. Here is where you make your final check to see that your hose and fittings are properly clocked. Now it's off to the shop for crimping.
Enjoy, Scott.


