(BRAKES) How To: Replace rear brake shoes
 07-23-06, 05:38 PM
#1
(BRAKES) How To: Replace rear brake shoes
Another DIY for those people like me who "enjoy" doing work on their cars themselves. This was a very good learning experience for me and additionally, an excercise in frustration, curiosity, and temporary heat exhaustion. If asked to do this again, it would more than likely take about 15-20 minutes. Once you install and remove the retaining springs 17 times, it becomes second nature.  You'll see why later on.
Here it goes, hope this helps people. I'll try to document almost everything I do to the car since each time I do something, I learn something. Plus this is fun for me. All those that have insight and helpful additions, please post. I'm just a shady tree mechanic trying to prepare for the GRM 2006 challenge. I'm sure others know more than me.
Tools needed:
Whatever you use to remove the wheels, I have an impact wrench
Torque Wrench for proper lug bolt installation
Phillips head screw driver to remove the drum retaining screw
Needle Nose Pliers
Needle Nose Vise Grip (this will be your new best friend)
Small flat head screw driver
Whatever you use to bleed brakes
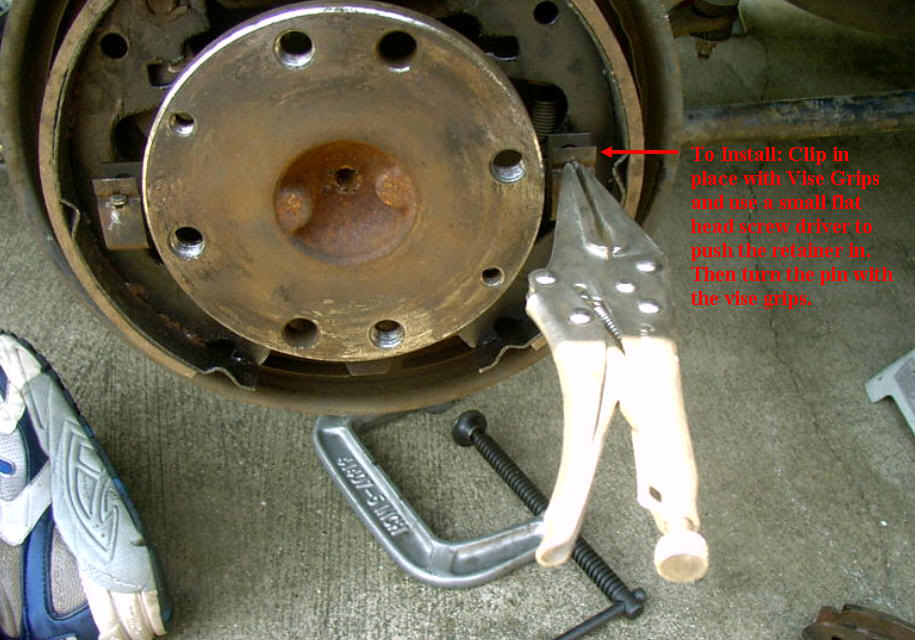
Once you remove the wheel and drum retaining screw, remove the drum with the hand brake off.
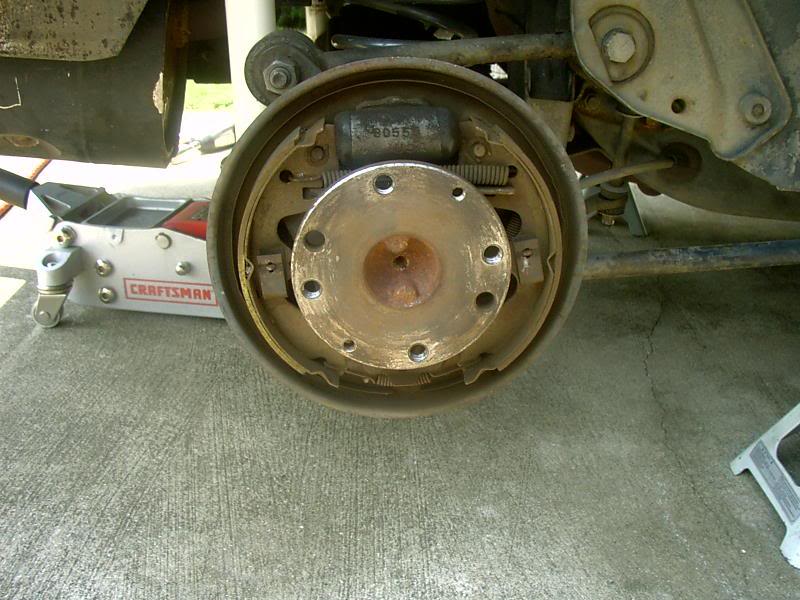
It'll look like this. This is where the needle nose and vise grips come in handy.
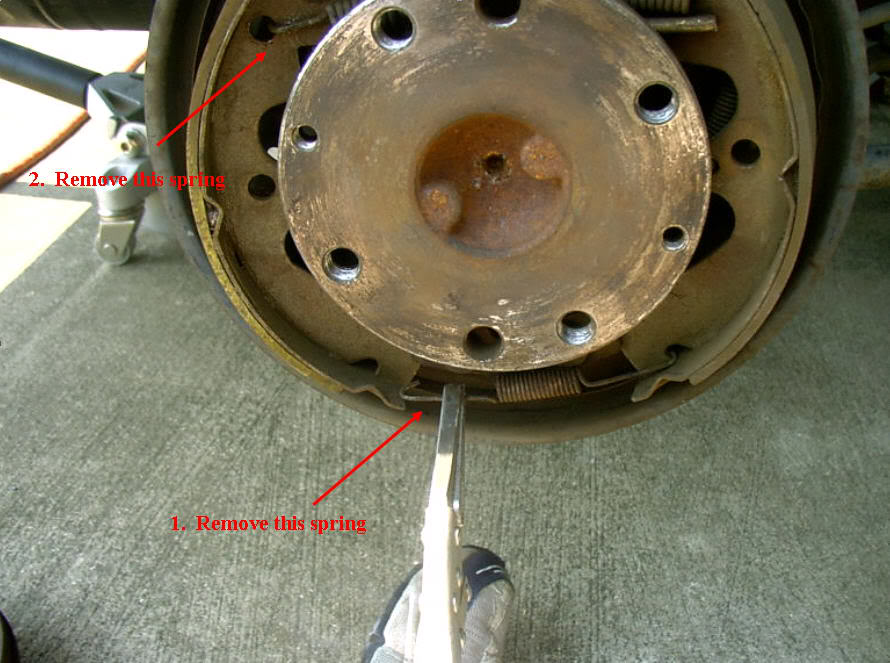
Remove the bottom and then top springs. The pictures shows the guide pins already removed, but do those after the springs are out. Either way, it should work on the removal.
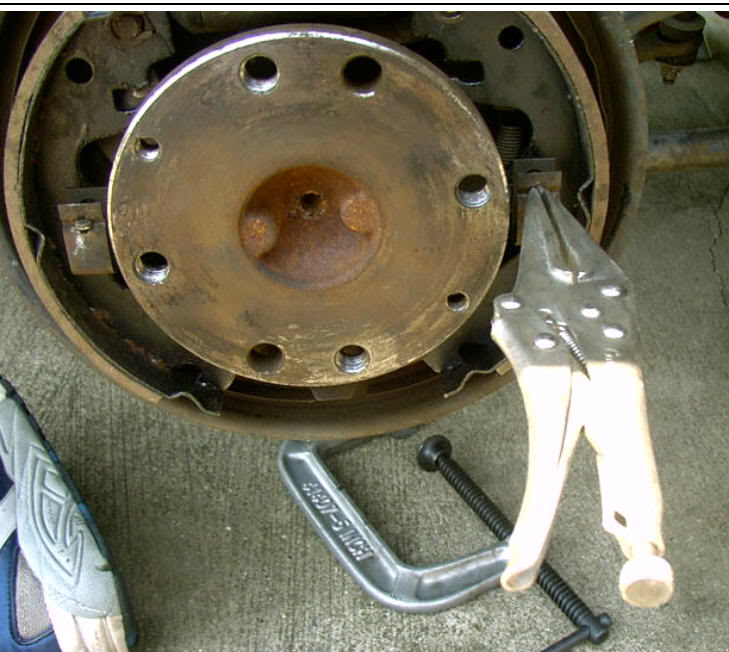
Then remove the Guide pins. Use the vise to grip the head of the pin, push down, and then turn to remove them. They'll just pop out then.
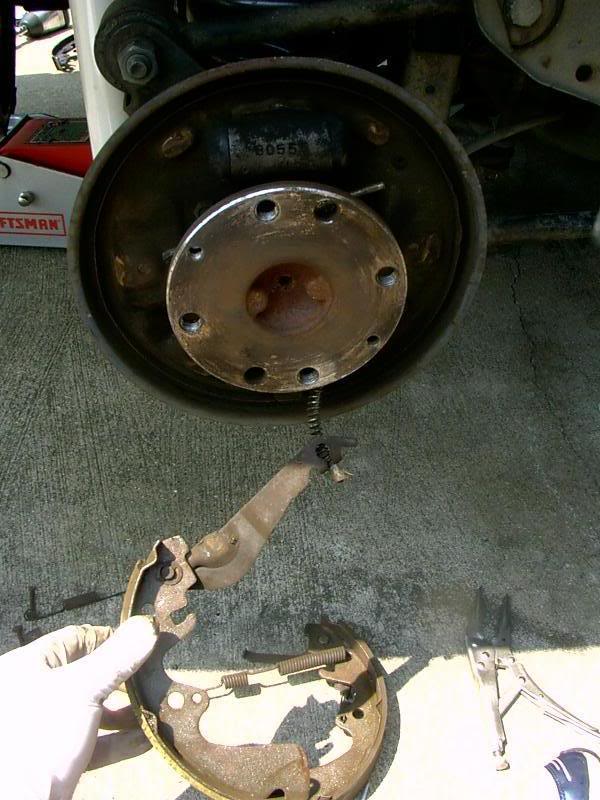
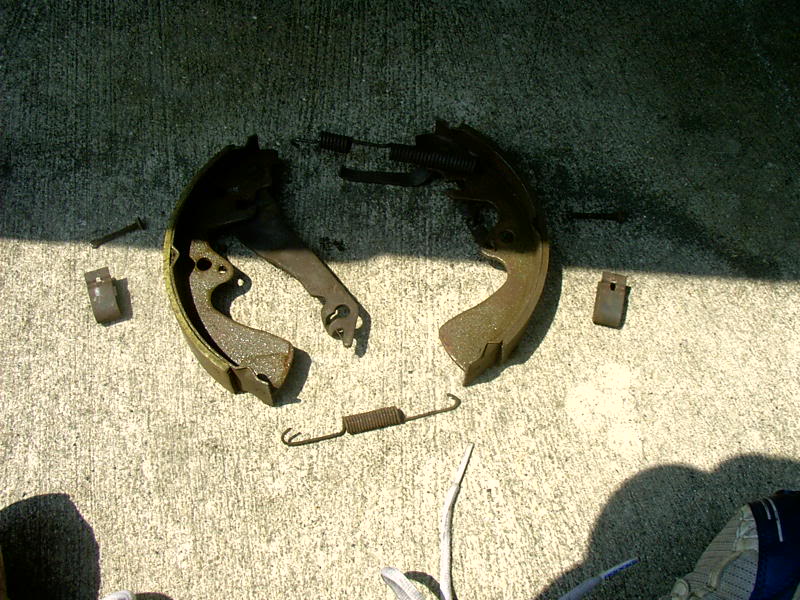
After this, the shoes can then be removed. The e-brake cable will be attached to one of the levers. I made the mistake of removing it from the lever for one side and it is a B*tch to reinstall. Instead of that, keep it attached to the cable and remove the pivot pin on the shoe and reattach it to the new shoe. It's MUCH easier this way. The pivoting pin is right above my thumb in the below picture.
These are the parts that are removed. Sorry for the dark picture.
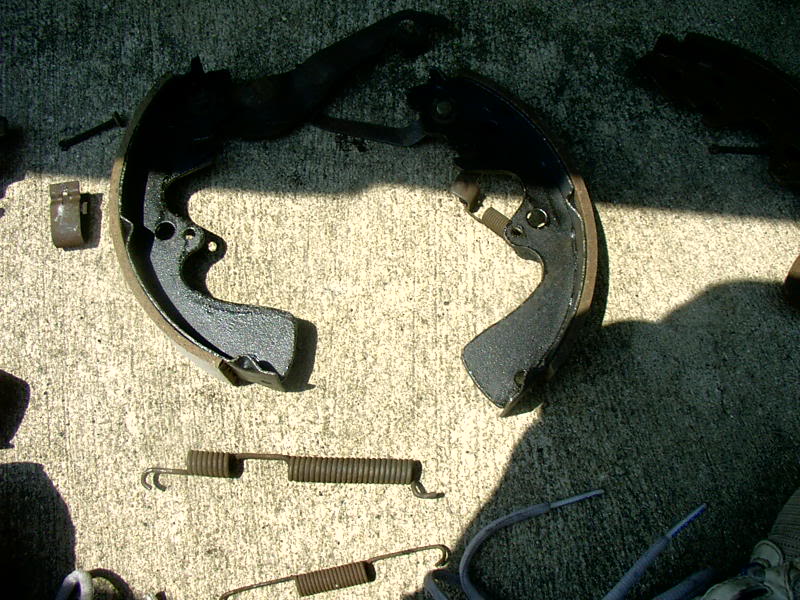
These are the new shoes with the levers reattached to them.
To reinstall the shoes, you need to adjust the Adjuster so that the shoes were in the right spot to install the drum back. At first, the drum wouldn't fit. Using the small screw driver, I turned the adjuster to shorten it which allowed the shoes to shorten thier diameter.
When istalling the shoes, put in the one attached to the e-brake cable first, install the guide pin for it.
Then put the adjuster in place. Slide the second shoe and the top spring in place. Then attach the second shoe with the guide pin. The adjuster and top spring need to be there and because they won't fit once both shoes are in place. Once both sides of the adjuster are in place and both guide pins are installed, pull the top spring with the vise grips and install to the adjacent shoe. Then install the bottom spring.
You can use the small screw driver to turn and adjust the adjuster to meet you needs to install the drum. Once the drum fits, make sure the e-brake will hold. If it doesn't, you'll need to turn and readjust the adjuster to make sure it holds.
Then, once the drum in back in place, bleed brakes and you're good to go. The trouble I had was that when I installed everything and pumped the brakes to check my work before putting the drum on, I noticed that fluid was spraying out of the Wheel Cylinder boots. Both wheel cylinders had to be rebuilt. I had inspected them prior, but not enough I guess. I had to take everything apart, go to the auto parts store, buy a rebuild kit, and rebuild both cylinders. Good news, the kits are only about $5 each.
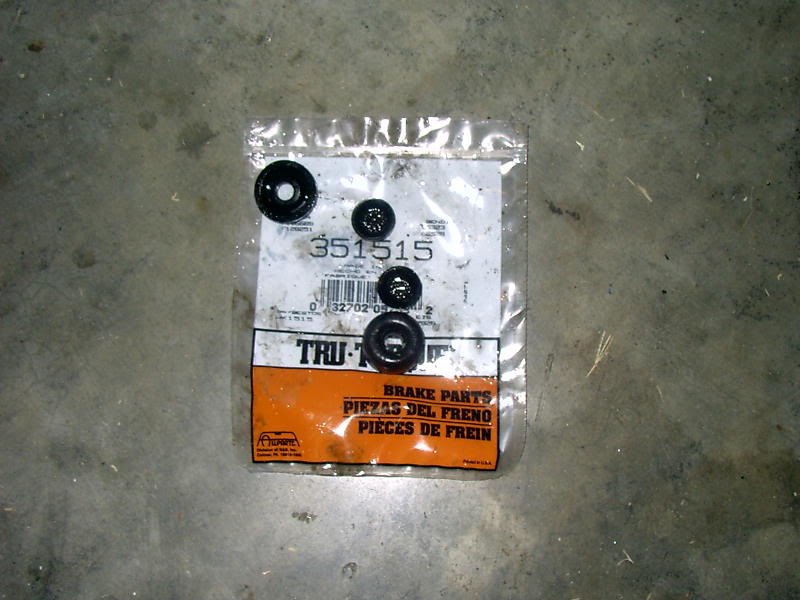
I replaced both sets of cups and boots, cleaned out the pistons, and reinstalled it. This is a good time to make sure both of the boot sets are in good shape, or replace them anyway since they are only $10. Clean everything up with brake cleaner too.
Good luck. Let me know if I can answer any questions. I'll update with as questions get answered and suggestions are given. All in all, this isn't very hard. The Mazda shop manual was ok help, but with this and the manual, you should be good to go.
You'll see why later on.Here it goes, hope this helps people. I'll try to document almost everything I do to the car since each time I do something, I learn something. Plus this is fun for me. All those that have insight and helpful additions, please post. I'm just a shady tree mechanic trying to prepare for the GRM 2006 challenge. I'm sure others know more than me.
Tools needed:
Whatever you use to remove the wheels, I have an impact wrench
Torque Wrench for proper lug bolt installation
Phillips head screw driver to remove the drum retaining screw
Needle Nose Pliers
Needle Nose Vise Grip (this will be your new best friend)
Small flat head screw driver
Whatever you use to bleed brakes
Once you remove the wheel and drum retaining screw, remove the drum with the hand brake off.
It'll look like this. This is where the needle nose and vise grips come in handy.
Remove the bottom and then top springs. The pictures shows the guide pins already removed, but do those after the springs are out. Either way, it should work on the removal.
Then remove the Guide pins. Use the vise to grip the head of the pin, push down, and then turn to remove them. They'll just pop out then.
After this, the shoes can then be removed. The e-brake cable will be attached to one of the levers. I made the mistake of removing it from the lever for one side and it is a B*tch to reinstall. Instead of that, keep it attached to the cable and remove the pivot pin on the shoe and reattach it to the new shoe. It's MUCH easier this way. The pivoting pin is right above my thumb in the below picture.
These are the parts that are removed. Sorry for the dark picture.
These are the new shoes with the levers reattached to them.
To reinstall the shoes, you need to adjust the Adjuster so that the shoes were in the right spot to install the drum back. At first, the drum wouldn't fit. Using the small screw driver, I turned the adjuster to shorten it which allowed the shoes to shorten thier diameter.
When istalling the shoes, put in the one attached to the e-brake cable first, install the guide pin for it.
Then put the adjuster in place. Slide the second shoe and the top spring in place. Then attach the second shoe with the guide pin. The adjuster and top spring need to be there and because they won't fit once both shoes are in place. Once both sides of the adjuster are in place and both guide pins are installed, pull the top spring with the vise grips and install to the adjacent shoe. Then install the bottom spring.
You can use the small screw driver to turn and adjust the adjuster to meet you needs to install the drum. Once the drum fits, make sure the e-brake will hold. If it doesn't, you'll need to turn and readjust the adjuster to make sure it holds.
Then, once the drum in back in place, bleed brakes and you're good to go. The trouble I had was that when I installed everything and pumped the brakes to check my work before putting the drum on, I noticed that fluid was spraying out of the Wheel Cylinder boots. Both wheel cylinders had to be rebuilt. I had inspected them prior, but not enough I guess. I had to take everything apart, go to the auto parts store, buy a rebuild kit, and rebuild both cylinders. Good news, the kits are only about $5 each.
I replaced both sets of cups and boots, cleaned out the pistons, and reinstalled it. This is a good time to make sure both of the boot sets are in good shape, or replace them anyway since they are only $10. Clean everything up with brake cleaner too.
Good luck. Let me know if I can answer any questions. I'll update with as questions get answered and suggestions are given. All in all, this isn't very hard. The Mazda shop manual was ok help, but with this and the manual, you should be good to go.

The following users liked this post:
Theodore W (06-30-19)
 Sunburn...that's what garages are for LOL
07-23-06, 09:13 PM
Sunburn...that's what garages are for LOL
07-23-06, 09:13 PM
#7

when you rebuilt the wheel cylinder did you hone it out? if not you will be rebuilding them or replacing them soon.
What happens is as your shoes wear, the piston and it's seal naturally move outwards to accomodate the wear. As it does it no longer is moving in the beginning position as a set of new shoes would. The inside of the cylinder now sits there and corrodes from the brake fluid being hydroscopic and not having the seal move over that spot, so little black pits form. (These little black pits can easily be seen) Your now new shoes push the piston and seal back inside and ride on the now pitted unsmooth surface and do not seal, leak, and ruin your new shoes.
So moral of the story is either rebuild or replace your wheel cylinder whenever doing a drum brake job. Most of the time its just as cheap to buy new cylinders, then your don't have to worry about honing too much of the bore and not having your piston cups seal. Easy reassurance for me i think.
Trending Topics
07-24-06, 12:38 PM
#11
Too old to act my age
Join Date: Feb 2005
Location: Tulsa, Ok.
Posts: 3,164
Likes: 0
Received 0 Likes
on
0 Posts
The trouble I had was that when I installed everything and pumped the brakes to check my work before putting the drum on, I noticed that fluid was spraying out of the Wheel Cylinder boots.
One more tip, disassemble the adjuster bar, clean it up real good, and apply a light coat of grease to the threads and the blank stud on the other end. This will prevent it from rusting and freezing up.
07-24-06, 01:10 PM
#12
voo doo witchdoctor
Join Date: Aug 2005
Location: Texarkana, Arkansas
Posts: 365
Likes: 0
Received 0 Likes
on
0 Posts
imo this really belongs in the archives. 2 weeks after i bought my 7 i did a brake job and i had no idea what i was doing, it took me over a week to figure out how to put the **** back together. whoever said a pic was worth a thousand words wasnt makin **** up cuz if i could have found one it would have saved me a hellauva lotta drivin around in a toyota for a week.
07-24-06, 01:41 PM
#14
Too old to act my age
Join Date: Feb 2005
Location: Tulsa, Ok.
Posts: 3,164
Likes: 0
Received 0 Likes
on
0 Posts
Originally Posted by Hades12
Do one side at a time and use the other side for reference.
07-24-06, 03:07 PM
#15
Originally Posted by Rogue_Wulff
Pumping the brakes without the drum on WILL make the wheel cylinders leak. They travel too far without the drums to stop the shoes from moving........
07-24-06, 03:09 PM
#16
Originally Posted by Hades12
Do one side at a time and use the other side for reference.
Agreed, I had to do this a couple times to make sure the adjuster and the E-brake bracket was right.
I hope these DIY's help. I'll continue as I work on the car.
 10-13-07, 01:39 AM
#18
Nekurd

Join Date: Feb 2006
Location: California
Posts: 1,129
Likes: 0
Received 0 Likes
on
0 Posts
I compared how I assembled my drum shoes with how you did yours, same stuff... yet there is 2 different outcomes. Yours function properly, although mine works but the e-brake doesn't work at all. No tension difference when the lever is up or down. Whats wrong with my e-brake cables? I tried adjusting the tension... didn't work. I looked underneath the car... all cables are connected/etc. WHATS WRONG?!!?
10-18-07, 01:42 AM
#21
Nekurd
Join Date: Feb 2006
Location: California
Posts: 1,129
Likes: 0
Received 0 Likes
on
0 Posts
Everything is connected. When I pull the brake lever I can see the pivoting lever move, yet there is no tension. Its weird because its been stored for 2 years and with the e-brake lever down.
10-18-07, 03:56 AM
#23
Right near Malloy
iTrader: (28)
Join Date: Dec 1999
Location: Behind a workbench, repairing FC Electronics.
Posts: 7,835
Received 502 Likes
on
340 Posts
If you feel no tension, your adjuster may be too loose. It should be a little star wheel lookin guy.
Turn him until the shoes JUST BARELY touch the drums...
Turn a couple notches, put the drum back on and turn it. Listen till you hear a little "shhhh" noise of the shoes touching the drum... (With no lugs or wheels on, you'll either need to put the screws in that hold the drum to the hub or just press it against the hub...
10-18-07, 08:28 AM
#24
Waffles - hmmm good
iTrader: (1)
He has an SA, theres no star wheel and its not done from the front side of the hub.
Using two wrenches you need to loosen the locked nut on the back bottom of the brake backing plate and rotate it until the shoes start to rub the drums. Then tighten it down. You'll have to adjust this as the brakes wear as well.
What your doing is rotating a cam that the lower part of the brake shoes rest on. It pushes them out up to about 3/8 of an inch max.
10-18-07, 02:37 PM
#25
Nekurd
Join Date: Feb 2006
Location: California
Posts: 1,129
Likes: 0
Received 0 Likes
on
0 Posts
Oh.. are you talking about the 2 nuts behind the plate at the bottom?, the side where the brake line is and where the bleeding bolt is? If that is it then Im going to do it now!