(BRAKES) How-to: Rebuilding the SE rear calipers
 07-11-09, 08:40 PM
#1
(BRAKES) How-to: Rebuilding the SE rear calipers
Actually, it's a sneak preview. Tomorrow, when I take pictures of the second one, I'll have the how-to up. I just finished rebuilding this one tonight, and it's NOT easy. I'd give it about a 4 of 5 for difficulty level, and I've been a mechanic for years. It's either spend some time getting to know your car better, or spend about $75 each for the rear calipers, plus core charge. It's your choice.
The hardest part is reassembling the e-brake section. There's so many little parts that all have to go together at the same time... under spring pressure, it's quite frustrating.
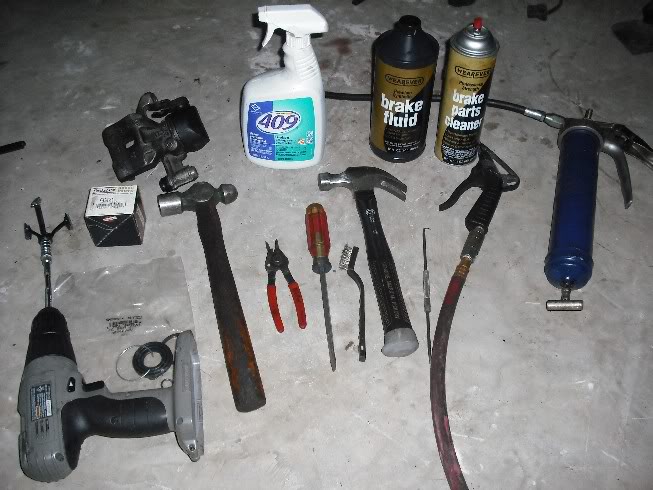
So here's the list of tools you're going to need:
Flat blade screwdriver
Hammer
Brake cylinder hone
Drill
Scribe
Blow gun (optional)
Small brush (optional, but VERY useful)
Consumables:
Caliper rebuild kit
Grease
Brake fluid
Brake parts cleaner
Degreaser (409)
Water
Patience (because throwing it against the wall doesn't help)
1000 & 2000 grit sandpaper
Like I said, tomorrow when I do the second one, I'll take pics and do a step by step on the process.
The hardest part is reassembling the e-brake section. There's so many little parts that all have to go together at the same time... under spring pressure, it's quite frustrating.
So here's the list of tools you're going to need:
Flat blade screwdriver
Hammer
Brake cylinder hone
Drill
Scribe
Blow gun (optional)
Small brush (optional, but VERY useful)
Consumables:
Caliper rebuild kit
Grease
Brake fluid
Brake parts cleaner
Degreaser (409)
Water
Patience (because throwing it against the wall doesn't help)
1000 & 2000 grit sandpaper
Like I said, tomorrow when I do the second one, I'll take pics and do a step by step on the process.
 07-12-09, 06:02 PM
#2
As promised:
Let's start with removing the caliper. Place a rubber cap over the brake line on the car so you don't lose all your fluid.
Now, there's 2 options here. Use compressed air and a hammer handle to pop the piston out.
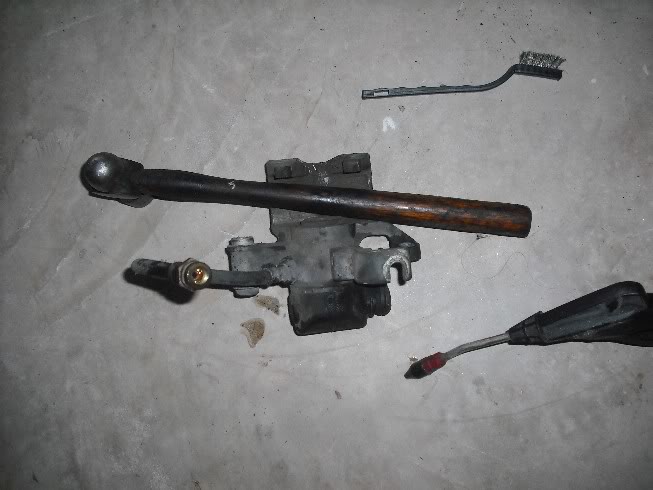
Or hook the line back up and pump it out with the brake pedal. Both mine were siezed so badly that I had to pump both out. I still had to use air to get it all the way out though, and it makes a big mess.
Separate the boot from the piston
And pop the piston out with compressed air.
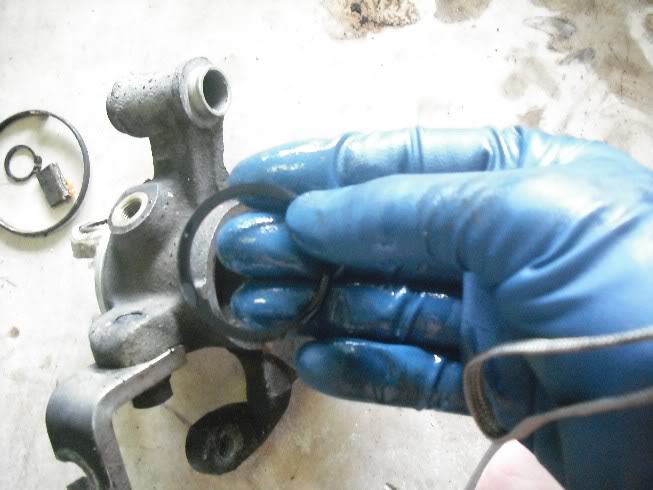
There's a snap ring holding the boot in, remove it with the scribe.
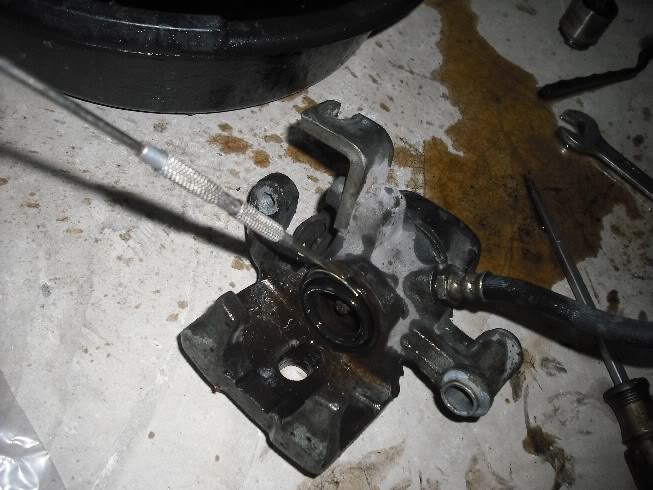
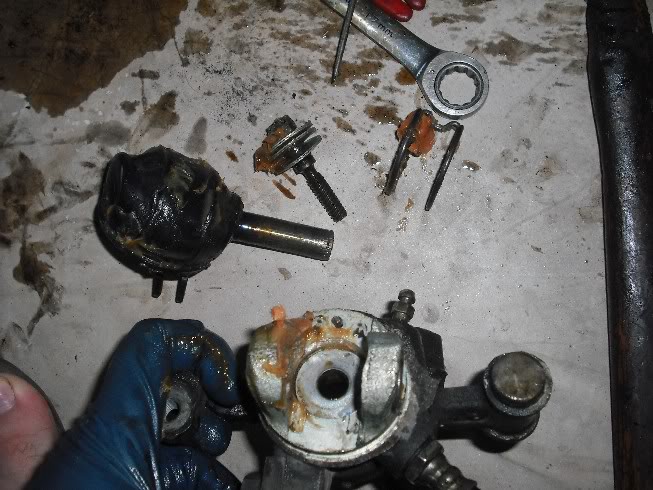
Now remove this retaining ring that holds the boot over the parking brake mechanism.
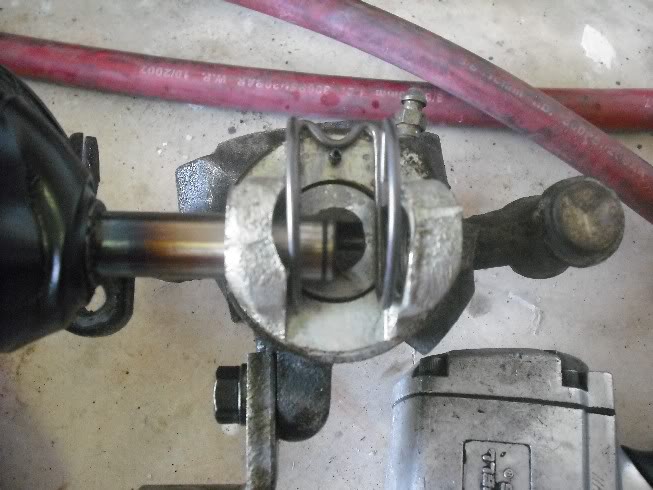
See that snap-ring on the end of the parking brake actuator shaft? Remove it, then hammer the shaft out.
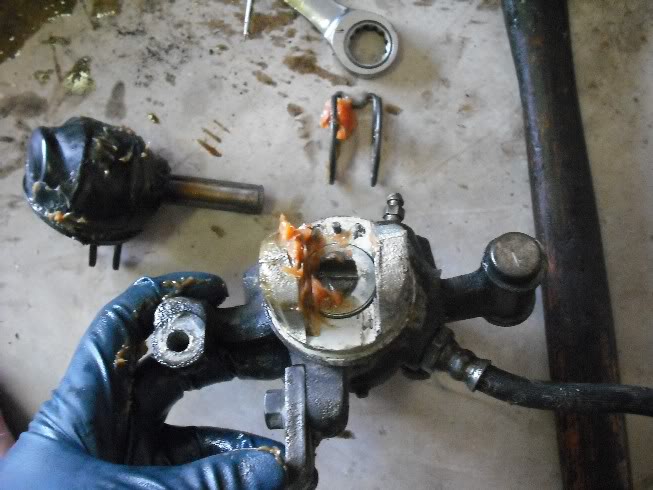
See the screw adjuster in the center? Pop it out.
Now, there's 2 options here. Use compressed air and a hammer handle to pop the piston out.
Or hook the line back up and pump it out with the brake pedal. Both mine were siezed so badly that I had to pump both out. I still had to use air to get it all the way out though, and it makes a big mess.
Separate the boot from the piston
And pop the piston out with compressed air.
There's a snap ring holding the boot in, remove it with the scribe.
Now remove this retaining ring that holds the boot over the parking brake mechanism.
See that snap-ring on the end of the parking brake actuator shaft? Remove it, then hammer the shaft out.
See the screw adjuster in the center? Pop it out.
07-12-09, 06:03 PM
#3
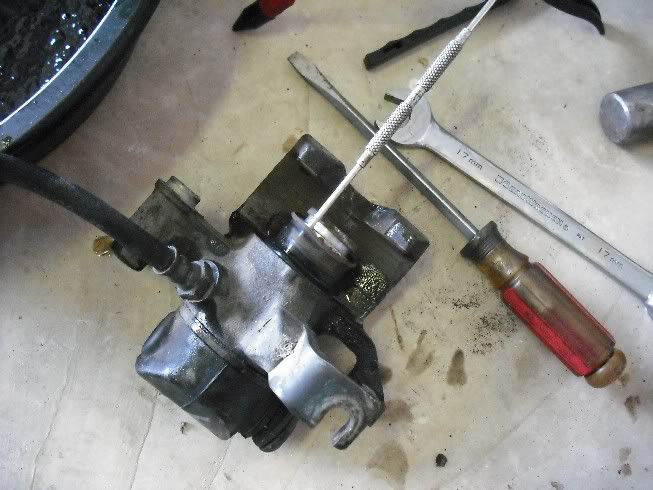
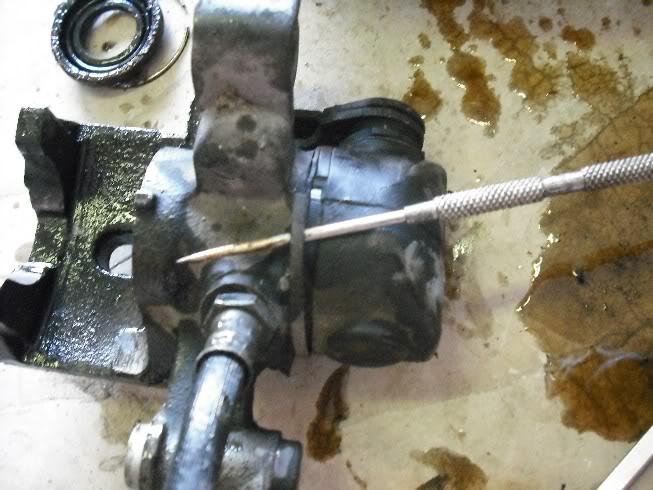
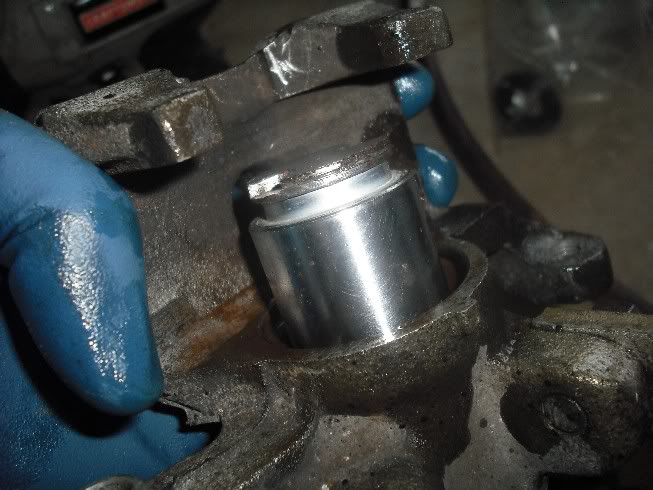
See how gross the bore of the cylinder is? That's from years of neglect. Let this be a reminder that every 2 years, you should flush your brake system. I'll go more in depth on this later.
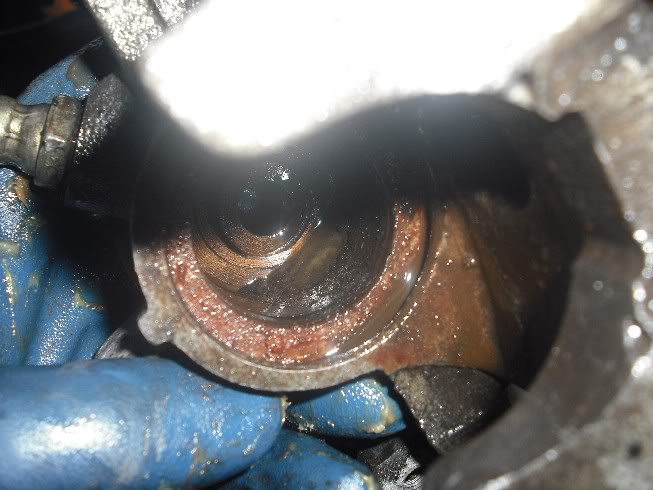
Use a scribe and remove the old piston seal. Use the 409/water and brush and scrub the hell out of the body of the caliper. Clean all the old dirt, brake fluid, rust, grease, etc. off as best as you can. When you're done, hose it down with brake parts cleaner, blow it dry, then put some brake fluid in the bore and hone the cylinder out. Go slowly, and use an in/out motion to get a nice crosshatch pattern on the cylinder.
Now, clean it out again with the 409/water and brake cleaner. It should look better than this.
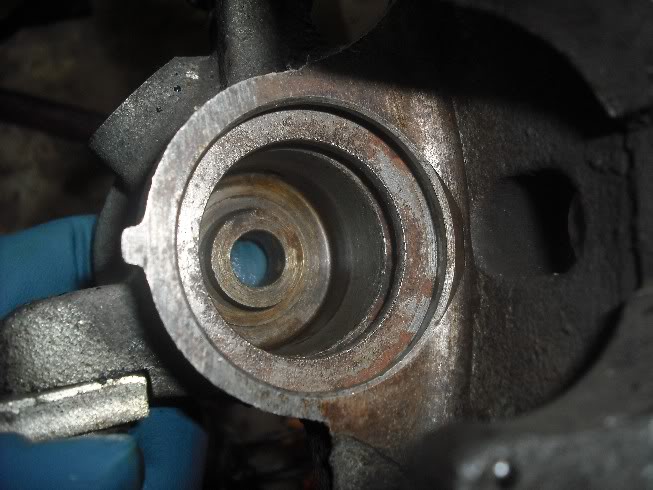
Do not use anything OTHER THAN brake fluid to lubricate the seal.
Put the piston seal in. It's going to seem like the seal's too big, but it'll fit, trust me. Don't use anything that can tear the seal to install it.

Polish the piston up with some 1000 and 2000 grit sandpaper if necessary. Now put the piston on the bore like this.
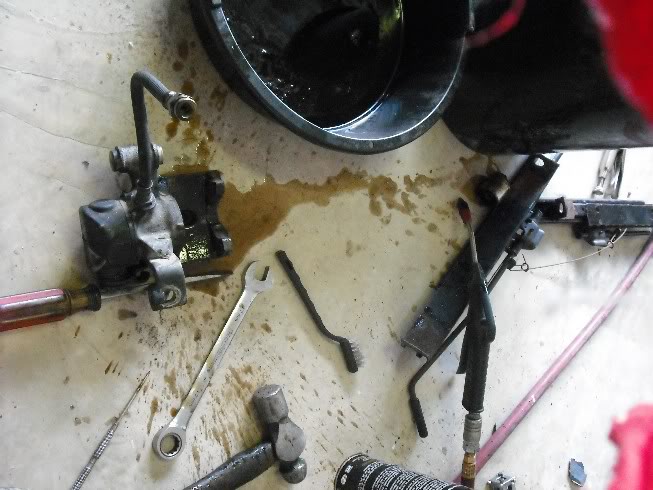
And tap it in with the HANDLE of the hammer. It should slide in relatively easy.
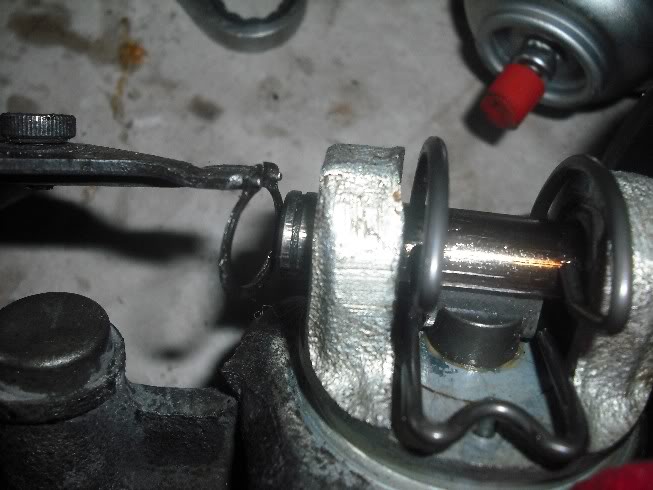
Now screw the adjuster in the back, making sure you kept all the spring washers.
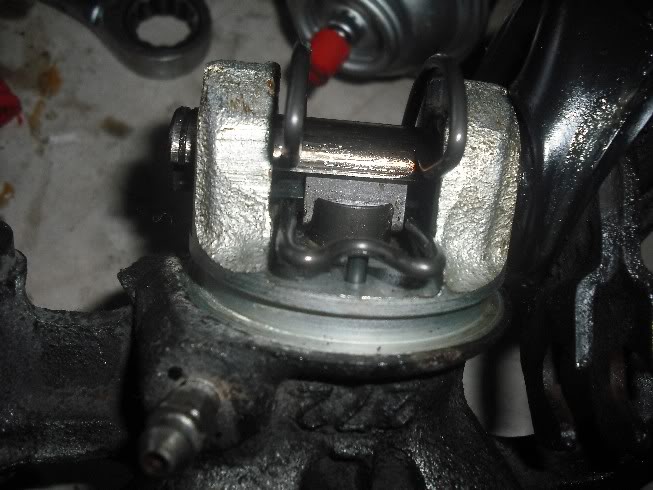
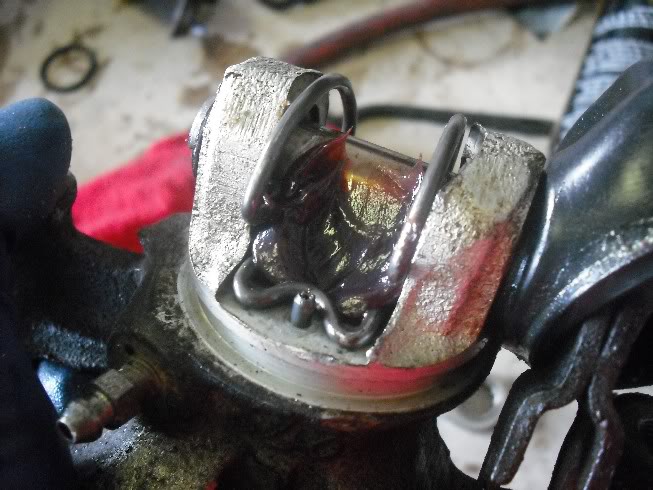
Ok. Here's the hardest part. Put this spring just like this.
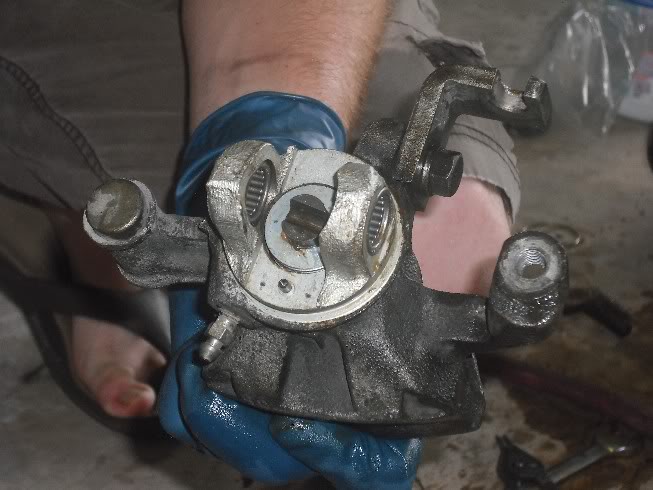
Use a large flatblade screwdriver and push as hard as you can while turning the adjuster screw in. Make sure it ends up looking like the above picture. Slip the boot over the actuating lever, and push it in a little bit.
Use a scribe and remove the old piston seal. Use the 409/water and brush and scrub the hell out of the body of the caliper. Clean all the old dirt, brake fluid, rust, grease, etc. off as best as you can. When you're done, hose it down with brake parts cleaner, blow it dry, then put some brake fluid in the bore and hone the cylinder out. Go slowly, and use an in/out motion to get a nice crosshatch pattern on the cylinder.
Now, clean it out again with the 409/water and brake cleaner. It should look better than this.
Do not use anything OTHER THAN brake fluid to lubricate the seal.
Put the piston seal in. It's going to seem like the seal's too big, but it'll fit, trust me. Don't use anything that can tear the seal to install it.
Polish the piston up with some 1000 and 2000 grit sandpaper if necessary. Now put the piston on the bore like this.
And tap it in with the HANDLE of the hammer. It should slide in relatively easy.
Now screw the adjuster in the back, making sure you kept all the spring washers.
Ok. Here's the hardest part. Put this spring just like this.
Use a large flatblade screwdriver and push as hard as you can while turning the adjuster screw in. Make sure it ends up looking like the above picture. Slip the boot over the actuating lever, and push it in a little bit.
07-12-09, 06:03 PM
#4
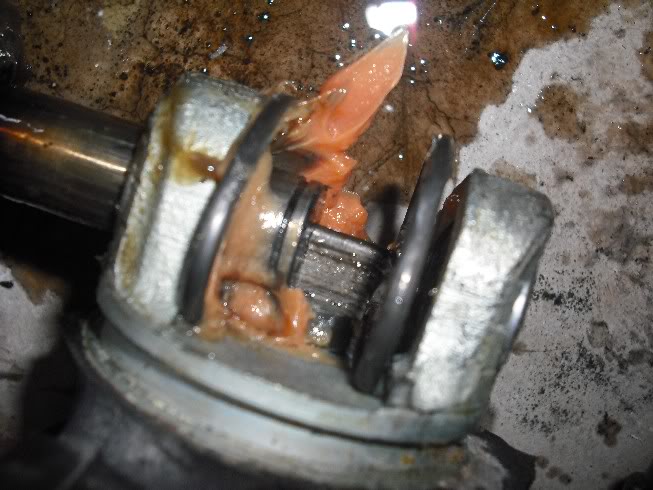
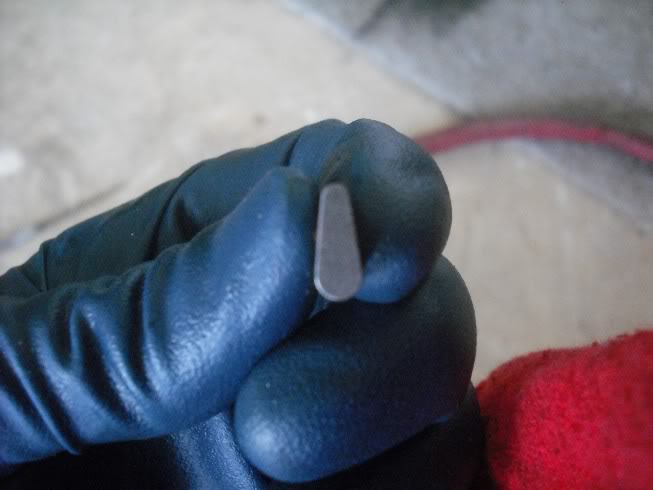
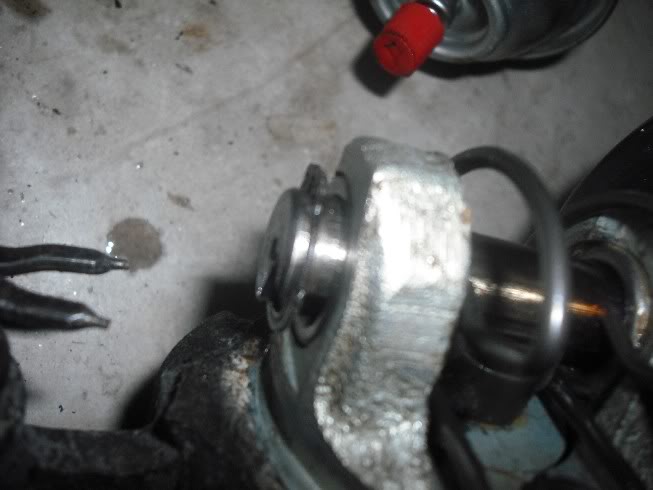
Note that this little key has a fat and skinny end. The fat end goes down towards the screw.
Push the key in between the actuating lever in as best as you can, and tap it in with a screwdriver and hammer.
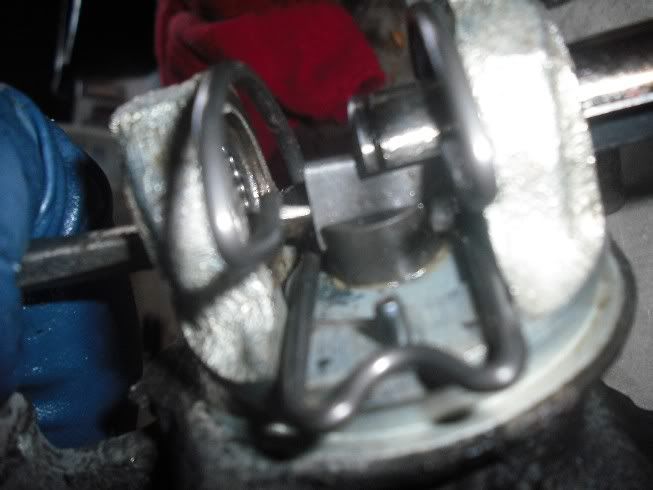
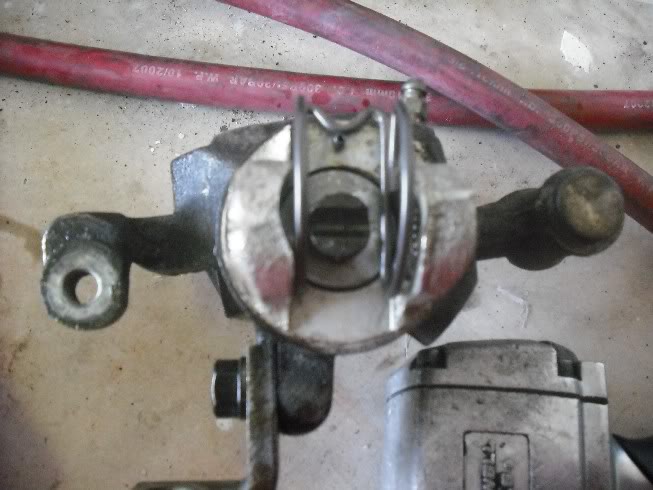
Notice in the above picture that the spring is OUTSIDE the notch. It makes installation alot easier.
Tap the actuating lever in all the way.
And reinstall the snap-ring.
Push the notched side of the spring up and over the peg. I had to use a hammer to get it that last little millimeter.
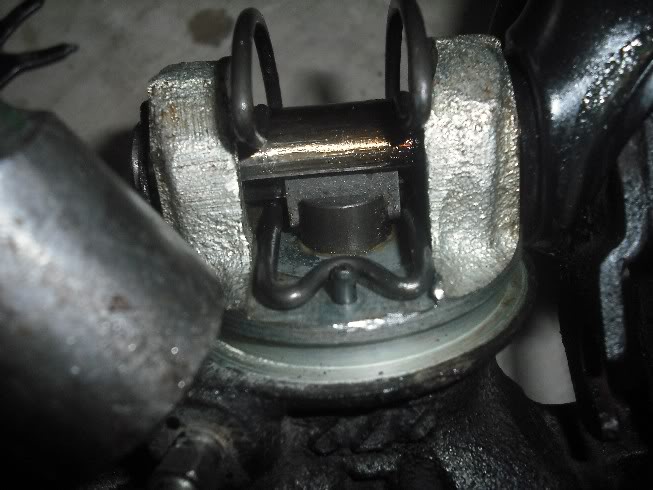
Use a screwdriver and get one end of the spring in the groove.

And then the other end.
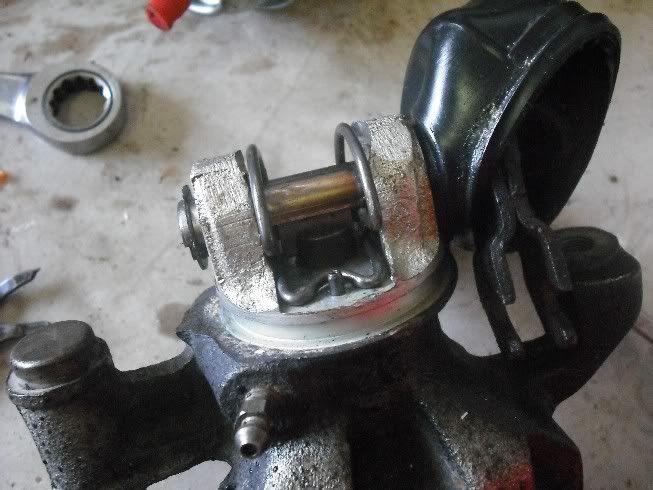
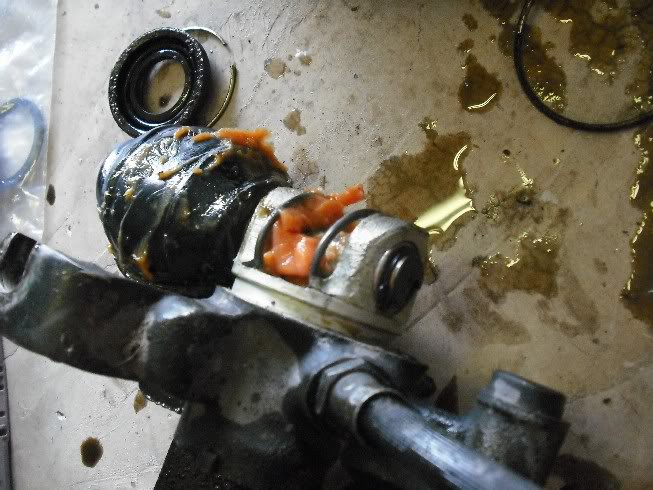
Grease it up.

Slip the boot over and reinstall the retaining clip.
The piston boot is reinstalled the exact same way it came off. Pop the boot on the piston first, then push it around into the bore. Put the snap ring in the boot and work it in there the same way it came out.
Now you're done. Do the other side, and bleed your brakes.

Push the key in between the actuating lever in as best as you can, and tap it in with a screwdriver and hammer.
Notice in the above picture that the spring is OUTSIDE the notch. It makes installation alot easier.
Tap the actuating lever in all the way.
And reinstall the snap-ring.
Push the notched side of the spring up and over the peg. I had to use a hammer to get it that last little millimeter.
Use a screwdriver and get one end of the spring in the groove.
And then the other end.
Grease it up.
Slip the boot over and reinstall the retaining clip.
The piston boot is reinstalled the exact same way it came off. Pop the boot on the piston first, then push it around into the bore. Put the snap ring in the boot and work it in there the same way it came out.
Now you're done. Do the other side, and bleed your brakes.
07-29-09, 07:35 PM
#6
Sorry, for those of you that need part numbers, I used Oreilly's Brakebest rebuild kit CK351212. It comes with a piston seal, piston boot, a new boot clip, and 2 random O-rings. I've tried figuring out where those 2 o-rings go, but they just DON'T have a place on the caliper. Although, the kit DOES NOT come with the o-ring for the parking brake assembly, so be careful not to scratch the seal there, because you WILL be reusing it.
07-30-09, 06:55 AM
#7

Thanks AGreen for the excellent tutorial, I'm with Crit, ship it to the Archive! I've always just payed the penalty and bought the rebuilds (about twice the cost of the front calipers!) but next time I'll be following your lead. Thanks for taking the time to document and post.
Incidentally how's that SE project coming? I hope you will post some progress pics soon.
Incidentally how's that SE project coming? I hope you will post some progress pics soon.
Trending Topics
07-30-09, 08:08 AM
#8
I'll archive this in a bit. You can also get the seal kit from Mazda/Mazdatrix. I'm sure it is quite a bit more than you paid, but it does contain all of the seals.
It is possible for you to upload the pics to the forum? You might have to do it over several posts. The reason is that these links to photobucket (and similar) get broken over the years when pics are deleted, moved, or folders renamed. Then the "how-to" is no good because there are no pics. We have had this happen to some very good archive material.
It is possible for you to upload the pics to the forum? You might have to do it over several posts. The reason is that these links to photobucket (and similar) get broken over the years when pics are deleted, moved, or folders renamed. Then the "how-to" is no good because there are no pics. We have had this happen to some very good archive material.
07-30-09, 05:48 PM
#9
Ray- Those calipers were going to be around $80 each at the cheapest I could find, so paying $10 for a rebuild kit was a much better option  The SE project has slowed down a little bit, but I'm currently working on re-covering the tweed-covered plastic interior. I bought this really nice black suede upholstery material that I've covered the headliner and a-pillars with. The sunroof panel got covered by a smooth leather-esque black vinyl, and some of the other random bits are being covered with a black knit cloth. Sounds cheap... well, it is, but it looks really nice. I finally got all the tweed out of the interior, so all that's left is to remove the dash and finish covering the pieces I've chosen, re-paint the other ones, and paint the dash. Then comes the exterior, which isn't going to be really bad, but it'll take a little while. Then comes the drivetrain, and all the miscellaneous crap here and there. I'll post some pics of the interior pieces when the camera gets charged again.
Addict- Do you know if the Mazdatrix kit comes with the adjuster screw seal? Even if it costs more, that's probably the one I should have gotten to begin with. I don't know why I didn't look to them for the kit. I'll try to get those pics transferred to the website. You've got a good point, but I'm not one to delete pics without fixing my DIY's. I mean, I still have a whole load of Tiburon DIY's on my old forum that still work, and I don't even have a Tiburon anymore. It'll probably be easier for forum users though. Can you change the original post when I get the pics on this site so I don't have to re-post them? That would just make this thread impossible to load for users with slower internet connections.
The SE project has slowed down a little bit, but I'm currently working on re-covering the tweed-covered plastic interior. I bought this really nice black suede upholstery material that I've covered the headliner and a-pillars with. The sunroof panel got covered by a smooth leather-esque black vinyl, and some of the other random bits are being covered with a black knit cloth. Sounds cheap... well, it is, but it looks really nice. I finally got all the tweed out of the interior, so all that's left is to remove the dash and finish covering the pieces I've chosen, re-paint the other ones, and paint the dash. Then comes the exterior, which isn't going to be really bad, but it'll take a little while. Then comes the drivetrain, and all the miscellaneous crap here and there. I'll post some pics of the interior pieces when the camera gets charged again.Addict- Do you know if the Mazdatrix kit comes with the adjuster screw seal? Even if it costs more, that's probably the one I should have gotten to begin with. I don't know why I didn't look to them for the kit. I'll try to get those pics transferred to the website. You've got a good point, but I'm not one to delete pics without fixing my DIY's. I mean, I still have a whole load of Tiburon DIY's on my old forum that still work, and I don't even have a Tiburon anymore. It'll probably be easier for forum users though. Can you change the original post when I get the pics on this site so I don't have to re-post them? That would just make this thread impossible to load for users with slower internet connections.
07-30-09, 06:27 PM
#10
Believe it did. I was going to do mine. One caliper (piston) ended up being in too bad of shape and the other I had a heck of a time getting that parking brake back together. I ended up just getting rebuilt calipers.
I should have all of the seals floating around still. I can double check what all was included. I also know that I have some pics as I was thinking of doing a write-up like this one.
Yep. Once you upload, I can update the post.
Kent
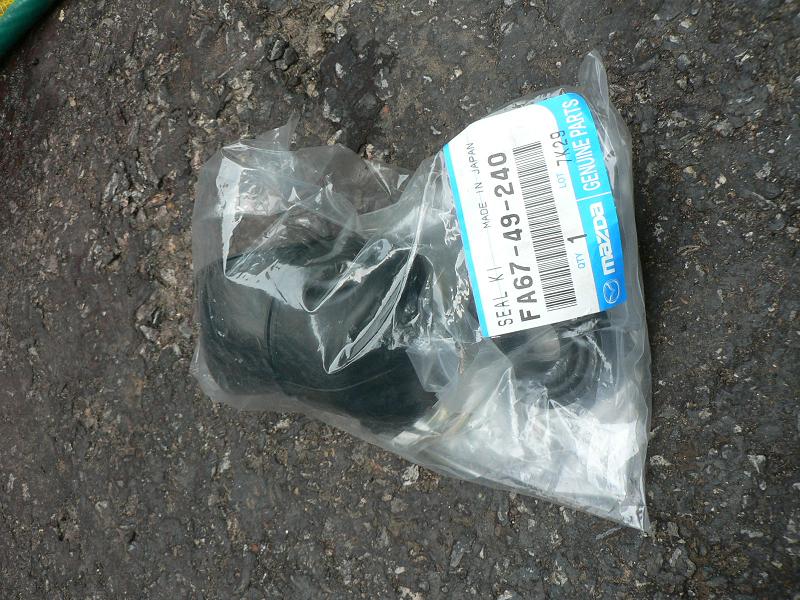
Edit: Here is what the Mazda kit looks like:

I should have all of the seals floating around still. I can double check what all was included. I also know that I have some pics as I was thinking of doing a write-up like this one.
Yep. Once you upload, I can update the post.
Kent
Edit: Here is what the Mazda kit looks like:
07-30-09, 07:42 PM
#11
WOW!! That kit's awesome! It even comes with the parking brake boot! I checked out their website.... $34.56 for BOTH! That's not that much more, and it's still one hell of a deal compared to $160+ for remanufactured parts. The picture on their website shows it all laid out, and it's quite clear that the adjuster screw seal is there, along with all the proper grease.

My album has all the pics ready to go! Thanks in advance for the archive
My album has all the pics ready to go! Thanks in advance for the archive

Thread
Thread Starter
Forum
Replies
Last Post
Frisky Arab
2nd Generation Specific (1986-1992)
13
08-18-15 05:30 PM

